Finally, after trying it in vain for more than a week, I managed to post the last of only two saved copies of the originally produced video! I was finally able to do it with NCH VideoPad…this was the sixth one I had downloaded to solve this problem! The first program Cyberlink power director 12 that came with my computer had all kinds of for me unsolvable problems and crashed several times! And one of the 2 copies of the original finished video that I could save from them capt on showing up flipped after posting it on youtube?! Even after flipping it over with a downloaded program it still showed up wrong?! No help could be found on or from youtube…so I was glad that I was finally able to post this second copy with the help of VideoPad!!! Although the sound on this only left good version is not too good, I still hope that it is enjoyable for the Bonsai lovers out there?! It brought me a lot of headaches and frustrations …bud it thought me to only work with good devices and programs and most of all: SAFE MORE THAN ONE COPY !!!
More videos will be uploaded soon (if all goes well that is)! 😉
I am happy and relieved to tell you all that last night I finally posted Part I of the story of “the Elephant” onto YouTube! It took me 6 days and late at night to do it right…but I finally was happy enough with the result to post it!!! It took me this long because I had to go through many hundreds of pictures on 2 computers and 3 external hard drives to find the best ones! Then I had to improve most of them to finally be able to load them from my old computer onto my new computer, where I had to make a film of them with a for me totally new and unknown program named: CyberLink PowerDirector…..and that was not that easy…to say the least!!! It has been some years since I cursed that much!!! 😉 But I have to say that the final result is very satisfying…so I hope you like it too?! Tonight I will start to work on Part II which is all video and covers the massive repotting I did this spring, when after living for 10 years in a wooden box, “the Elephant” was finally planted in its first real Bonsai pot! I hope to upload that in a week or so?! For now, I hope you enjoy this first part?!
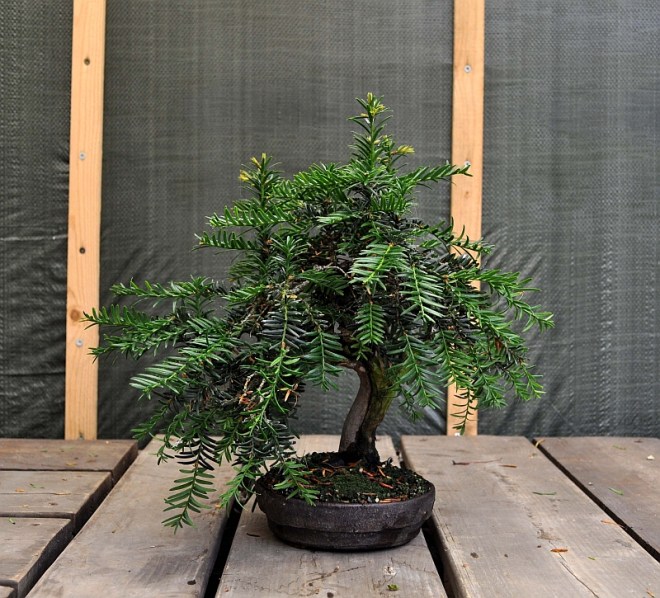
I just discovered that I forgot to show and discuss my baby Yamadori in my earlier Yew maintenance post! This Taxus baccata Yamadori was some 10 years ago given to me by my dear old Bonsai friend Terry Foster when I was a guest in his welcome home in the North of England. Terry and his lovely wife Charlotte took me in as one of their own every time I was one of the instructors at Tony Tickle’s “BURRS” weekend extravaganzas! And as if that was not enough…I always left with some sort of wonderful gift! Such a shame that we live so far apart! They both feel like family to us!
Below: November 2008. “Little Terry” as we named it, just after cleaning the wood and the deadwood (Jin and Shari) and treating it with Lime sulphur and wiring and styling it! Height: This 21 cm/ 8.5 Inch high. Such a little gem! 🙂
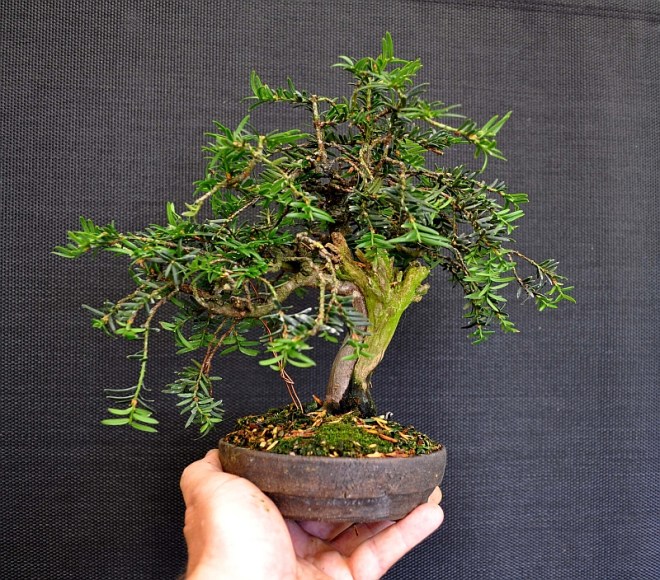
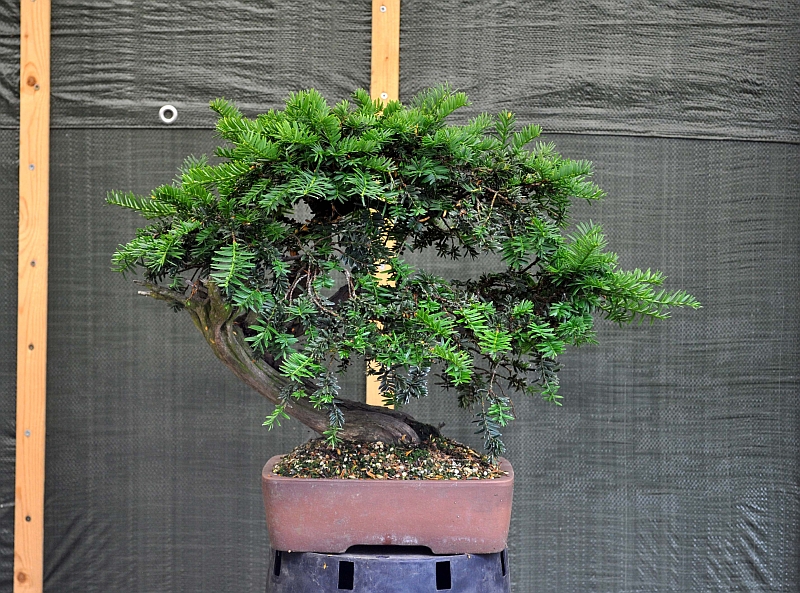
Below: Just before I pruned it. Last year it was allowed to grow freely for a whole season to recover from a bad winter! Pot: Brian Allbright. (UK)
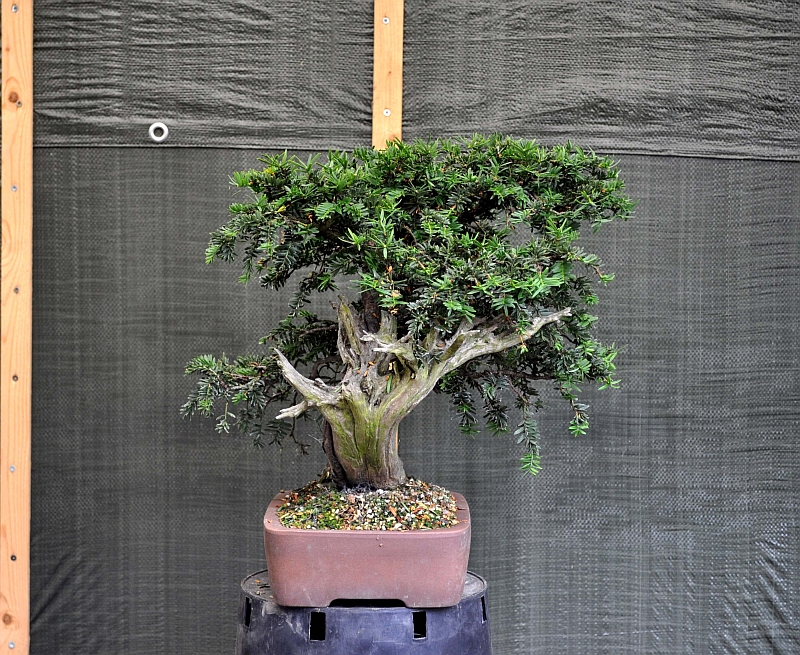
Below: After cutting the new shoots and pinching the old needles. The too-long branches will be cut back as soon as new buds or shoots have appeared!
I hope you enjoyed this late entry to the Yew maintenance post?! Little Terry became a bit jealous! 🙂
last week it was time to cut back all the strong new growth on all my Yamadori Taxus baccata’s that I collected many, many years ago in Wales with my dear friends Tony Tickle, Terry Foster and Mike Sullivan. Last year they were all heavily fed and allowed to grow freely to build up their strength and that resulted in this year in strong growth all over all of them! So like I mentioned before, last week was the right time to cut back all the new strong growth! How do you know when the right time has arrived? Easy, when the new growth has become harder and stiffer to the touch and has become a darker colour green! Then it is time to cut back into that new growth with very sharp and clean scissors, leaving 3 pairs of needles on a strong shoot and 4 or 5 pairs of the weaker ones! But IMPORTANT: you don’t cut back the new growth on branches that are weak or the ones that you want to thicken or extend!!! But even on branches that need to grow, you should remove some/most of the old needles to promote back budding!!! After all, this is done, you give the trees at least a week time to recover from the stress and to close all the wounds from cutting them! Then you carefully pick/pull off the old needles from last season, making sure that you pull in the direction they grow! This reduces the chance of damage to the often thin branches! After all, if this is done and all goes well then many new strong buds will start to appear at the end of this season, and for sure in the next growing season! The other advantage is that because most branches are now without needles sunlight can reach all areas better and it has become much easier to select and wire them all! All this will result in healthy and strong growth closer to the trunk and main branches and the fuller appearance that we seek in Yew Bonsai and Bonsai in general!
Here are my own Yew Bonsai as an example of how it is done.
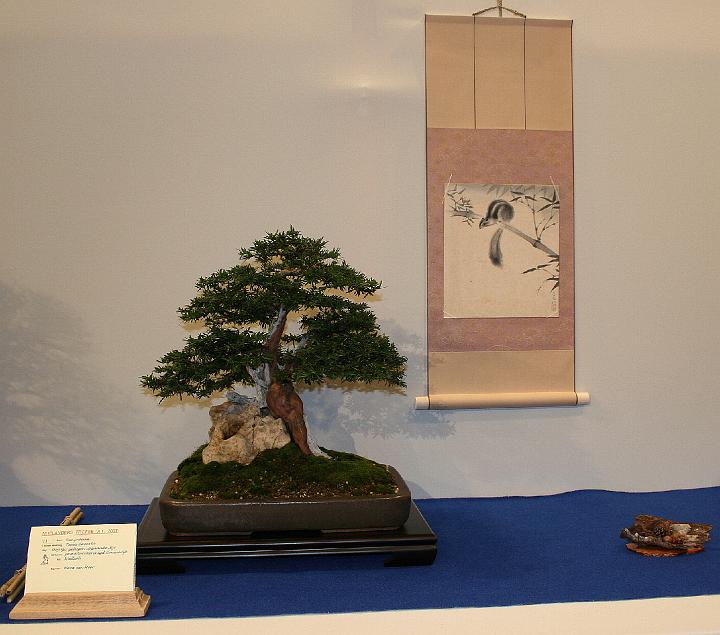
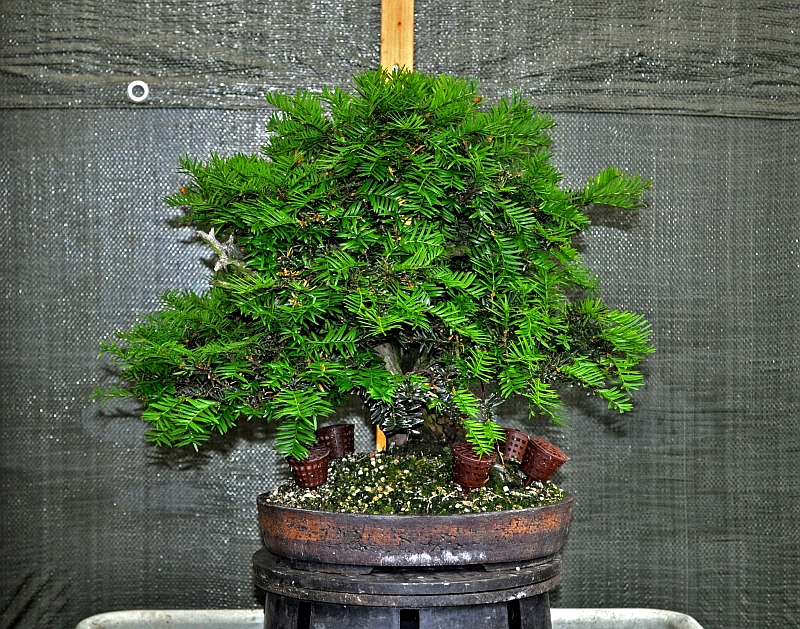
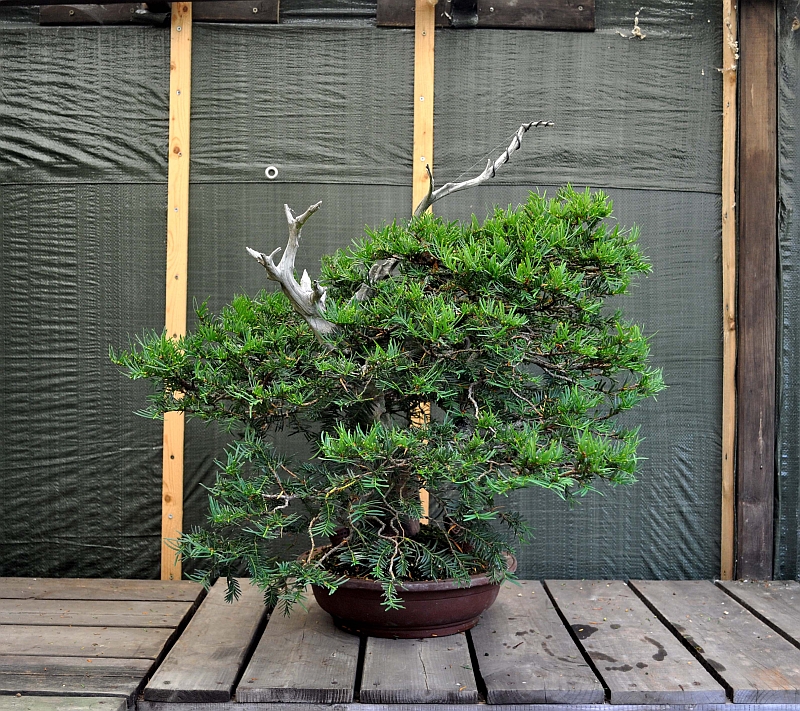
Below: The first one that I like to show you is a Yamadori baccata that was given to me as a present by Tony Tickle when he visited my house almost 20 years ago now! He had collected it himself a few years earlier and I remember him smiling when he gave it to me and said: “let’s see what you can make out of this”?! When I later took it out of its plastic training pot, I understood exactly what he meant when he said this! Underneath the wide base of the tree grew a 15 cm long thick root with only roots at the end….it looked like a lollypop! It took me the better part of 4 years to force the tree to make roots higher and closer to the trunk base so that I could finally shorten that long root and plant the tree in a more normal pot! But during those years I had already started to style the tree and found a solution to make good use of that bulging trunk section and the Jin that emerged from it on the left! And that solution was all the time lying on my garden floor! It was a viewing stone from Indonesia which, when I held them together, fitted like a clove! The small base of the tree fell exactly into a cavity in the stone and the Jin rested on top of it, like a big branch that had died back many years ago….amazing! 🙂 Then in February 2007, the Bonsai made it through the tough pre-selection of the prestigious “Noelanders Trophy” in Heusden/Zolder Belgium. The lollypop Yew had become a Bonsai! 🙂
Height 55 cm/22 Inch. Table, scroll and Shikishi Japan.
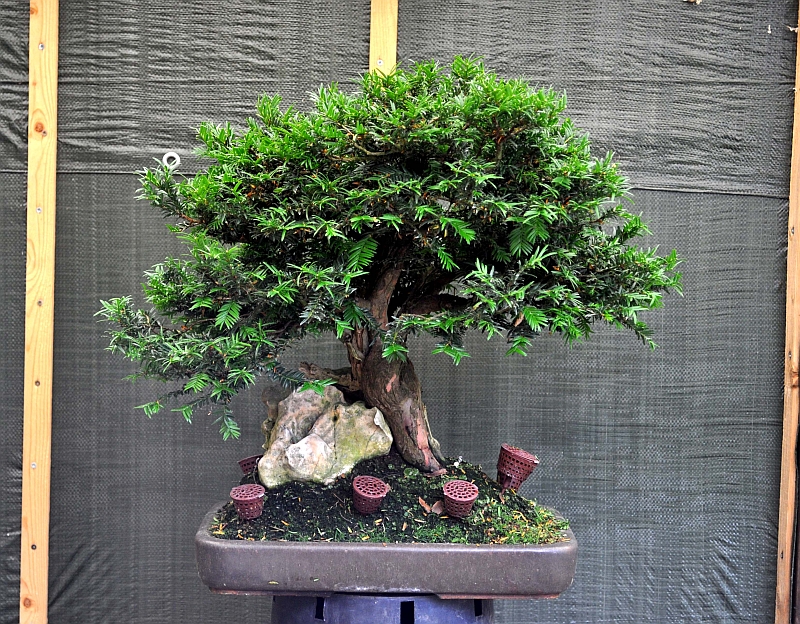
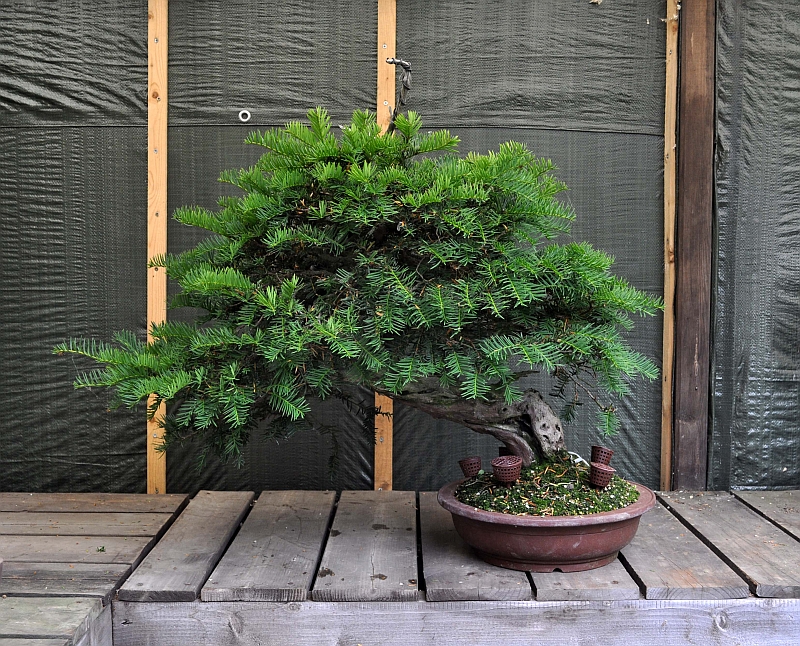
Below: The same tree 10 years later! Healthy…but in need of a haircut and complete wiring!
Below: Side view
Below: After shortening all the healthy shoots! Next, on the agenda is pinching most of the old needles and then rewiring the whole tree and cleaning the live section and the deadwood section and applying lime sulphur.
Below: Side view. Out of model….but he looks healthy enough!
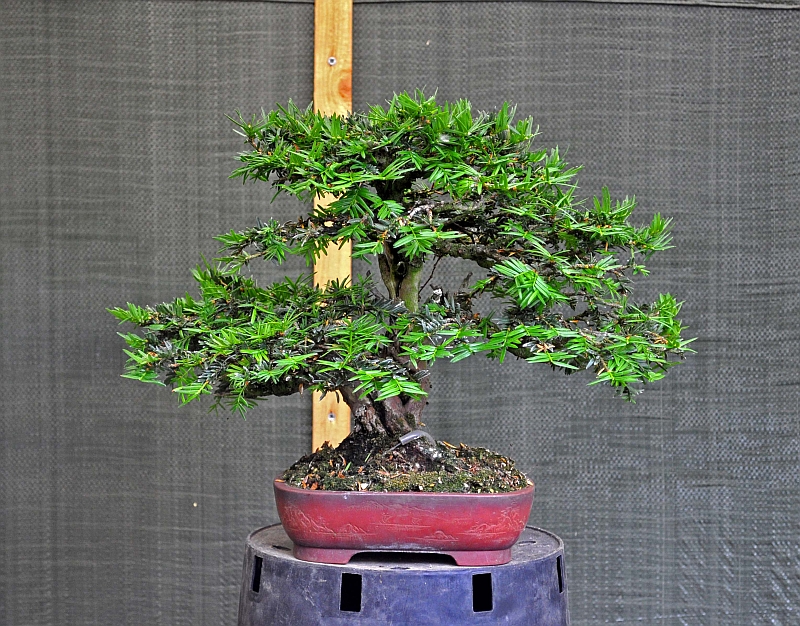
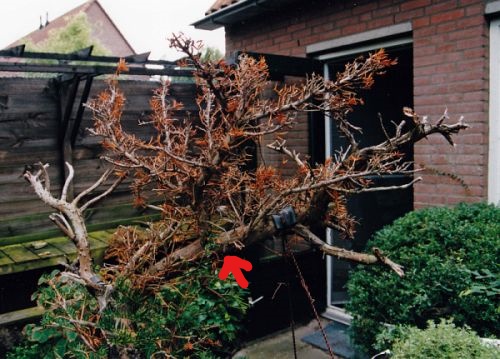
Below: The second one that I like to show was in 1999 given to me (again) as a gift from Tony Tickle when we said ower goodbyes at the end of the historic second “Ginkgo Awards” in Belgium. This next year’s picture was taken in my garden just after I repotted it. The left arrow points at the large Jin that you can see on the left in the second picture below. The bottom arrow points at the large branch that I removed completely so that I would be able to create a more compact middle-size Bonsai (Chuhin)! The large Jin/Shari section that you can see in the middle of the trunk in that same second picture is all that remains of this large branch!
Below: September 2007. The same tree, but now as a Bonsai! It was earlier also shown in one of the “Noelanders trophies” together with another small size Yew that I will show you next! Height: 35 cm/14 Inch. Pot: Klika & Kuratkova Table: CHR furniture (B)
Below: The same tree before cutting the new shoots. The right bottom branch has lost some thicker branches on the backside that need to be replaced and filled with new young branches in the next seasons! The ones growing from there are left alone to thicken and extend, so no cutting or pinching! The rest of the tree will be treated as explained before!
Below: Right side view of the tree. Note how the top leans towards the front…like in most of my Bonsai designs!
Below: After cutting the new shoots. The length of the branches is like in the first tree too long and the desired silhouette is lost! But after the new buds that will appear have opened and grown enough, well then all these too-long branches will be cut back so that the proper silhouette will return!
Below: 1999. A young and thinner me and my dear old friend Tony Tickle on a collecting trip in Wales…good times! 🙂
Below: The third example. Here is one that I collected myself during one of those exciting trips late last century with Tony, Terry and friends!
Below: And this is how it looked in September 2007. In a custom-made pot by old friend Brian Allbright (UK) and another table custom-made by CHR furniture (B). Height 28 cm/11.2 Inch. This Bonsai was shown together with the one before this in the Noelanders trophy.
Below: And this is how it looked before pruning began. It has outgrown its beautiful Tokename pot, where it has been growing for almost a decade! So I have to start looking for a new beautiful and more spacious one!
Below: Right side view.
Below: After cutting the new shoots. It is obvious that the left side of the top needs to be wired and repositioned!
Below: In this left-side shot it is even more obvious that the left side of that top needs to be filled up by lowering the branch above that big gap! This open space arose when a major branch died back!
Below: Collecting one of the Yews from this post!
Below: The fourth example. This one was collected by myself during one of the collecting trips I made with Tony and friends during the late nineties in Wales. As soon as I got home it was planted in a hard plastic Bonsai container and then left alone to recover!
Below: After the first signs of recovery I removed all the useless growth of those long branches so that all the energy would go to the foliage that matters! And then the tree was left alone again to get stronger for its first real styling!
Below: The tree consists of left and right sections with a strip of deadwood running in between from top to bottom. A year later, when the tree was looking very vigorous, I decided that it was safe to perform a drastic pruning! So I cut off all the foliage and branches from the left section of the tree, leaving the stumps so that they could be turned into Jins. And I removed all the bark from that left section, creating a nice contrast between the live (brown) section and the deadwood (white) section! The branches that were useful for my design were wired and then the tree was left alone (as long as it needed) to recover from it all!
Below: A year later it was doing just fine so I planted it in a proper Bonsai pot.
Below: And this is how that same Bonsai looked in September 2007. That same year it was proudly exhibited in the fifth and last edition of the now legendaries “Ginkgo Awards” in Belgium. I like the contrast of colours in this tree and the circular design! Almost like yin yang…live and dead! But what I like most is that I created a design with an otherwise big no-no….the right bottom branch that grows directly out of the inside of that curve! And still, it works and makes you look twice because it is so unconventional! And that was just what I hoped to achieve with this design!
Below: The tree before shortening most of the new growth. And after that, it is time to rewire and restyle the whole tree again!
Below: Left side view showing the deadwood/Shari and Jins.
Below: After cutting most of the new shoots.
Below: It is thinned out a lot! Now it is time to remove most of the older needles from the strong branches so that light can reach in and new buds can appear!
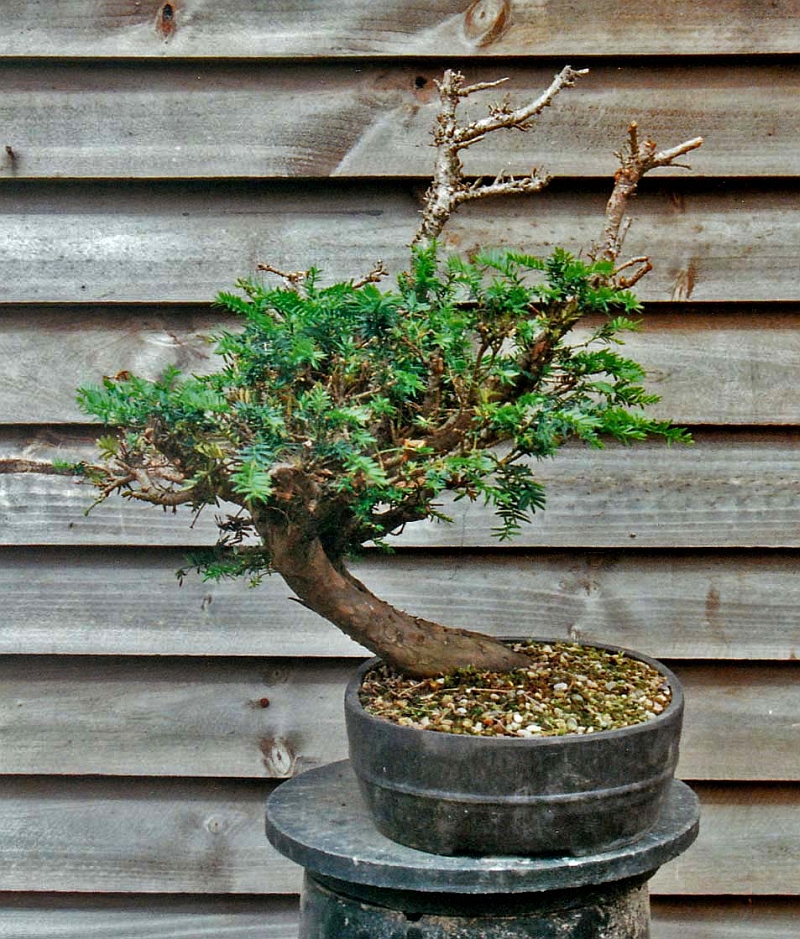
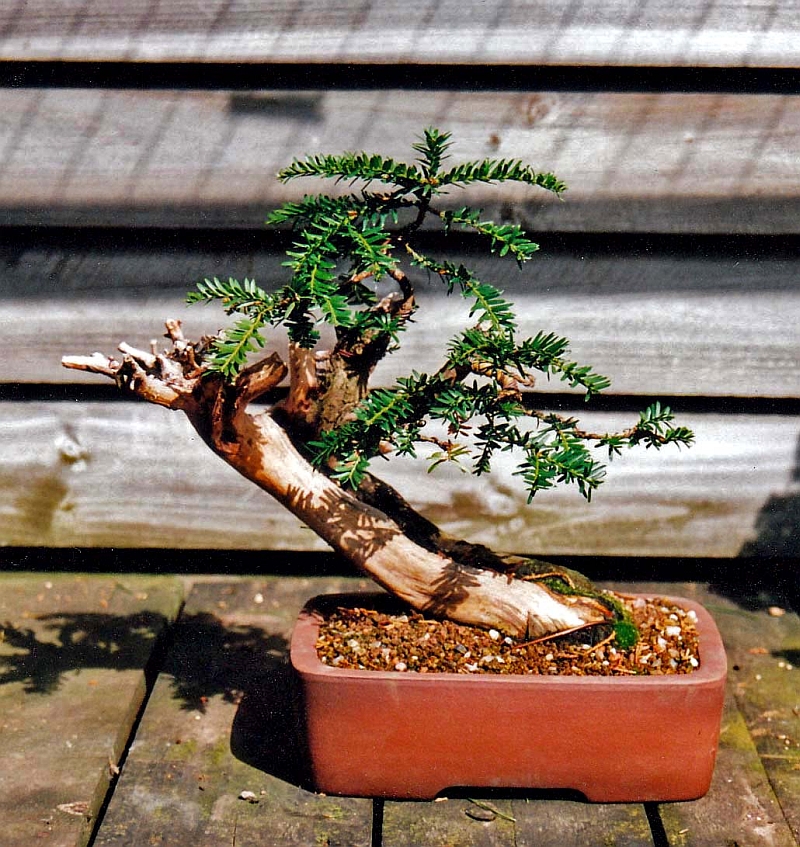
Below: The fifth and last example. This Yew was actually the first tree that I ever collected and yes it was Tony Tickle again who made that possible for me! I met Tony for the first time in 1997 at the first-ever “Ginkgo Bonsai show” in Belgium and we have been great friends ever since and had some amazing Bonsai adventures together since then! It was during that first meeting that Tony invited me to come to collect with him in the UK! I could not believe my luck and sure enough in early 1998, I drove all the way to the north of England! And the next day, the first tree I ever collected, was the Yew that I am next going to show and discuss!
Below: Happy me with my first collected Yamadori ever!!! This Yew marks an all-important turning point in my Bonsai life….sins then on I decided that this was what I wanted to do Bonsai! And since then I have nearly always worked exclusively on raw unstyled material that I often found and collected myself! I wanted to have all the excitement from the beginning to the end…I choose the long way…but my way! And this Yew started that all of, so you can imagine that it holds a warm spot in my heart! 🙂
Below: In my garden, it lost the whole top section, but luckily the bottom foliage survived!
Below: A not-so-good picture made inside my house in 2003. As you can see that half of the dead top section was removed right up to the red arrow in the above picture, and only a small Jin remains! The large upwards-going Jin you see in the below picture is the dead upwards-going branch that starts just above that red arrow in the above picture!
Below: September 2007. Just rewired, repositioned, live wood cleaned and Jins and Shari’s treated with lime sulphur. Table: CHR furniture (B)
Below: Early 2008 in its present pot. From here on it was all keeping it very happy, and healthy with the main focus on fuller and better branch structure! Growing, cutting, pinching and wiring etc. etc…..ect.😉
Below: Just look at how full the tree is today! Now there is more than enough foliage to work with and to bring the Bonsai further and closer to the end image that I had in mind all those years ago when I gave it its first styling! This pot is by now a bit too small, but is in the style that I would like to use when the Bonsai is finally ready to show…so the search is on! And the tree needs to be tilted more to the right when it is repotted back in this or in its new pot!
Below: After cutting and pinching. The copper wire in the top of that Jin is there to prevent it from accidentally breaking when I move it around! My garden is covered with galvanized iron gauze (normally used in concrete walls), so a mistake is easily made when lifting up a tree too high!
Below: Left side view of the tree. Again notice how far my Bonsai lean forwards! This, in my mind, creates a lot of depth and creates a feeling as if the tree leans over you. If I learned one thing from looking at hundreds of Japanese Bonsai in books and in real life then it is this principle! Depth creates a sense of reality…even in pictures!
In between writing this, I spent a lot of fun time with the all-important task of the branch and new growth selection and branch shortening or removing on all the Yews! And although it is a sign of good health, a lot of growth of small and larger branches is useless or unwanted. It blocks out sunlight for the new growth and the branches that are important in your design! So it should be removed or shortened! Then there is branch shortening to reduce the overall size and mass of your design! And last but not least, branch shortening to create better branch structure and ramifications! By cutting back a larger branch right up to where there is a strong shoot or even bud, you will create shorter and better ramification branches and better taper! This should be one of the main objectives of Bonsai and is in modern Bonsai often neglected! You should not be only proud of the outside image of your Bonsai, but also of your branch structure!!! And it is very important for the well-being of your Bonsai! For example, the first Bonsai from this post was after this (long) branch selection round reduced by some 20% !! After all the here discussed Bonsai have gone through this same procedure, they will all be wired, styled, cleaned and treated with Lime sulphur. After that, I will make new pictures and show them to you! I hope you enjoyed this post and found it useful and interesting?!
Now I will start to work again on my new Bonsai video that is almost finished…it only needs music underneath it! That might sound easy to some…but for a novice like me, it all is a big difficult puzzle?! 🙂 It is Part I of the story of “the Elephant” my big Yamadori Larch. So watch this space!
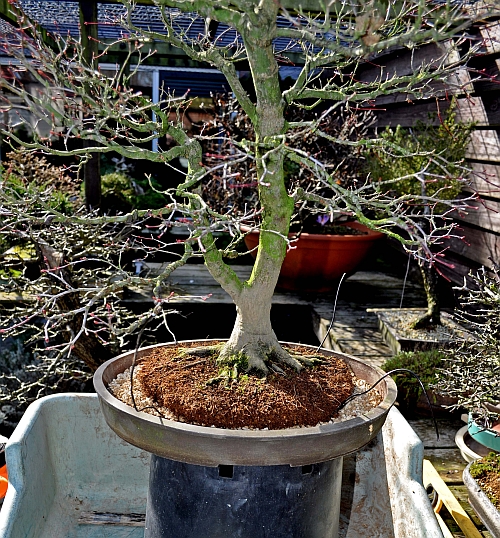
it has been a while …I know! But believe me, a lot has happened in my normal and in my, Bonsai life! I have over 60 trees to take care of in a very limited and crowded garden space (10 x 5 meters) and that makes it very hard to get around and to work on them! And taking decent pictures of it all, or these days videos is even harder to do! I am proud to say that in my normal life I have spent the last 6 mounts successfully detoxifying from 10 years of heavy neuropathic pain medication and 20+ years of antidepressant medication! And by cutting down on sugar and carbohydrates I have overcome my recently discovered diabetes and lost some 20 kilos! So you see…I have been busy! 😎 I am currently finishing the video of my big Yamadori Larch “The story of the Elephant” part I for youtube and it will be posted in a few days! Part I is all pictures and words, simply because I did not have a video camera in those early days! So watch this space! Part II is all video and shows the compleat story of the massive undertaking of repotting it from the big wooden box where it lived for 10 years, and into its first real Bonsai pot! And it shows “the Elephant” later on with new fresh green foliage….doing just fine! I hope to finish and post this part II in the next few weeks?! So again….watch this space!!!!
And what more? I have been busy with my workshop group and that is very fulfilling to do! Not a lot of styling has been done up to now, but I did do a lot of maintenance these last couple of mounts! And I will show some of that later on, but first I want to share some approach grafts that I made on one of my old Yamadori Prunus mahaleb from Slovenia!
Below: Remember this picture showing the marcot (air-layering) that I was planning to make on this big old Prunus mahaleb?! Well, the left bottom branch that you see in this picture grows from just below the stump (red drawing) that was left when it was separated from the rest of the tree. On this, by now thick remaining branch, I made 3 approach grafts to get some new branches closer up to the trunk!
Below: the marcot after separation.
Below: a year later in full bloom.
Below: (red arrows) With an sharp and clean curved chisel I made tiny wounds in both the mother branch and in the small sucker branches that grow from way down low on the trunk. These unwanted sucker branches would normally be removed constantly from anywhere on the trunk. Because they leave behind ugly scars if you let them grow too long….and Prunus mahaleb’s make a lot of them all through the growing season! Sometimes so much that when they just appear, I use my small burner to get rid of them!
Below: (red arrows) left one shows the one that I made first. The right one shows the second one that’s like the first one tight down securely with the help of a tie-wrap and then is sealed with cut paste to prevent drying out!
Below: red arrow points at the third one that I made. Behind that arrow, you can see the big deadwood stump that needs some more shaping!
Now it is waiting for en hoping that they will fuse together properly so that I can create better ramifications in the desired design for this promising future Bonsai. If so, then I can shorten the thick mother branch you can see in the above picture by some 25 cm or more! So fingers crossed! I hope you enjoyed this little update on the life of this old Yamadori?!
The next post is about pruning and pinching my Yew Yamadori Bonsai…so watch this space!
remember last year 29-4-2016 when I told you all about my plan to air layer a thick and old second trunk of my large Prunus mahaleb Yamadori that I collected a few years ago with my dear friends from Slovenia in Slovenia?!
Below: The red line shows the original massive trunk of the tree that would stay with me in Holland after the separation of the thick second branch ( yellow line). This branch section would be given later to my old Bonsai friend Tony Tickle to say thanks for all he has done for me over the last two decades! I can easily say that I would not have been where I am now in Bonsai without the help of Tony! He took me on my first Yamadori trips and arranged many demos and workshops abroad for me! Just to name a few: the E.B.A in Stratford (UK), 2 times Joy of Bonsai in Bath (UK) and last but not least 4 times at his own Bonsai extravaganza weekend workshop in Burrs (UK)! 6 of my best Bonsai that I have shown in many prestigious events, like the Ginkgo’s shows and the Noelanders trophy, I have because of Tony’s kindness….so I am finally glad that I can give something special back to this important friend of mine!!!
Well on 17-5-2016 I made the air layer as I wrote and showed here !!
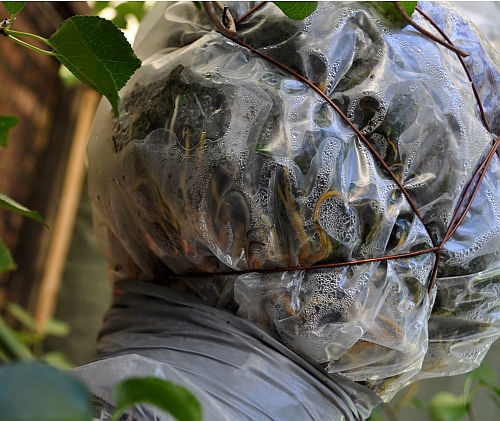
Below: This is how the marcot/air layer looked that day.
Below: on 28-7-2016, just over 2 months later there were lots of new roots to see pushing against the plastic bag! So it was already time to separate the branch from the tree!
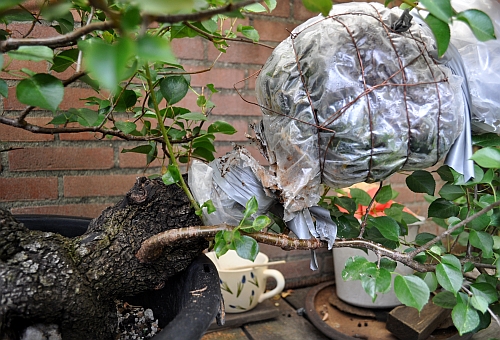
Below: I left the plastic on there to protect the fragile roots! With a saw and a bit anxious the branch was cut off! This took surprisingly long because the branch consists of 75 per cent hard deadwood!
Below: Finally finished! Only the duck tape was holding the branch in place here! The here still thin and young branch you see beneath the cut will play an important part in my design of the original tree! But that is another story!
Below: Just before the marcot is planted into its new temporary home. Just look at all those strong new roots! I could not be happier!
Below: The sphagnum moss was kept on there and the pot was filled with a mixture of Akadama, Kiryu, Bims en regular rough garden soil. It was not possible to secure the new tree in a regular way, so I tied it down with wire and hooks around the pot rim. And watered it well before I placed it out of the wind in a half-shaded and not-too-hot spot in my garden. From now it was praying and hoping for the best!
February 2017: Like every year Tony visited my house the day after the Noelanders trophy before he sails off to the UK again. We drink, eat, talk Bonsai and gossip like an old woman! And of course, he wanted to see my trees and the Prunus I promised him 2 years ago! 🙂 He liked it a lot and wanted to take it home that same day! But I convinced him that it would be better to leave it for another year in my garden so that the roots would be able to grow even stronger! That way the bumpy ride home could not harm the health of this new tree! But next February 2018 when he visits my house again it will be his! And I think that the next couple of pictures that I shot a few days ago of this new tree and future Bonsai in full bloom, will show just why I’m sure that he will!!
Natural deadwood is something we can never copy! That’s why working on and with these ancient Yamadori is such an honour and privilege to me!
Below: View of the stunning base. The spot where I made the air layer was carefully chosen just below this wides spot just below this little tree on the right side of it! This natural little tree is almost completely surrounded by really old deadwood and shows how resilient mother nature can be! From there on upwards, it is all very old and weathered deadwood with only a small live vein running right up to the top, that keeps the rest of the tree alive! This small tree on what is really a Literati tree is very unique in my vision and, if necessary, I will convince Tony to keep it on there! 🙂
Below: Halfway up the tree. Just look at the cracked, burned and naturally bleached old deadwood. These trees grew in between the long man-made rock land divisions and were considered a pest by the farmers on whose land they grew and were chopped and burned regularly over many decades! That’s how they became so gnarly and full of this stunning deadwood!
Below: And finally a shot of the whole new tree and future, in my humble opinion, unique and stunning Literati Bonsai! I am really proud of it….and I hope my friend Tony will be pleased with it?! He deserves it!
it’s has been a while (again), sorry for that…but I had some serious health problems to face and get through over the last couple of months so blogging or Bonsai work was on hold during that time! But things are a lot better now and I have already done a lot of Bonsai work that I would like to share with you all again from now on! I repotted a lot of my trees, even one very big one (the elephant Larch) after being 10 years in his wooden box! But that will be shown in a video story that I am currently working on to be posted on youtube soon! So watch this space if you are interested!!! For the guy’s who were so kind to comment over the last couple of months: I just saw them for the first time and will react as soon as I finished this post!!!
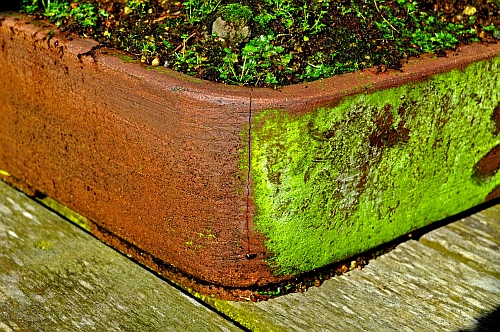
After a very mild winter, I was taking out my trees from the winter shelter in the back of my small garden so that I could check them out, remove weeds and clean their pots. I was very surprised to find out that one of the (expensive) custom-made pots was cracked on its four corners! This is very strange because we had hardly any frost this winter and these pots suppose to be frost prove?! And to be honest: it has never happened with any pots I have in my collection from many other potters?! This is the second one by these potters that I lost because of this….so I won’t be buying another one from them!
Bellow: the frost cracks.
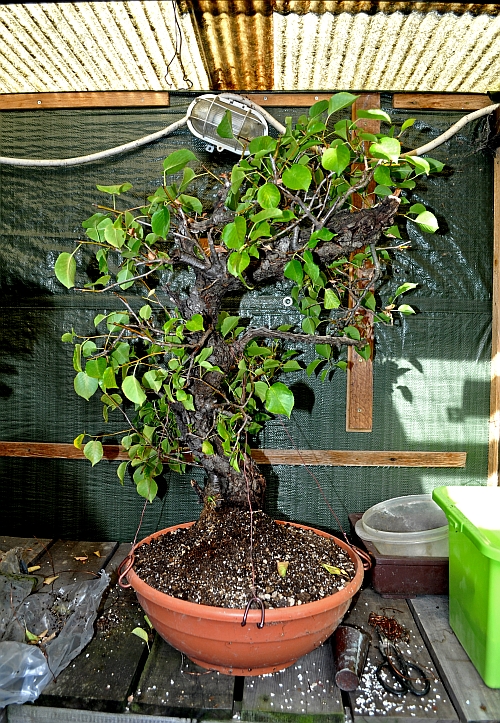
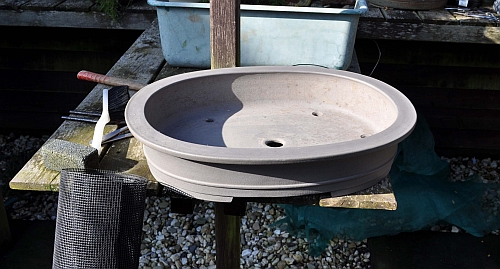
Below: So I had to make an unexpected repotting and the only pot I had that would fit this large Dutch Crataegus Yamadori, was this (too big) Tokoname pot! But it would do for now and the tree has more room to grow quickly this way!
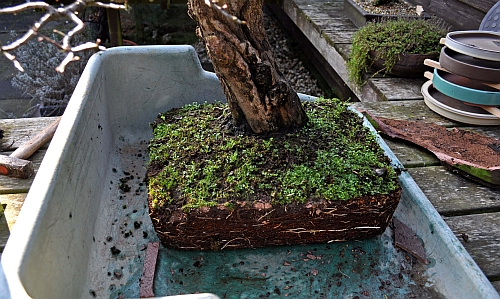
Below; The tree was removed from the broken pot. Now I could start to carefully remove the old soil.
Below: Thick roots that were left during the last repotting, were now shortened to just before where there were small healthy roots growing out from it!
The old soil was removed as much as possible and the smaller roots were shortened sufficiently so that the tree could grow strongly again for some years!
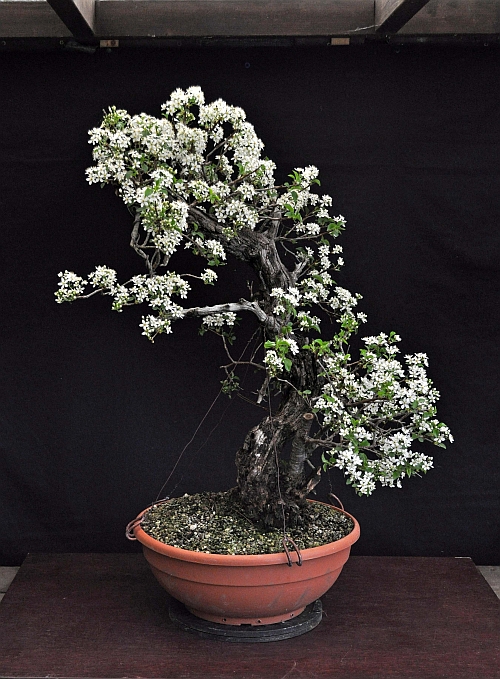
Below: The tree in its temporary new pot. This Dutch Hawthorn Bonsai was well over 2 meters when I collected it and is pretty rare because of its natural deadwood all along its trunk line! It takes forever to create a proper branch structure…but I am not going anywhere and neither is the tree…so who cares?! 🙂
Below: This Acer palmatum “deshojo” is one of my first Bonsai and is in my collection for well over 25 years now! It has grown almost twice in size and the root base is completely created during that time!
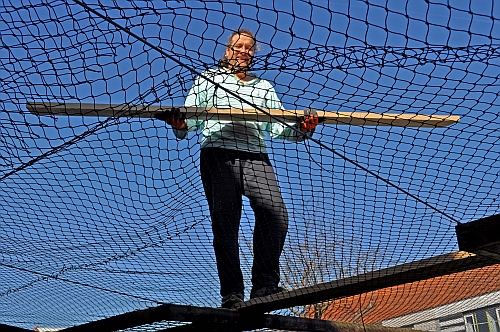
In my element! After suffering yet another #*X## sparrow attack on the roots and old flaky bark of many of my defenceless trees, I decided enough is enough!!! So I bought a birdcage net online and covered my whole garden with it! This was hard and somewhat dangerous work and I must have climbed up and down a ladder a hundred times! But after 2 days of work, my garden was finally bird-proof! No more exposed roots, loss of moss or bark destruction!
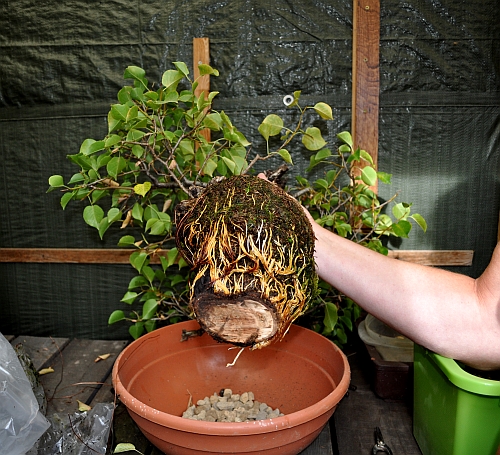
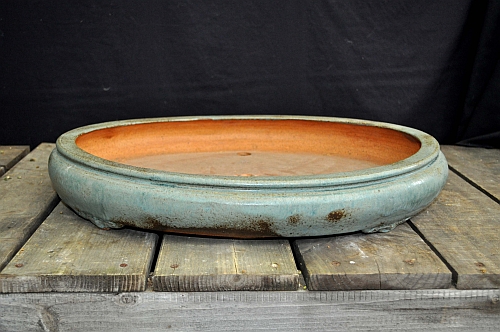
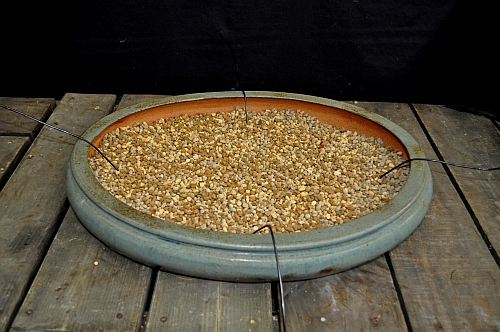
Repotting my Ilex vertillata. This is 50 years+ Dutch urban Yamadori in the multiple trunk style “Kabudachi”. Right from the start, I realised that this would be a difficult repotting, because, from an earlier repotting into its present plastic container, I had discovered that the roots consisted mostly of one big massive root clump! But I still wanted to plant it into the beautiful early “Isabelia” Bonsai pot that I bought especially for it, out of the pot collection from my dear old friend Danny Use from the Bonsai centre “Ginkgo” in Belgium.
Below: The beautiful pot.
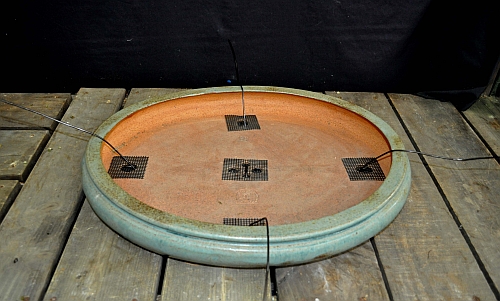
Below: Prepare the pot with plastic gauze covering the draining holes and aluminium wire to secure the tree tightly into its new home.
Below: A layer of Bonsai soil containing Akadama, Kiryu and Bims is placed onto the bottom of the pot.
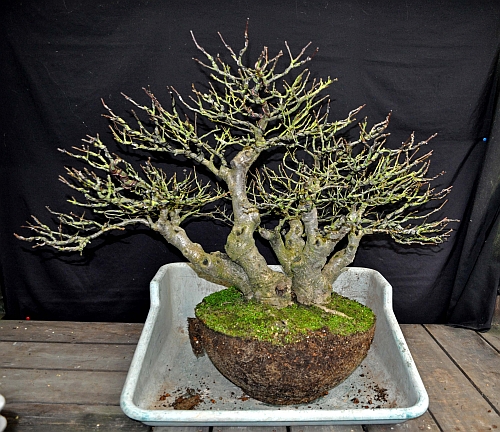
Below: The tree was relieved from its old home.
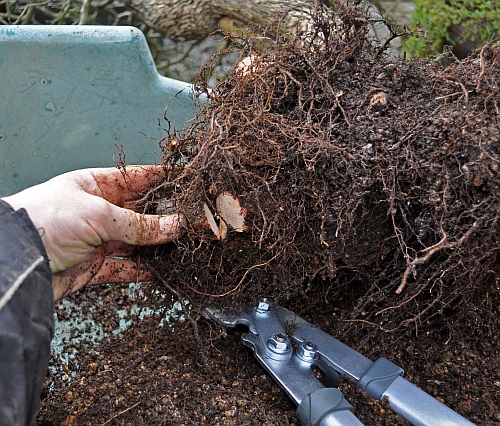
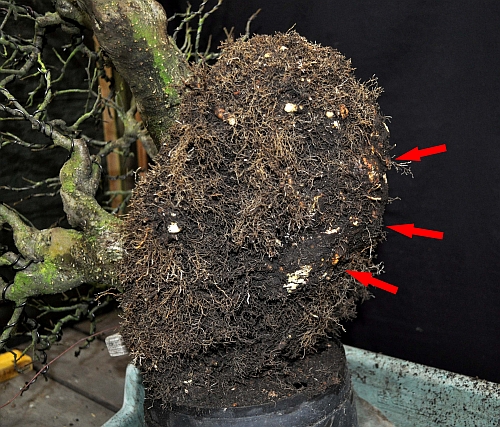
Below: The old top and bottom soil are removed and all fine roots are shortened. As you can see here: this will never fit into the shallow new pot?!
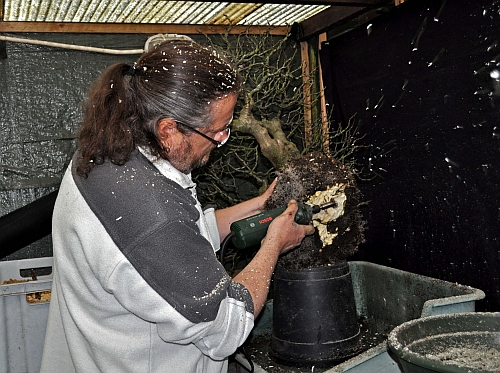
Below: All thick roots were shortened as far as possible. But the red arrows point at the huge massive root ball that was still sticking out at least 6 to 7 cm too far! I was able to remove some of it with an electric saw and with concave cutters, but this was as far as I could get with those?! So it was time to get out my trusty Bosch power tool with my largest-size cutter in its mouth!
Below: Car fully carving away the centimetres of excess wood, constantly checking if I had done enough!
Below: Happy me! It was not easy to hold the heavy tree with one hand and to carve with the heavy bouncing power tool! That’s why it took me more than 20 minutes to safely remove enough to fit the tree into its new home!
Below: Carefully pushing in the soil into the roots with the help of a chopstick. Making sure that no air pockets remain! Almost finished! I am so glad that the tree is finally in its new pot! And now it is cleaning time and then of to the shower!
Now a few weeks after this repotting, I am glad to say that this tree is doing just fine and it has new foliage on all its branches! So no harm was done! I am even thinking of showing it in the next Noelanders trophy….but that’s for later! 😉
Hope you enjoyed these little stories? More to come in the next couple of days! So watch this space!
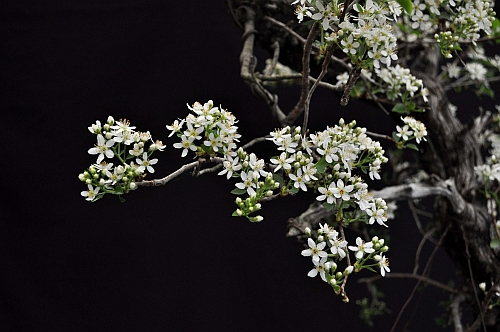
a few days ago I did some maintenance work on my old Pinus thunbergii Yamadori from Japan. I got this pretty tree some 20 years ago as a birthday present and I still think it is wonderful! She has been through a lot since she arrived in my garden! Like being blown right off the table by an uninspected storm…twice! The second time straight into the pond I then still hat in my garden! She laid several days completely submerged under water before we noticed that she was missing! And then there was the time that she after I had cut off the old needles, dropped all of her new growth! She was completely bold! But she soon made new buds and now some 12 years later is still doing fine! Although I love the small round pot she is in now, I am still planning to repot her next year in a slightly bigger and heavier square pot so that she can grow some more roots and so that she can stand more safely and secure by herself on my tables. Now she is still tight down with wire and a piece of bamboo to the upside-down pot that you can see under need its pot! This pot is there to hold and weigh her down to the table! Before these pictures were made I removed last year’s needles so that more light can reach the inside of the branches to promote back budding! Tomorrow I will remove the wire from all the branches! I will rewire her just before I will repot her next Spring! But I still wanted to show her to you all and I hope you like her just as much as I do?!
Close-up of the beautiful and all-natural deadwood/ Shari and old bare roots/ Neagari. The trunk winds halfway down the foliage you can see and then curls up again to just under the bottom of its pot!
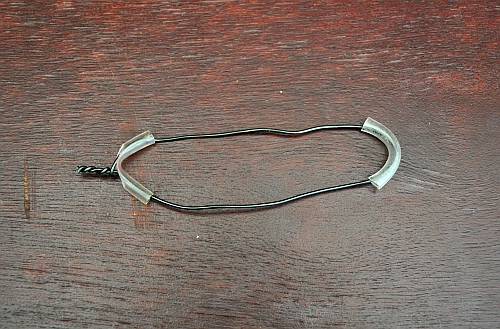
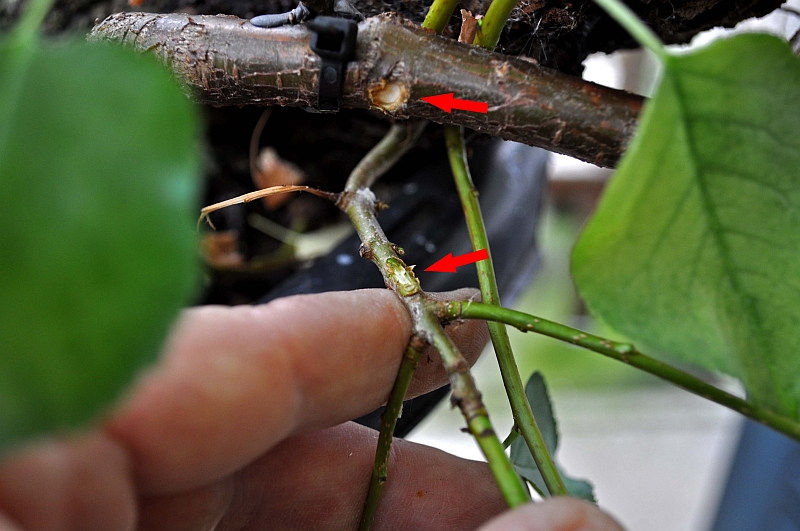
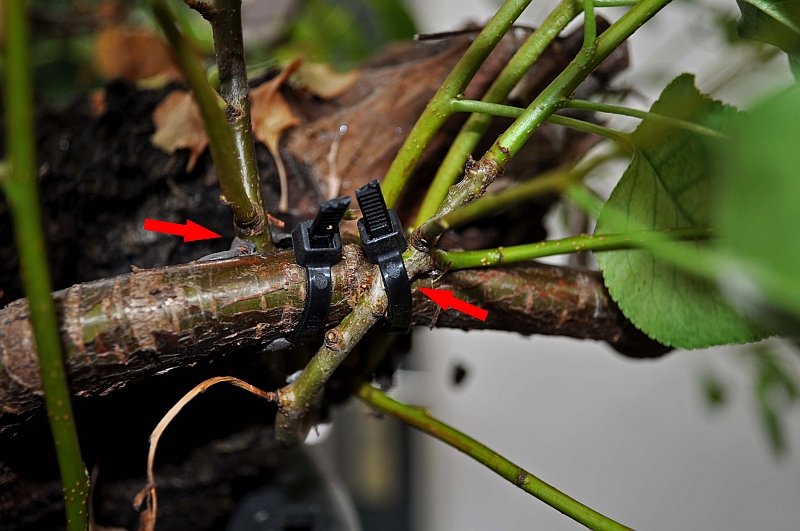
And then now another (I hope) helpful tip! A lot of us use aquarium tubing (see the picture!) to prevent the wire from digging into the bark of the tree when we are bending thick branches with tension wires between the two branches!
But then we have a problem because this tubing can only be used on one branch because if we want to use it around the second branch (see the picture!) to protect it, we can’t run the wire through it and tighten it?!
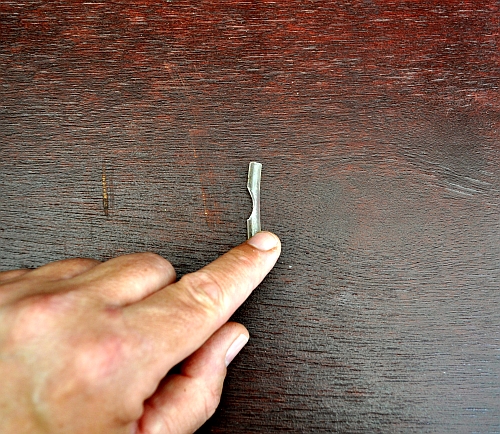
Well here is the solution! With the help of a concave cutter (see the picture!) cut out a small bite off one side of the tub!
So that you are left with a piece of tube that looks like this (see the picture!)!
Now you can run both ends of the wire through both ends of the tube en run them through the hole you just cut out! Slide the tube down the wire as tightly against the bark as possible and with a tong twist both ends of the wire as tight as necessary to hold the branch/es in position!
Hope this will help you and that you liked the quick view of my little old Pine?!
I just to let you know that the last part of XL’s story is online! Something went wrong and one little segment of 15 seconds is missing and black, but that should not matter too much! I don’t know how to fix it, so I will let it be like it is before I do more harm! I hope you enjoy it anyway?! I will film 2 first styling sessions of 2 Scots pines that I have waiting for it and post them in the near future! So watch this space for that! And where I wrote Solden in Belgium, should be Heusden- Zolder in Belgium! Oops! 🙂
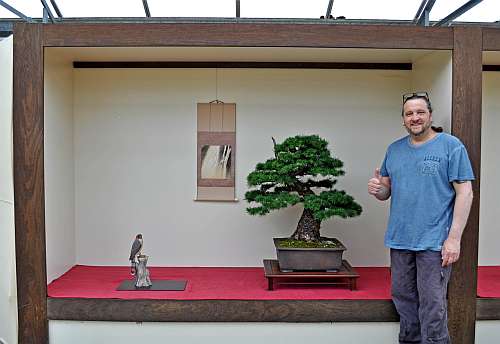
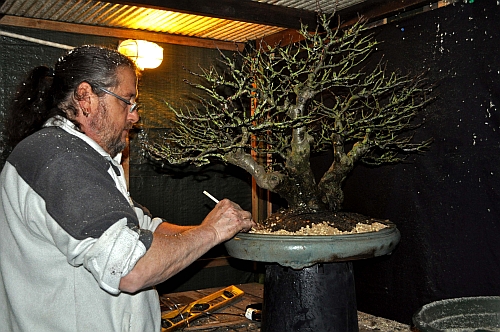
today is the Sunday after my visit to the long-awaited “KEI BONSAI KAI” exhibition that my dear old friends Danny Use his wife Ingrid and their amazing club members staged last Saturday in their famous Bonsai Centre “GINKGO” in Laarne Belgium! Danny staged this unique Bonsai show to commemorate the first friendships that weremade when he, almost 20 years ago, staged his now legendary first “Ginkgo award backin 1997! In February this year, some 10 years after the last “GINKGO” Award was staged, friends from these early hours and from all around Europe were called by Danny and were to their surprise invited to exhibit there by now matured work at this “KEI BONSAI KAI” exhibition and one of them was little old me! So I prepared 4 of my show-worthy Bonsai for this one-off show, from which 2 Hawthorns had to be cancelled because they were attacked by insects that caused bums on most of the foliage! But XL my big Yamadori Larch and Wolfie my Mugo Pine were show worthy! On the Friday before the show, both trees, tables and other accessories were carried into my car to arrive some 2 hours later at the “Ginkgo Bonsai centre”! I had not seen Danny and Ingrid for almost 10 years, but was greeted by them as if we had seen each other only yesterday…..that was very heartwarming!!! We have a long and intense history together and it was good to see and feel that nothing has changed since then!!! From all sides, Danny’s helpers jumped out to help me lift the big Larch and heavy table chest onto trolleys and they drove them for me past the hundreds of stunning Bonsai that were already on display…..I was immediately amazed by all their quality!!
Danny had saved a beautiful Tokonoma for my big Larch and it was the first time for me to be able to do that!!! Creating my composition in this special space was a first for me and therefore very exciting and a real honour! As you can see here, I am happy with the way it all looks! And I am especially proud that this is a Bonsai from a tree that I collected myself all those years ago and that almost all branches and the top section were created from nothing! Later that evening my friend Mario Komstra, for who I have the highest regard, discussed with me this tree and he gave me an honour that surpasses for me every award there is to win! He called this old larch a Bonsai and an important European tree! Coming from him, I think this tree and me did all right up to now! But he also pointed out that there are still things that could and should be improved! Like the thickness of some of the branches and the top trunk section and maybe a shallower pot in the future! Points are taken Mario and thanks for the discussion and talk we had…you are an inspiration in many ways my friend and I do hope to visit you sometime, when things are better!!! 😉
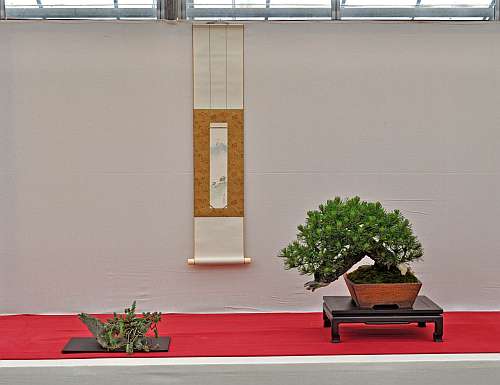
This is a picture of the second Bonsai that I brought along with me! This is “Wolfie” the Mugo pine that I swapped so many years ago with another old friend Wolfgang Putz when my dear friend Tony Tickle (UK) and I visit him in his beautiful place in Austria! The beautiful accent stone is yet another gift from another old Bonsai friend from the UK, Terry Foster!
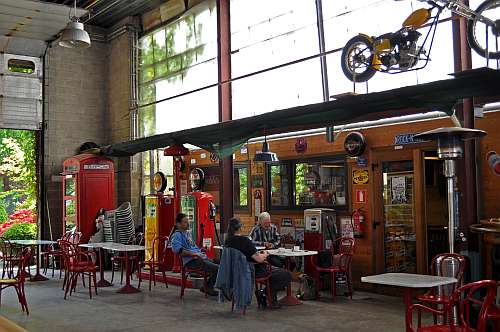
It was very intense and hot work building up my compositions underneath all that glass of the greenhouses that make up a large section of the “GINKGO” Bonsai centre! So I was glad to be able to sit down with my old friend Danny and my new friend, the very talented Frederic Chenal from France! This picture is taken in front of Danny’s unique “Route 66” roadhouse music bar that is built right in the middle of his Bonsai centre! Above the entrance, you can see one of Danny’s many hotrod bikes that he collects along with all kinds of paraphernalia that has to do with it! You got to love this guy!!! 🙂
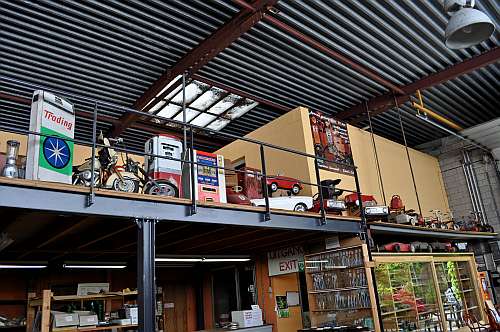
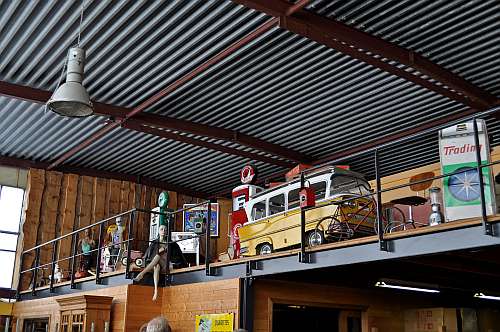
Across from the roadhouse, above the entrance and the pay desk, there are loads more of Danny’s collected stuff! Ranging from petrol pumps to children’s miniature cars and bikes!
More to the left even more collected stuff! Just underneath this, you can see the entrance to space where Danny’s students made a very inspiring exposition of Bonsai in the dark!
Imagine this composition in complete darkness, which was impossible to capture with my camera, because it kept on using its flashlight! But I hope you get the idea. It was all so inventive and uniquely made, really breathtaking andinspiring!
And here is another picture I made in that dark room! just look at that amazing old wood they used to create that Tokonoma and the contrast it makes with that modern lighted base where the Bonsai stands…great stuff!!!
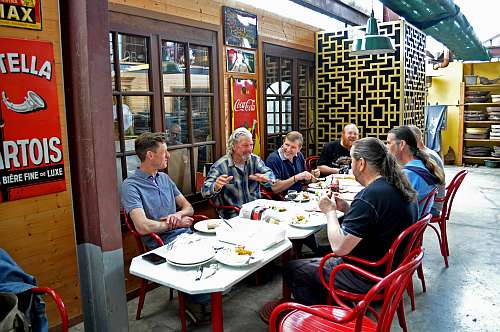
Lunch among friends during the show on Saturday. Danny is here telling the great story, of how he, me, Ludo and Carlos drove all through the UK to convince and invite artists like Colin Lewis, Harry Tomlinson, Dan Barton, Salvatore, John Hanby and Marco Invernizzi to come to the first “GINKGO AWARDS” in 1997! We drove about twice the distance then was really necessary and the way that happened is a classic story that still makes everybody who hears it laugh! It was good to hear about the adventures Danny and I had all those years ago! I am so glad we got reacquainted again and that nothing has changed, besides the colour of our hair and the shape of our bellies!! 🙂 He and Ingrid are indeed great friends and I am very grateful that I had the chance to spend this wonderful weekend with them again!!! Thanks, Danny, Ingrid and all who made this wonderful show possible…..and I will see you soon!!!
In the next couple of days, I will work on a video that I shot of this great event and of all the wonderful trees on display! This is a first for me so it might take me a while….but watch this space for the link!
I was smiling when writing this! Bonsai, Bonsai friends and everything that’s got to do with it is so special and uplifting! I wish the whole world could do it! Keep them small!!


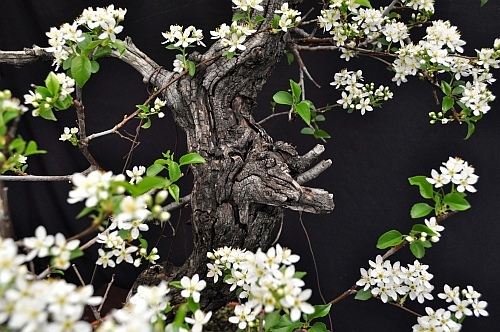


 Close-up of the beautiful and all-natural deadwood/ Shari and old bare roots/ Neagari. The trunk winds halfway down the foliage you can see and then curls up again to just under the bottom of its pot!
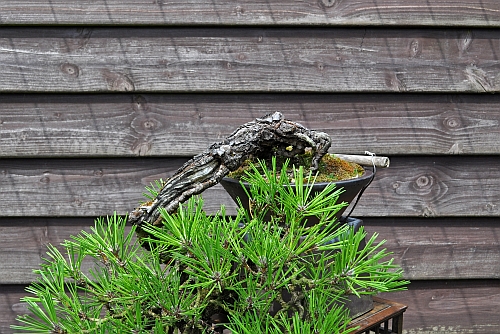 And then now another (I hope) helpful tip! A lot of us use aquarium tubing (see the picture!) to prevent the wire from digging into the bark of the tree when we are bending thick branches with tension wires between the two branches!
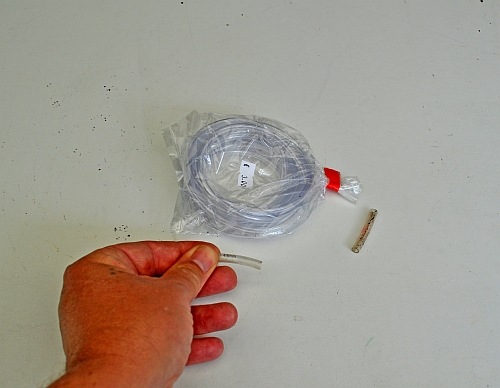 But then we have a problem because this tubing can only be used on one branch because if we want to use it around the second branch (see the picture!) to protect it, we can’t run the wire through it and tighten it?!
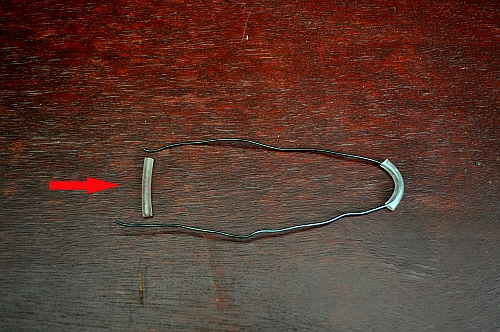 Well here is the solution! With the help of a concave cutter (see the picture!) cut out a small bite off one side of the tub!
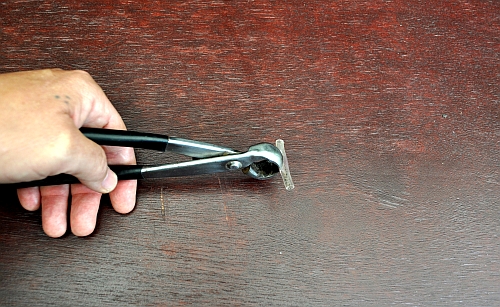 So that you are left with a piece of tube that looks like this (see the picture!)!