My double-sided Dutch Hawthorn in beautiful Fall colours.

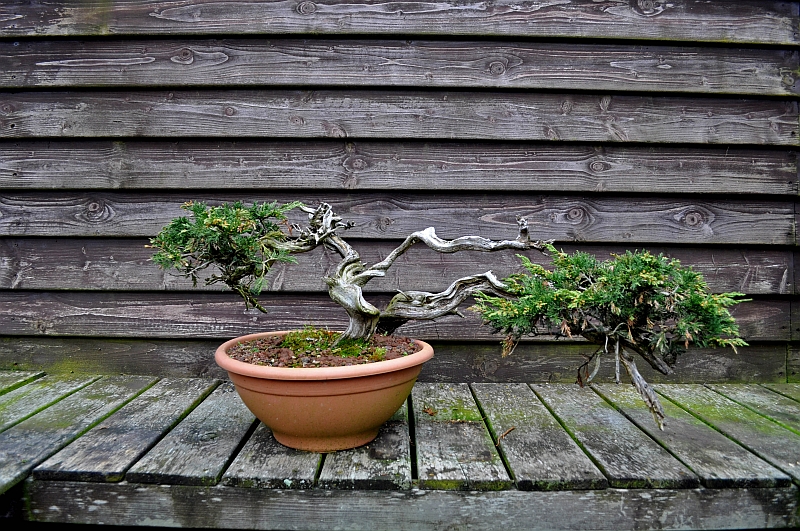
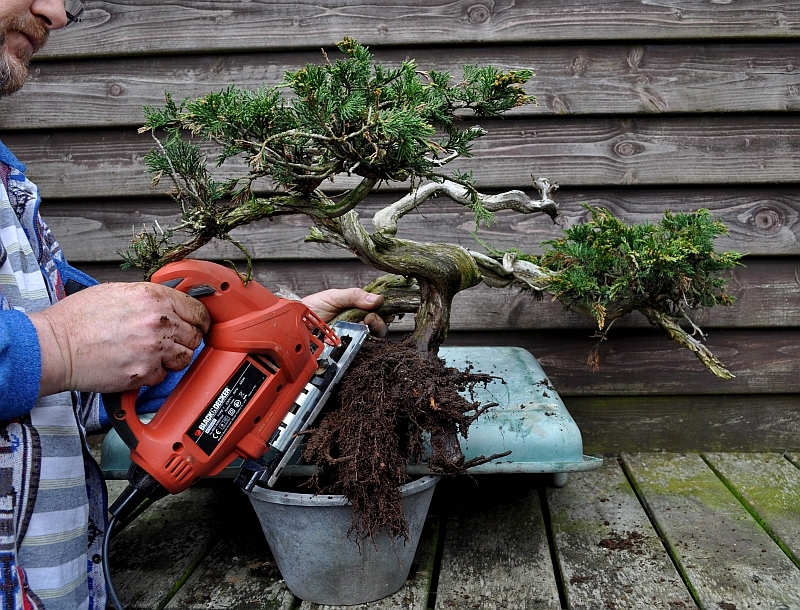
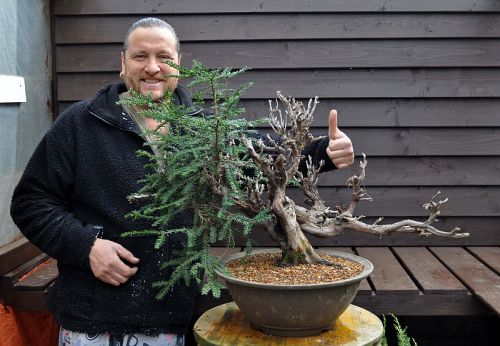
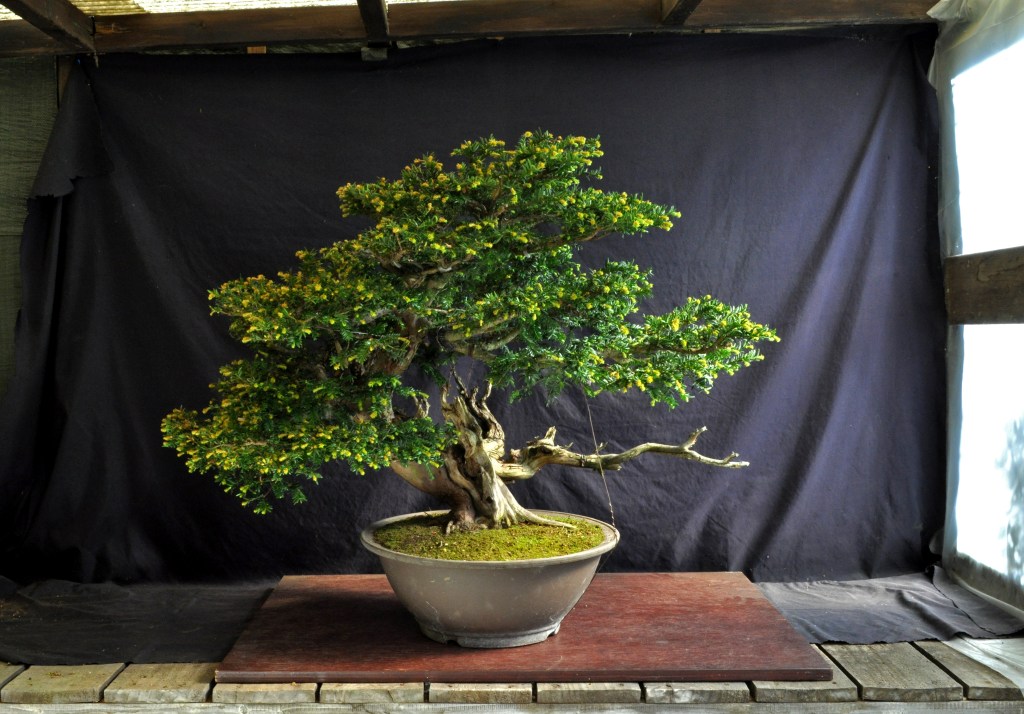
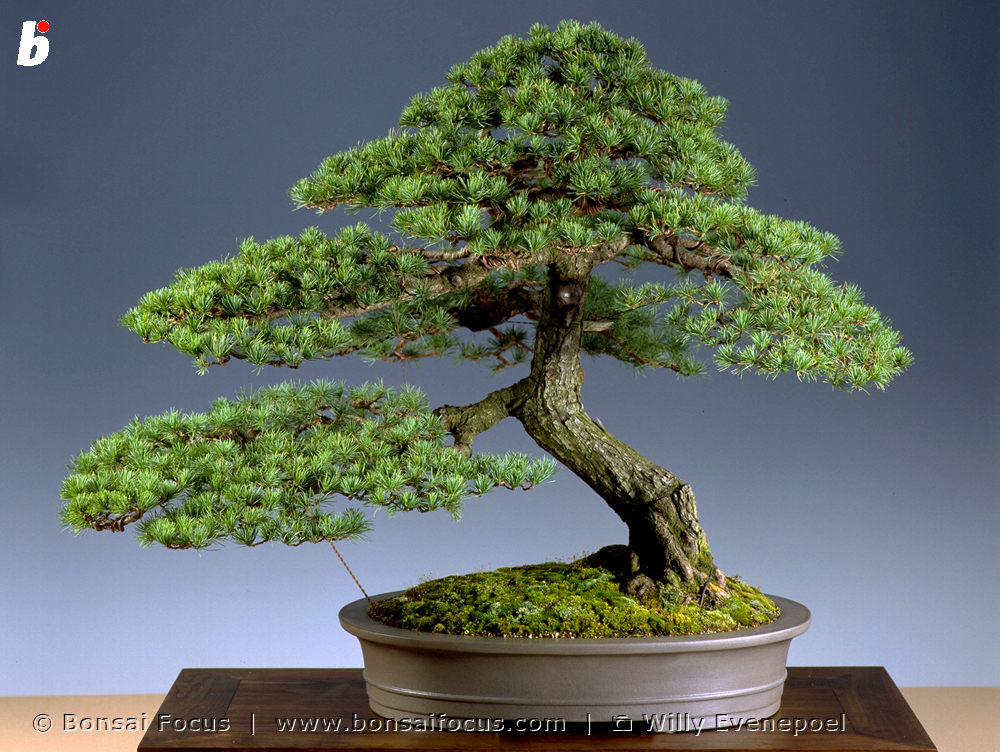
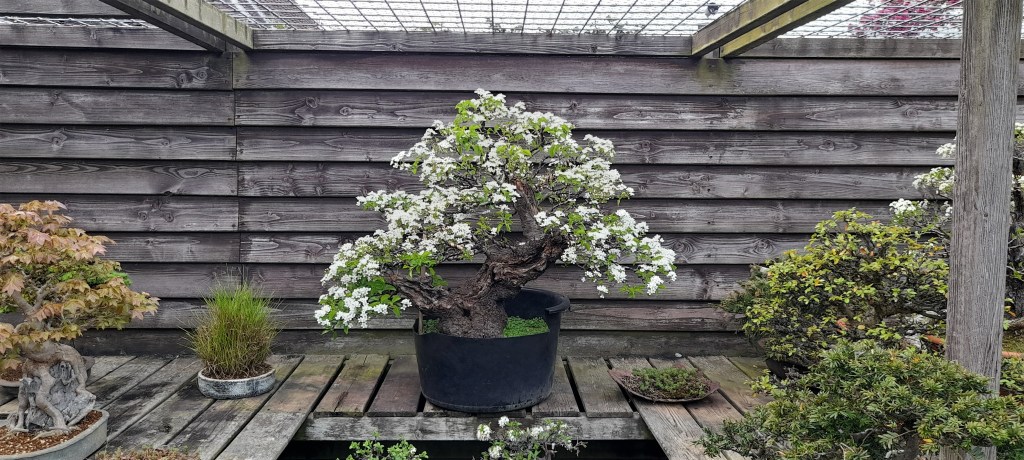
Hi everybody! We had nothing but rain the past few days, so as soon as the sun broke through the clouds, I grabbed my phone, a Bonsai table and my old double-sided Dutch Hawthorn with stunning Fall colours to make a few pictures that I could share with you all! I collected this old Hawthorn not far from where I live in a wet dune forest close to the sea. The poor tree was almost completely covered with sand and only a long battered branch with just a few leaves (now that Jin) grew above the soil line! The deer that roam free there had eaten most of its already spares foliage. And to make things even harder for this poor little tree, that protruding 1-meter-high almost dead branch was used as a scratching pole by the big buffalo that live there! This straight and half-death top section was all that I could see, so when I dug it up with only my hands, I was pleasantly surprised to discover a beautiful hidden trunk full of deadwood! Now decades later, he has become a mature old-looking Bonsai with two possible fronts! I think it looks really good in this beautiful pot by Graham Potter (UK)! So for now it can freely mature some more and developed more finner ramifications! And by then will decide what will be its front, or I will plant it in a beautiful round pot so I can turn it around and enjoy both fronts?! What do you Girls and Guys think is the best front???
Height: 38cm/15 Inch.

Below: Present front-side.

Below: A close-up of the present front side.

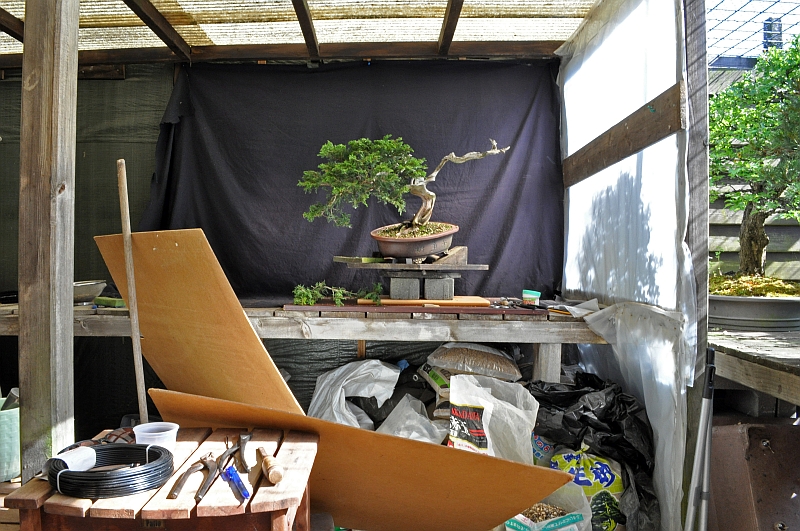
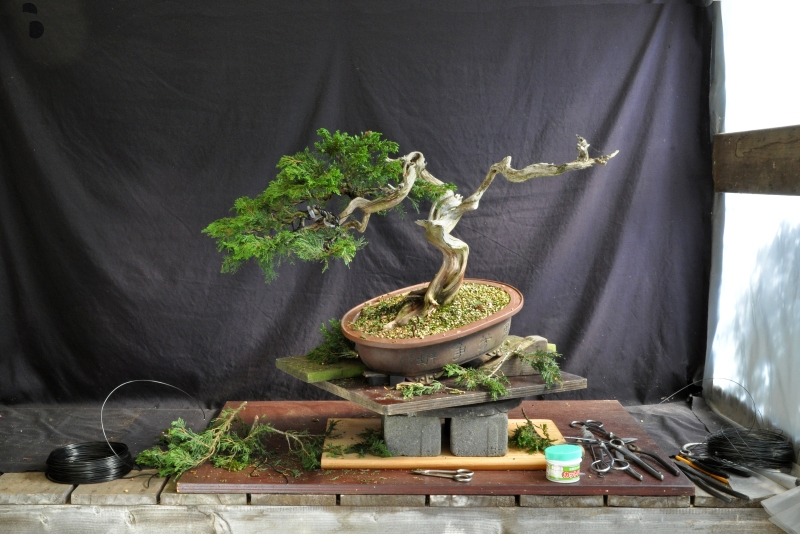
Below: Alternative front-side.

Below: Alternative front-side close-up.

Cheers and stay safe,
Hans van Meer.

Juniperus sabina Yamadori first styling.

Below: April 2018. Here is a picture of how I bought the Dubbel trunk, Juniper Sabina of this little story! Both trunks are connected underneath the soil line and I took a big gamble that I could separate them to get two very nice Yamadori for the price of one!

Below: After I first had made sure that the divided roots would be enough for both sides to survive on their own, I separated them with a power saw!

Below: And that is how one Juni became two Junipers!

Below: Next to each other in their new homes after a dust-removing shower!

Below: fast forward to 17-5-2022. Before the work begins a quick picture! The tree is healthy with tons of foliage and more than enough (small) branches to choose from! But there is a problem! From this really only possible angle there is just one live line to see on the left bottom side and along the whole top section that is now all still hiding behind the lush foliage!

Below: Is an overview of my very professional working aria/foto studio!🤣😇

Below: Brach selection is always an exciting part of styling that needs to be done with confidence! I remember what the famous John Naka once set during a demonstration when he was about to cut off a major branch: “Let’s cut it off for now!” 😉

Below: More branches are removed or shortened until just the ones that are or could be useful are left!

Below: The all-important first styling work is done and now the tree needs some time to recover! But I can work on the deadwood and bleach it and with an old toothbrush carefully clean the life vein from its outer dirty skin layer to reveal its dark brown colour!

I hope that you like what I have done with this elegant Juni?!
Cheers,
Hans van Meer.

White pine picture “candles & apple”.

Below: I just wanted to share this cell phone picture that I made of 4 small candles hugging an apple on my old Pinus parviflora. She responds very well after her repotting and is covered with bright green candles! The 2 most minor will be removed in favour of the 2 stronger ones! Always leave a maximum of just 2 end buds at the end of each Pine branch so that they will not become too coarse in the future!

Cheers,

Hans van Meer.

My Taxus windswept is coming along!

Below: This is how I found him during my 2007 collecting trip with Tony Tickle in Wales. The large rock that you can see at the bottom of this picture originally covered most of the trunk right up to where the foliage starts! It took all my strength to lift it off of the poor tree! And freeing it from all the rocks it lived in for all those years took a long time indeed! But it was well worth it!!!!

Below: And this is how it looks after 15 years of training and good care! He is completely covered with new bright green buds! Pinching them all back took me a while and gave me a chance to overlook its progress over the last years. And I have to say that he is coming along faster than I could ever wish! There is hardly any wirer necessary to keep this basic shape and from now on it will mostly be refining detail work! I hope it to be show worthy by next season?! Height: 64 cm/ 25 inch. Pot Japan.

Cheers,

Hans van Meer.

Bending a thick Pine branch with cheap Sisal rope protection!

Below: Just so show you all that I practise what I preach! Here is a fast Cell phone picture that I shot from underneath the thumb-thick old Pine branch that I had just bent some 45 degrees with the help of a double protecting layer of cheap and easy-to-get Sisal rope and two 5mm aluminium wirers! The white arrow points at where the branch has bent the most! That tin red line to the right shows where the branch used to be before it was bent! Impressive yes?! And no mess or damage from using that clumsy wet Raffia!

Cheers,

Hans van Meer.

My Japanese black Pine with exposed roots repotted.

Below: My Japanese black Pine “Pinus thunbergii” is with me since 1990 and was styled by me during a demonstration a year later. I remember the excited reaction of the students when I chopped off most of the top and turned the rest into a Jin (deadwood). It needed a repotting and some fresh soil to grow and strive in. Lifting it out of its pot was easy and that is a sure sign it needs to be repotted into fresh soil! All the long circling roots were shortened and a layer/ring of old soil and roots was removed working inwards and upward from the side leaving a hole in the middle for fresh soil. Pot by William Vlaanderen (NL). Height: 15-25 cm (Komono).

Below: The soil mount in between the exposed roots is left this time! water still penetrates it when I water so there is no problem for now! But next time that section needs more attention and fresh soil…but that’s for then!

Below: The tree basically grows over a month of soil, so when watering the water tends to run down fast and hard. So the chance that this fresh soil will be flushed away is imminent…so to prevent this I mixed some Kato with very fine Akadama and Akadama dust with some water to make it into a more malleable paste!

Below: That thick paste is then applied over the soil and pushed down to make a nice sloppy month where water can run down without taking the fresh soil along with it. I now only have to make sure that I water enough and have to check every time if the water runs through the hole in the bottom! In a month or so when the new soil is more settled the layer of Kato will be simply scraped away.

More later on this little tree!

Cheers,

Hans van Meer.

My windswept Taxus Yamadori.

Below: I found the Yew/Taxus of this story in November 2007 on a mountain in Walles! She was mostly covered by a large flat boulder rock and only the foliage you see on top and on the right side ware growing from under it! I was on my own and lifting that heavy rock off her without damaging her was a serious task…but boy was it worth it!

Below: 31-3-2012. The first repotting after collecting her in 2007 in Walles! Just look how little foliage she has after 5 years of recovering!

Below: 31-3-2012. And just potted in her first real pot and a happy and younger and leaner me in the background!

Below: 27-4-2022. And this is how she looks today with all the new brightly green buds! I am proud of this one! Someone once told me a long time ago: you can’t make a windswept Yew Bonsai…well I beg to differ! 😉😇 I consider this tree one of my best designs and hope to show it at the next Trophy in Belgium!

Cheers,

Hans van Meer.

Repotting my old Pinus parviflora.

The year is 1990 and I was doing Bonsai for not more than half a year or so when I visited the “China Bonsai centre” in Schiedam (Holland). This giant greenhouse was filled from top to bottom with many commercial Bonsai! But there were always a few better ones brought back from their trips to China! And one of them was the tucked-away big Chinese Pinus parviflora from this story! It cost us a whopping 1000 Gulden (450 Euro) and that was a lot of money those days and still is!
Below: 7 years later and the year is 1997 when my Pine was shown in the third edition of the famous GINKGO AWARDS in Belgium.

Below: 23-4-2022 and 25 years later! Yesterday my Dear old Bonsai friend Teunis Jan Klein brought the pot that I bought from him and now it is time to finally free my pine from his cracked pot! With a hammer, the pot is broken so that the pieces can be removed by hand!

Below: Just look at how compact those roots and soil have become over the years!

Below: All that greyish mycorrhiza is a welcome sign of good health and o so necessary for any Pine to thrive and survive!

Below: With a hook and a chopstick the old soil is removed via the bottom working my way up!

Below: Then only carefully working with a chopstick the old soil was further removed from in between the roots!

Below: The bottom of the pot is filled with a layer of soil containing Akadama and Bims. The greyish/brown pieces you can see scattered around on top are the saved layers of mycorrhizal fungi from before! This way the pot will fill itself much quicker with healthy and very necessary mycorrhiza! Remember all Pine trees need mycorrhiza to feed!!!

Below: Wiggling with a chopstick carefully working the soil into every open space between those roots. And then he is watered over and over again until the water that runs out of the holes in the pot is clear! I hope he recovers well from it all and that he may bring me pleasure for many more decades to come!

Cheers,

Hans van Meer.

My Pinus sylvestris cascade is coming along nicely!

Below: This feminine slender sylvestris that I collected in 2012 with my dear Slovenian friend on my first visit to their beautiful country. It was growing and hanging on for dear life on the very edge of a shifting sandy hill! I had to tippy-toe and work above my head to be able to free her from her place of birth and doom! And now 10 years later she has already become one of my favourite designs! She is so unconventional feminal elegant and yet showing the struggle of her mountain life through her flaky bark, Shari, Jin and strong Nebari (roots) that cling on for dear life! Now starts the hunt for a nice elegant crescent-shaped rock-like pot!

Cheers,

Hans van Meer.

My big Prunus mahaleb in full bloom!

Below: All pictures that I shot in the sun with my proper camera were overexposed from the reflecting light from all those delicate white flowers. So later this day when the sun was filtered by some light clouds I made some shots with 2 different cell phones. And two of those I would like to share with you all!

Below: He deserves a cool light azure blue-green pot to emphasise those white flowers and light green foliage! I hope I can find one in the future?!

I hope you enjoyed these pictures as much as I loved making them!
Cheers,
Hans van Meer.