Juniperus Sabina health warning!

Note: Before you read the following serious health warning! Please know that I will still work with Sabina Junipers or any other poisonous Junipers for that matter!!! But I will do so with more care from now on! So this is by no means mend to scare you! But to warn you please be careful with Male Sabina Junipers around the month of May! Or whenever yours has the below Male pollen cones (strobila) in jour part of the world!!!

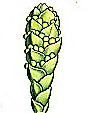
Below: Male Juniperus Sabina with still tiny jong Male pollen cones (strobilus).

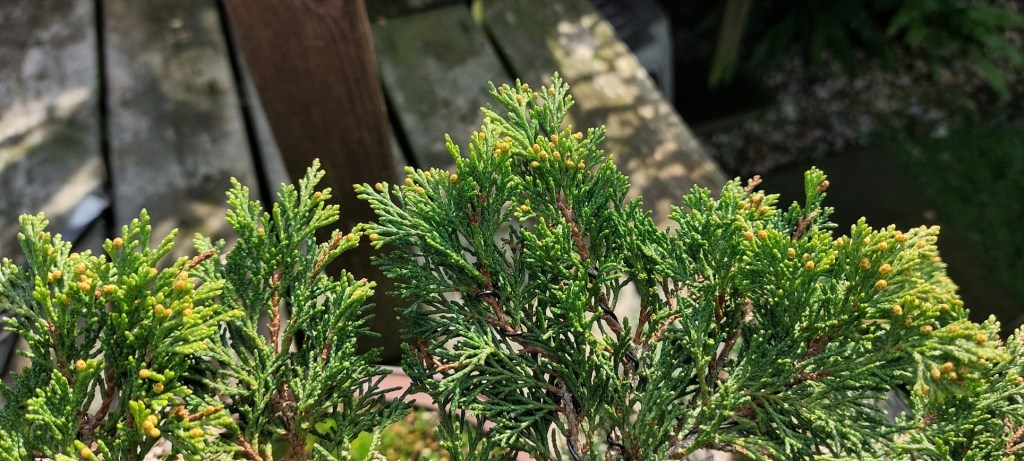
Below: A more mature Male Juniperus Sabina cone with pollen (strobilus).

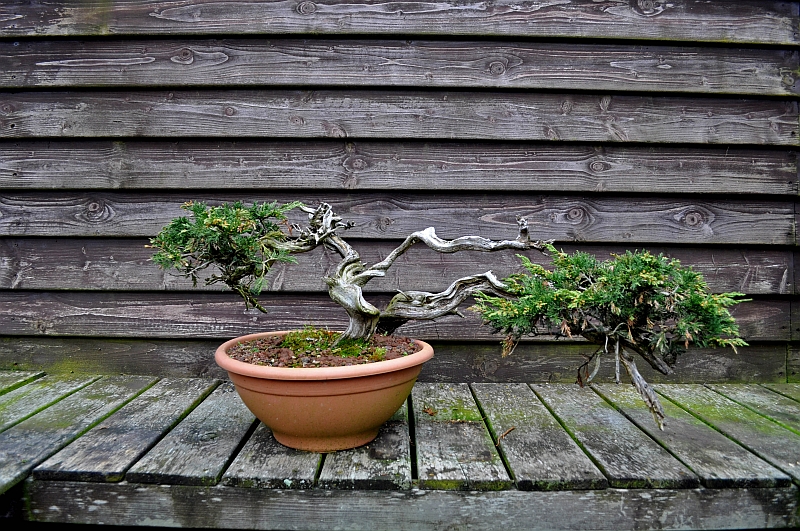
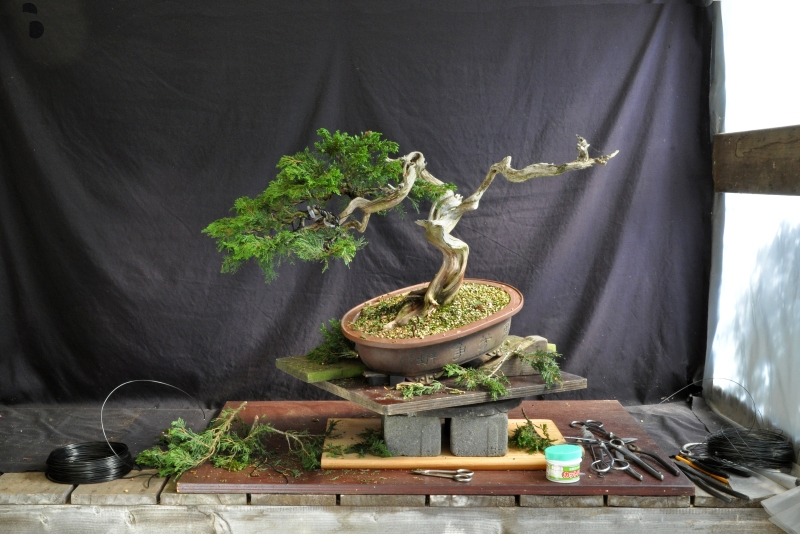
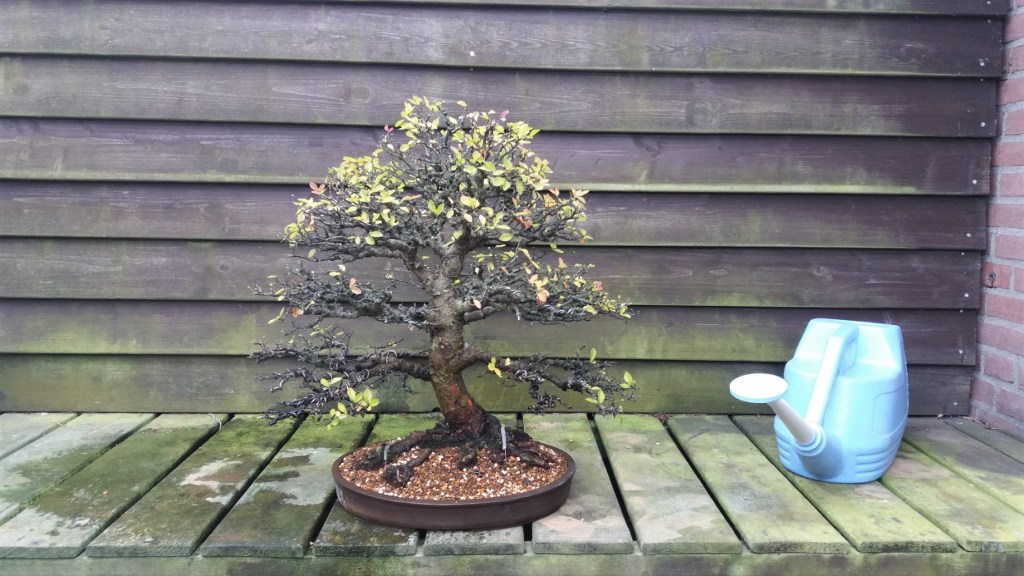
Above: May 2022. The Juniperus Sabina from this warning! It was shot just before I inhaled the pollen cloud while working on it! In the left bottom corner of that large brown wooden plate, just below that cut-off branch, you can see a few of the tinny brown pollen pods that made me so sick!

Juniperus Sabina health warning!
I thought hard and long about posting my warning about working on and with a male Juniperus Sabina during the period that they have very tiny male brown pollen cones or strobila at the tips of their foliage! My Sabina that’s from the south of Europe do then still tinny brightly green male flowers start to grow around the middle of September on the tips of its typical soft Sabina foliage. And the following year around the month of May, they had grown just a little and had turned into a light brown colour! And seemed to be dried out! And by then ( as I found out later ) were ready to disperse their powdery pollen content! And that was precisely the time that I decided to work on it, not knowing what would or could happen next?! During this wiring, it was inevitable to touch the foliage and while bending a branch a cloud of brown powder-like pollen was disparaged into the air right into my face and eyes! I un avoidable inhaled a large portion of this cloud and immediately started coughing like crazy! This went on for several minutes and then the gag reflexes started and I ended up on my knees on the ground contorting with every painful cough and gag! And this went on for at least ten painful minutes before I was able to stand up and painfully breathe a little without coughing and gagging! The pain in my chest was excruciating, so much so that the next day I had to visit my Dockter! After he examined my ribs and lungs, he told me I had several bruised ribs on both sides of my chest! Today as I write this warning, it is the end of September and four months after my misfortune and my ribs and longs are still very painful with every breath! So much so that next week I have to go to a long specialist for tests and a further examination to find out if my longs are damaged?! So please be very careful if you work on a Juniperus Sabina around May when you see those tiny light brown male pollen pods at the tips of the foliage! Or better still: do your styling or maintenance work earlier when they are still brightly green or later when those pods are empty and dried up!!! And if you do have to handle them during that risky period, well, then make sure to wear a mask and protecting classes and wash your hands when you finish! Believe me, you don’t want to inhale it or get it in your eyes!!! In the Netherlands, we have a saying:

A warned person counts for two!!!
Cheers and stay safe,
Hans van Meer.

Below: 30-9-2022. The same Sabina of this story is now already full of still jong and tinny yellowish-green male pollen pots!

Juniperus sabina Yamadori first styling.

Below: April 2018. Here is a picture of how I bought the Dubbel trunk, Juniper Sabina of this little story! Both trunks are connected underneath the soil line and I took a big gamble that I could separate them to get two very nice Yamadori for the price of one!

Below: After I first had made sure that the divided roots would be enough for both sides to survive on their own, I separated them with a power saw!

Below: And that is how one Juni became two Junipers!

Below: Next to each other in their new homes after a dust-removing shower!

Below: fast forward to 17-5-2022. Before the work begins a quick picture! The tree is healthy with tons of foliage and more than enough (small) branches to choose from! But there is a problem! From this really only possible angle there is just one live line to see on the left bottom side and along the whole top section that is now all still hiding behind the lush foliage!

Below: Is an overview of my very professional working aria/foto studio!🤣😇

Below: Brach selection is always an exciting part of styling that needs to be done with confidence! I remember what the famous John Naka once set during a demonstration when he was about to cut off a major branch: “Let’s cut it off for now!” 😉

Below: More branches are removed or shortened until just the ones that are or could be useful are left!

Below: The all-important first styling work is done and now the tree needs some time to recover! But I can work on the deadwood and bleach it and with an old toothbrush carefully clean the life vein from its outer dirty skin layer to reveal its dark brown colour!

I hope that you like what I have done with this elegant Juni?!
Cheers,
Hans van Meer.

White pine picture “candles & apple”.

Below: I just wanted to share this cell phone picture that I made of 4 small candles hugging an apple on my old Pinus parviflora. She responds very well after her repotting and is covered with bright green candles! The 2 most minor will be removed in favour of the 2 stronger ones! Always leave a maximum of just 2 end buds at the end of each Pine branch so that they will not become too coarse in the future!

Cheers,

Hans van Meer.

Bending a thick Pine branch with cheap Sisal rope protection!

Below: Just so show you all that I practise what I preach! Here is a fast Cell phone picture that I shot from underneath the thumb-thick old Pine branch that I had just bent some 45 degrees with the help of a double protecting layer of cheap and easy-to-get Sisal rope and two 5mm aluminium wirers! The white arrow points at where the branch has bent the most! That tin red line to the right shows where the branch used to be before it was bent! Impressive yes?! And no mess or damage from using that clumsy wet Raffia!

Cheers,

Hans van Meer.

My Japanese black Pine with exposed roots repotted.

Below: My Japanese black Pine “Pinus thunbergii” is with me since 1990 and was styled by me during a demonstration a year later. I remember the excited reaction of the students when I chopped off most of the top and turned the rest into a Jin (deadwood). It needed a repotting and some fresh soil to grow and strive in. Lifting it out of its pot was easy and that is a sure sign it needs to be repotted into fresh soil! All the long circling roots were shortened and a layer/ring of old soil and roots was removed working inwards and upward from the side leaving a hole in the middle for fresh soil. Pot by William Vlaanderen (NL). Height: 15-25 cm (Komono).

Below: The soil mount in between the exposed roots is left this time! water still penetrates it when I water so there is no problem for now! But next time that section needs more attention and fresh soil…but that’s for then!

Below: The tree basically grows over a month of soil, so when watering the water tends to run down fast and hard. So the chance that this fresh soil will be flushed away is imminent…so to prevent this I mixed some Kato with very fine Akadama and Akadama dust with some water to make it into a more malleable paste!

Below: That thick paste is then applied over the soil and pushed down to make a nice sloppy month where water can run down without taking the fresh soil along with it. I now only have to make sure that I water enough and have to check every time if the water runs through the hole in the bottom! In a month or so when the new soil is more settled the layer of Kato will be simply scraped away.

More later on this little tree!

Cheers,

Hans van Meer.

Repotting my old Pinus parviflora.

The year is 1990 and I was doing Bonsai for not more than half a year or so when I visited the “China Bonsai centre” in Schiedam (Holland). This giant greenhouse was filled from top to bottom with many commercial Bonsai! But there were always a few better ones brought back from their trips to China! And one of them was the tucked-away big Chinese Pinus parviflora from this story! It cost us a whopping 1000 Gulden (450 Euro) and that was a lot of money those days and still is!
Below: 7 years later and the year is 1997 when my Pine was shown in the third edition of the famous GINKGO AWARDS in Belgium.

Below: 23-4-2022 and 25 years later! Yesterday my Dear old Bonsai friend Teunis Jan Klein brought the pot that I bought from him and now it is time to finally free my pine from his cracked pot! With a hammer, the pot is broken so that the pieces can be removed by hand!

Below: Just look at how compact those roots and soil have become over the years!

Below: All that greyish mycorrhiza is a welcome sign of good health and o so necessary for any Pine to thrive and survive!

Below: With a hook and a chopstick the old soil is removed via the bottom working my way up!

Below: Then only carefully working with a chopstick the old soil was further removed from in between the roots!

Below: The bottom of the pot is filled with a layer of soil containing Akadama and Bims. The greyish/brown pieces you can see scattered around on top are the saved layers of mycorrhizal fungi from before! This way the pot will fill itself much quicker with healthy and very necessary mycorrhiza! Remember all Pine trees need mycorrhiza to feed!!!

Below: Wiggling with a chopstick carefully working the soil into every open space between those roots. And then he is watered over and over again until the water that runs out of the holes in the pot is clear! I hope he recovers well from it all and that he may bring me pleasure for many more decades to come!

Cheers,

Hans van Meer.

Mugo Pine back budding on old wood!

Yes, you read it right! My Yamadori Mugo Pine from Italy is back budding all over on older up to pinkie thick bare branches! There goes the “Mugo Pine not budding back where there is no old needles” theory! But Big Ron is that famous exception to that rule! He is an old from top to bottom hollowed-out Italian Mugo Yamadori that does not follow those rules! Just look below at all those buds!

Below: Everywhere enough new growth so that in the future I can shorten the eventually too-long branches back to all that new growth! Keeping them full and much shorter to the mainframe!

Cheers,

Hans van Meer.

Removing rotten roots wood from my Mugo pine (Big Ron).

Today was a weird Bonsai day, to say the least! Because most of it was spent removing with long tweezers and a small chisel the completely rotten wood from Big Ron’s underground deadwood section! And then filled those deep holes that were left with a coarse hard soil mix so that in the future new roots can grow fast and all excess water can run out of the pot away from all that buried deadwood! Why and how did this happen you might ask? Well, during his long life somewhere high on a mountainside in Italy he has grown a very solid base! But during the many passing years, somehow those firm base roots were covered with a layer of shifting soil, rocks and dead vegetation! And that made that “Big Ron” created higher up his trunk new secondary roots on that new soil level and that took probably many decennia to get to this big as they are now! The now completely buried old roots started to rot away over the many decades until they finally completely turned into powder! Later the dead right and back side of the tree turned over many decades into completely hollowed-out deadwood that makes this old Mugo so special! Bud decay is still going on as we speak so the priceless deadwood needs permanent protection in the form of impregnating it completely with a commercial wood hardener for the hole hollow inside parts and commercial super glue for the more visual outside Jins and Shari! But before all this: all the deadwood needs to be bleached with Limesulfer+ashes+water in different shades of greyish whites!

Below: That mount of wood dust came out of that large hole and is all that is left of a large dead and completely rotten away root!

Below: The hollow trunk and the hole in the ground as seen from the right side.

Below: That same hole filled with a midsized soil mixture so that new roots can grow fast!

Below: The backside hole is also filled up. Now the roots can feed, grow and fill those two large holes with healthy useful roots again!

Now I have to clean that pot…but that is a whole other story…pppfffff!💨💨

Cheers,

Hans van Meer.

My old Mugo Pine (Z) needs a haircut!

The problem with Mugo pines is that they almost always bud back at the base of last year’s needles or even older ones! That is good and bad news for us! Good news: because as long as there are still strong older needles on a not-too-thick branch then in early spring we can cut it right back in between those needles as long as there are sufficient needles left to promote new buds from! Bad news: because it means that for a Mugo branch to back bud, we have to live with a rough and unrealistic-looking Bonsai with branches filled with needles from the base to the tip! Now we can decide to pluck them off and leave a bunch of them in places where we would like buds to appear! But that simply looks ridiculous and would make wiring difficult! So what to do? Well every now and then we have to style or restyle our Bonsai and need to wire the branches of our Bonsai…imagine doing that with all those needles still on there! So we pluck them off leaving just enough to with the help of wire create our famous pine Bonsai branch tips that we all know so well! So that is what I did all those years ago before I restyled Z my Mugo Pine Yamadori for the second time when she had branches with short internodes and beautiful short needles. But first a bit of history:

Below: In March 2002 I was invited by Mark Noelanders to do a demonstration at his then Bonsai club B.A.B in Belgium! So I had to find something special to entertain all his knowledgeable students! After visiting all the Bonsai dealers in the Netherlands I ended up at a Bonsai centre deep in Belgium where I found the, to say the least, weird France Yamadori of this story! This tree was a real challenge and risky… so perfect for this evening’s demo! But the guy who sold it to me was clearly surprised that I even looked at this tree! And was clearly happy that I bought it from him!

Below: After 2 hours of hard work the birth of Z is finished.

Below: 10 years later in 2012, I restyled her again completely! She then looked at her best with those short needles and clear foliage peds! Pot: Brian Albright (UK). It truly is a big transformation and one of those trees that I am really proud of! Back then I should have entered her in an exhibition!

Below: And fast forward another 10 years to the present day 10-2-2022. Oh, what a tangled web we weave! Z desperately needs a serious haircut where usable foliage-baring branches are cut back as far as possible to where there is healthy and strong secondary new growth. And unusable branches (too weak, too long and/or too thick etc.) will also be removed. She is healthy and her needles are still short though and that’s a really good thing!

Below: 30-3-2022. This is how she looks after most too-long and bare branches are removed or shortened to where there is healthy new growth. That bottom left-side hanging too long branch most probably will be cut back or turned into a Jin?!

Now she will be wired completely so that she can be restyled. During that styling, some more useless branches will be shortened or removed to give her back her looks! So watch this space for the outcome!
Cheers,
Hans van Meer.

Some more Spring repoting! part II

Here are some more cellphone pictures of the repotting that I did during the last couple of days. I kept it at doing only 2 trees a day to keep the amount of …well discomfort doable for me. It is also a safeguard to keep it enjoyable for the future! So here we go! Below is a tip: this is how I bend my little wire hooks! In this way, there is no change of roots lifting up the mash that covers the hole! So make sure to save those little leftover pieces of wire that are always there after a wire session and use them to make these hooks! Below: prepping the pot to be reunited with his buddy: my Ulmus parviflora. This old Lady is my third Bonsai and now 32 years my girlfriend. She has grown from a skinny jong teenager into a beautiful natural old looking “Grand dame”!

Below: Just look at that old colourful base and roots (Nebari).

Below: How is that for a firm grip?! It has grown into a big small tree! Just look at that flaky colourful old bark and roots. Beauty comes with age!

Below: This Taxus/Yew is with me since ’96 or ’97 and was a gift from my main man: Tony Tickle when he visited our house back then. There was a lot of joking around when I noticed that the tree had a reverse taper underneath the soil line! But you should never look a Giffen horse up the ass (we are Dutch and talk dirty a lot!) and fit it against a beautiful white Hardrock stone from Indonesia that had been lying for years on the gravel floor in my garden! And would you know: it was a perfect match!!! And they have been living together for almost 25 years now! On the bottom left side of the picture, you can see the stone!

Below: Back in its pot in fresh soil and leaning again on its Hardrock buddy!

More will follow soon!

Cheers,

Hans van Meer.