First here is the link to Ryan Neal’s BONSAI MIRAI LIVE website where you can find lots of wonderful Bonsai related video’s! And HERE is the link to the amazing video about Winter Preparation on Ryan Neal’s Bonsai Mirai Live! Thanks Ryan for helping so many Bonsai enthusiasts around the world!
Promo: Early Spring and days are getting longer, the weather is warming – spring is a pivotal time to maximize your bonsai’s development. Use this video to learn what to prioritize and where you should be placing your efforts in the month of April. Join us as Ryan covers different reasons for pruning, whether or not to repot, and how to approach fertilization at this point in the season.
This is what I wrote on YouTube after seeing this amazingly helpful video late yesterday night.
Wow! I have watched this 2-hour video totally captivated in one go until 3 in the morning! It is by far the best educational video around because Ryan has a way of teaching, explaining and showing that makes it all logical, understandable and stick! I have always been a big fan of his work….but his teaching easily equals his artistry. I will post a link on to my blog so that even more students of Bonsai can find their way to this uniquely valuable source of Bonsai information. Thanks, Ryan and all who made this Video possible! I can’t wait for the next edition!
I know of no other video or book that covers all the basics of Spring Fundamentals like this 2-hour video from Ryan, so please do your self and your Bonsai a favour and watch it!
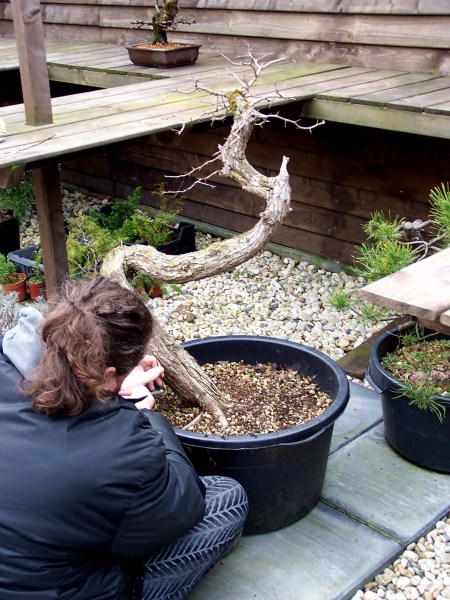
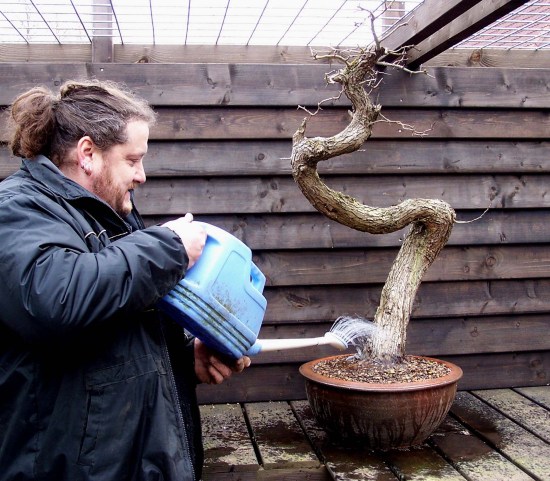
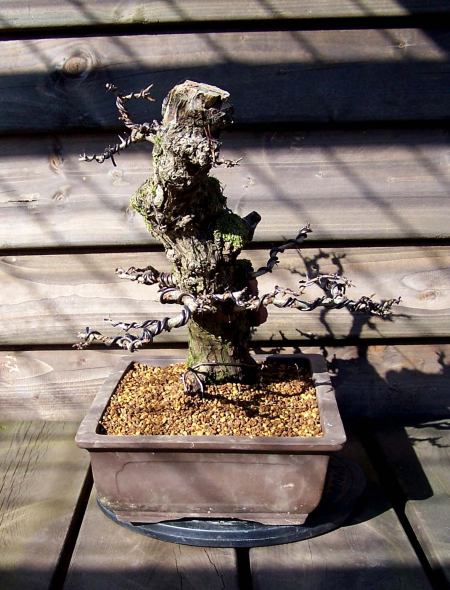
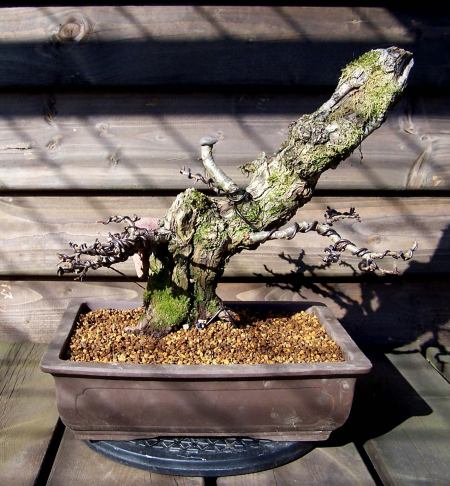
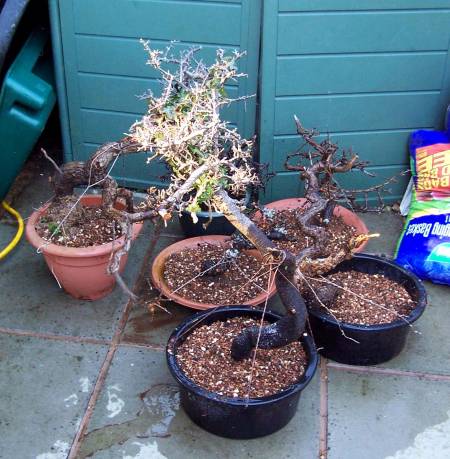
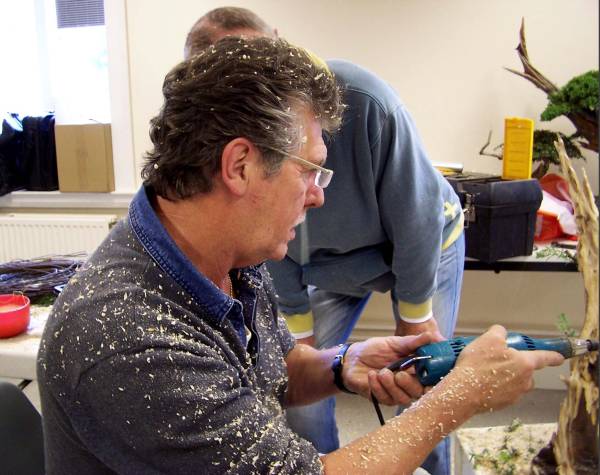
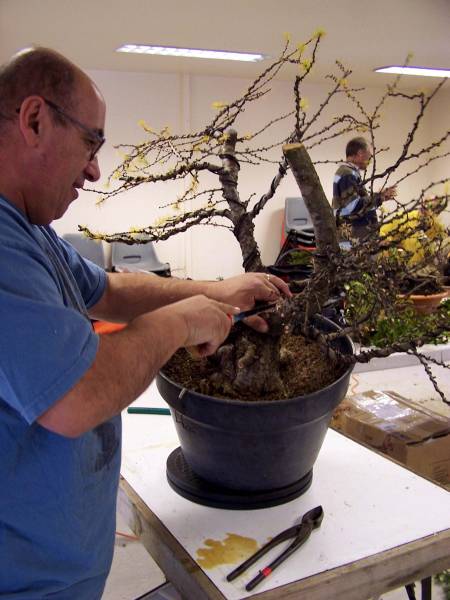
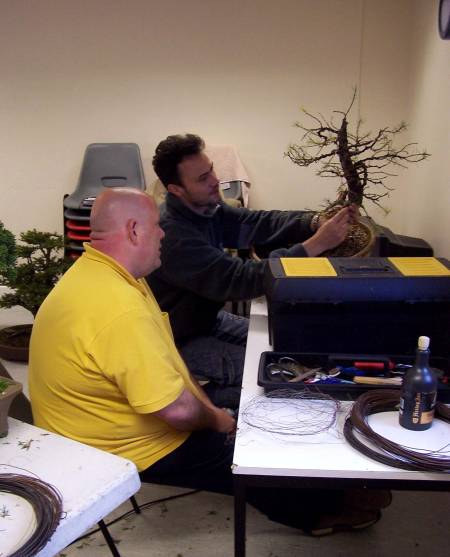
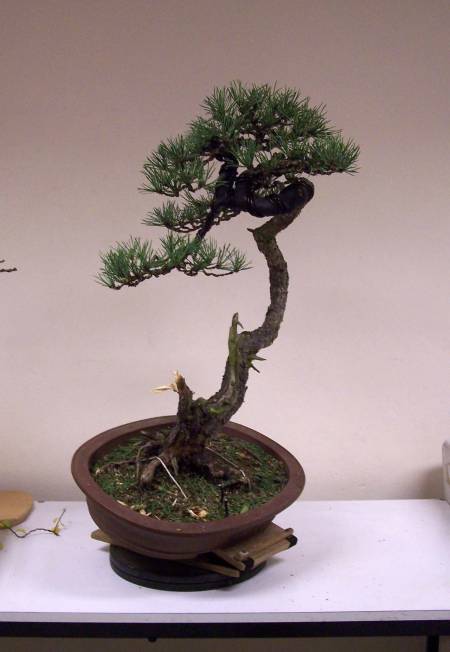
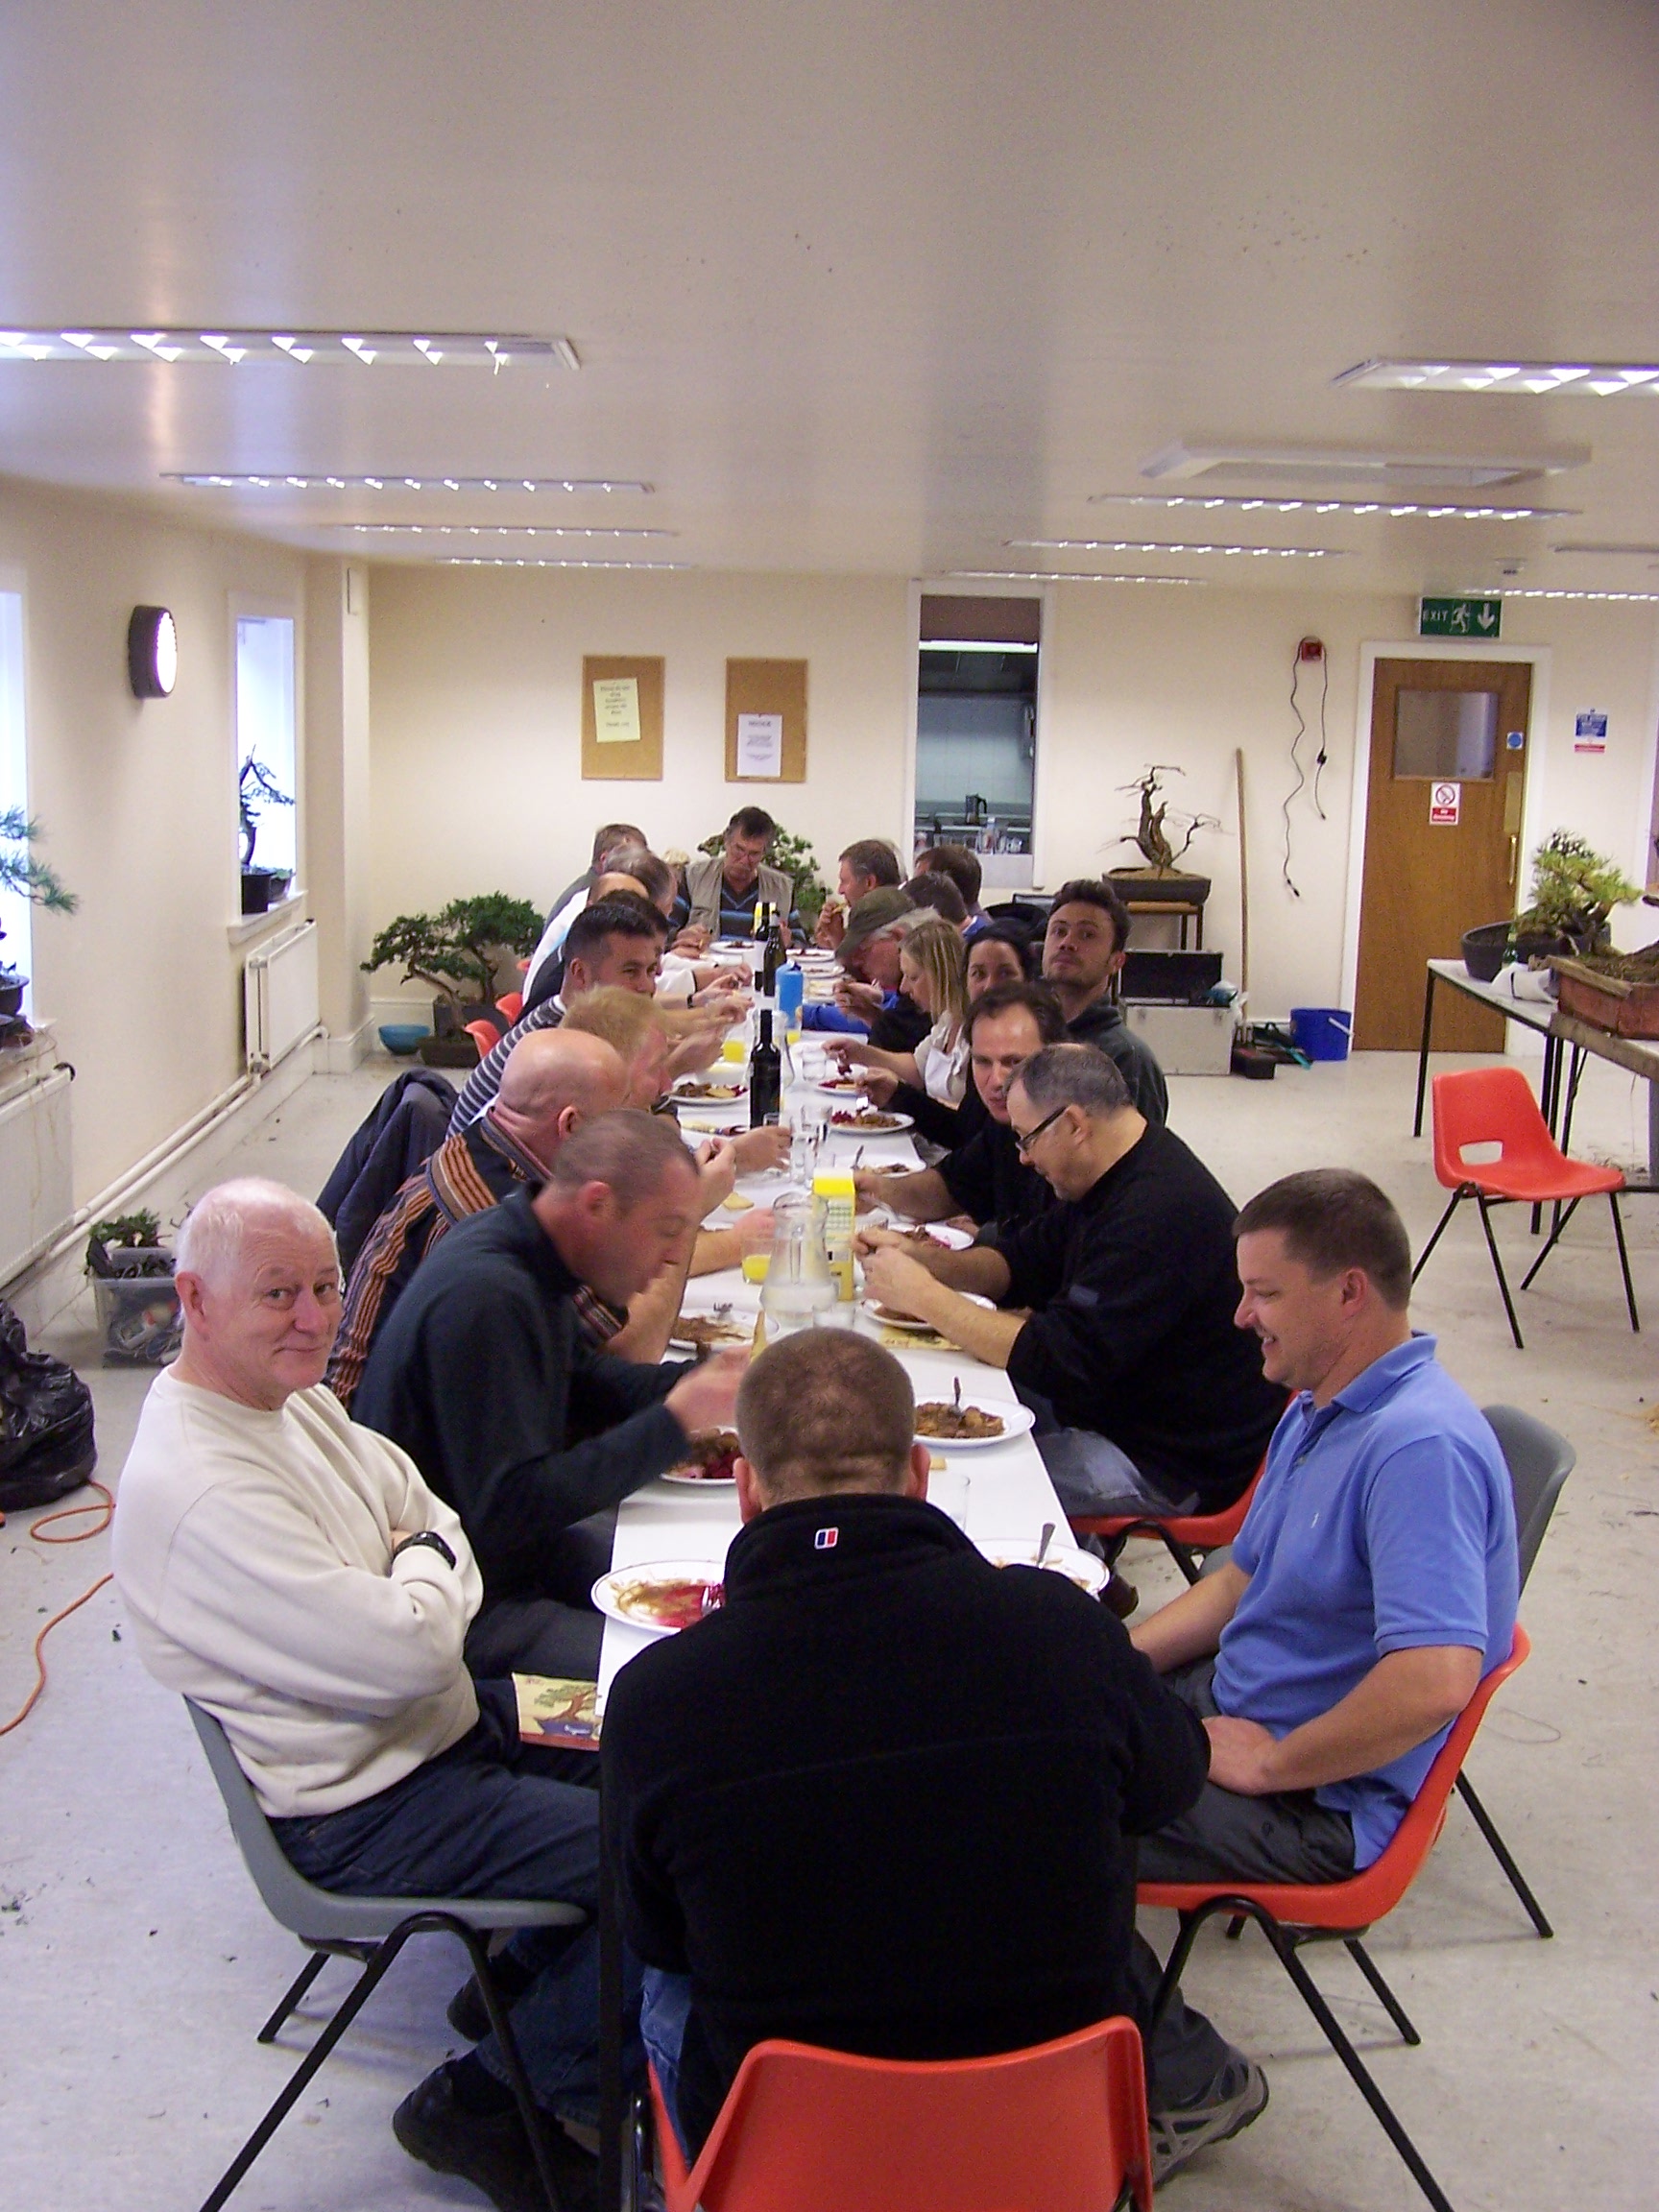
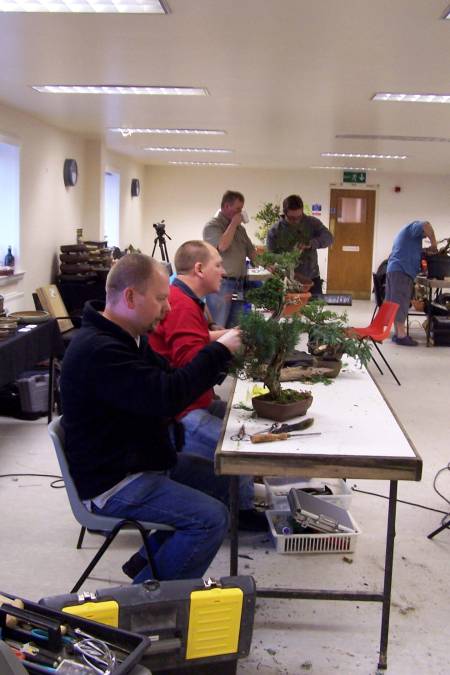
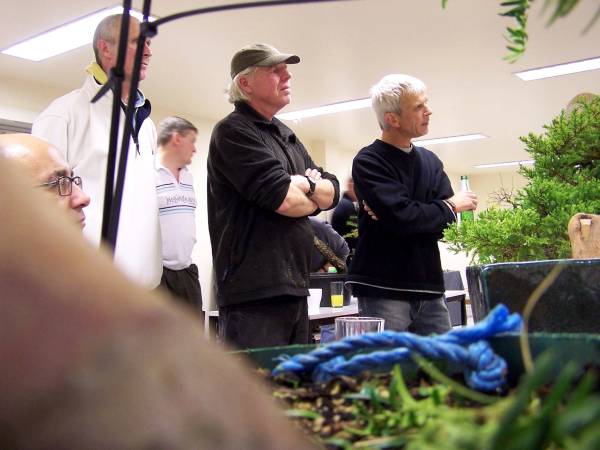
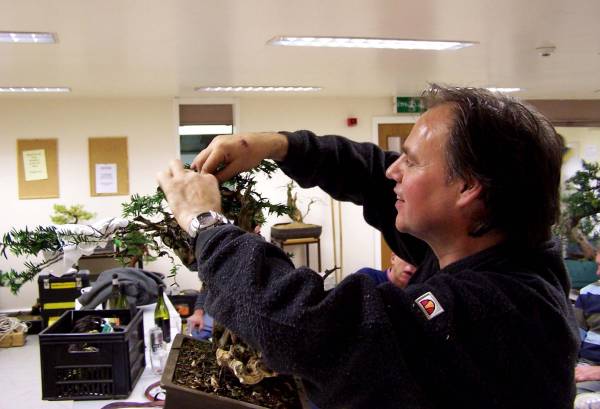
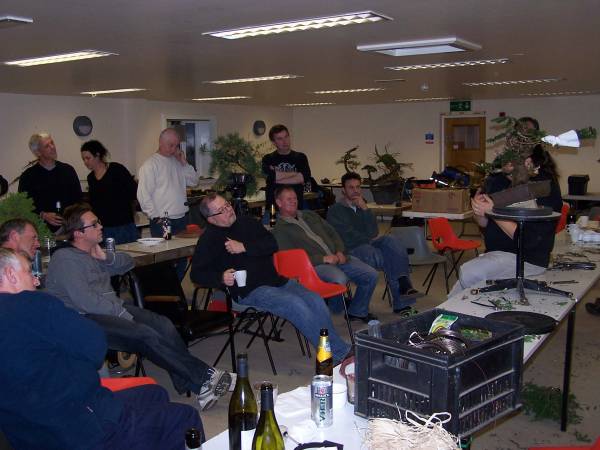
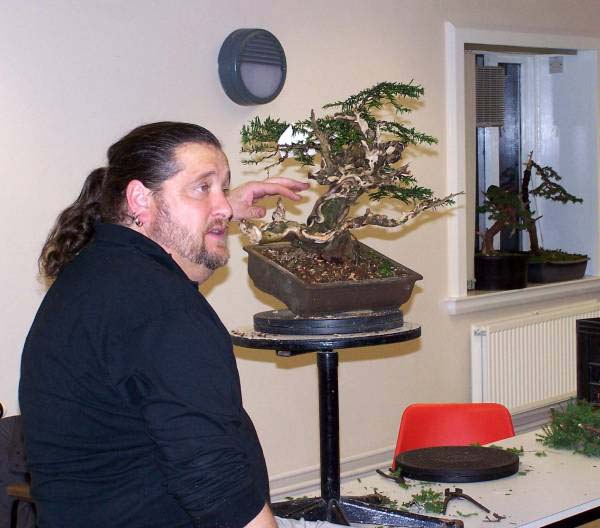
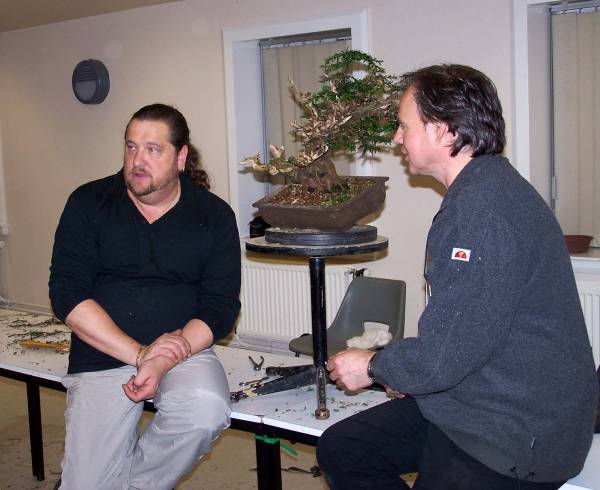
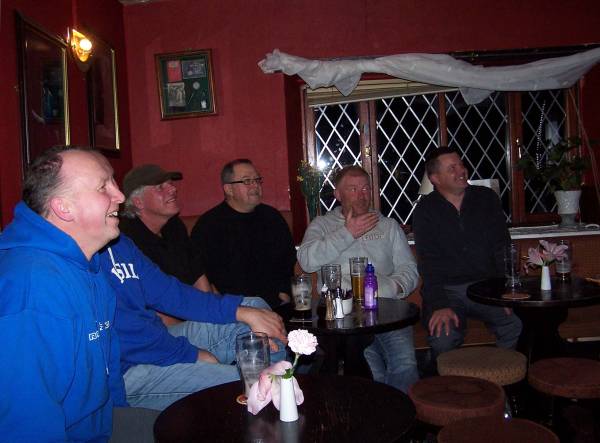
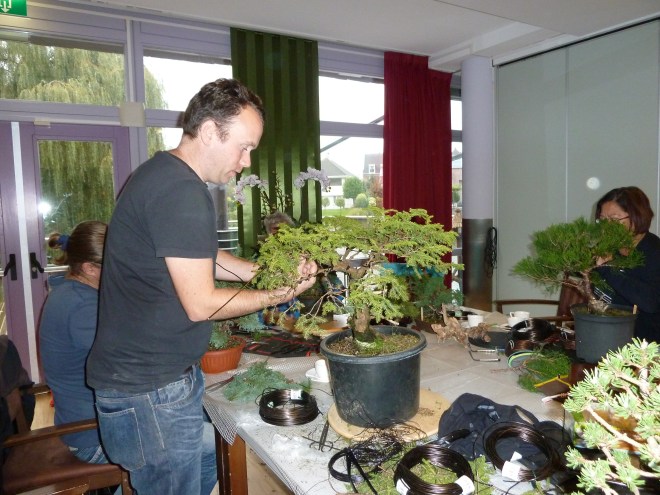
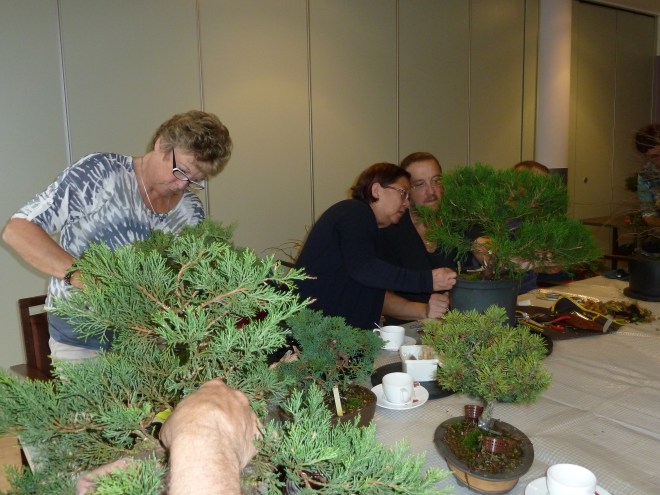
here are some pictures from last Sunday of my Poortugaal workshop group. With more than a dozen student it was hard work to spend enough time with everybody and their trees but I managed it…although I forgot to eat anything during that whole day! Everybody was happy after a long day of Bonsai fun and the next edition is already almost fully booked! 🙂
Thanks to Marijke for taking so good care of us all and for these pictures!
Hallo allemaal,
hier zijn wat foto’s van de afgelopen Zondag Poortugaal workshop groep. Met meer dan een dozijn studenten was het hard werken om iedereen en zijn bomen genoeg tijd en aandacht te geven, maar het is me toch gelukt….al was ik wel de hele dag vergeten om iets te eten! 😉 Iedereen was blij en te vreden na een lange dag Bonsai plezier en de volgende editie zit al bijna weer helemaal vol! 🙂
Bedankt Marijke voor al je hulp en voor deze fotos!
I got home very hungry and tired but in a good way! I love to spread the love for Bonsai and my knowledge, it is immensely fulfilling and uplifting! I can’t wait for the next edition!
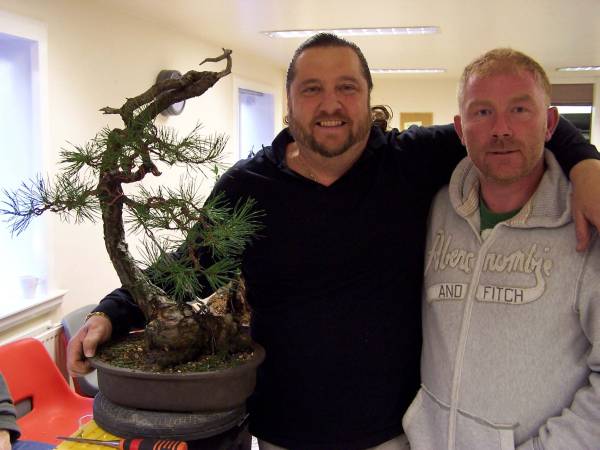
Early next Wednesday morning I am off to the North of Holland to my new Bonsai friend Diederick to help him to style his beautiful big Yamadori Scotts Pine that he recently bought from me. This exciting massive job will be photographed and completely filmed to be posted later on to YouTube. I am looking forward to this and happy to be able to help with the ( in my opinion) promising future of this Pine that I collected some 4 years ago! And I know that enthusiastic Diederick will take good care of him…and that is a good thing to know!!! 🙂
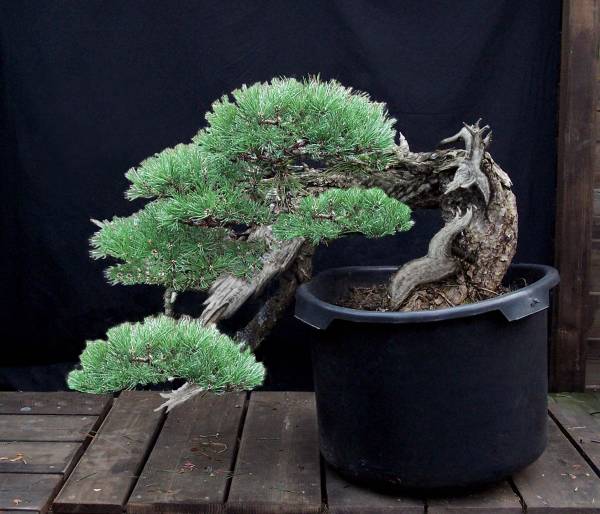
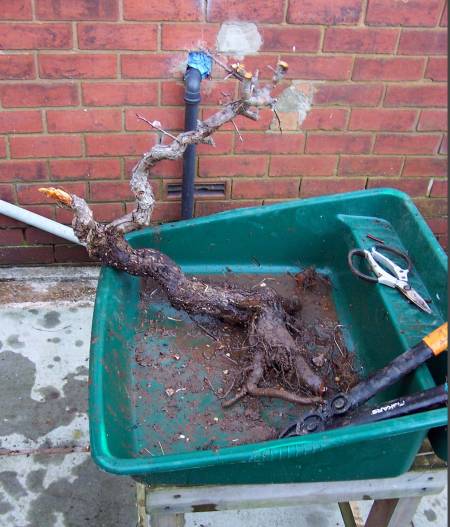
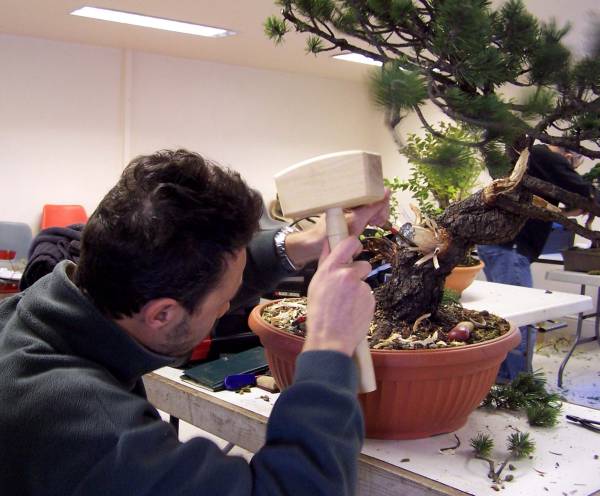
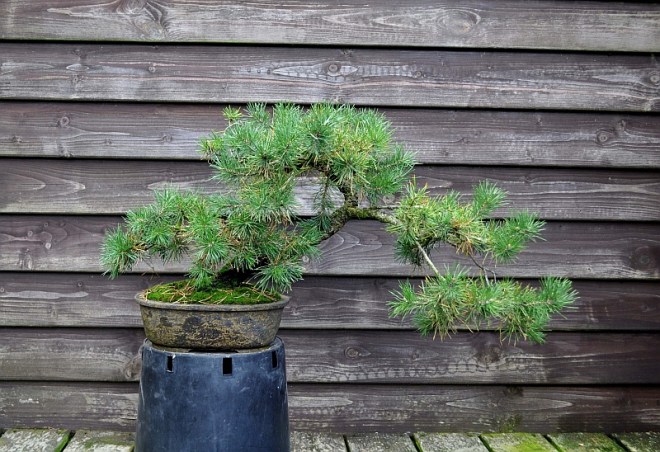
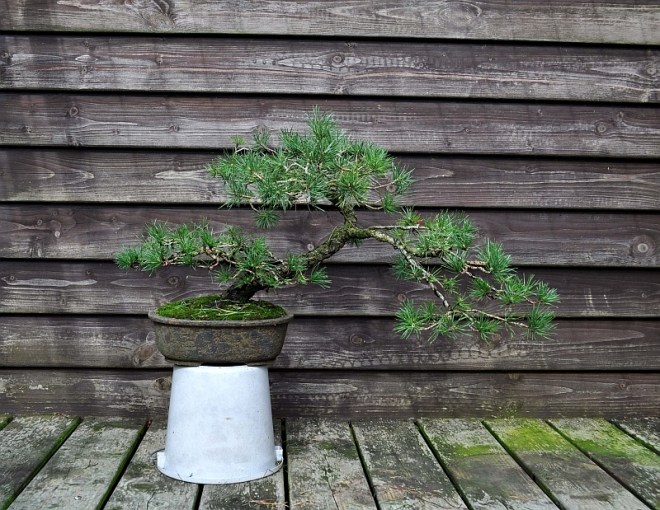
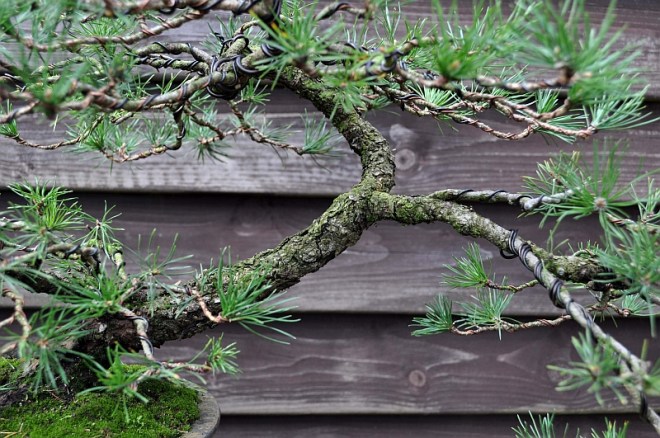
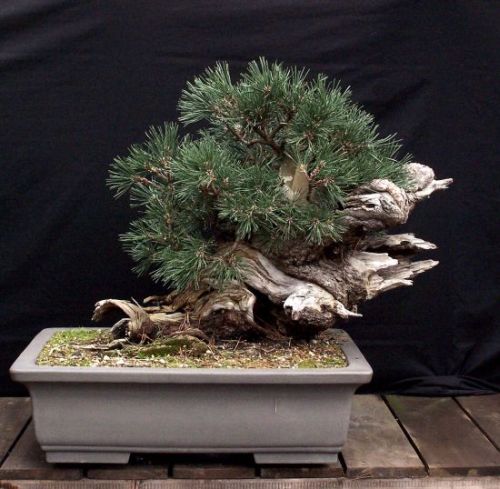
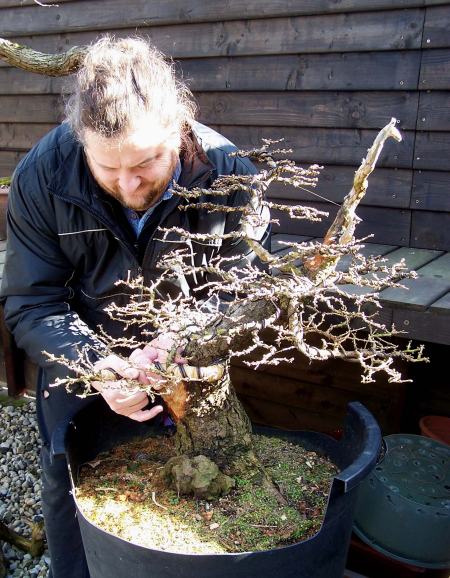
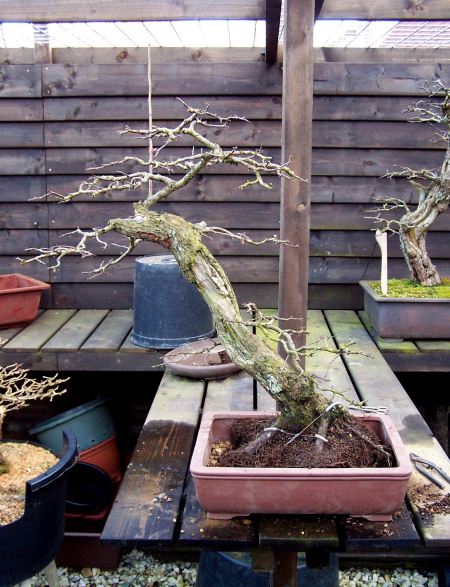
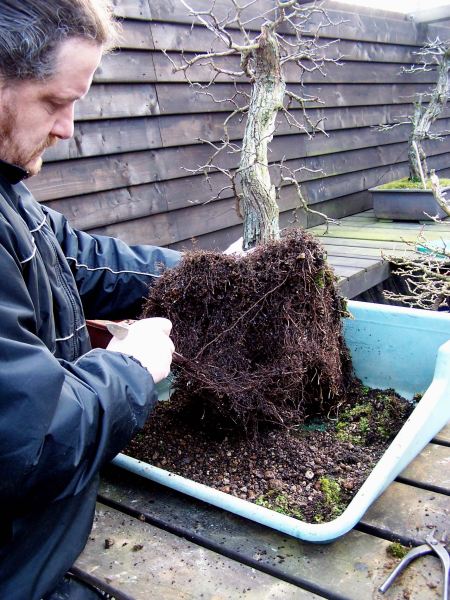
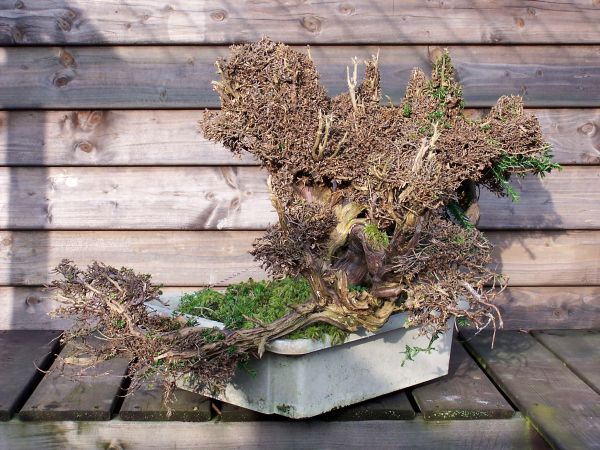
today after weeks of cold weather and biblical rain, we finally had a sunny day! So I graphed my chance to finally do some restyling. The small Pinus sylvestris of this post was during my 2005 vacation in Austria saved from a bulldozer! They were demolishing a large pine forest on the long road to the village where we stayed for the second year running to build a petrol station and trailer parking lots 😦 Underneed this tall and very dense pine forest in the lush vegetation grew tiny but old Pines. They stayed this small because of the lack of sunlight and were the perfect material for Bonsai! We knew this because we made long walks true this part of the forest the year before! So I asked the driver of the bulldozer in my best German if I could collect some of these poor little trees before the lumberjacks would chop down the tall Pines and the bulldozer flattened the small ones! He understood my prayer and said that it was alright as long as we stayed well away from where they were working! So we parked the car some hundred meters in front of that war zone and grabbed our collecting stuff from underneath the holiday luggage en started to surge for worthwhile trees that could be dug up with a reasonable chance to survive. We managed to save 6 or 7 before the machines came too close to being safe! The problem was then that we were there for a week plus an extra day for the travel back home and all this time these poor trees had to survive in plastic bags filled with wet sphagnum moss….this meant that after all only 4 survived that ordeal! This one was one of the lucky ones because I could simply scoop it off from a large boulder, so it had very flat and compact roots and survived without any problems! And now 12 years later it is the star of this little story.
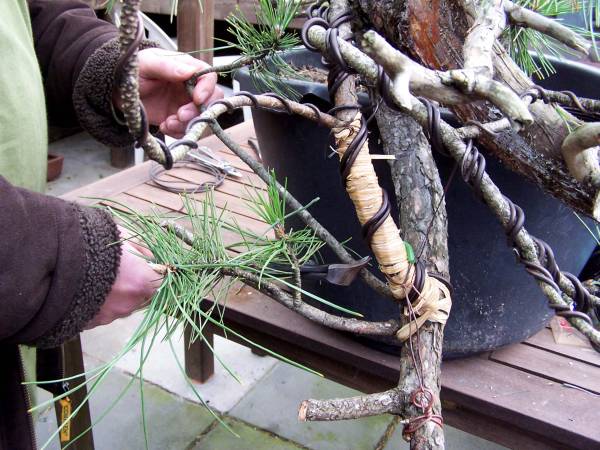
Below: before removing the third-year-old needles. 36cm/14.4Inch. The new top section grew straight to the right and was bent back years ago with the help of in-water-sooked raffia and thick copper wire! Now after several growing seasons, the top section has filled out enough to form a nice top out off!
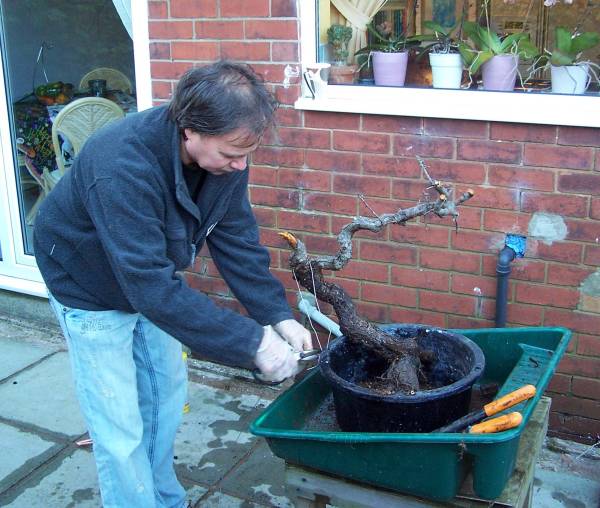
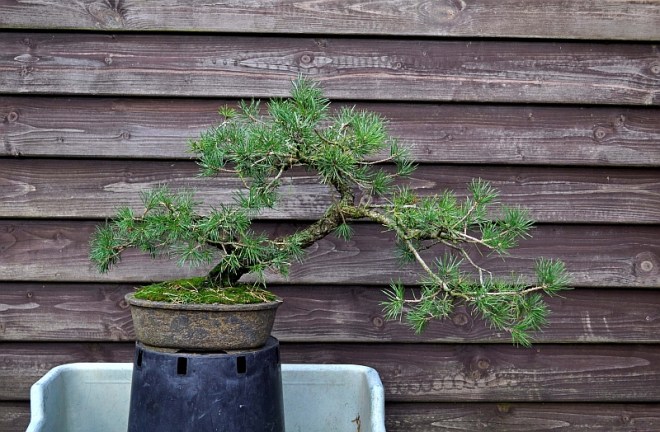
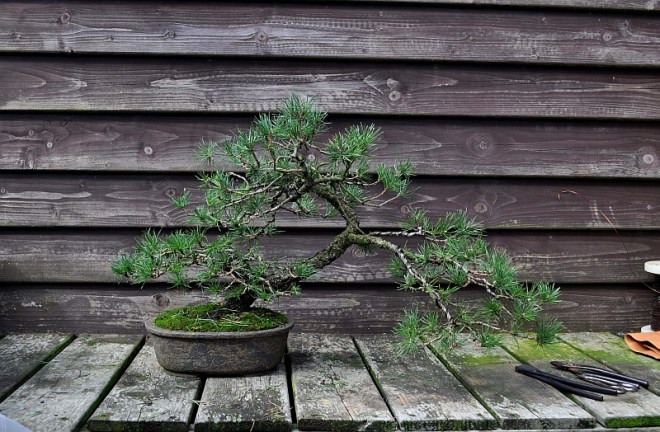
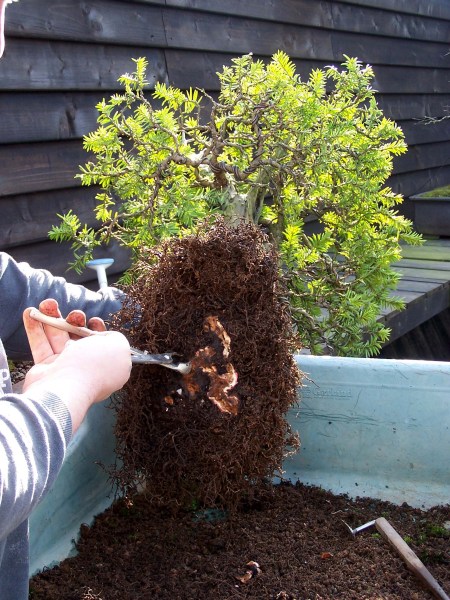
Below: After the old needles were removed. Now it is time to wire all the branches.
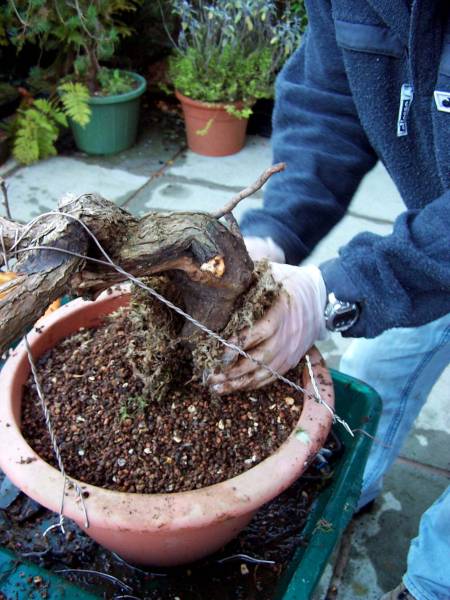
Below: The left branch is wired and more or less bent in position with all needle bundles facing upwards.
Below: the right cascading branch placed more or less in position.
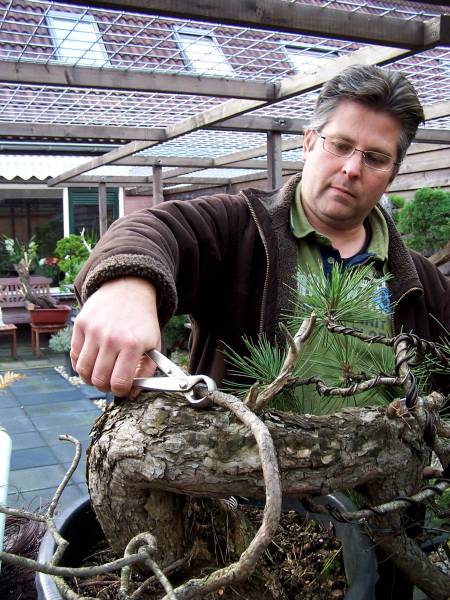
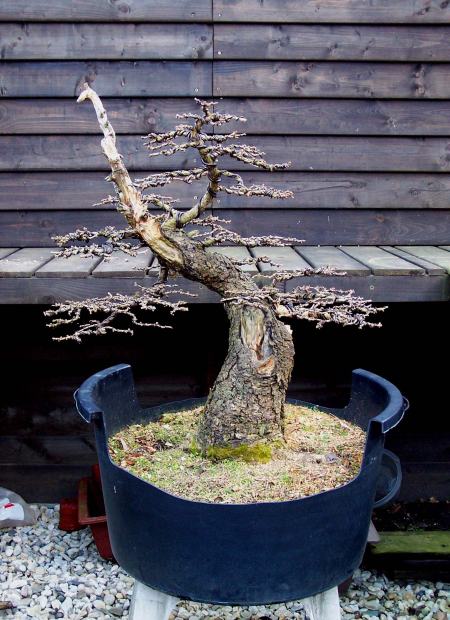
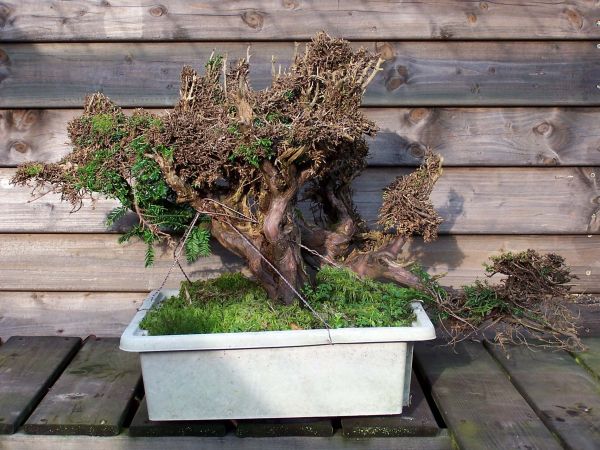
Below: Left part of the top is more or less in position. The new top is raised upward considerably with two 3mm wires!
Below: slowly getting there…I love to solve these natural puzzles with a nice design!
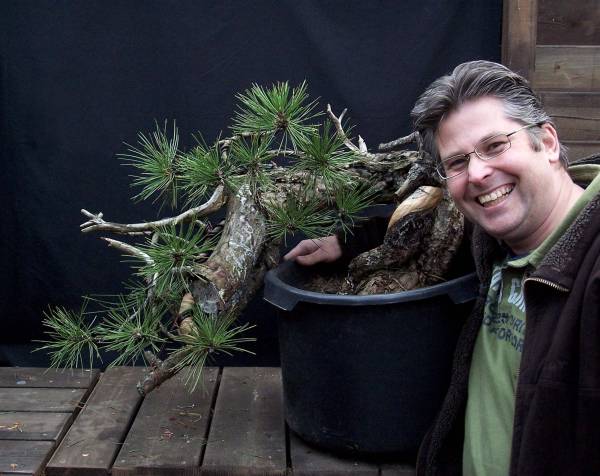
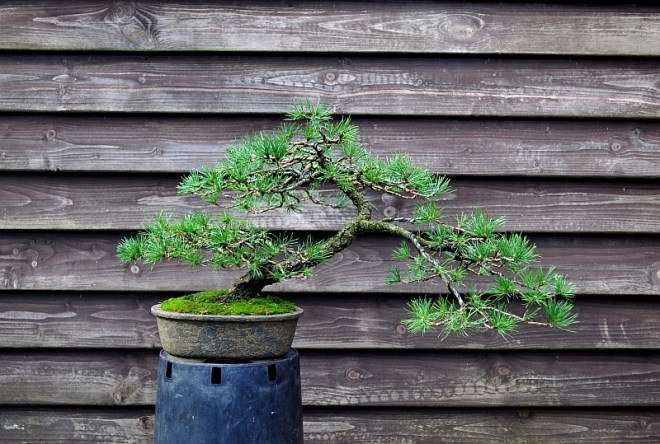
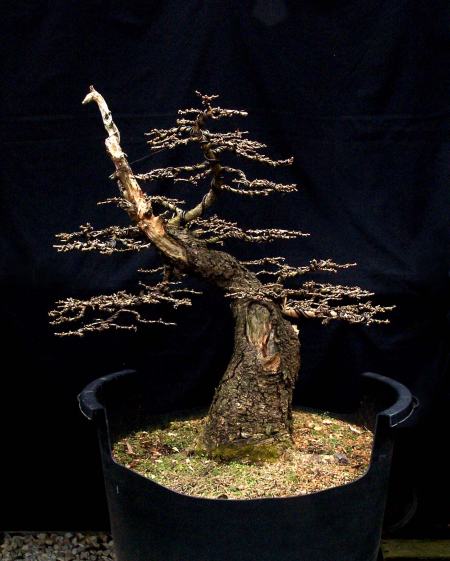
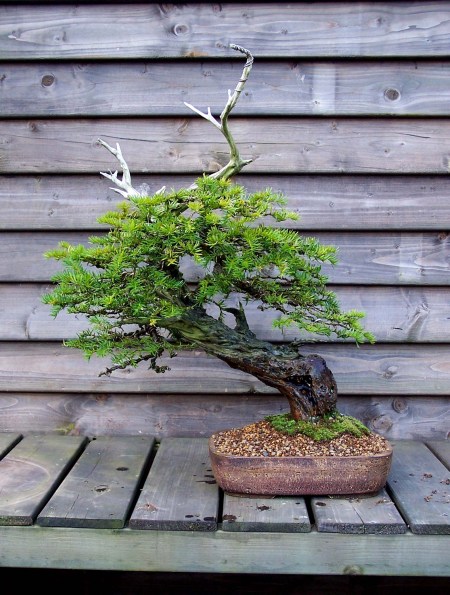
Below: Finished for now! I am happy with this result for now. In a few years’ time when the cascading branch has filled out some more, it will most likely be shortened and made less heavy…but that will be up to its new owner because it is up for sale and probably will go to a good home off one of my students?!
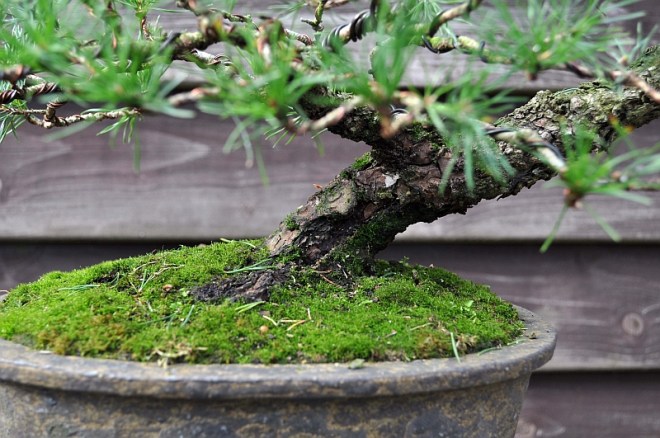
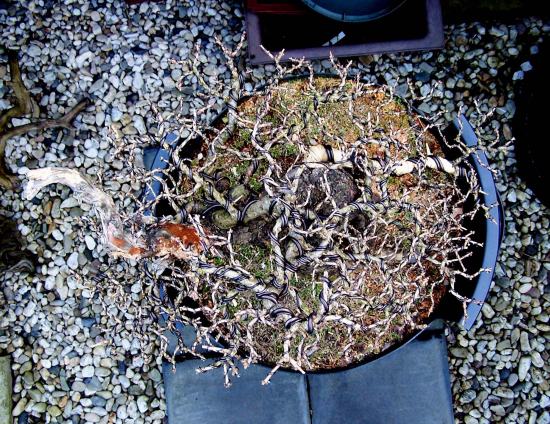
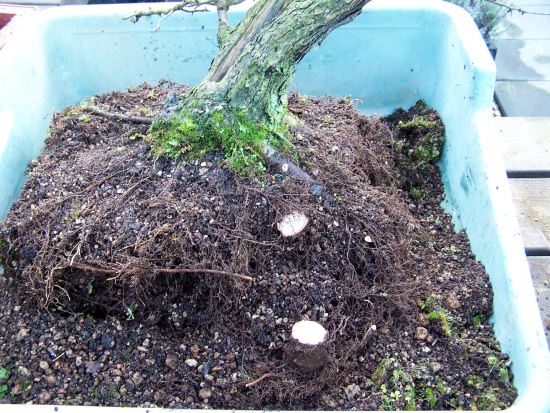
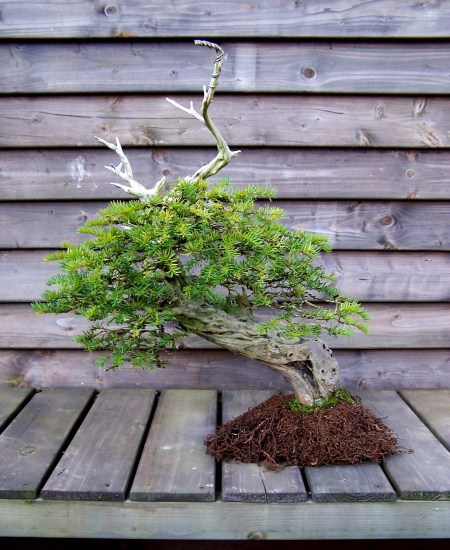
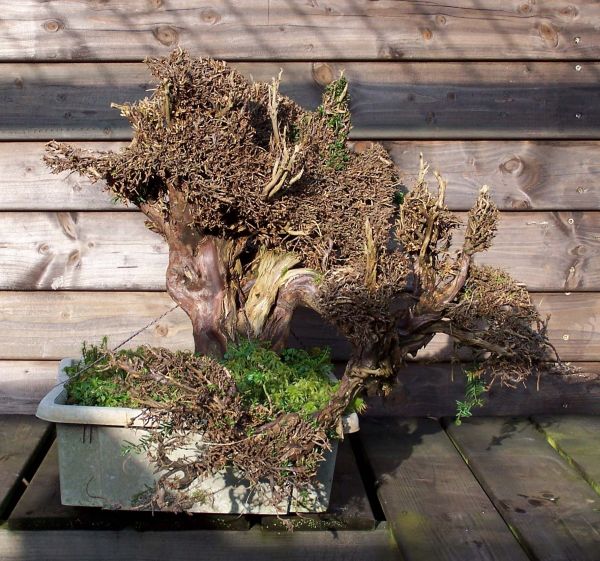
Below: close-up of the nice root base, lovely old bark and natural (still brown-coloured) Shari.
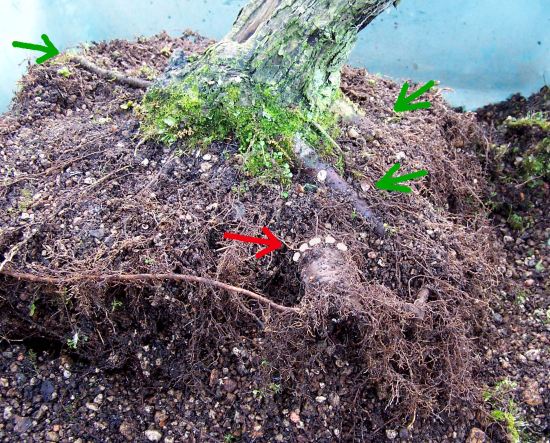
Below: close-up of the nice old and cracked bark.
I hope you enjoyed this little story about the life of a saved little big Bonsai?!
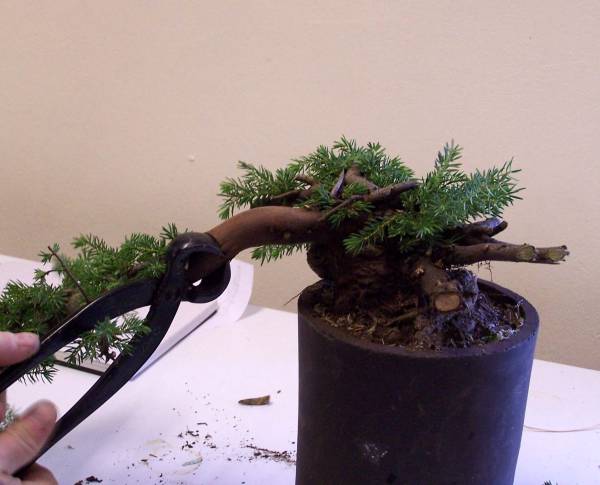
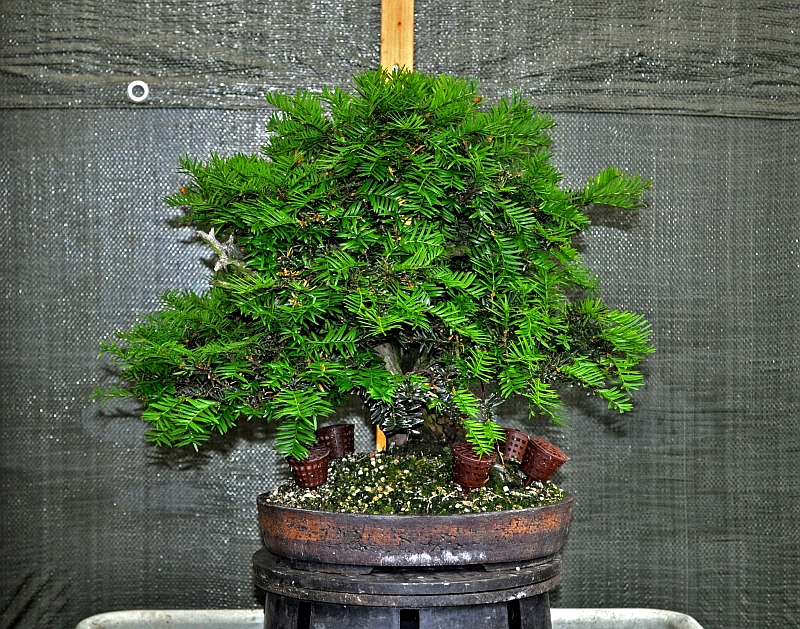
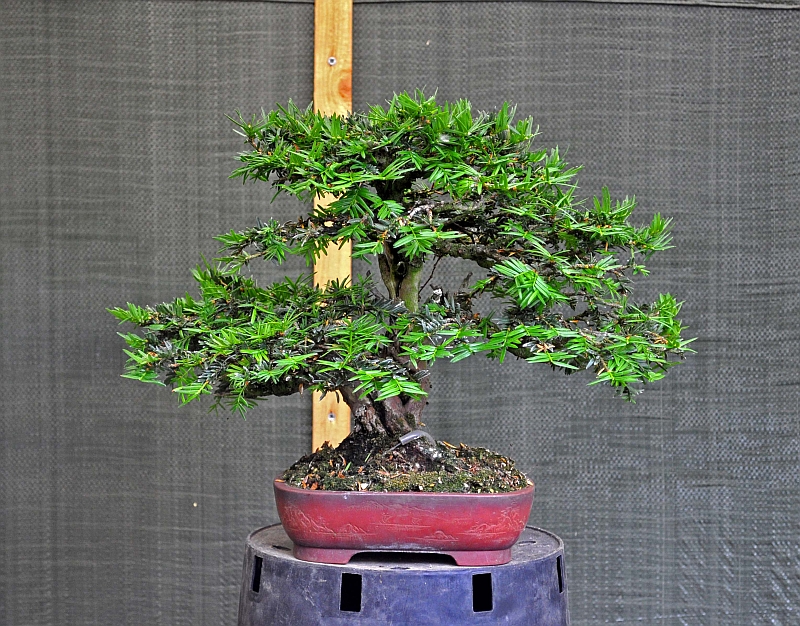
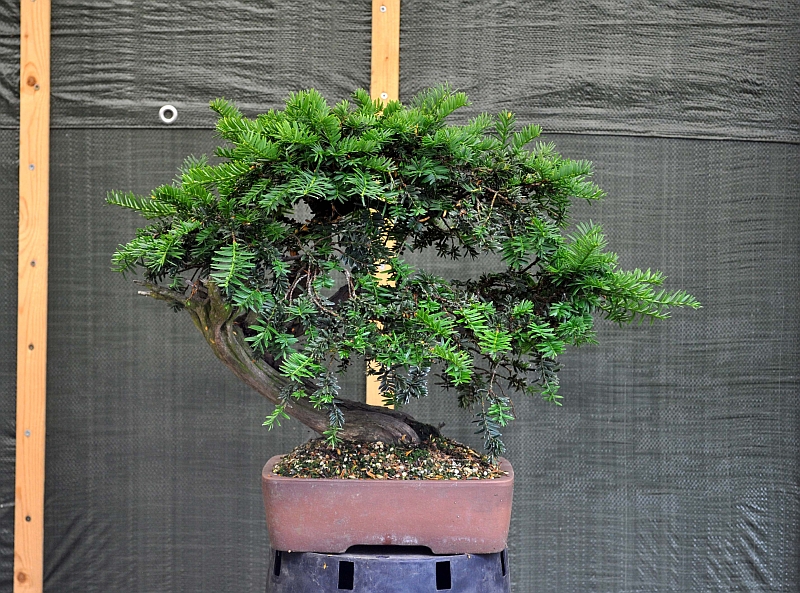
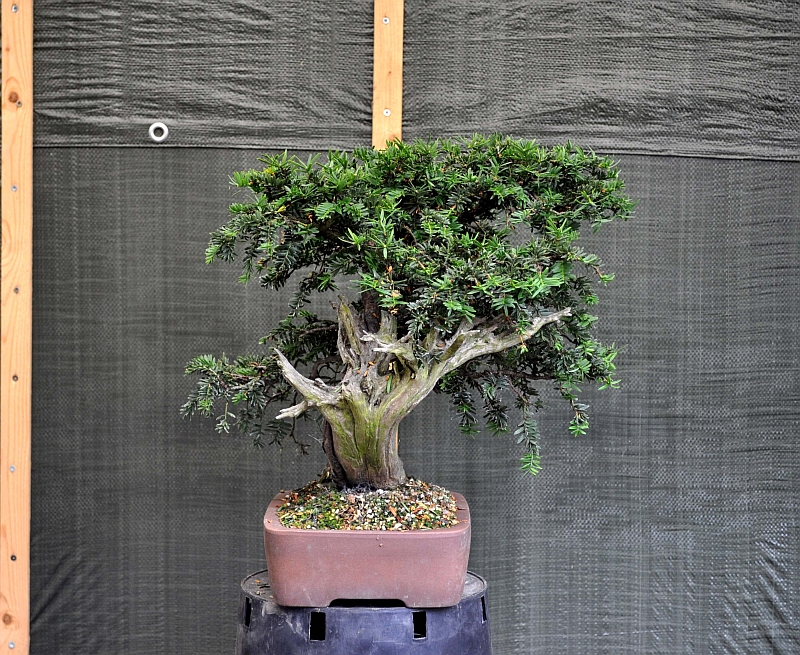
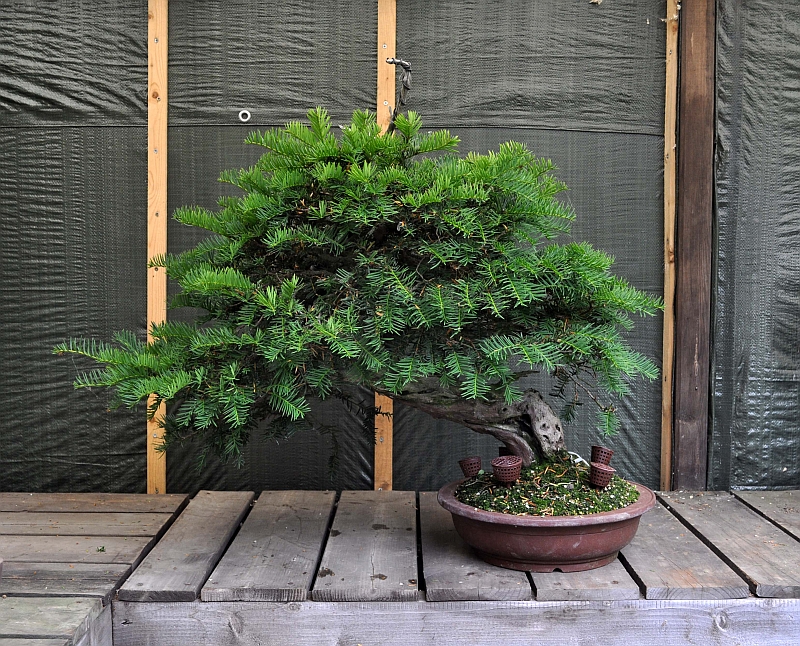
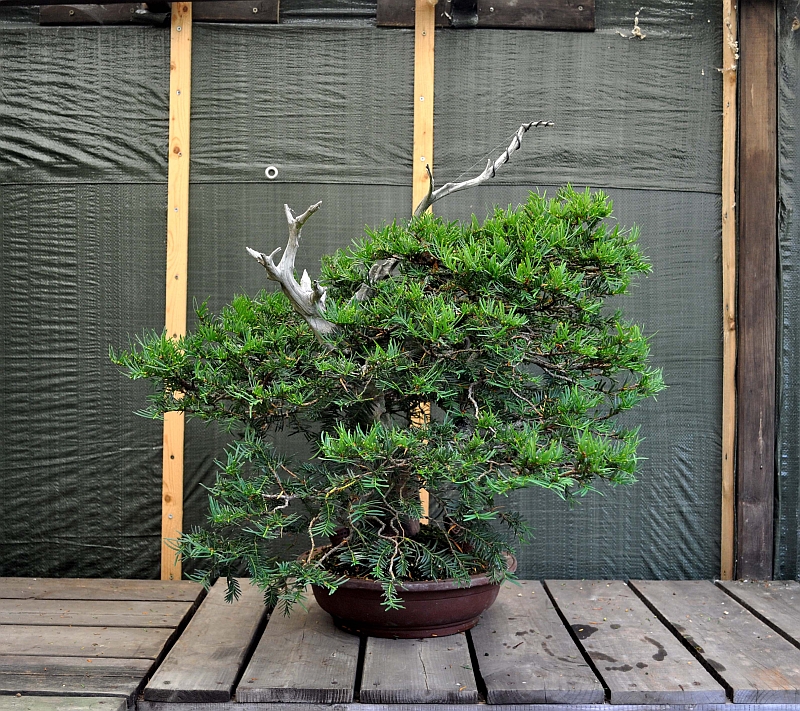
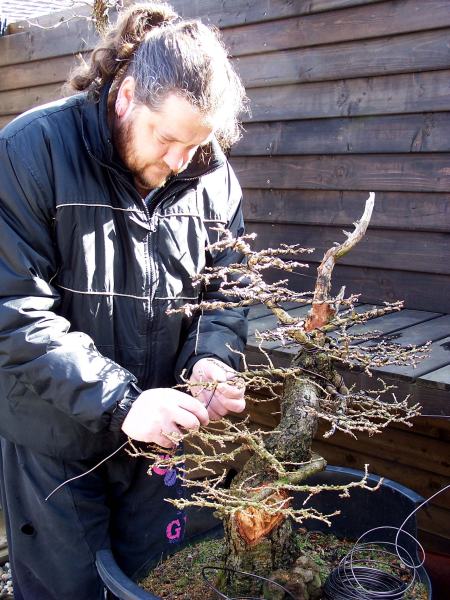
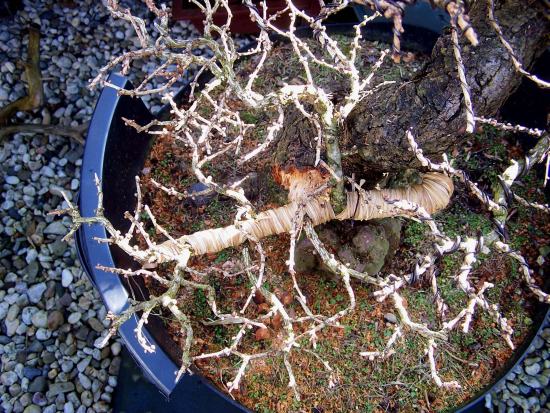
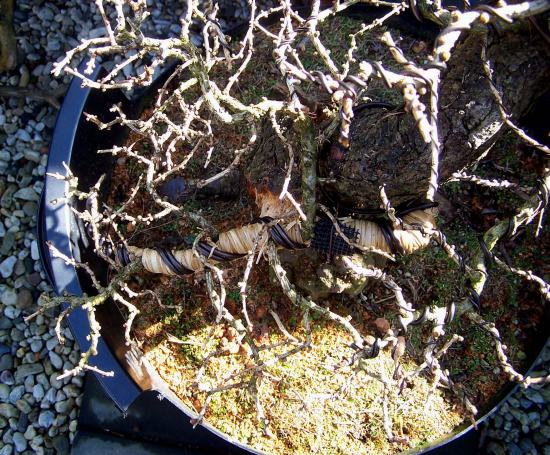
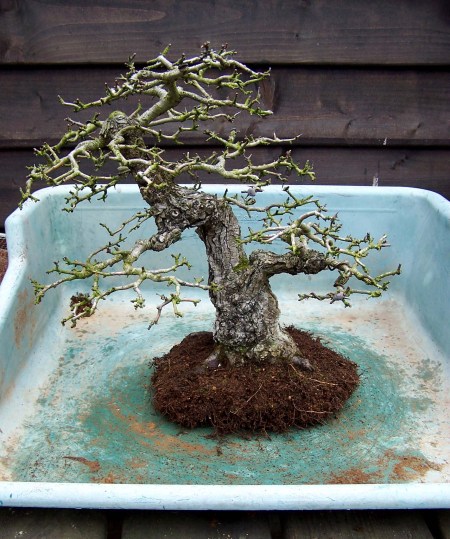
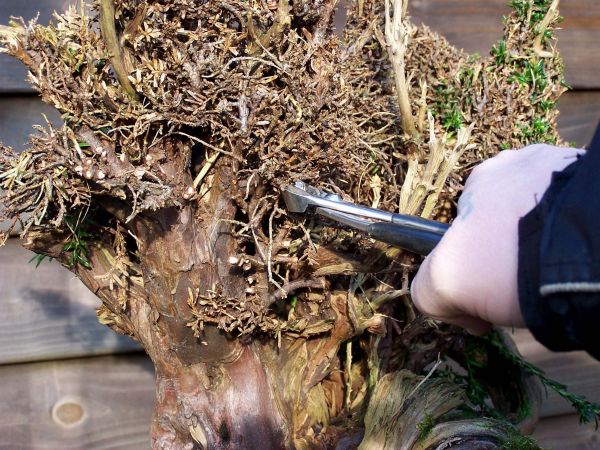
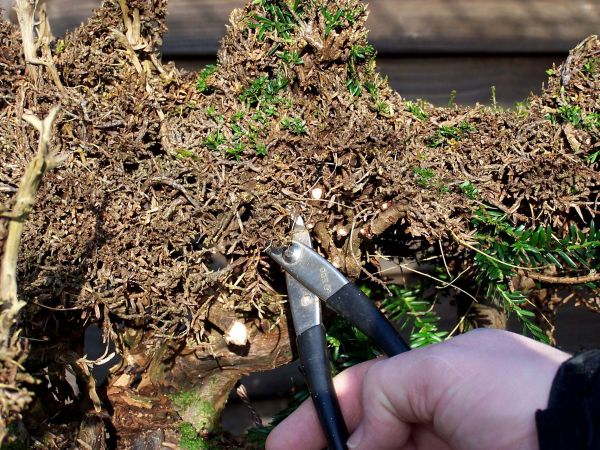
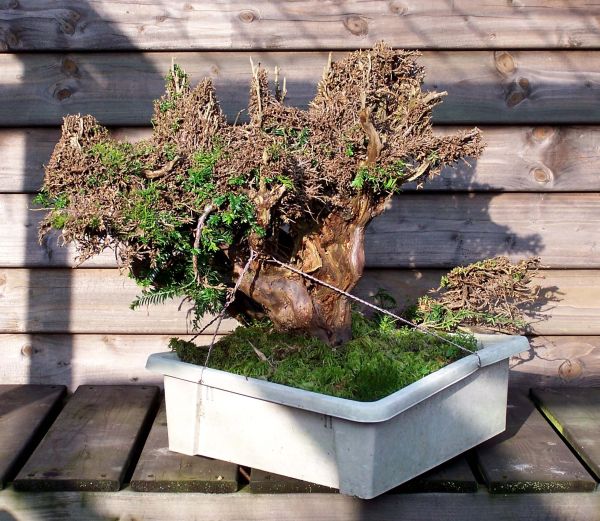
last week it was time to cut back all the strong new growth on all my Yamadori Taxus baccata’s that I collected many, many years ago in Wales with my dear friends Tony Tickle, Terry Foster and Mike Sullivan. Last year they were all heavily fed and allowed to grow freely to build up their strength and that resulted in this year in strong growth all over all of them! So like I mentioned before, last week was the right time to cut back all the new strong growth! How do you know when the right time has arrived? Easy, when the new growth has become harder and stiffer to the touch and has become a darker colour green! Then it is time to cut back into that new growth with very sharp and clean scissors, leaving 3 pairs of needles on a strong shoot and 4 or 5 pairs of the weaker ones! But IMPORTANT: you don’t cut back the new growth on branches that are weak or the ones that you want to thicken or extend!!! But even on branches that need to grow, you should remove some/most of the old needles to promote back budding!!! After all, this is done, you give the trees at least a week time to recover from the stress and to close all the wounds from cutting them! Then you carefully pick/pull off the old needles from last season, making sure that you pull in the direction they grow! This reduces the chance of damage to the often thin branches! After all, if this is done and all goes well then many new strong buds will start to appear at the end of this season, and for sure in the next growing season! The other advantage is that because most branches are now without needles sunlight can reach all areas better and it has become much easier to select and wire them all! All this will result in healthy and strong growth closer to the trunk and main branches and the fuller appearance that we seek in Yew Bonsai and Bonsai in general!
Here are my own Yew Bonsai as an example of how it is done.
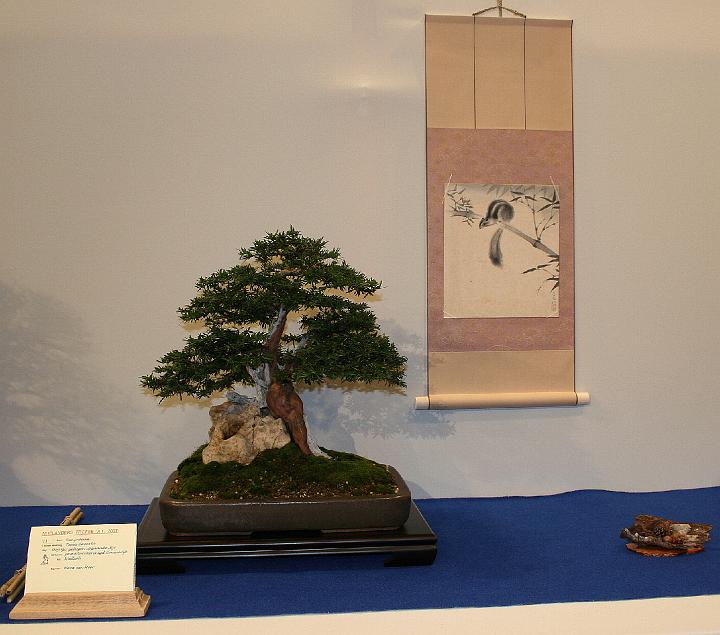
Below: The first one that I like to show you is a Yamadori baccata that was given to me as a present by Tony Tickle when he visited my house almost 20 years ago now! He had collected it himself a few years earlier and I remember him smiling when he gave it to me and said: “let’s see what you can make out of this”?! When I later took it out of its plastic training pot, I understood exactly what he meant when he said this! Underneath the wide base of the tree grew a 15 cm long thick root with only roots at the end….it looked like a lollypop! It took me the better part of 4 years to force the tree to make roots higher and closer to the trunk base so that I could finally shorten that long root and plant the tree in a more normal pot! But during those years I had already started to style the tree and found a solution to make good use of that bulging trunk section and the Jin that emerged from it on the left! And that solution was all the time lying on my garden floor! It was a viewing stone from Indonesia which, when I held them together, fitted like a clove! The small base of the tree fell exactly into a cavity in the stone and the Jin rested on top of it, like a big branch that had died back many years ago….amazing! 🙂 Then in February 2007, the Bonsai made it through the tough pre-selection of the prestigious “Noelanders Trophy” in Heusden/Zolder Belgium. The lollypop Yew had become a Bonsai! 🙂
Height 55 cm/22 Inch. Table, scroll and Shikishi Japan.
Below: The same tree 10 years later! Healthy…but in need of a haircut and complete wiring!
Below: Side view
Below: After shortening all the healthy shoots! Next, on the agenda is pinching most of the old needles and then rewiring the whole tree and cleaning the live section and the deadwood section and applying lime sulphur.
Below: Side view. Out of model….but he looks healthy enough!
Below: The second one that I like to show was in 1999 given to me (again) as a gift from Tony Tickle when we said ower goodbyes at the end of the historic second “Ginkgo Awards” in Belgium. This next year’s picture was taken in my garden just after I repotted it. The left arrow points at the large Jin that you can see on the left in the second picture below. The bottom arrow points at the large branch that I removed completely so that I would be able to create a more compact middle-size Bonsai (Chuhin)! The large Jin/Shari section that you can see in the middle of the trunk in that same second picture is all that remains of this large branch!
Below: September 2007. The same tree, but now as a Bonsai! It was earlier also shown in one of the “Noelanders trophies” together with another small size Yew that I will show you next! Height: 35 cm/14 Inch. Pot: Klika & Kuratkova Table: CHR furniture (B)
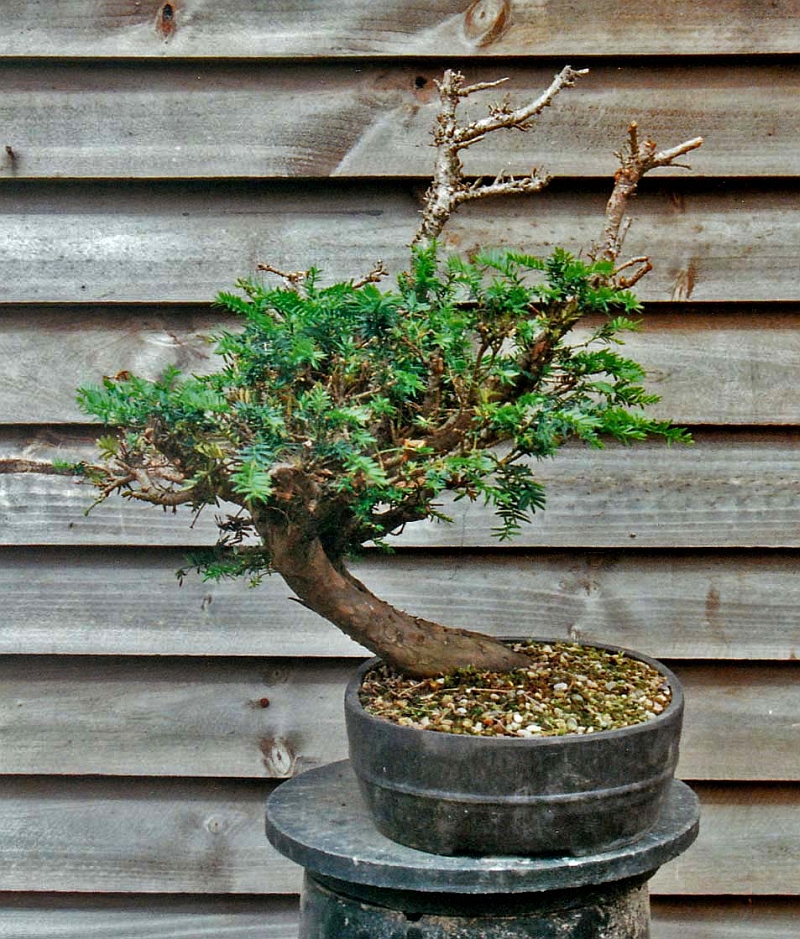
Below: The same tree before cutting the new shoots. The right bottom branch has lost some thicker branches on the backside that need to be replaced and filled with new young branches in the next seasons! The ones growing from there are left alone to thicken and extend, so no cutting or pinching! The rest of the tree will be treated as explained before!
Below: Right side view of the tree. Note how the top leans towards the front…like in most of my Bonsai designs!
Below: After cutting the new shoots. The length of the branches is like in the first tree too long and the desired silhouette is lost! But after the new buds that will appear have opened and grown enough, well then all these too-long branches will be cut back so that the proper silhouette will return!
Below: 1999. A young and thinner me and my dear old friend Tony Tickle on a collecting trip in Wales…good times! 🙂
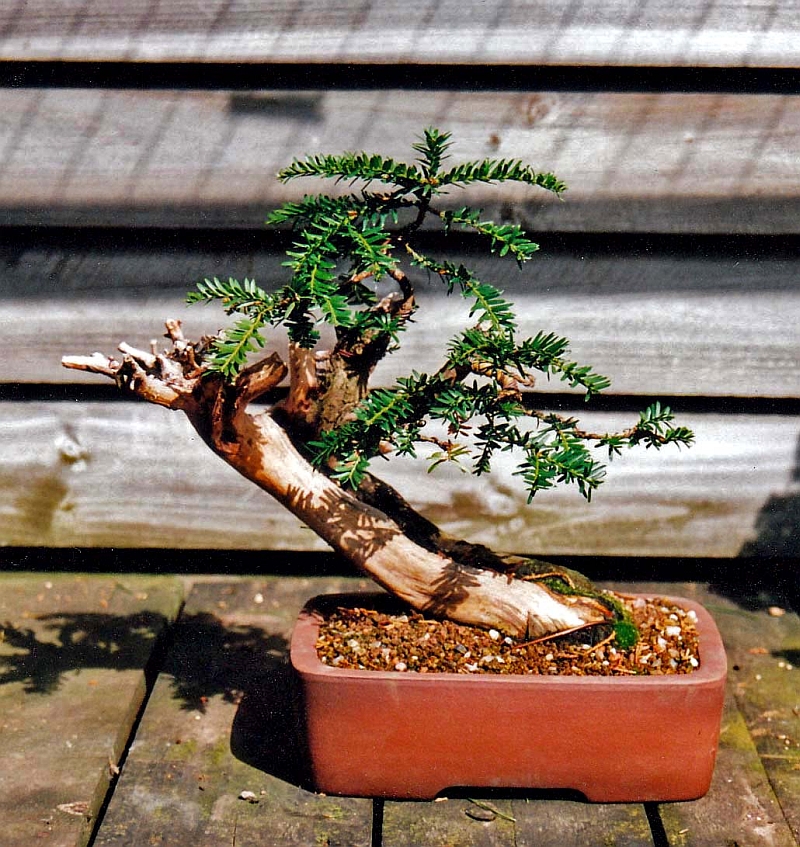
Below: The third example. Here is one that I collected myself during one of those exciting trips late last century with Tony, Terry and friends!
Below: And this is how it looked in September 2007. In a custom-made pot by old friend Brian Allbright (UK) and another table custom-made by CHR furniture (B). Height 28 cm/11.2 Inch. This Bonsai was shown together with the one before this in the Noelanders trophy.
Below: And this is how it looked before pruning began. It has outgrown its beautiful Tokename pot, where it has been growing for almost a decade! So I have to start looking for a new beautiful and more spacious one!
Below: Right side view.
Below: After cutting the new shoots. It is obvious that the left side of the top needs to be wired and repositioned!
Below: In this left-side shot it is even more obvious that the left side of that top needs to be filled up by lowering the branch above that big gap! This open space arose when a major branch died back!
Below: Collecting one of the Yews from this post!
Below: The fourth example. This one was collected by myself during one of the collecting trips I made with Tony and friends during the late nineties in Wales. As soon as I got home it was planted in a hard plastic Bonsai container and then left alone to recover!
Below: After the first signs of recovery I removed all the useless growth of those long branches so that all the energy would go to the foliage that matters! And then the tree was left alone again to get stronger for its first real styling!
Below: The tree consists of left and right sections with a strip of deadwood running in between from top to bottom. A year later, when the tree was looking very vigorous, I decided that it was safe to perform a drastic pruning! So I cut off all the foliage and branches from the left section of the tree, leaving the stumps so that they could be turned into Jins. And I removed all the bark from that left section, creating a nice contrast between the live (brown) section and the deadwood (white) section! The branches that were useful for my design were wired and then the tree was left alone (as long as it needed) to recover from it all!
Below: A year later it was doing just fine so I planted it in a proper Bonsai pot.
Below: And this is how that same Bonsai looked in September 2007. That same year it was proudly exhibited in the fifth and last edition of the now legendaries “Ginkgo Awards” in Belgium. I like the contrast of colours in this tree and the circular design! Almost like yin yang…live and dead! But what I like most is that I created a design with an otherwise big no-no….the right bottom branch that grows directly out of the inside of that curve! And still, it works and makes you look twice because it is so unconventional! And that was just what I hoped to achieve with this design!
Below: The tree before shortening most of the new growth. And after that, it is time to rewire and restyle the whole tree again!
Below: Left side view showing the deadwood/Shari and Jins.
Below: After cutting most of the new shoots.
Below: It is thinned out a lot! Now it is time to remove most of the older needles from the strong branches so that light can reach in and new buds can appear!
Below: The fifth and last example. This Yew was actually the first tree that I ever collected and yes it was Tony Tickle again who made that possible for me! I met Tony for the first time in 1997 at the first-ever “Ginkgo Bonsai show” in Belgium and we have been great friends ever since and had some amazing Bonsai adventures together since then! It was during that first meeting that Tony invited me to come to collect with him in the UK! I could not believe my luck and sure enough in early 1998, I drove all the way to the north of England! And the next day, the first tree I ever collected, was the Yew that I am next going to show and discuss!
Below: Happy me with my first collected Yamadori ever!!! This Yew marks an all-important turning point in my Bonsai life….sins then on I decided that this was what I wanted to do Bonsai! And since then I have nearly always worked exclusively on raw unstyled material that I often found and collected myself! I wanted to have all the excitement from the beginning to the end…I choose the long way…but my way! And this Yew started that all of, so you can imagine that it holds a warm spot in my heart! 🙂
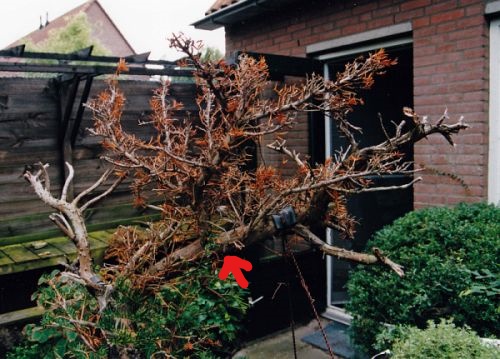
Below: In my garden, it lost the whole top section, but luckily the bottom foliage survived!
Below: A not-so-good picture made inside my house in 2003. As you can see that half of the dead top section was removed right up to the red arrow in the above picture, and only a small Jin remains! The large upwards-going Jin you see in the below picture is the dead upwards-going branch that starts just above that red arrow in the above picture!
Below: September 2007. Just rewired, repositioned, live wood cleaned and Jins and Shari’s treated with lime sulphur. Table: CHR furniture (B)
Below: Early 2008 in its present pot. From here on it was all keeping it very happy, and healthy with the main focus on fuller and better branch structure! Growing, cutting, pinching and wiring etc. etc…..ect.😉
Below: Just look at how full the tree is today! Now there is more than enough foliage to work with and to bring the Bonsai further and closer to the end image that I had in mind all those years ago when I gave it its first styling! This pot is by now a bit too small, but is in the style that I would like to use when the Bonsai is finally ready to show…so the search is on! And the tree needs to be tilted more to the right when it is repotted back in this or in its new pot!
Below: After cutting and pinching. The copper wire in the top of that Jin is there to prevent it from accidentally breaking when I move it around! My garden is covered with galvanized iron gauze (normally used in concrete walls), so a mistake is easily made when lifting up a tree too high!
Below: Left side view of the tree. Again notice how far my Bonsai lean forwards! This, in my mind, creates a lot of depth and creates a feeling as if the tree leans over you. If I learned one thing from looking at hundreds of Japanese Bonsai in books and in real life then it is this principle! Depth creates a sense of reality…even in pictures!
In between writing this, I spent a lot of fun time with the all-important task of the branch and new growth selection and branch shortening or removing on all the Yews! And although it is a sign of good health, a lot of growth of small and larger branches is useless or unwanted. It blocks out sunlight for the new growth and the branches that are important in your design! So it should be removed or shortened! Then there is branch shortening to reduce the overall size and mass of your design! And last but not least, branch shortening to create better branch structure and ramifications! By cutting back a larger branch right up to where there is a strong shoot or even bud, you will create shorter and better ramification branches and better taper! This should be one of the main objectives of Bonsai and is in modern Bonsai often neglected! You should not be only proud of the outside image of your Bonsai, but also of your branch structure!!! And it is very important for the well-being of your Bonsai! For example, the first Bonsai from this post was after this (long) branch selection round reduced by some 20% !! After all the here discussed Bonsai have gone through this same procedure, they will all be wired, styled, cleaned and treated with Lime sulphur. After that, I will make new pictures and show them to you! I hope you enjoyed this post and found it useful and interesting?!
Now I will start to work again on my new Bonsai video that is almost finished…it only needs music underneath it! That might sound easy to some…but for a novice like me, it all is a big difficult puzzle?! 🙂 It is Part I of the story of “the Elephant” my big Yamadori Larch. So watch this space!
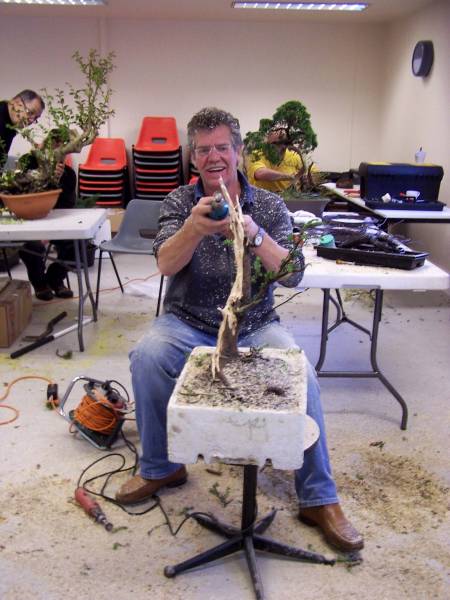
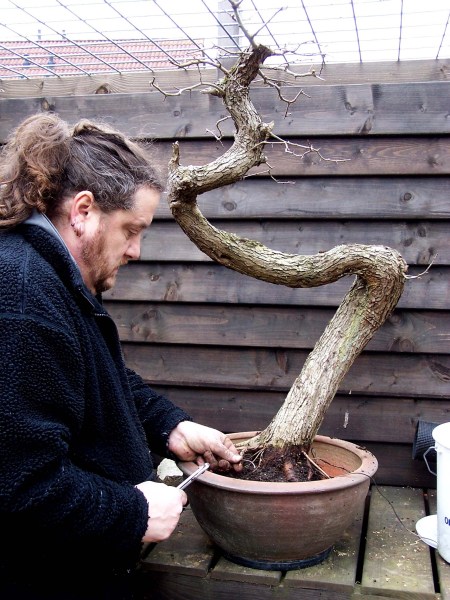
it might have taken me the better part of 2 days, but today I finished the styling of the foliage on “THE SWAN”. The tree was placed just too high for me, to comfortably wire it and I am not able to lift a big tree like this anymore, with the state my back is in at this moment. I might only just start working on Shohin in the future. NOT! 🙂 I had to make some big decisions and a lot of branches had to be removed and replaced by the branches I had allowed to grow especially for this purpose. Just how this all was done, you can read on my website in a few days! Together with the story of the first styling of “THE SWAN”!
Well, here she is, the new “SWAN”! I am really pleased with the result so far, it is going a lot faster than I had hoped for. The whole tree has so much character and a nice flow to it, the vibrant green foliage leaning on and embracing the massive hollow trunk, with all it’s deadwood, clinging on to live on this weather battered fallen over high mountain pine. It is almost a living JING/JANG symbol I am really Hope you like it so far?
Above pictures: The secondary branch structure is getting better on all the branches, but the straight line of the first branch on the right is bothering me. This is the only older branch on this tree and it needs a bit off help to get some gentle movement. This way it looks less boring and will fit the rest of the branch structure of this tree. Straight lines must be avoided at all times in a successful design, the stick out like a sore thumb! So I wrapped it in water soaked raffia and bent some movement in it.
Above: I know! I’m a tree hugger!
Above pictures: It was hard to place my hands on this branch to bend it, but you can see I managed to great a gentle curve in that straight and thick branch in the end! Now it fits the rest of my branch structure. In Bonsai you have to pay attention to every little detail, even if you think no one will knottiest what you are doing. A lot of small mistakeswill make a big one!
Above: Bird’s eye view of the branch structure.
Above; I made this picture with a backdrop to make the branches stand more out. I am really happy how the image of “X.L” is progressing. I can’t wait to see how he will look in a few weeks, when the brightly, and still very small, green needles start appearing. Then the scale of this old Larch is at it best! Maybe next year, if possible, I will plant him in a nice pot? I hope you like the progress so far?
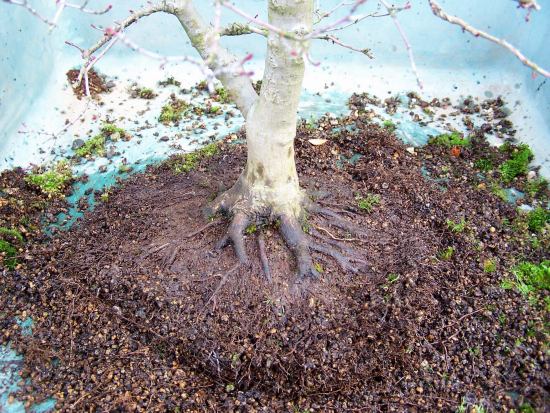
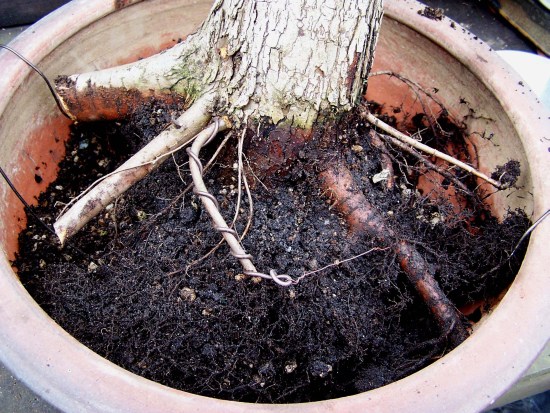
These roots, on one of my Acer palmatum’s, are begining to look nice.
Here the tree is back in it’s old pot, as soon as it is settled down and showing lots off new growth, I will start to wire it again and bring it back into its desired form. I am glad this tree recovered from it’s ordeal so well, it holds a lot of good memories for me!
Look how flat the football, consisting of only small feeder roots, is now! This means I can plant it deeper into it’s pot and that the tree will look more balanced in it!
Here I am removing more off the old rootstub that was left for safety the last time this old Yamadori “Yew’ was repotted. This “Yew” I found in the U.K, many years ago now and it is the first tree that I ever collected. This tree lost a lot off its vitality 2 years ago and some lower branches on the left were lost, but now it slowly recovered and it was safe to work on the roots again!
For now this “Dancer” has a new home, were it can grow into a beautiful lady! 🙂
Some promising roots were redirected with wire. Thicker roots were cut back, right up, to about half a Inch away, from were strong, but smaller roots emerge from it. This simple, but sure technique, will be repoted, until the overall roots size, fits inside the planed design for this tree.
For now she is planted in a deep pot, with plenty of room to grow. I want a vigures tree, that produces lots of new growt to fill out and style the top section of this future Literati Bonsai.
Now I am left with a nice flat rootbase, full of fine feeder roots. This means that at the next repoting, I will be able to plant this tree in a much shalower pot. This wil make here, more elegant and smaller…she is a bit tall! 🙂
Here I am removing the extra roots I left on for extra security when I collected this Dutch Yamadori “Hawthorn”.
Repotting the “DANCER”.
Moments of joy! 🙂
Here the tree is planted back into it’s small Brian Albright pot.
Side view of the “larch” stumb. 🙂
Here the same tree is planted back into it’s Brian Albright pot.
Not me!:) Here is a other Hawthorn with only small feeder roots.
Who sad that you could not get, a easy to repot, root system on a Hawthorn?
, I know! But I had to take a few steps back from the keyboard and try to focus on the more important things in life, mainly my health! These last few month’s, my back problems have become more severe and kept me more or less away from any real Bonsai work. But I did do some important small styling work and some repotting that could not wait any longer! At this moment I am gladly posting these pictures in the knowledge that there might be a solution for my back problems in the near future. I have found a great Doctor in Belgium that uses a new kind of operating technique! So now I only need the O.K from my insurance company and I am off to Belgium! So keep your fingers crossed for the next couple of days for me! 🙂
Who said that you could not get, an easy to repot, root system on a Hawthorn?
Not me!:) Here is another Hawthorn with only small feeder roots.
Here the tree is planted back into it’s small Brian Albright pot.
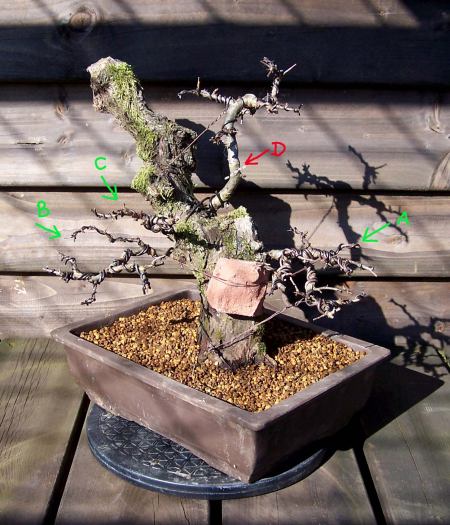
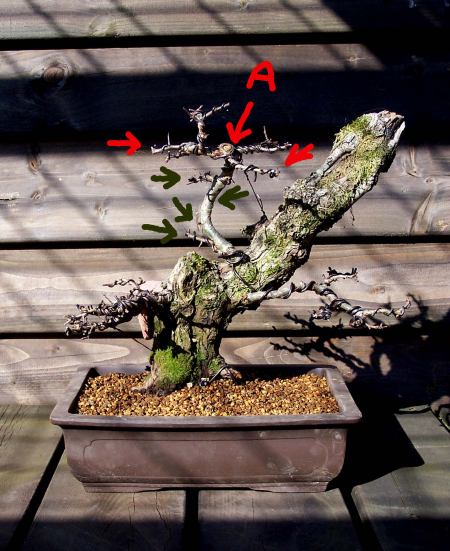
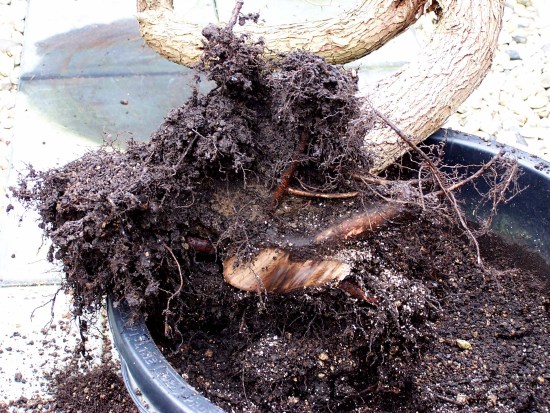
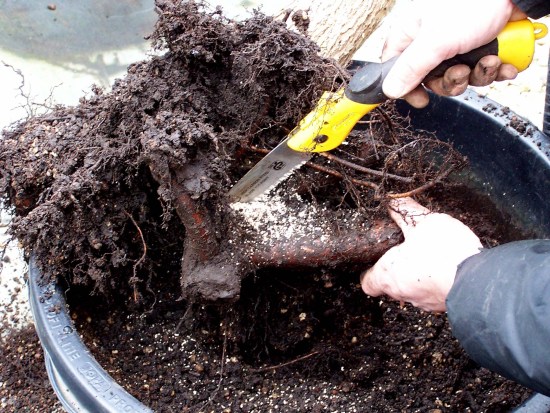
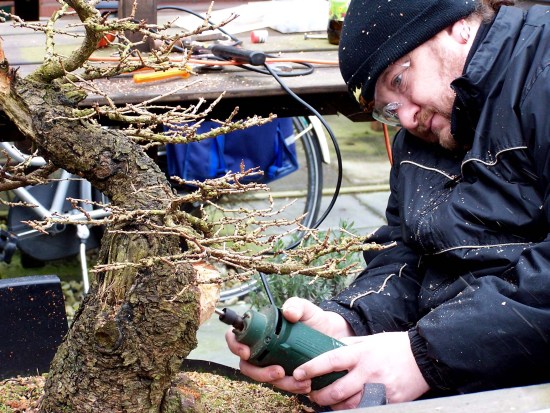
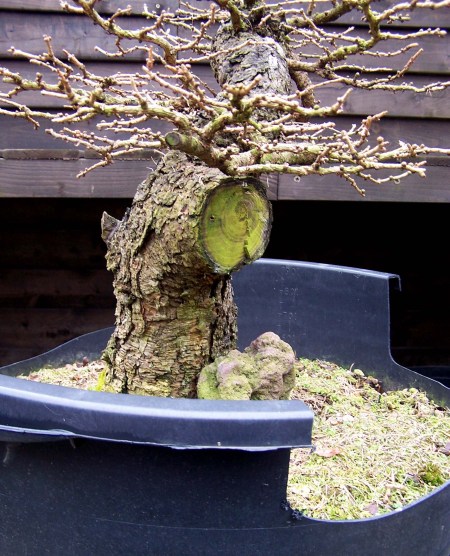
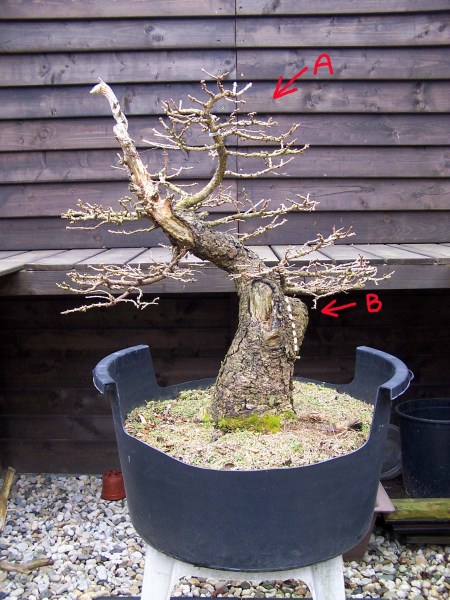
Above: This“Larch” has been completely wireless during the winter months. So, considering the short time I have been working on this tree, I am pretty pleased with how quickly the, mostly new branches, have already settled in their position. Only the (Youngest) top section (A) needs to be repositioned. I had left the Large stump (B) alone for a few seasons, to prevent the risk of dye/dry back in the main trunk. So now it was safe to remove most of it with power and hand tools and then style it in harmony with the spirit of this tree! The white dotted line is more or less the line of the trunk, so a lot of work had to be done to get there!
Repotting the “DANCER”.
Here I am removing the extra roots I left on for extra security when I collected this Dutch Yamadori “Hawthorn”.
Now I am left with a nice flat root base, full of fine feeder roots. This means that at the next repotting, I will be able to plant this tree in a much shallower pot. This will make her, more elegant and smaller…she is a bit tall! 🙂
For now, she is planted in a deep pot, with plenty of room to grow. I want a vigorous tree, that produces lots of new growth to fill out and style the top section of this future Literati Bonsai.
Some promising roots were redirected with wire. Thicker roots were cut back, right up, to about half an Inch away, from were strong, but smaller roots emerge from it. This simple, but sure technique, will be repeated, until the overall roots size, fits inside the planed design for this tree.
For now, this “Dancer” has a new home, where it can grow into a beautiful lady! 🙂
Here I am removing more of the old root stub that was left for safety the last time this old Yamadori “Yew’ was repotted. I found this “Yew” in the U.K, many years ago now and it was the first tree that I ever collected. 2 years ago this tree sadly lost a lot of its vitality and some lower branches on the left were lost, but now it has slowly recovered into good health, so it was safe to work on the roots again!
Look how flat the rootball is now, consisting of only small feeder roots! This means I can plant it deeper into its old pot and that the tree will look more balanced in it!
Here the tree is back in its old pot, as soon as it is settled down and showing lots of new growth, I will start to wire it and bring it back into its desired form again. I am glad this tree recovered from its ordeal so well, it holds a lot of good memories for me!
Above: This is the first transplanting for this Dutch “Hawthorn” Yamadori. As you can see the pot is full of healthy roots, so it was safe to remove the too thick root (red arrow) you can see in the second picture. The green arrow in that same picture, show some nice positioned strong roots. The next 2 picture s show how I removed that root. The last picture shows the tree in its new pot for now. For the next couple of seasons, I will concentrate on the growth of the relatively young branches, the need to thicken and mature. And of course, I have to work on the total ramification of the tree. This ugly duckling is quickly becoming one off the favourites trees to work on, in my collection! A couple of years ago I offered it for sale, still as raw material, during a big convention. For a very reasonable price, but nobody seemed to notice this oddly shaped tree, so full of natural mistakes. There and then, I drew a design on a small piece of paper, and afterwards, I gladly took the tree home with me, to style it myself! I have to admit though, it took a lot off imagination and even some optical tricks. But I seem to have overcome, some major design problems. Creating a thing of interest or even beauty, out of not too good material, is something I really love. Because these trees are not too obvious to style, you really have to look for that hidden Bonsai! But when you find it and everything turns out well, you will have a Bonsai that is often so much more interesting than the prefab ones. I enjoy it when a plan comes together! 🙂
Of course, I know, this tree has a very long way to go, but it is growing nicely into a “Mother and child” tree, with a twist. The mother leaning into the wind, protecting the little child that clings to her side, from the prevailing winds that torture the Dutch coastline were I actually collected this tree! I will keep you posted.
These roots, on one of my Acer palmatum, are beginning to look nice.
Above picture: This small tree is also a Dutch “Hawthorn” Yamadori.
Some serious bending going on.
Before We go any further,I would like to say, I am sorry that this post is dragging on so long. But it is the only way I am able to post anything new on my blog!
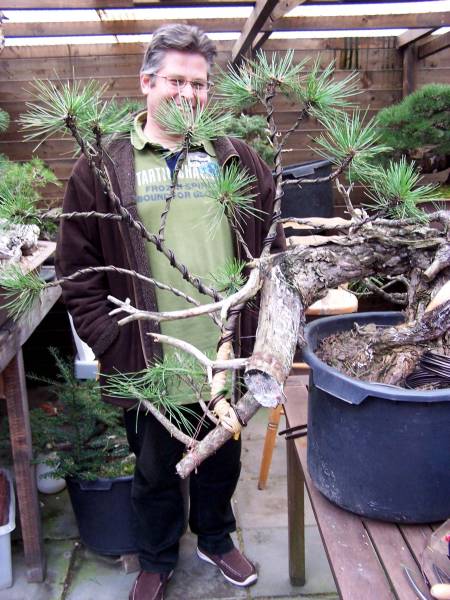
last Thursday my student Ed van der Reek brought his latest find, a Pinus uncinata, to my garden to give it it’s first styling. This small Pine showed all the typical Yamadori futures we look for in good Bonsai material, But on the other hand, it showed just as many typical Yamadori problems, that needed to be solved, or better yet, incorporated into the overall Bonsai design, in a way that would actually make the tree look better. There is a lot of beauty to be found in imperfection!
More text to the pics will follow tomorrow!
*
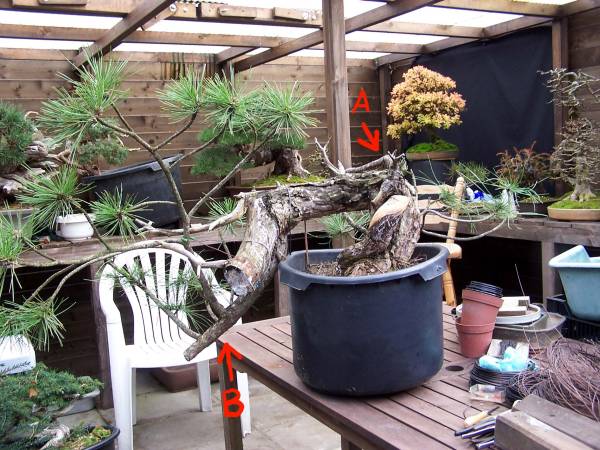
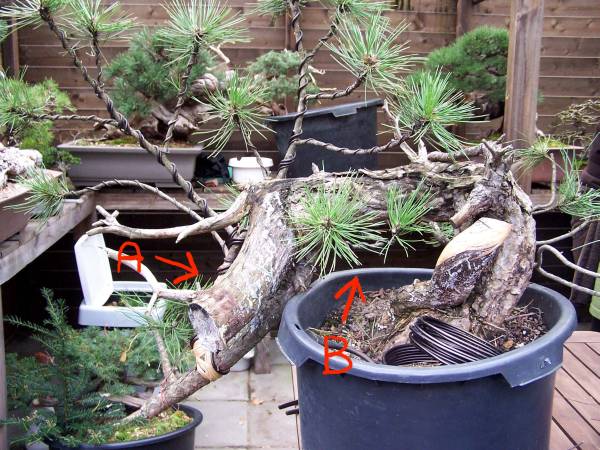
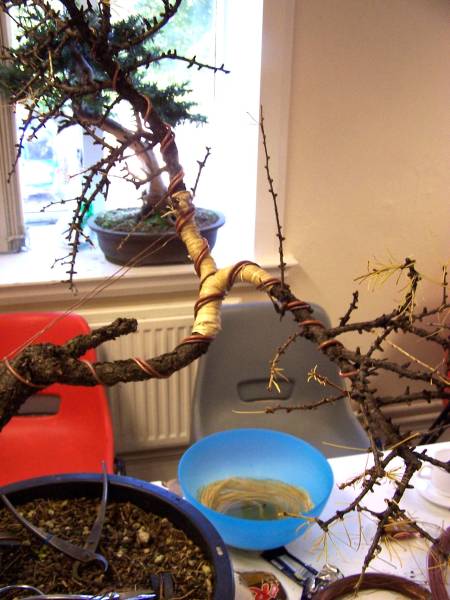
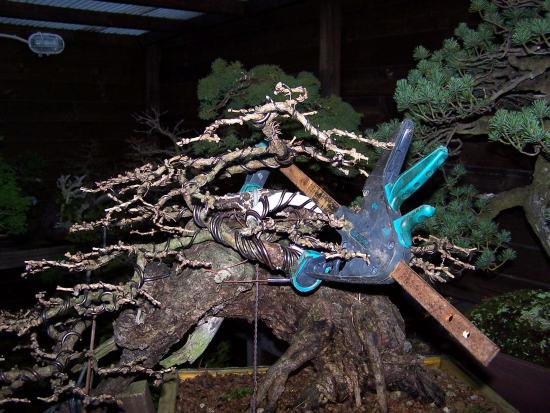
Left picture: Sorry for this poor picture against that bad background. Those two chairs were there for me, I had to go sit down every now and then! Point A: Shows one of the only 2 branches on the battered Pine. It is a to long branch, that grows from an ugly spot on the back side of the tree. It will be a major problem, to use this weak branch in any design we might come up with! Point B: Shows the second (Cascading) branch. This is a very hard to bend straight and thick branches, from which, way down 3 secondary branches grew. 1 strong and long and 2 smaller and weaker once. Above this branch, you can see a large dead wood stump that needs to be reduced and shaped in the future after the tree has its new image!
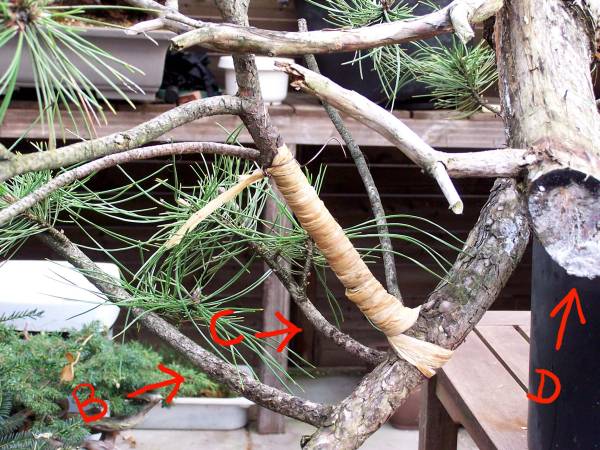
Right picture: A: Close up of the weak back branch.
Left picture: Side branches B and C are the weakest 2 of the 3 growing from the main branch, and they are placed to low down. ED uses wet raffia to tightly wrapped the place where the thick branch endures the most pressure when it is brought into the desired position. Than 2 lengths of copper wire are, with the help of pre-cut small pieces of thin wire, placed lengthwise along the side of the outside curve of the branch. The small pieces are there to help you attached the lengths of wire along the side of the branch, even if you work alone. Just hold them in place with one hand and use the other to swing the little piece around the area you are holding and then tighten it by hand and then by pliers. You repeat this process along the rest of the branch, very easy this way and it ensures that the lengths of wire are very tightly bound to the part where the branch needs protection from breaking! Then, as tight as possible, another layer of wet raffia was applied and over that layer normal wire was applied to hold everything tightly into place!
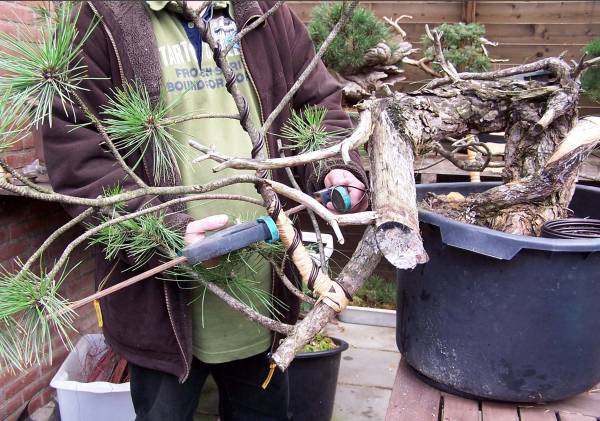
Right picture: A normal wood clamp was used to, very easily, bend the thick branch, bit by bit, into its desired position.The 15 minutes break we took in between the bending of this all-important branch, were used to wire the rest of the smaller branches and to drink some more coffee.
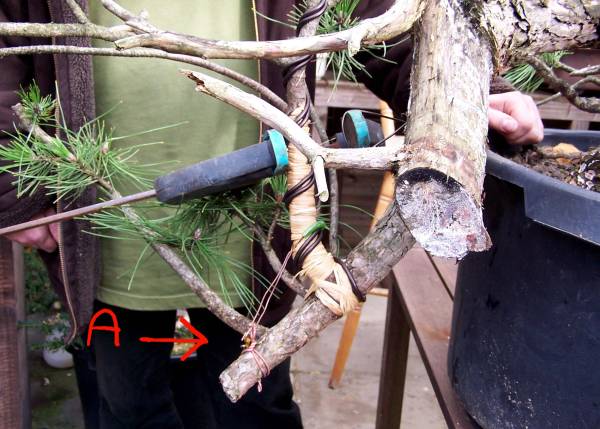
Left picture: Point A: The base of the branch was secured by a piece of copper wire to the dead stump. To prevent it from being torn off at its base! Here you can also clearly see the large deadwood stump that hides most of the main branch. This deadwood needs to be reduced and shaped in the future. In a way that fits the tree design as well as hiding the straightness of that same main branch.
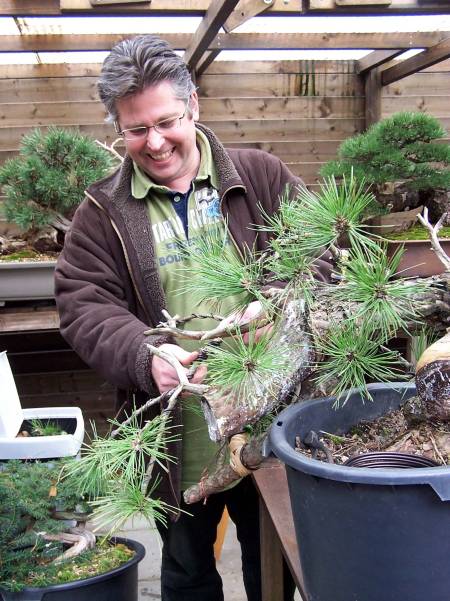
Right picture: WOW! Look how far it has come and without any problems. Ed still can’t believe it! 🙂
Left picture: Side branch B is bent down and appears here from under need the trunk.
Right picture: Here Ed is carefully bending the cascading (side) branch into position.
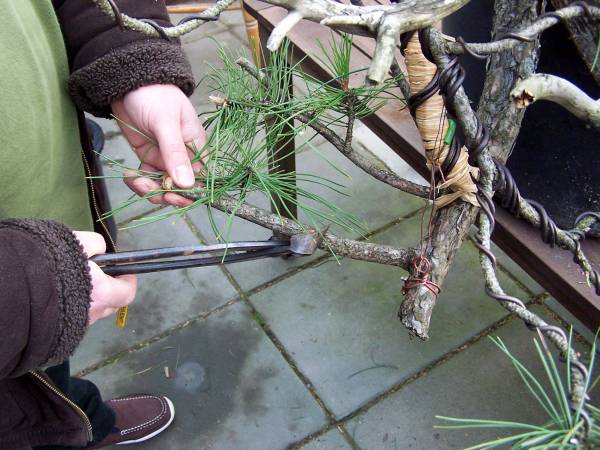
Left and right picture: The now useless side branches are removed by Ed.
Left picture: without hesitation, Ed removes the useless branch on the right (back) side of the tree. Leaving a stump for a future Jin.
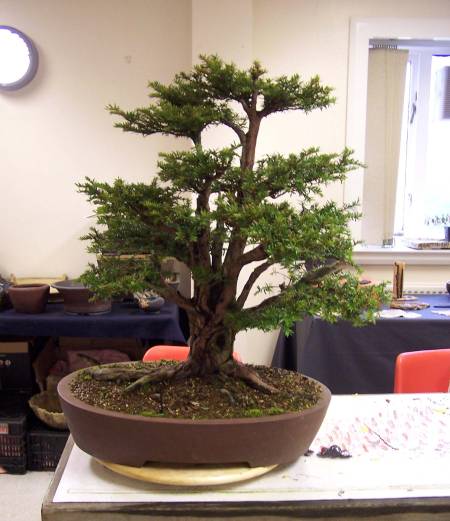
Right picture: After an afternoon of fun, Ed can really smile with the outcome of his work. The deadwood carving will be don later when Ed is more used to the trees new image. He has to charge his fantasy first for a while, so to speak. I am sure this tree will turn out just great in the future!
Most of the times I make a drawing, but this time I made this virtual of this future Bonsai for Ed. There are no back branches visible in this drawing, but there are 3 of those in the real design. Out of experience with my own trees, I have learned, that when the proper technique to stimulate back budding are applied on these Yamadori Pines, a design like this can be visual in 7 to 10 years. I know it sounds like a long time, but every step in the life of a Bonsai is worth taking, believe me!
Ed is happy so I am very happy, so it was a good Bonsai day again!
THE 2008 “BURRS” RESIDENTIAL BONSAI WORKSHOP WEEKEND !!!
Hi everybody,
this weekend I had the immense pleasure to be a part again of the, 2008 “BURRS” residential bonsai workshop weekend, that Tony Tickle organize every year. This was already my 3 time there and I am already committed to doing the next one in 2009. And it is almost fully booked, so if you are interested to join us next year, you can find more Information here: http://www.bonsaischool.co.uk/
I must admit that lately, I have lost my belief in a part of the bonsai community. I was so very disheartened by the behaviour and attitude of some, that I decided to stay out of any debate in the future, that could not be won, even if I was right! So I have stopped posting on some forums to avoid temptation and aggravation. My precious time is better spent on my own Bonsai and Bonsai friends. It just wasn’t worth any more of my good intended time!
But after this weekend in “BURRS”, being an intimate part of this large group of egoless and pretentious Bonsai lovers, that I call my friends, I know again, where I can find the true heart and soil of Bonsai.
They all come every year to this magical place in the U.K, from different countries in Europe, to teach, learn, eat and drink and have immense fun while creating beautiful stuff!!!
I thank all these dear Bonsai friends for their trust in us. This weekend was like a warm bath for me and you all revived my spirit and believes! Thanks Tony for organizing this event so well every year! And thanks to Ivo, Enrico and my dear friend Terry for their love of Bonsai!
I will see you all next year in magical “BURRS”!!!
“Turkey Cats” Rules !!!
Have fun,
Hans van Meer.
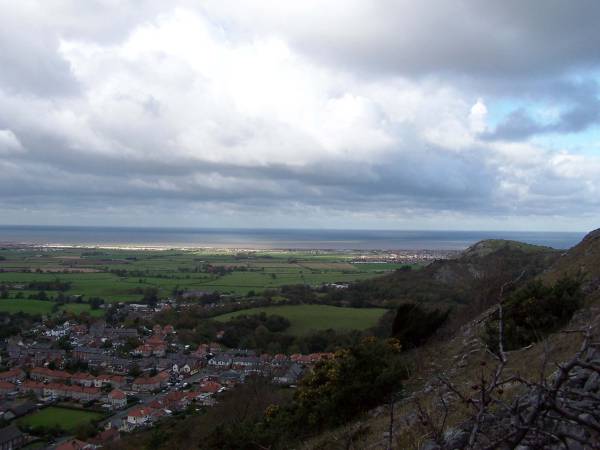
The picture above: I arrived at the “John Lennon” airport in Liverpool early Friday morning, where my dear friend Tony Tickle was waiting for me. We then drove up North, had a typical English breakfast in a fully for Halloween converted diner, while we waited for my other friends Lee and Simon to arrive. From there we drove up to a wonderful place to collect some Yamadori from a rather steep and hard to climb mountain. This picture tells how lucky I felled to be able to do that because only a week ago my back problems became so bad that I could hardly sit up, let along climb up a mountainside. It took some heavy medication, but I made it up there! The Bonsai gods were with me again on this one!
Below: The view was breathtakingly beautiful and worth the struggle!
Below: I took this other lovely view after I had to climb down most of the way to find my camera that had fallen out of my broken backpack. I was lucky again to find it back amongst all the Black and Hawthorns, but having to struggle all the way up again was no walk in the park for me!
Below: picture: Tony and Simon found their first Hawthorn.
Below: Early next Saturday morning at Terry’s place, while he allowed me to get a bit more sleep, he prepared everything to pot my collected trees in plastic containers. Then he woke me up, and with a warm cup of real thee, we started to do this exciting work! This promising Hawthorn was collected by Simon and Tony for me.
Below: After a fitting container was found, the tree was firmly secured from 4 sides to prevent any movement. Then it was filed up with a mixture of Akadama and Biosorb.
Below: This Hawthorn is planted in a cascading style, this meant some roots up the trunk were exposed to the air. That’s why Terry placed some Sphagnum moss around it, so they would stay alive to help the recovery of the tree next growing season. Later on, when the tree shows enough signs of recovering, they could be removed!
Below: Here are my 6 Yamadori potted up. So it was time for the lovely breakfast that Terry prepared as well for us! You got to love this guy!!!
Below: Here we just arrived at the “BURRS” venue. Isn’t this a fitting way to move a great talent and his wonderful material! 🙂
Below: Hawthorn after first serious cutting.
Below: Simon wiring his Pine. This odd-looking Yamadori turned out to be rather stunning in the end!
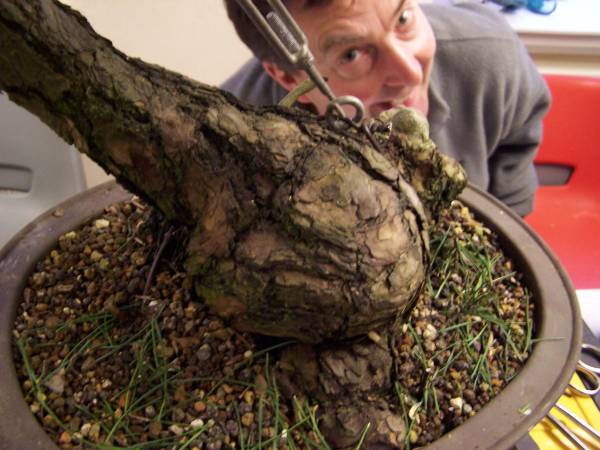
Below: Mister Tickle googling over the bulging root base of Simons Pine. Note the screw that is placed in the deadwood section to help pull down the whole top section to enhance the movement.
The surprising end result, a promising stylish Literati Bonsai!
Simon and his little helper are proud of what they accomplished! 🙂
Below: Pine forest on a natural slab.
Below: Ivo working on the deadwood of Jerry’s Mugo Yamadori.
Below: My quick drawing, of a possible future, for Jerry’s Mugo(the one above). He was very excited about it, I hope he brings the tree with him next year?!
Below: Cutting away this to thick and straight cascading branch on this Juniper, instantly created a very exciting fat Shohin!
Below: Eric and Ivo, having a get to getter, over Eric’s Larch.
Below: Like in earlier editions, Potter and Bonsai artist John Pitt had brought along an import tree for Enrico and a Yamadori tree for me to help to style. This unique larch turned out very nice and looks very natural.
Below: A stunning Sylvestris Pine.
Below: A typical Yamadori Larch.
Below: My quick design drawing as a possibility and a guide for the student.
Below: With the help of wet raffia and copper wire the tree is already brought an end in the right direction.
Below: Concentrated at work…I love to see that!
Below: And yet another finished promising Bonsai!
Below: SWEAT!!
Below: Then on Saturday evening the very tasty traditional Diner as always prepared by Tony’s lovely wife Carolyn.
Below: Andrew “stone monkey” concentrated as always.
Below: Me clowning around like most of the time before the evening demo of Terry Foster and little old me!
Below: The students looking and listening on during our demo’s.
Below: Jerry looking at what we are doing and explaining.
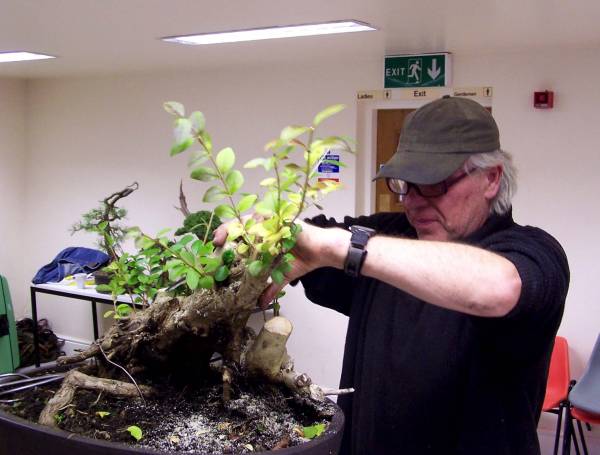
Below: Terry did a lot of the wiring while I did sitting down most of the deadwood! And there was a lot of it on this unique old Yew from Terry’s own collection.
Below: Every big decision was discussed by me or terry and explained with the students before they were actually done!
Below: I have placed the tree in front of a white wall and covered the back branch to show and discuss how it would look with or without it?!
Below: Asking the audience what they think about removing that left side branch?! Enrico and Jihn are debating it together.
Below: You can see just how tired I am after this long day! Here we are discussing the end result of a not so usual styling of a unique Yew.
Below: The end result for now. A not twelve in a dozen Pre Bonsai with a lot of character and flair!
Below: The guy’s being funny! 🙂
Below: The Dutch posy! Finally everybody, in the pub 25 meters across the road for a beer or two…tree…four…who is counting anyway?!
We had a great evening/night and Terry and I went on at his place until deep in the night, sampling fine Scottie’s Whiskey and talking like the good friends that we are for such a long time now! The Sunday session was over before we knew it and then it all ends so fast and I had to walk past my great hero John Lennon again entering the Liverpool airport! Yet another magnificent “BURRS” weekend is over and what a great experience it was again! Thanks, Tony, Carolyn, Terry, Charlotte and thanks, Enrico, Ivo and all student for making this such a amazing experiance again!
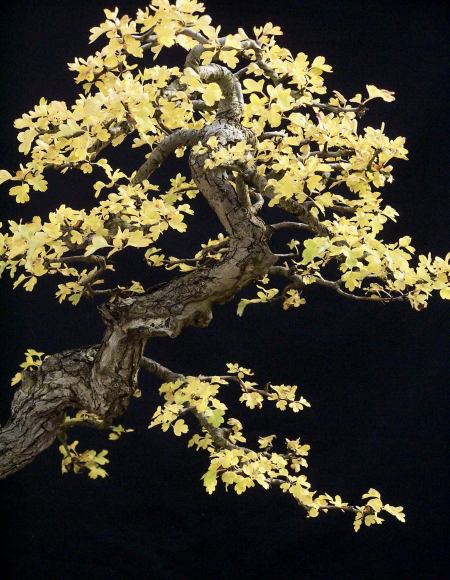
today I spend most of, probably one of the last real sunny days, shooting pictures of my Hawthorn (Crataegus monogyna) Literati. The tree is in early full Fall colours this year and the leafs seem to reflect the sun in bright yellow light.
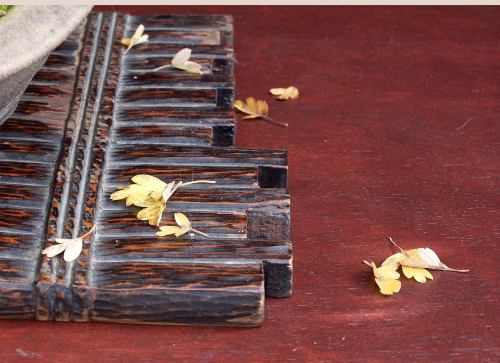
I used a standard Kodak easy share camera on a tripod, on ISO 200, between f 3.6 and f 5.0, and between 1/125 and 1/250 to get this intense yellow reflection from the foliage. Direct sunlight, that hits the tree from the right, was filtered and 2 reflecting white hard boards were use to reflect light on the Bonsai. One from the left side and the other one from below/front of the tree. An umbrella above the camera to avoid direct sunlight hitting my lens and then I shoot more than a hundred pictures! The intensity of the bright yellow reflection seemed to increase every minute, as the sun moved through the sky. I love making pictures like this, that show the contrast between the rough old bark and the soft lines of the yellow leaves. I hope you like them too?!


 , I know! But I had to take a few steps back from the keyboard and try to focus on the more important things in life, mainly my health! These last few month’s, my back problems have become more severe and kept me more or less away from any real Bonsai work. But I did do some important small styling work and some repotting that could not wait any longer! At this moment I am gladly posting these pictures in the knowledge that there might be a solution for my back problems in the near future. I have found a great Doctor in Belgium that uses a new kind of operating technique! So now I only need the O.K from my insurance company and I am off to Belgium! So keep your fingers crossed for the next couple of days for me! 🙂