A SNEAK ( NIGHT) PREVIEW!

Hi, everybody,

it is too late for me to sort out all the pictures I shoot today and then post them, but I promise I will do so tomorrow. Today I not only gave the “SWAN” a new home, but I also repotted one of my other favourite Pines. It was just after midnight that I finished working. I turned off all the light but kept one led spot burning right on the second Pine I repotted today. And with a well deserved Heineken in my hand, I saw this picture from my living room. And I must say, that I am a happy man, who is not complaining! It has been a really good. GOOD DAY!!!

Pinus Uncinata.

                                                      Pinus uncinata.

  
30-8-2009 verpot dag 044 Hans van eer

Oh, and of course, a quick shot of me lifting the “SWAN”! 🙂

Tomorrow I will post more pictures, now it is off to bed for me.

Cheers,

Hans van Meer.

Info: karamottobonsai@hotmail.com

—————————————————————————–

ALL SYSTEMS ARE GO FOR TOMORROW!

Hi, everybody,

I spent most of this day sifting and mixing my soil in preparation for tomorrow’s repotting of the “SWAN”. This is not one of my favourites thing to do anyway, but to do it with this back off mine was murder! But everything is finally mixed and prepared in 3 different grain sizes.  I even prepared the pot, so that tomorrow morning,  I can start right away with the actual repotting. I cant hardly wait to see if I can fit the “SWAN” into his much smaller new home?

29-8-2009 006 Hans van Meer

                                 Above: The new temporary pot from China.

29-8-2009 002 Hans van Meer

Above: All the soil ( akadama, kiryu, bimbs) I mixed in three different grain sizes.

Until tomorrow!

 Cheers,

Hans van Meer.

Info: karamottobonsai@hotmail.com

—————————————————————————————————–

————————————————————————————-

REPOTTING MY PINUS SYLVESTRIS LITERATI.

Hi, everybody,

today I repotted the Pinus sylvestris Literati I styled in May this year.  LINK

I had planned to plant it into a slightly smaller pot, but that proved to be to much of a risk for this tree! So I (gladly) planted it into an old pot that used to belong to Saburo Kato. Years ago my friend Dany User, owner of the Ginkgo Bonsai Centre in Belgium, brought a couple of exclusive old pot’s back from his visit to Mr Kato’s Garden and I was lucky enough to be able to buy this wonderful pot from him! To think that this great master, whose work I so greatly admire, might have used this pot under need some of his own trees in the past, makes this pot just that bit more special to me!

26-8-2009 013 Hans van Meer

Just look how ingeniously they made anchor point on the bottom of the pot to run your wire trough. So you are able to firmly secure your tree to this shallow pot.

26-8-2009 016 Hans van Meer

Close up of one of those handy anchor points in the pot. In this way no wires have to run under need the pot, that would look ugly and make the pot unstable! Clever isn’t it!

  26-8-2009 010 hans van Meer

After 4 years in this pot, the tree had grown a pot full of healthy looking roots, covered with the all-important Mycorrhizal fungi. I saved as much as possible of this white gold to mix into the new soil mixture, to help the tree’s recovery!

         26-8-2009 020 Hans van Meer

The tree in his new home. The piece of wood you see at the base of the tree is placed there to push and hold the tree more forward. The tree is not exactly in the position that I would have preferred, but it is close enough for now. I had to keep the health of this tree in mind! From now on this tree’s roots, will have 3 seasons to grow into the shape of this new pot, then at the next repotting it will be much easier for me to cut some roots and plant it a bit deeper,  just the way I want it!  I think that in the future this Literati Pine is going to look pretty cool in this pot! It proves that even out off not the best possible material in the world, you can still make a pleasing looking Bonsai!

Next Sunday I will repot the “SWAN” into its new pot that I bought 2 day’s ago at Lodders Bonsai centre. I can’t wait to see if he will fit into it! I’ll keep you all posted!

Cheers,

Hans.

Info: karamottobonsai@hotmail.com

————————————————————————-


ROOTS DO GROW FASTER WHEN THEY ARE EXPOSED ABOVE THE GROUND!

Hi, everybody,

A few days ago I did some serious branch shortening and some branch replacement on this Ficus benjamina you see in the picture below. There is no wirring in this tree, only some to pull some branches down were used. I bought it some 15 years ago as a 7 inch high seedling at our local supermarket. It wasn’t much thicker than my pinkie back then, now the tree base is almost as thick as my wrist. Back home I planted it on a beautiful moon rock that I found at a local garden centre, leading the small root over the rock and through the holes and then I covered the rock and the roots completely with soil. I wanted to create the image I had seen on pictures of those large Ficus trees that grow over rocks and ruins in the jungle. After about half a year I started to remove a small layer of soil from the top, exposing the roots to the air and light. After a year or 2 all the roots were completely freed from the dark. During all this time the Ficus stood inside the house in my living room. Even now the tree spends about 8 months inside our house under need a window in the attic. Only the 3 warmest months in the Dutch Summer are warm enough to keep it outside during the night. And it is way to heavy to lift it inside the house every time it gets to cold! So naturally this Ficus is way less vigorous and grows much slower in Holland than it would do in the warm and moist climate of the tropics and there for it took the roots of this Ficus more than a decade to thicken enough to look believable. This tree is not really that good yet, but it is one of those trees you just can’t let go, it has become a part of the family!

17-8-2009 020

Above: Anyway, some 15 years ago the small scrub you see growing next to the base of this Ficus arrived out of now were, and it has since then lived as it’s partner on this rock. I only had to cut them too long stems every now and then, to keep the growth in check. But this time I decided to remove most of it completely from the back side of this rock, because during all these years this scrub had completely overgrown most of the roots on the back side, with a thick layer of old and new plant stems,  covering them just like a thick layer of soil would have don! It was actually the first time, in a long time, I could see these roots on the backside. And to my surprise, I discovered something that proves the theory that says: that roots exposed to light and air, grow faster and thicker. Now I know that there are more roots on the front side than there are on the back side, but if you look at the close up of the front and back side, I think, the difference in the thickness is too much to ignore!

17-8-2009 019

Above: Front side of the tree. All roots are at least twice as thick as the ones on the back!

17-8-2009 015

Above: Thinner and much weaker roots on the back side. The black area you can still see on the rock between the roots are the remains from the scrubs I removed. I find this difference truly remarkable and that is why I wanted to share it with you all! What do you think?

Cheers,

Hans van Meer.

Info: karamottobonsai@hotmail.com

——————————————————————————————————

A GREAT BONSAI DAY IN MY GARDEN!

Hi, everybody,

yesterday my Bonsai friend Dirk Mundorf from Germany drove more than 3 hours to see my Bonsai and to work on the urban Yamadori Yew (Taxus baccata) he brought along. He promptly arrived at 10 in the morning, which is pretty impressive if you realise that I live here for almost 20 years now and still get lost every now and then. We had a few coffee’s, wile we looked at and discussed my Bonsai and than it was time for Dirk to bring in his surprisingly heavy Yew. After we had prepared everything to get started, I first asked Dirk what his ideas for this future Bonsai were? I always do this when someone is asking me to help them with the styling of their tree. It is all too easy to push forward my own ideas and style, but by doing so, I might be destroying someone’s unique vision of  beauty in Bonsai! Listening to Dirk, I soon found out that he had a good eye for discovering the possibilities of this  Yew. Although Dirk is doing Bonsai for a relatively short time, he has all ready clear ideas about what he likes in Bonsai. So it is up to me to encourage his ideas and help him to realise his own sense of beauty in this tree. Than we both looked and discussed, if his general ideas for this Yew were doable?

Dirk's Yew design

Above: While keeping  in mind Dirk’s own ideas for his future Bonsai, I made a quick drawings of what I thought was possible with this tree. After discussing this possible design, Dirk felt that the first branch should be closer to the trunk line, making the tree more compact.

Dirk's yew design 2

Above: So I made this second one, with a shorter and closer to the trunk placed first branch. We both agreed that this design was the fare better one of the two and that this was more or less the desired design we would try to archive.  So now we were ready to really start some working!

Dirk asked me if we should start with improving and creating new deadwood? To his surprise I sad no. I think it is better to first style your tree and than work on styling your deadwood. You should be absolutely certain about what you want, before you style your deadwood, because what you do, is mostly in reversible! And after the first styling when the  image/outlines of your future Bonsai are more or less there in frond of you to see, it is much easier to style the perfect deadwood to go along with it!

But before we go any further with this story, I would like to share 5 before pictures of this yew, that Dirk made a few weeks ago.

dsc_0002-hans-van-meer2

dsc_0010-hans-van-meer

dsc_0008-hans-van-meer

dsc_0013-hans-van-meer

dsc_0021-hans-van-meer

                                              OK, lets go on with the story.

Wile I was preparing the raffia that was needed to bend a thick branch, Dirk started to remove everything  unwanted  from the tree. This make it easy er to work and to clearly see what you are doing! But we would leave as much foliage as possible on the tree to make sure it would not suffer to much from this first styling and recover quickly.

4-8-2009-002-hans-van-meer

This is how the tree looked at the beginning of its first styling. Dirk is cleaning up the tree, removing everything that is not of any use fore the planed design.

4-8-2009-006-hans-van-meer

Dirk hard at work, bravely removing all unwanted branches. But leaving more than enough foliage to secure the health of the tree.

dsc_00061-hans-van-meer

                  Sunshine, good company and Bonsai. That’s live for me!

dsc_00191-hans-van-meer

          It was good for me as well to finally do some real Bonsai styling again!

4-8-2009-013-hans-van-meer

The end result after a day of hard but pleasant hard work. I think this tree has a great future ahead! Next spring it will be repotted by Dirk and then, when it shows all signs of recovery, it is time to start thinking about creating a beautiful Shari that runs from the root base of this massive tree, all the way up to the deadwood on the top. Making this already a good looking tree, really impressive and special!

4-8-2009-024-hans-van-meer

 Dirk proudly standing next to his very promising pre-Bonsai. It was a great pleasure to work with Dirk on his tree.  A memorable day indeed!

Well don Dirk! 🙂

Cheers,

Hans van Meer.

Here is the link to Dirk Mundorf Bonsai Blog.

* pictures of me are made by Dirk.

Info: karamottobonsai@hotmail.com

——————————————————————————————–

—————————————————————————————————-

THE PHILOSOPHER’S STONE.

Hi, everybody,

my post from July 27Th about “A rock planting that shows it all” got a bit more elaborated than was intended. I originally just started to write about the things that I had discovered in this uniquely shaped stone, but while I was doing this, I felt the need to go deeper into the importance of empty spaces in Bonsai and that took a bit longer than I had expected. I make no plans when I start writing about a idea that I suddenly want to share with you all. And more often than not it takes me a long time to find the right word, pictures or drawings to explain my feelings and thoughts. That is OK by me, but some times you have to hang in there a bit longer for the clues of my story’s! 🙂 I had some encouraging comment and questions from enthusiasts who are following me analyzing my thought about this rock, that from now on I would like to call “THE PHILOSOPHER’S STONE”! 🙂 So I will write down some of the other things that struck me when I was watching this stone that night. 

When I look at this stone below, I notice that it has a lot of visual speed. 

22-7-2009-040-hans-van-meer-22

You almost might think, that the stone almost magically rises from the right bottom corner, and from there our eyes quickly follow the waving movement of the stone to the left, where they are launched into space like a ski jumper leaving the ramp.

22-7-2009-040-hans-van-meer-5

But now look again and remember the natural viewing direction I spook about earlier.

22-7-2009-040-hans-van-meer-21

Bellow: Wouldn’t our eyes start from the left side of the object? Leading our eyes to the right, slowly downwards and upwards, trough the plants that grows in the valley of this stones. Then, a fast downhill descent, until we reach the solid ground again.

22-7-2009-040-hans-van-meer-10


worm-61

Its almost moves like a snake that quickly disappears into his hole on the right! 🙂

22-7-2009-040-hans-van-meer-3

Here I flipped the image over to show you the difference this will make!

22-7-2009-040-hans-van-meer-11

Now we first have to slowly climb a mountainside to reach the growth in the valley. Our eye movement with the image in this way is much relaxer.

More later! 🙂

Hans.

Info: karamottobonsai@hotmail.com

———————————————————————————

Bonsai Tutorials: downsizing the image of a full-size tree into a compact miniature Bonsai version.

Hi, everybody,

I wanted to tackle the subject of downsizing the image of a full-size tree into a compact miniature version. Off course Bonsai is not the simple copying of trees from nature, but to understand how it works can help you to realize your own ideas. I will use an imaginary example of a 50 cm/20 Inch high Bonsai and will, later on, use two of my own Bonsai of that same hight to make things clear!

After surging the web, I have found a wonderful dark silhouette image of a tree to use as an example. 

sil12-hans-van-meer

The above silhouette gives use enough info we need to recognize what it is. Even without the wooden bench underneath the tree, we can figure out how tall, big and fare away from us this tree is. So if we use these same features that give us all that info in our Bonsai, we will at least end up with the right proportion in our little tree. And that is not a bad start, believe me!

sil-3-hans-van-meer1

Above: So here is the silhouette of this tree more clearer to see. I have removed the two small branches that were growing low on the trunk, to make things clearer to see. And while I was at it, I planted the tree in a Bonsai pot. Looks good already, doesn’t it?

sil-2-hans-van-meerkopie

Above: The yellow dots show the outlines of the frame/skeleton of this tree. This design as Bonsai would be about 20 inch/50 cm high and material with a trunk and branches like this can easily be purchased from any Bonsai dealer that imports Acer palmatum or Ulmus but for example, a Beech or Hawthorn would do just as easily! But the amount of foliage you see here would be hard to archive with the too large foliage of most deciduous species we could use to create this image with as a Bonsai. So we should divide the messy foliage into more compact and well-outlined foliage pads. Doing this, we will create more open spaces, that clearly open up the foliage pads from each other.

sil-5-hans-van-meer

Above: Here I created some clearer open spaces between the foliage layers. It is the same image, but this time it is doable to shape it as a Bonsai. In principle, you only have to fill those outlined foliage pads with the larger leaves of the species you use to create this image.

sil-6-hans-van-meer

Above: Here I filled these foliage pads with the foliage I borrowed from my own Carpinus betulus with exactly the same size as this imaginary Bonsai 50 cm/ 20 Inch. I placed the silhouette and a picture of my Carpinus next to each other and then cut and pasted the foliage onto the silhouette. So the size of this foliage in comparison to the trunk and height are accurate. So as you can see this could already be doable and believable as a Bonsai.

sil-7-hans-van-meer

Above: Here I filled those foliage peds with the foliage of my same sized Acer palmatum. Again the size of the foliage is accurate. So again, doable and believable!

Even though like in most Bonsai, the leaves are monstrously big in comparison to the tree image we have created, the outlines of the trunk, branches and foliage pads are correct, making it a believable image that reminds us of the trees we see in nature. Just like the painter, who only uses a few brush strokes to paint all the foliage of a large branch, we sometimes only use a few leaves to create all the imaginary foliage of a large branch.

More tomorrow, I really have to get some sleep now! 🙂

Thanks for listening again,

Hans van Meer.

Info: karamottobonsai@hotmail.com

————————————————————————————————

Bonsai Tutorials: downsizing the image of a full-size tree into a compact miniature Bonsai version. PART II


Note: This has been posted before in Juli 2009

Hi, everybody,

today, while chilling in the warm sun, I thought a lot ( again) about what I wrote the night before about the importance of empty spaces in Bonsai design. And I came to the conclusion that I wanted to share some more of my ideas on this subject with you.

Bonsai is an illusion, a fantasy. Some one’s impression of a full grown tree in nature, that is living in a small pot. The size of the foliage of any plant or tree, in comparison to the height of the Bonsai, will always be way off. No matter what species you use. Still, if the overall appearance of this small tree gives us the impression that we are actually looking at a tree growing in the distance, we all gladly overlook this oddly oversized foliage. And that is because the artist is creating a believable illusion! He downscaled the tree, making sure that were possible all the proportions between the trunk and the branches mimic the growth of a large tree! And that is just the area were empty spaces play such a prominent part!  As long as the silhouette or outline of your Bonsai tells a believable story, you can get away with a lot of illogical things, like oversized foliage.

foliage-size-1

Top left: I have drawn a  silhouette of a branch to make things clearer. But off course, the same thing goes for a whole tree! Imagine that this is the outline of a branch that fits perfectly into your  Bonsai design. It has some very beautiful and informative open spaces, that divide the foliage layers in a way that is very pleasing to look at. And at the same time. they give us a lot of information about the size of this branch. It is a well-balanced branch, compared with the overall image and size of your Bonsai and it shows the story you like to tell!

The light green open space, tells us that this branch is growing down from the trunk. Giving us clues about the size and age of the tree and what species it is or style it is shaped in.

The darker green open space, tells us there are separate layers of foliage in this branch. A sign of maturity and age. But they also give us a clue of the distance, between us and the tree we are looking at, making it easier for us to calculate how tall this Bonsai image is meant to look in comparison to a tree in nature!

The top brown open space, almost pushes the branch down, like a load of invisible snow. Emphasizing the downward movement of this branch. While the bottom brown open space is supporting the weight of this branch.

Top right: Your perfect branch silhouette filled with the foliage of a Juniper Itoigawa. This foliage is very small and allows you to bring much detail in this branch.

Bottom left: Your perfect branch silhouette filled with the foliage of an Acer Buergerianum. These leaves are relatively small and show great detail.

Bottom right: Your perfect branch silhouette filled with the relatively short needles of a Pinus Sylvestris.

foliage-size-2

Top left: Your perfect branch silhouette.

Top right: Your perfect branch silhouette filled with the relatively longer needles of a Pinus Densiflora. with foliage of this size, you only use a few needle clusters to fill out your wanted silhouette.  With a lot of trans parity, to keep it light. But even in this case, where the size of the needles is way out of proportion, the all-important outline of the foliage ped tells the same story as with the smaller foliage!

Bottom left: Your perfect branch silhouette filled with the very small foliage of a Buxus, Ulmus or Olive. Again this means you can bring more detail into your branch, but the outline stays the same!

Bottom right: Your perfect branch silhouette filled with the relatively larger leaves of a Fagus.

Peaking through your eyelashes helps to see the outline of your work easier!

 The outlines of this branch give us a lot of information about what we are looking at, like size, height and type of tree or style. They help us to understand what the Bonsai artist wants us to see. So Bonsai is a lot of silhouetteisme (if that’s a word?). And empty spaces are vital to bringing detail and info into a silhouette!

I hope this all makes sense? It is not an exact science, they are just my thought and it is so hard to explain my ideas like this, so I sure hope they come over a bit?!

Again it is 4 in the morning, I spent 3 hours on this PPFFFF! I am off to bed!

I will try to write some more tomorrow!

Thanks for listening,

Hans van Meer.

Info: karamottobonsai@hotmail.com

————————————————————————-


A ROCK PLANTING THAT SHOWS IT ALL!

Hi, everybody,

I like to make/create new things out of everything that lies or grows around in my garden. In early March I planted a small Alpine plant on a beautifully shaped rock from the U.K.  HERE 

A couple of nights ago, it must have been around midnight after a long and hot day, I was chilling in the back of my garden, laying on a sunbed listening to some roots reggae. It was pretty dark and because I only had a small lamp burning behind me, only a small part of my garden was visible against a dark background. Then I found myself looking for a long time at the rock planting from this post. Because I was lying down, my eyes were at the same height as the rock planting. That stood, only 2 meters away, on my workbench in front of me. There is so much to see in this simple composition, things that are so important in a successful Bonsai design as well, that I could not stop looking to analyse it all! Here are some of the things that struck me, that I would like to share with you all.

22-7-2009-040-hans-van-meer

Maybe it is a nice idea to look at this picture for a while for yourself and analyse it before you look further! And remember this is not an exercise in beauty or anything like that, it is more a study of principles that are very useful and of great importance in Bonsai design. If you learn to recognize those principles in any design you look at, be it in Bonsai, painting, sculpture or architecture! It will be easier to create things of beauty your self and you will appreciate and or understand the work of others much more. I am not a big fan of over-analyzing Bonsai, but sometimes it is very interesting to find out why certain things work and others don’t! Being accustomed to these principles, which you can find in this simple rock planting, will help you better understand and create your own Bonsai as well as analyse others’ work!

22-7-2009-040-hans-van-meer-2

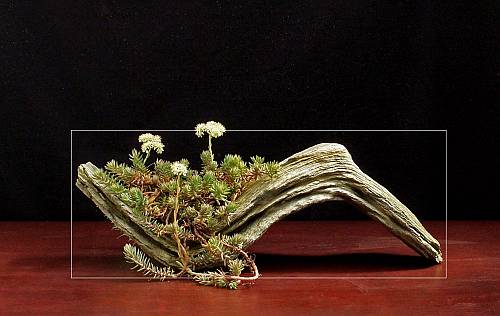
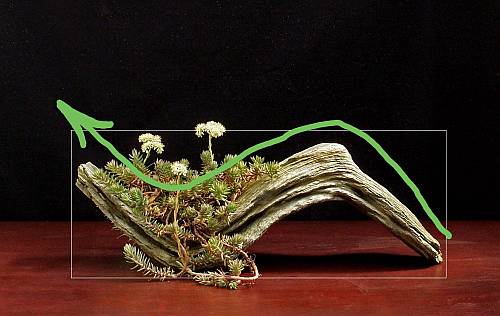
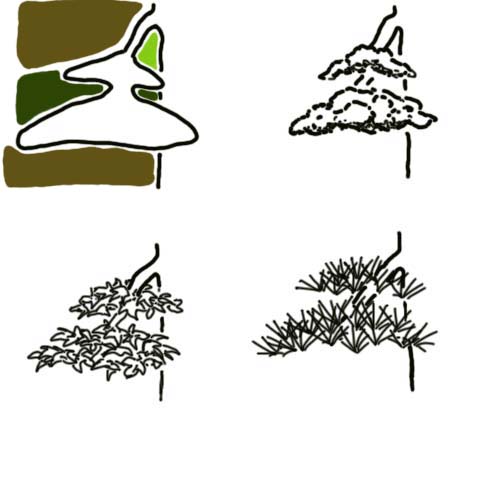
To make things more visible and clearer I have drawn an outline around the subject. Immediately certain things become more visible and obvious. Do you see them?

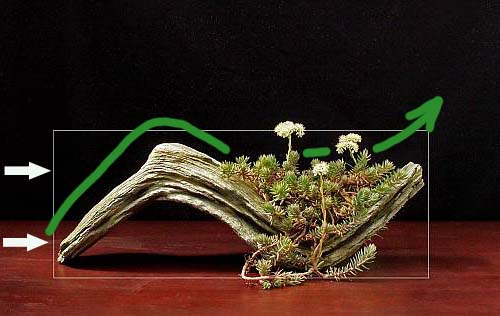
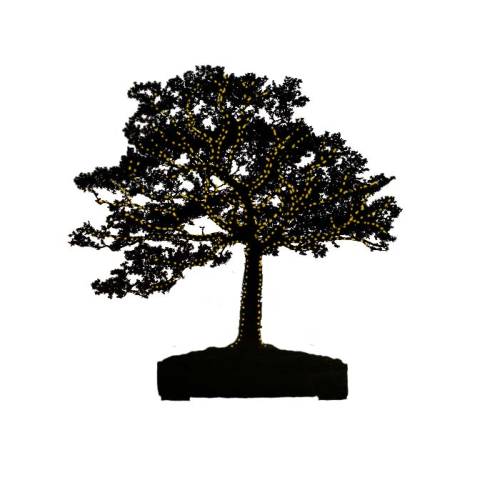
But first, this: I don’t know if there is any proper word for it? But I like to call it “the natural viewing direction”. If you look at the above picture, what do you see first? If you learned to read from left to right, most likely the plant on the left side! Now you might think, so what?! Well, now look at the picture below that is flipped over horizontally. 

22-7-2009-040-hans-van-meer-3

Well, what did you see first now? The arched part of the stone on the left, right? We tend to look at everything from the left to the right, but why is that important to Bonsai’s design? Look at the next two pictures and see how our visual habits play tricks on us.

cascade-pine-11

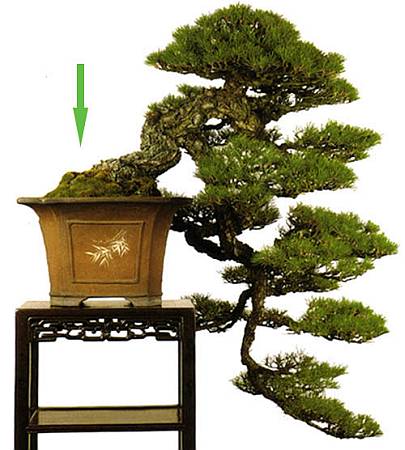
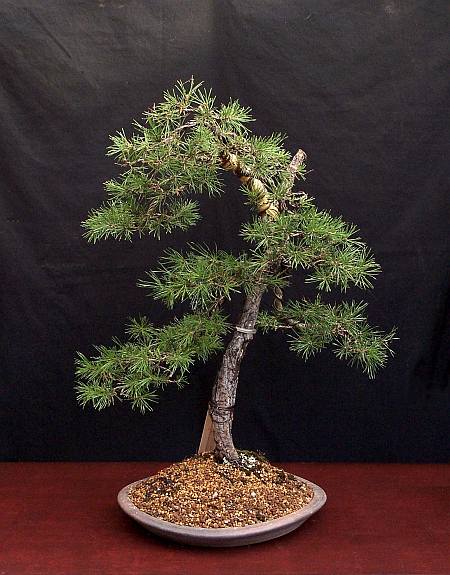
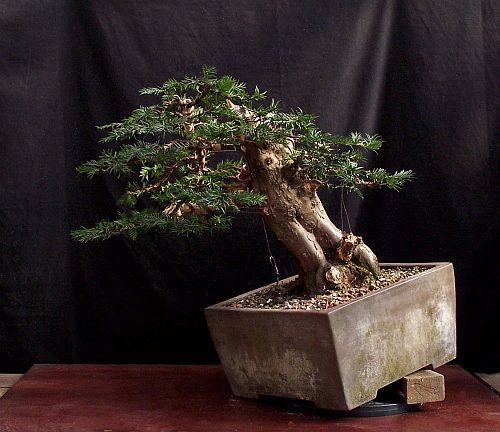
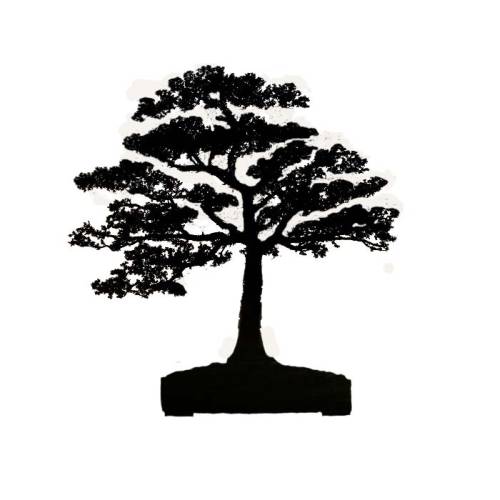
This above original image of a stunning cascading Pine is a perfect example of a tree that is in perfect balance with the pot it grows in. The table ( in real life longer than in this picture) and the pot on the left, are the first thing we see when we look at this Bonsai. They together occupy the same space on the left half, as the foliage mass of the tree on the right side. Even the empty space ( green arrow) on the left,  is about the same size as the empty space under need the right bottom branch. As I said, perfect balance! Now, look what happens when I flip over the image of this perfectly balanced Bonsai!

cascade-pine-2

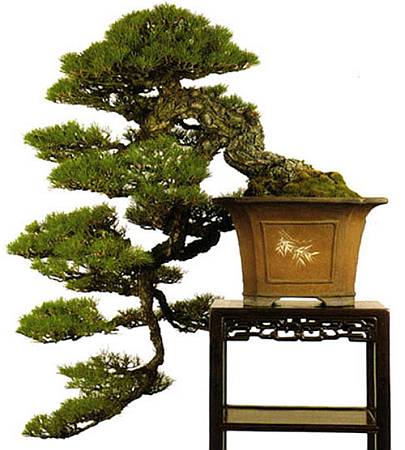
Some difference Huh! The first thing you see now, when you look at this tree, is the now too-heavy, foliage mass. And even though everything is the same as in the original picture, the balance seems to be lost. It almost seems like the pot is too small to hold the tree upright! So knowing this phenomenon helps us when we decide in what direction we wish to style a Bonsai or what size and style of pot to use to balance the image or when we are working on our Bonsai display for an exhibition. Imagine a tall slanting tree, that can be styled, growing to the left or growing to the right. If we want the foliage of this future Bonsai to be the focal point, from where the eye travels the trunk downwards to the pot. It should be styled growing to the left side. If we want the pot to be the first thing that is knottiest, from where the eye follows the trunk upwards toward the foliage of the Bonsai, it has to be styled growing to the right side!

OK back to the rock planting and its empty/negative spaces!

22-7-2009-040-hans-van-meer-4

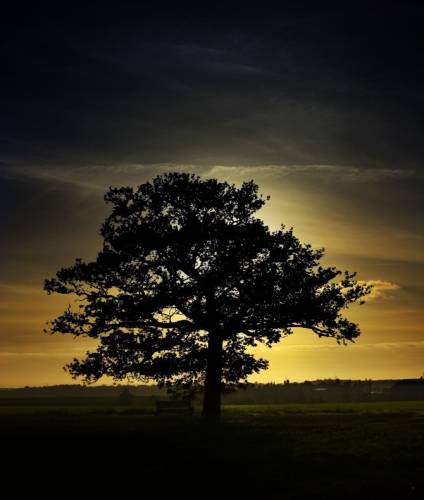
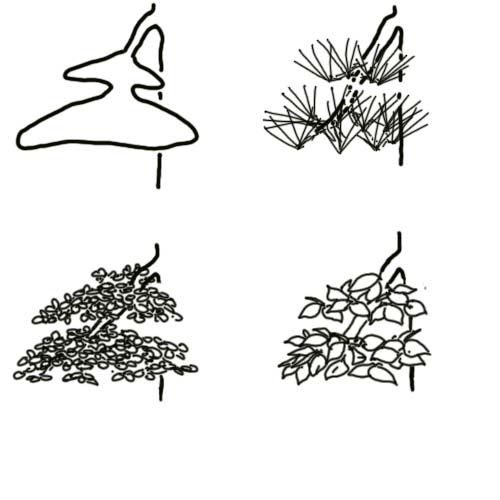
That same night in my garden, but one beer later, I started to admire all the empty spaces surrounding this stone, that make it so special! If you divide this image, from top to bottom into half, you could see how similar both halves are, yet the left side has a plant growing, whereas the right side has nothing but empty/negative space! Still, the empty green space on the right side is occupying the same space as the plant on the left balancing it out. Even the empty/negative space on the left bottom side is similar to the one on the right top side. So if you look at all these empty/negative spaces surrounding this rock planting,  you can see how important this often misunderstood and a bit abstract principle really is! Is it the actual shape of this stone itself or is it the empty/negative spaces surrounding it, that give us a true sense of what it looks like? Especially when used properly in Bonsai, these empty spaces will give us so much information about vital things like size, distance and age of the tree we are looking at, that I dare to say that they are properly the most important part in Bonsai designing.  Picture this: you have just reached the top of a small hill (green arrow), and in the distance growing slightly below you, you can, despite the fading light, just make out the silhouette of a distant tree. You are looking straight ahead at this distance tree,  and your eyes are looking at a point about 20/25% from the top. Just like we are used to doing, when we look at a Bonsai, only on a smaller scale! 

view-on-a-distand-tree-2

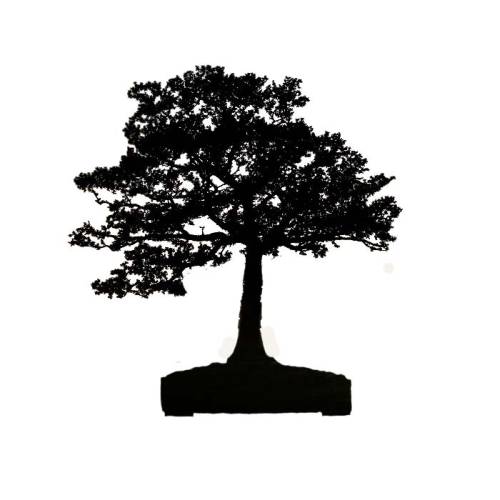
Above: So what can this silhouette of a distance tree tell us? The empty spaces in this silhouette show use where the branches are placed and how long they are and how they grow and how many there are and from what height they start growing and how much space is between all the branches in comparison with the thickness of the trunk. In an instant, all this info is then sent to the brain. And this brain will compare this to all the memories we have of trees similar to this silhouette we see in the distance. The link is quickly made and then we have a pretty good idea of what kind of tree it might be, so we then know how tall it probably is, from which we can deduce how far away it is growing from the point where we are standing! Do you get my point? If these similar empty spaces are well used in your Bonsai design, the brain of the viewer will recognise them, just like in the open field and it will tell him exactly from what distance and height he is watching your Bonsai image of a distant natural looking tree! Because they give us important information about the scale the artist is working in, a Bonsai should never be without some empty spaces among the branches and foliage. The proper use of empty spaces is invaluable for a believable and natural-looking Bonsai!

It is not one good branch, nor is it two. It is the space in between them that is important!

I hope you don’t mind me rambling on like this, but I have a lot of time to kill and not much else to do than think! So why not share my thought with you all! It is half past 3 in the morning now so I will finish my “Screwdriver” and then it is off to bed! I will share some more of my idea with you tomorrow if that’s OK that is?  

Hans van Meer.

———————————————————————————————————-

THE JOY OF BONSAI EVENT 2010.


Hi, everybody,

I am proud to announce that I will be doing a demonstration again at this special edition of “THE JOY OF BONSAI “.

Make sure that you don’t miss this great event!

Hans van Meer.

ASSOCIATION OF BRITISH BONSAI ARTISTS PRESENT,
The JOY of BONSAI ’10

DAN BARTON • EVENT COORDINATOR
dantheman.barton@virgin.net

Hi Everyone,
The Association of British Bonsai Artists is delighted to announce that we will be bringing back the well known and ever popular JOY OF BONSAI event in 2010 (March 20th and 21st). Once again it will be held in The Pavilion, North Parade Road, Bath.

We do hope that you will be able to come along to the event.

• There will be an increase of demonstrators from the usual 7 to a mind-blowing 11(note, not Sundays).

• Space for up to 24 Traders offering everything imaginable for bonsai

• Supporting exhibitions of Bonsai • Shohin • Bonsai Pots • Virtual Bonsai •Kusamono & Accent Plants • Bonsai
Innovations (a new exhibition project for ABBA introduced and promoted by Simon Temblett)

• A full additional programme of associated Japanese activities such as Ikebana • Bushido • Tai-chi and many
more related activities that will take place on the stage.

• Bath also has its wide variety of tourist attractions and shops

• Excellent accommodation available to suit all pockets — check with:
Bath Tourist and Information Centre, Abbey Chambers, Abbey Church Yard, Bath, BA1 1LY   01225 462831

• There are four Park & Ride Services in Bath that operate from Monday to Saturday

Sincerely,
Dan

Info: karamottobonsai@hotmail.com

———————————————————————————————————