ROOTS DO GROW FASTER WHEN THEY ARE EXPOSED ABOVE THE GROUND!

Hi, everybody,

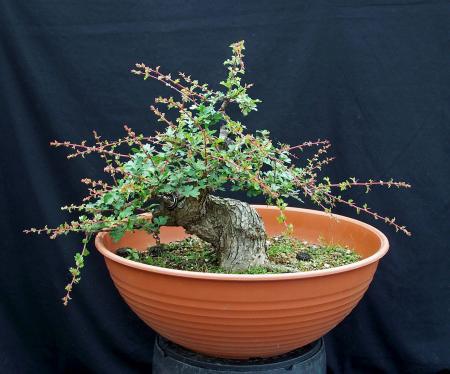
A few days ago I did some serious branch shortening and some branch replacement on this Ficus benjamina you see in the picture below. There is no wirring in this tree, only some to pull some branches down were used. I bought it some 15 years ago as a 7 inch high seedling at our local supermarket. It wasn’t much thicker than my pinkie back then, now the tree base is almost as thick as my wrist. Back home I planted it on a beautiful moon rock that I found at a local garden centre, leading the small root over the rock and through the holes and then I covered the rock and the roots completely with soil. I wanted to create the image I had seen on pictures of those large Ficus trees that grow over rocks and ruins in the jungle. After about half a year I started to remove a small layer of soil from the top, exposing the roots to the air and light. After a year or 2 all the roots were completely freed from the dark. During all this time the Ficus stood inside the house in my living room. Even now the tree spends about 8 months inside our house under need a window in the attic. Only the 3 warmest months in the Dutch Summer are warm enough to keep it outside during the night. And it is way to heavy to lift it inside the house every time it gets to cold! So naturally this Ficus is way less vigorous and grows much slower in Holland than it would do in the warm and moist climate of the tropics and there for it took the roots of this Ficus more than a decade to thicken enough to look believable. This tree is not really that good yet, but it is one of those trees you just can’t let go, it has become a part of the family!

17-8-2009 020

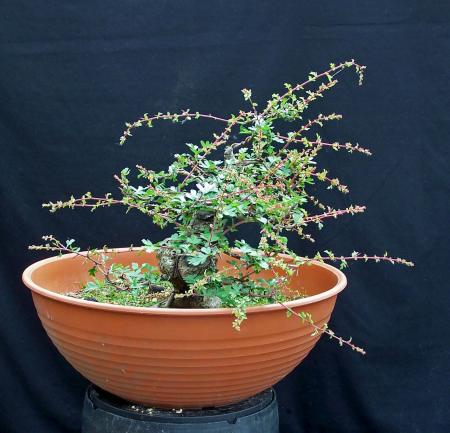
Above: Anyway, some 15 years ago the small scrub you see growing next to the base of this Ficus arrived out of now were, and it has since then lived as it’s partner on this rock. I only had to cut them too long stems every now and then, to keep the growth in check. But this time I decided to remove most of it completely from the back side of this rock, because during all these years this scrub had completely overgrown most of the roots on the back side, with a thick layer of old and new plant stems,  covering them just like a thick layer of soil would have don! It was actually the first time, in a long time, I could see these roots on the backside. And to my surprise, I discovered something that proves the theory that says: that roots exposed to light and air, grow faster and thicker. Now I know that there are more roots on the front side than there are on the back side, but if you look at the close up of the front and back side, I think, the difference in the thickness is too much to ignore!

17-8-2009 019

Above: Front side of the tree. All roots are at least twice as thick as the ones on the back!

17-8-2009 015

Above: Thinner and much weaker roots on the back side. The black area you can still see on the rock between the roots are the remains from the scrubs I removed. I find this difference truly remarkable and that is why I wanted to share it with you all! What do you think?

Cheers,

Hans van Meer.

Info: karamottobonsai@hotmail.com

——————————————————————————————————

THE PHILOSOPHER’S STONE.

Hi, everybody,

my post from July 27Th about “A rock planting that shows it all” got a bit more elaborated than was intended. I originally just started to write about the things that I had discovered in this uniquely shaped stone, but while I was doing this, I felt the need to go deeper into the importance of empty spaces in Bonsai and that took a bit longer than I had expected. I make no plans when I start writing about a idea that I suddenly want to share with you all. And more often than not it takes me a long time to find the right word, pictures or drawings to explain my feelings and thoughts. That is OK by me, but some times you have to hang in there a bit longer for the clues of my story’s! 🙂 I had some encouraging comment and questions from enthusiasts who are following me analyzing my thought about this rock, that from now on I would like to call “THE PHILOSOPHER’S STONE”! 🙂 So I will write down some of the other things that struck me when I was watching this stone that night. 

When I look at this stone below, I notice that it has a lot of visual speed. 

22-7-2009-040-hans-van-meer-22

You almost might think, that the stone almost magically rises from the right bottom corner, and from there our eyes quickly follow the waving movement of the stone to the left, where they are launched into space like a ski jumper leaving the ramp.

22-7-2009-040-hans-van-meer-5

But now look again and remember the natural viewing direction I spook about earlier.

22-7-2009-040-hans-van-meer-21

Bellow: Wouldn’t our eyes start from the left side of the object? Leading our eyes to the right, slowly downwards and upwards, trough the plants that grows in the valley of this stones. Then, a fast downhill descent, until we reach the solid ground again.

22-7-2009-040-hans-van-meer-10


worm-61

Its almost moves like a snake that quickly disappears into his hole on the right! 🙂

22-7-2009-040-hans-van-meer-3

Here I flipped the image over to show you the difference this will make!

22-7-2009-040-hans-van-meer-11

Now we first have to slowly climb a mountainside to reach the growth in the valley. Our eye movement with the image in this way is much relaxer.

More later! 🙂

Hans.

Info: karamottobonsai@hotmail.com

———————————————————————————

A UPDATE ON MY EARLYER MUGO POST.

Hi, everybody,

here is some more information to go along with my earlier “SERENDIPITY” MUGO post from last week. I do this after a received a comment on this post from my highly respected Bonsai friend Mario Komsta. In which he explained his concern about using this technique as a method for getting more buds to quickly fill your foliage pads with. Believe me, I do know that this pulling off needles technique should not be used for this purpose because it will only work for a short while! Your branch tips will get too thick and ugly in only a few years time! But it could be helpful to get weaker parts of your branches to bud more! And it could be helpful on raw material, where you need a lot of new foliage quickly!

“QUOTE Mario”

hi hans !
that’s a normal reaction to this situation with needles but it is not good.why?coz you will get in one spot many new buds which look very bad, you should remove all of them and leave only two or maybe three.the tree maintained like that will have superb ramification and very nice shape. moreover, if you leave more than two or three buds in the same place you will get a big ball at this place in the future. The way you are maintaining pines is incorrect ( fast to make density but ugly in the future ). keep in touch, Mario.

“QUOTE end”

But reading back what I posted earlier, I see why Mario responded and wanted to warn me and others about what will happen if you leave all these buds on the branch tips for the wrong reasons. And for that effort, I thank Mario, who is not too selfish to help others. He made me see, that I should not over-enthusiastically write a post expecting anyone to understand what goes on in my brain! 🙂 I should explain my self better the next time! 4 days ago I had removed almost all bud on the branch tips, leaving only 2 well-placed buds. I left 3 buds on the weak branches (see pictures below) and that fact, is why I was so excited! 3 buds on a, earlier, weak branch!!!! I wrote this post under the misconception that everyone knows that you should only leave two buds on every branch tip. Especially on a more established tree like this is. Because otherwise, the branch tips will become too rough and thick in a short period of time. But this unwanted side effect of the multitude buds growth that happened on my Mugo, was not why I was so excited and I  should have explained that right from the start!  So thanks Mario for your help! Here is what I should have posted as an explanation along with the earlier post, this is why I thought this technique could be interesting to me!


8-6-2009-003-hans-van-meer      8-6-2009-005-hans-van-meer

8-6-2009-008-hans-van-meer

Above: 3 days ago I removed all unwanted buds. Leaving 2 well places buds. The reason why I do this late is that until a few weeks ago, they were very hard to keep apart to safely remove them with a small tweezer!

8-6-2009-023-hans-van-meer

Above larch picture: This was last September a very weak branch with only a few long needles with a weak bud. If I would not have then, for another reason, pulled off some of the long needles from that year, I now still would have had a weak branch with only one weak candle. Cutting off that weak candle in mid Summer, would not have let to this much new buds, that I had got with this removing off new needles! Only the timing should be a bit better the next time, I believe it is better to pull off the needles in early Summer when they are still soft. This way the new buds that appear can strengthen during that same season! I will try it only on the weaker branches and candles! On the strong parts of this Pine, I will keep on working in the normal way. Because I don’t want my branch tips to become too full and thick! But I do think this could be a useful technique to get more buds on an otherwise weak inner branch.

mugo-21

Above quick drawing:

Left: Sept. 2008. If I would have cut off the candle (red line) like you would normally do with a stronger candle, to force this week bud into making more than one new bud. I would most likely end up with a slightly longer weak branch with still only one weak bud on it (Left bottom: July 2009) As so often happens with these tiny branches that try to grow in the more light sheltered places of a big Pine like this one. These tiny branches often die back by them self or are removed by use because the just will not get any stronger!

Right: Sept. 2008. But I had pulled off the too long needles, for purely aesthetic reasons, and that had triggered this tree into survival mode and sure enough, it reacted with an abundance of new buds on this and other weak small branches! The right bottom drawing: I left 3 buds on these weaker branches. Now, this otherwise useless branch has a real chance to become a strong branch that can become an important part of the branch design. More important, because it grows strongly there now, I would be able to shorten the big branch it grows from in the future, if this would be necessary!

So I hope this makes it all a bit clearer! I will keep you all posted if I know something more to tell! I am happy with so many buds on my inner growth and weak branches!

Thanks Mario for your input and help, your thoughts on this are always welcome my friend! 🙂

Cheers,

Hans van Meer.

A MUGO “SERENDIPITY”.

Hi, everybody,

Might I have accidentally stumbled on an interesting technique here? Look at the next pictures I made of my Mugo Pine “Big Ron” and you will see what I mean!

 3-6-2009-086-hans-van-meer

3-6-2009-059-hans-van-meer1     3-6-2009-085-hans-van-meer

3-6-2009-078-hans-van-meer

See what I mean?!

Just before this Bonsai was entered into the “Ginkgo Awards 2007”,  that was staged in early September, I pulled off the too long needles of the new growth/candles, that were sticking out too much. Leaving only a few needles on the now almost needleless candles. Now, I do, know that with more or less this same technique, the same result can be obtained on a Pinus Sylvestris. They will react to pulling off needles of new candles, just like they would do, when a deer nibbles off the fresh young needles, in early Summer. They will burst out in a multitude of new clustered buds. These new buds will later open up with much smaller needles than otherwise would be normal! But, that a Mugo Pine would react this strongly when its needles are pulled off as late as September, is news to me! So this is “Serendipity”, stumbling onto something good, by accident! 🙂

I will keep you informed about the future of all those buds. Because with some more testing, it could become an interesting and useful Mugo Pine techniques in my opinion.

Regards,

Hans van Meer.

Info: karamottobonsai@hotmail.com

———————————————————————————————

THE COMPLETE STORY OF “BIG RON” IS NOW POSTED ON MY WEBLOG!!!

Hi everybody,

I would like to let you all know that I am almost finished posting, The story of “BIG RON”, onto my website! I am just about ready with the more than 100 pictures that show “BIG RON’S” road, from a Yamadori from Italy, all the way to the famous “Ginkgo Awards 2007” in Belgium! And for the first time shown, pictures of the rare invasion of “BIG RON “! 🙂

Tomorrow I will post all the text that goes along with the images. If you would like to check it out, click  HERE. Where you will find the four-part of “BIG RON’S” story so far! Just click on the pictures above the story you like to read and you are there!

I really hope you enjoy this little story!?

Cheers,

Hans van Meer.

Info: karamottobonsai@hotmail.com

—————————————————————————-

SECOND FLUSH OF NEW GROWTH ON MY SMALL HAWTHORN.

Hi, everybody,

I would like to share some pictures of the abounded second flush of new growth on this small Yamadori Hawthorn. After the first cutting back of the new growth, earlier this growing season, it responded with a lot of new, brightly red colored, small branches, with tiny leaves! The exact timing to cut back this new growth is crucial! If you wait to long to cut back this new growth that will be used to form the smaller ramification on the already shaped main branches, they will become to thick fore there intended purpose! I only allow these new branches to grow, were I need main branches to thicken (sacrifice branch) or were I need a new branch that is thicker and or longer! These will be allowed a bit longer and will be cut back in a few weeks time. The ones I cut today are shortened to about the second pair of leaves, depending how long I need them to be! Hawthorns can become very ruff in their branch structure if you allow small branches to grow to thick and long on a small tree like this one. If this is the case, in just a few years, your to thick branches will need some major cutting to open it all up again. And that means a lot of scares on a tree species that those not heals scares very well and slow! The can grow large bulbs of bark on trunks or at the end of shortened branches were big cuts were necessary! These big lumps of bark are almost impossible to correct, leaving you with the only option of cutting back that branch to before that bulky scare! So timing your branch cutting is very important for a nice clean future branch structure that can grow freely for many years with out many problems on a small Hawthorn like this one! And when you finally do have to cut back some of your branches in the future, your work will be much easier, you just cut to were you allowed a smaller branch to grow all those years ago!

08-06-2009-kleine-meidoorn-003-hans-van-meer

08-06-2009-kleine-meidoorn-006-hans-van-meer 08-06-2009-kleine-meidoorn-011-hans-van-meer 08-06-2009-kleine-meidoorn-008-hans-van-meer

08-06-2009-kleine-meidoorn-013-hans-van-meer

After the pruning. It might not look as if much is removed or shortened from this picture, but believe me, there is! And just in time to prevent unwanted branch thickening or lengthening! What is don today will show in a few years when the tree is shown in its new pot as a Bonsai!

I can hardly wait! 🙂

Cheers,

Hans van Meer.

Info: karamottobonsai@hotmail.com

——————————————————————————————————

SOME MORE WORK ON “WOLFIE” MY MUGO PINE.

Hi, everybody,

a few nights ago,  in the middle of the night, after a long study of how this old mountain Pine looks at this moment in time, I decided it was time to style the large Jin on “WOLFIE”. This small tree is already so far in its progress towards its planned design, that I can now see what to aim for when I start to work on its deadwood.  I prefer to leave important deadwood decisions alone until I know how my planed Bonsai design looks in real life, instead of as only just a picture in my mind.  This delicate work is too important for the success of this future Bonsai. So I choose only to start sculpting the deadwood, when I cant see the total, near finished,  picture of the Bonsai! And in this case, I had seen the light! 🙂 So next morning, I was waking up the neighbours with the sweet sound of my dremmel! I love the smell of warm deadwood in the morning! 🙂

06-06-2009-woolfie-002-hans-van-meer1

“WOLFIE” just before the work on the large Jin on the left begone.

I had placed a piece of wood under the pot to tilt the tree backwards. This opened up the view inside the tree more and improved the movement a lot! From this picture, it is obvious that the Jin is too long, thick and wrongly shaped. But worst of all, it pulls the tree downwards to the left and that needs to be solved and improved! The root base is rather special, consisting of a deadwood part (left side) a Shari on the front (centre) that ends into a  root and a strong root on the right side and a stone that is peaking around the right side of the trunk. But because of all these fixed roots, there was not much room left for changing the planting angle to improve the lines of the trunk! This was always a limitation in designing this tree, but also a great challenge! Because when you successfully overcome or incorporate problems into your design, the future Bonsai will become way more interesting and even more beautiful to look at!

06-06-2009-woolfie-008-hans-van-meer1  This would be the ideal new line that separate the live and dead part of the tree. This wil bring more movement and taper in this strait section of the trunk.

Left: First, the tree is extra secured to the pot with a copper wire. To avoid any movement that might damage the roots, while working on the deadwood.

Right: This red line shows the ideal new line where the live bark will meat the deadwood in the future. This will bring more movement and taper to this straight section of the trunk.

06-06-2009-woolfie-010-hans-van-meer 06-06-2009-woolfie-016-hans-van-meer

Top: Red arrows, the bark is already removed,  this gives me a better idea of how to shape the Jin.

Bottom: I used a knob cutter to shorten the Jin. A saw or power tool could shake the tree too much in its pot! Besides that, I love to do these tasks slowly. They are over before you know it and you can only do them ones, so you better enjoy the moment! 🙂

06-06-2009-woolfie-017-hans-van-meer  06-06-2009-woolfie-023-hans-van-meer

Left: The deadwood is already reduced to the point where I can start shaping it into its new form.

Right: Red arrow shows the old direction and the White arrow shows the new direction of this Jin.

06-06-2009-woolfie-044-hans-van-meer  06-06-2009-woolfie-045-hans-van-meer

Left: Backside of the Jin.

Right: The red arrows show, that even in the creation of this Jin, I tried to create a difference in dept! Preventing this Jin to become too flat and boring.

06-06-2009-woolfie-049-hans-van-meer      06-06-2009-woolfie-056-hans-van-meer

Left: The rough version of this Jin is finished. The detail work I will do later when I am more used to the present image of the whole tree!

Right: The red arrow shows the old downward direction of this Jin. This was pooling the eyes downward, away from the tree. Making the tree unbalanced and the middle trunk section too long and straight. The white arrow shows the new upward direction, pooling the eyes back into the composition of the tree. Now the tree is more balanced and compact!

07-06-2009-woolfie-169-hans-van-meer

Red arrows: Pieces of wood were used to lift the old branches, with Shari, into there position.

White arrows: Some were in the history of this tree, the trunk was forced to grow to the opposite direction and years later it happened again, further up the trunk! Leaving those almost straight folding scares, that seems to be made by Mother nature with the help of a ruler. 

07-06-2009-woolfie-179-hans-van-meer

This close up nicely shows the movement of the lower trunk. This movement, in real life, softens the straight line of the second part of the trunk. This is hard to see in most photos taken from the front side. Check out the 2 little stones in bedded into the left side of the trunk! They must have grown into the trunk, many, many years ago. I love those details of age in my Yamadori!

07-06-2009-woolfie-181-hans-van-meer1

Right side view of the tree. Here again, you can see the movement of the lower part of this tree. The stone between the roots has been there always and always will.

zzzzz12009520hans

“Wolfie” before all my work started. If you like to read how he was styled over the years, just click HERE !

07-06-2009-woolfie-125-hans-van-meer

I am really pleased with the image that this difficult Bonsai is showing already. I love the twirling movement of the trunk and the inclination to the left side. The movement, back to the right side, that starts from the Jin, pulls the tree back into almost balanced. This can be more appreciated in the future when I repot it in a more suitable pot. I lifted the top a bit more, to make the overall picture more rounded. This softens the straight line in this bonsai even more. Now only the Jin protrudes out through the circular image of this Bonsai, creating an interesting escape or resting point for the eyes. I love the negative spaces, that play such an important part in the success of this design. This tree has almost perfect disbalance! 🙂

07-06-2009-woolfie-077-hans-van-meer

“SO TROW THOSE CURTAINS WIDE, ONE DAY LIKE THIS A YEAR’D SEE ME RIGHT.”

From “One day like this” by one of my favourite bands of this moment “ELBOW”.

I had a great day and I hope you like the progress of “WOLFIE” so far?

Cheers,

Hans van Meer.

Info: karamottobonsai@hotmail.com

———————————————————————————–

UPDATE ON MY LARCH (XL).

Hi, everybody,

for today I planed to remove all the wire that was starting to dig into the bark of (XL). This is something that seems to happen in just a few days, so you have to check the tree every day. But before I started to do this tedious task, I took some pictures of how the tree looks at this time, that I would like to share with you all! 

31-05-2009-2-002-hans-van-meer 31-05-2009-2-005-hans-van-meer 31-05-2009-2-010-hans-van-meer

31-05-2009-2-018-hans-van-meer

Cheers,

Hans van Meer.

Info: karamottobonsai@hotmail.com

—————————————————————————————————-

MY FINISHED PINUS SYLVESTRIS LITERATI.

Hi, everybody,

in the next couple of pictures, you can see an impression of the styling proses of this Pine.

26-27-05-2009-004-hans-van-meer1   26-27-05-2009-003-hans-van-meer1

Left: After a lot of turning and tilting, I selected this as the future front for the tree. Most of the flows are hidden from this side and the good point, like the Shari and the nice bark, are highlighted. I tilted the tree to the left and towards the viewer, to give it more movement and interest. The only problem with choosing this as a front is that the future top is growing in the opposite direction, away from the viewer.

Right: Back side of the tree.

24-05-2009-020-hans-van-meer1    24-05-2009-025-hans-van-meer

Left: Here you can see the beautiful old bark on the trunk and right side branch. Because of the small Shari’s on this old branch, the bending to bring it into its position must be done very carefully!

Right: Point A is the selected front. As you can see from point B, that section grows almost in the opposite direction. The old branch with the Shari is wired in such a way,  that the wire covers more branch, to prevent it from breaking!

26-27-05-2009-029-hans-van-meer    26-27-05-2009-035-hans-van-meer

Left: The top section is protected with a tight layer of wet raffia. Then 4 pieces of copper wire are placed along it lengthwise.

Right: Than another layer of wet raffia is applied tightly. And then finally a layer of normal copper wiring is applied! The 4 long pieces of wire that stick out from under the end of the raffia are used to wire the rest of the thicker branches of the top.

26-27-05-2009-038-hans-van-meer 26-27-05-2009-041-hans-van-meer1 26-27-05-2009-044-hans-van-meer1

In the above sequence, you can see the top moving slowly toward the new front. This was done very carefully, without any hast!

26-27-05-2009-077-hans-van-meer

The final styling for now. I know that in my drawing I converted the right branch into a Jin, but for now, I decided to leave it on. It fits better into the design than I had expected, so I will see how it fits into the overall design after a couple of years. I can always cut it off later. There is no rush! It has become a bit of a strange design, balancing on the edge of dis balance.  The branch placement and the length of some are also not common. But that is what makes this design interesting to me and I hope to the viewer as well!? The new movement of this tree and branches can be better appreciated in real life. For now, I am pleased with the outcome of the image for this difficult tree. And I hope that in a few years the tree is more presentable as a representation of an old and battered mountain Pine that I admired so much while walking through the European Alps! I also hope that this styling has proven again that you can make an interesting Bonsai from not the obvious and best material in the world! There is beauty to be found in almost everything!

Hope you enjoyed this styling session?

Hans van Meer.

Info: karamottobonsai@hotmail.com

————————————————————————————————-

MY DESIGN FOR A DIFFICULT PINUS SYLVESTRIS.

Hi, everybody,

for the last couple of day’s, I have been working on one of my Pinus sylvestris Yamadori I collected in the Austrian Alps. The long hanging branches on this small tree, remind me of the large and tall trees I saw while walking through those wonderful mountains there! But to realise that vision into this tree, was and is not that simple! Although the tree has some nice features, like old looking bark and two old Shari on the trunk, overall this tree has really a lot of problems that need to be solved or incorporated into the future Bonsai design! Just like I like it the best! I spent hours just looking at all the possibilities, looking for something exciting and beautiful in the material. And then it hit me, so as always I made a quick drawing of the design I  discovered in the tree! As a blue print for my mind!

I will show pictures of the end result in a few days. First, some more puzzling needs to be done.

img-71

Later,

Hans van Meer.

Info: karamottobonsai@hotmail.com

———————————————————————-