STYLING MY STOWAWAY SPRUCE.

Hi, everybody,

last week I spend most of my time walking along the coastline not to fare from where I live. It was the warmest week on record with temperatures way above the twenty degrees mark! It was amazing to enjoy the warm sun this late in the year after such a bad bad Summer! Would you believe that I even had a lovely swim in a mirror-like calm sea on the first two days of October! But in between this Indian Summer fun I managed to restyle my Spruce that I brought back from a workshop and demo weekend that I did in August 2008 for the “Norsk Bonsaiselskap”in Norway. Link:  http://hans-van-meer.ofbonsai.org/2008/08/ A student from Sweden had brought along this yamadori, that he had collected himself, to work on. After the workshop, he swapped the tree with one of the organizers for some pots and other Bonsai related paraphernalia. And  I bought it from them because I liked it and it would be a nice reminder of the great time I had in friendly Norway! But I got there by aeroplane so there was one major question to be answered…would it fit into my trunk?! Well, my friend Rune, where I stayed during that weekend, helped me to pack my little stowaway tree like it was a priceless desk lamp! 🙂

People often ask me why I always bring such a big trunk along? Well, this is why!

      And this is the first picture of the tree unpacked and safe in my garden.

And this is how the tree looks after I restyled it a few days ago. I must look
for a better pot though, I don’t like the colour of this one ! 🙂

I think that this simple little tree already has a nice and pleasing image, but I don’t like where the bottom left branch is growing from. It is disturbing because it grows from the inside of that curve! I will replace it as soon as the branch above it has thickened enough. For now, it is back to growing happily for a few more years and then we will see what happens! Before I know it, it will be time to go and find me a nice pot for it!
This Friday I will travel to Slovenia to do a weekend workshop and demo! I can hardly wait to go and work with all those new Bonsai friends!!! I will post images from that trip as soon as I get back home! So watch this space!
Cheers,
Hans van Meer.

Info: karamottobonsai@hotmail.com

——————————————————————————————–

MY WORKSHOP AT V.B.V “DE LEIE” IN BELGIUM.

Hi, everybody,

on 17 September I gave a workshop at V.B.V “De Leie” in Deinze (Belgium). All day I worked together with about 10 very enthusiastic students and the day was over before we all knew it! I enjoyed myself very much working with these very friendly people and I would like to share some images from this fun day with you! If you are looking for a fun Bonsai club in the area of Deinze (Belgium) here is the link to their site: http://www.vlaamsebonsai.be/?q=node/49

I hope you enjoyed the pictures! Next weekend I am heading to Slovenia to do a workshop on the Saturday and a demo on Sunday! I am so happy that I am able to do this fun stuff again!

Cheers,

Hans van Meer.

Info: karamottobonsai@hotmail.com

———————————————————————————-

————————————————————————————–

SOME HANDY WORK FROM TWO BONSAI FRIENDS!

Hi, everybody,

two of my Bonsai friends on the IBC forum are responsible for the next virtual! Kev Bailey posted this beautiful picture of an evening sky with a “Z” from Zorro in it and Ed van der Reek virtually planted my “Z” next to it!

Picture by Kev Bailey and virtual by Ed van der Reek.

Cheers,

Hans van Meer.

Info: karamottobonsai@hotmail.com

—————————————————————————————————

RESTYLING MY MUGO PINE NAMED “Z”.

Hi Everybody,

In early 2002 I had the honour to be invited by Mark Noelanders to give a 3-hour evening demonstration in March of that same year at his Bonsai club in Belgium (B.A.B Belgium Bonsai association). Although I was really excited at the prospect to give a demonstration at this club that already had seen most of the big names demonstrate, it also put me under a lot of pressure! How and where could I find material good enough to work on that would entertain this knowledgeable crowd? I spend many days visiting all my regular material addresses here in Holland, but could not find anything remotely interesting or good enough! So in a last desperate attempt to find something, I drove with my wife An through Belgium to try our luck at the Bonsai dealers we knew there!  At the end of a long day driving, without finding anything suitable and affordable,  we had become pretty desperate! We had only one more Bonsai centre to visit and had not had much hope to find something there. But we did! In the back of the garden, hidden away from sight, we found some really weird and impossible-shaped Pine yamadori! And that was just what I was looking for, ugly and affordable! J
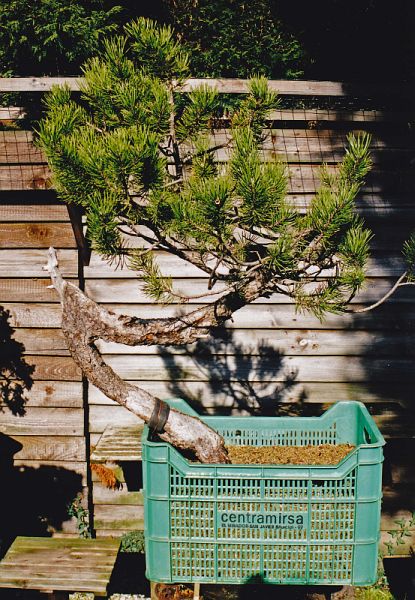
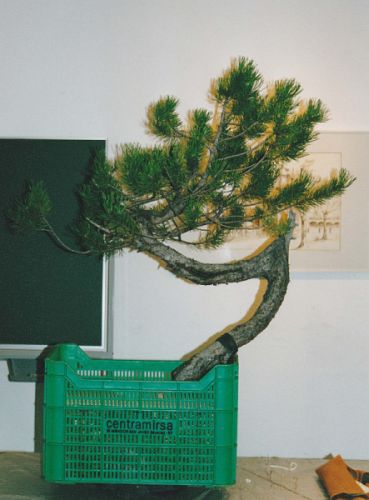
One-off them immediately jumped out to me, a Mugo that looked like the mark of Zorro! It was basically a long and thin Z-shaped tree full of mistakes and with only some long branches at its top. The base and the first 10 cm/2,5 inch upwards of the trunk were really thin and then suddenly changed into a big lump that was created over many years with old deadwood and thick live vain running over it! From there the trunk becomes thinner again and stays the same thickness until the first sharp bent to the left. The next section of the trunk is slightly curved and goes abrupt to the left and back downwards. Some time long ago this section of the trunk was split right through the middle by mother nature, leaving a long opening that looked very strange! And again this section also had no taper whatsoever! At the end of that section, there was another abrupt change of direction to the right side from which one thick branch and a few thinner ones grew upwards. Out of these branches I  had to create the whole future Bonsai! A big risk to try in a 3-hour demo, but this is what I like to do, trying to create a Bonsai out of challenging material! Because when it all falls together and it works it can become really special and unique! I always had, and still have, that motivation to work with impossible and unlikely material! At first because there simply just wasn’t any good material to be found here in Holland, but later I discovered that I really like that challenge to find something interesting or even beautiful in these ugly duckling trees! So this Mugo, which we instantly named Z, was just right to show what my interest in Bonsai.

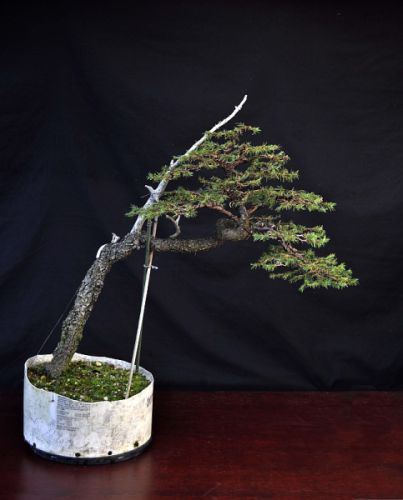
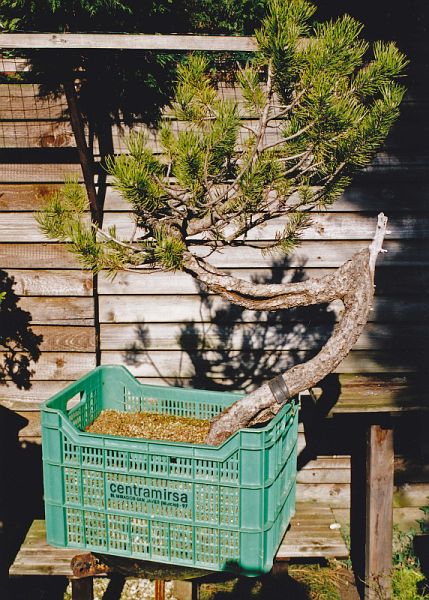
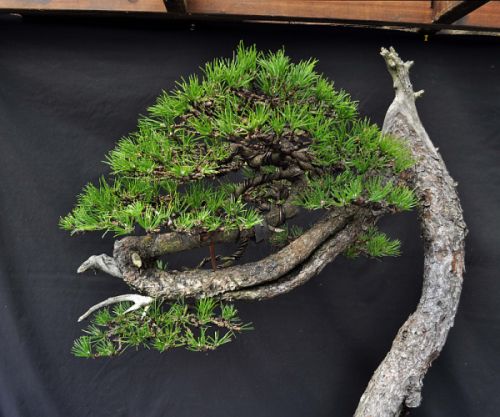
Below: The first pictures of  “Z”  in my garden. This is the planned front side of the tree.

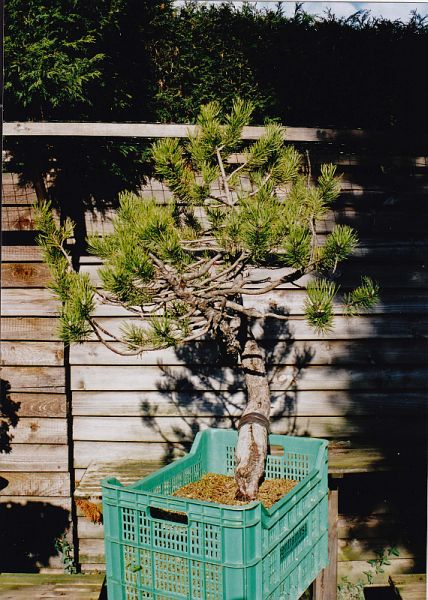
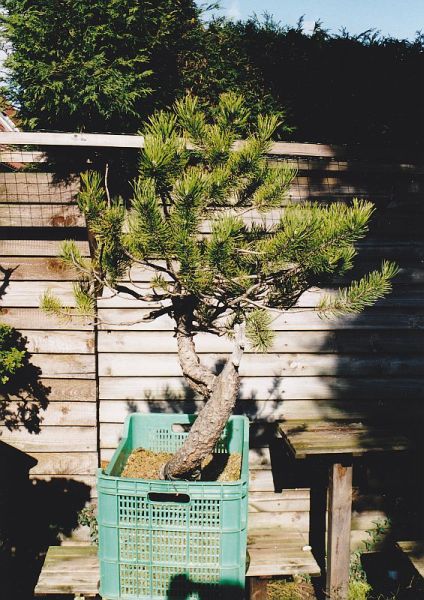
Below: Left side view. notice that in the whole of the trunk there is almost no movement to the back of the frond. So I had to create some sort of dept with the foliage!

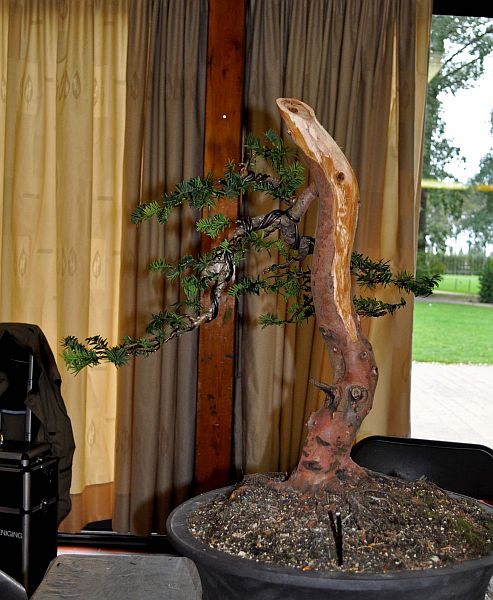
                                                  Below: Backside of the tree.

                                                     Below: Right side view.

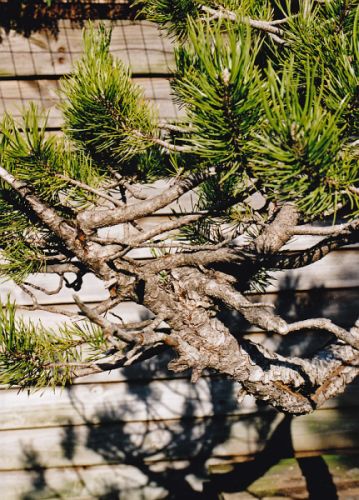
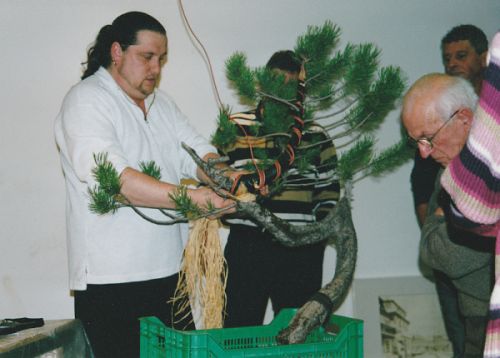
Below: Close up of the section where all the branches grew from. Only the thick branch will be used to create the whole top section!

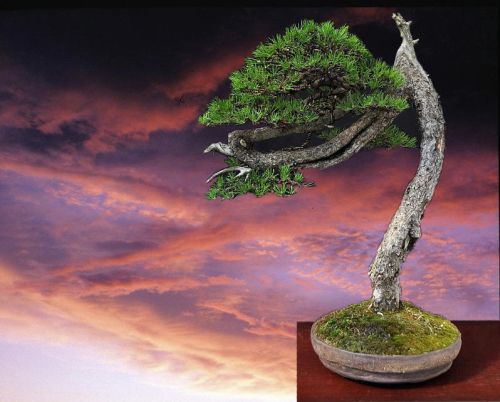
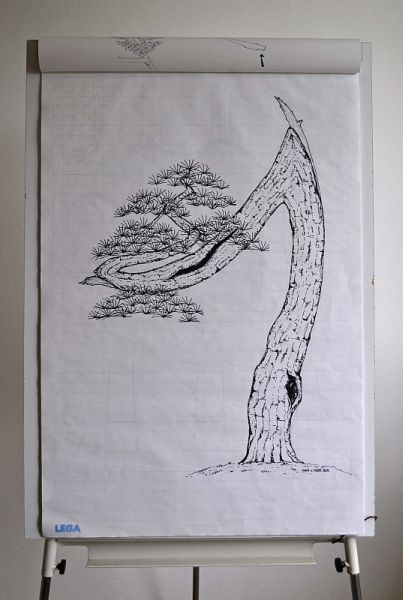
             Below: This is the design that I made as a reverence for the demo.

                                      Below: Before the demonstration started.

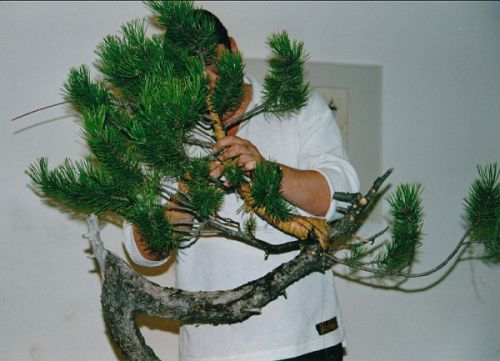
Below: Just one the right side of my top hand finger is where I sawed out a wedge, separating the branch from the deadwood section on the right. Allowing (I hoped) the branch to bend easier and further to the left side! The branch will be protected from breaking and ripping with layers in water socked raffia, tape and thick copper wire.

Below: This is probably the first demo tree that could receive Belgium radio!

Below: The audience was allowed to get real close to see what was going on. Just the way I like it!

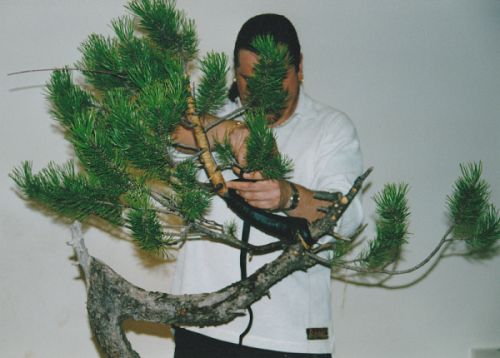
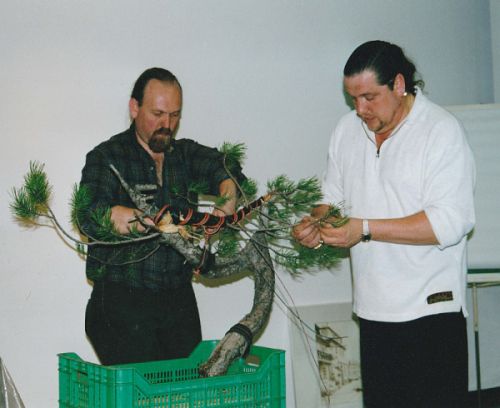
Below: The most difficult part of this demo, bringing down that thick branch, has worked out just fine. Without any splitting or cracking! But to make it in time I had help wiring the last branches from one of the friendly members of the club.

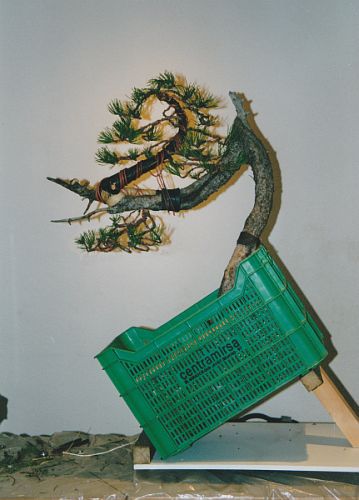
Below: At home, I had made construction that tilted the tree and pot into the desired angle and held it in place during work!

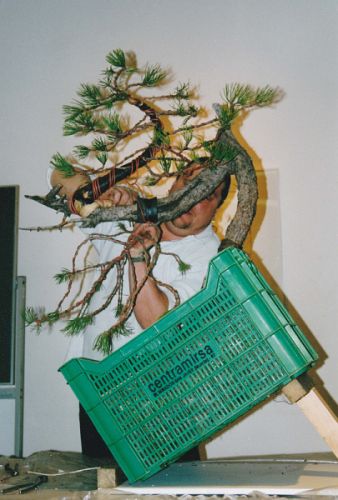
                                             Below: Bonsai is hard work! 

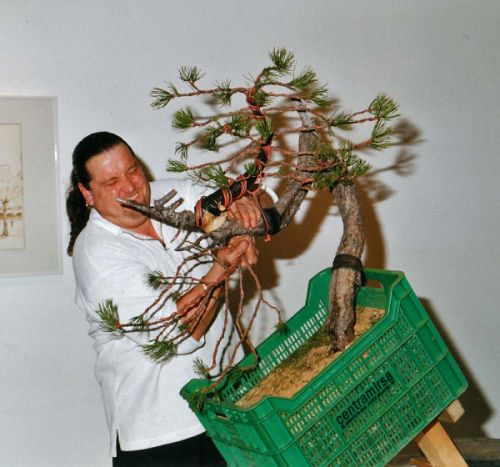
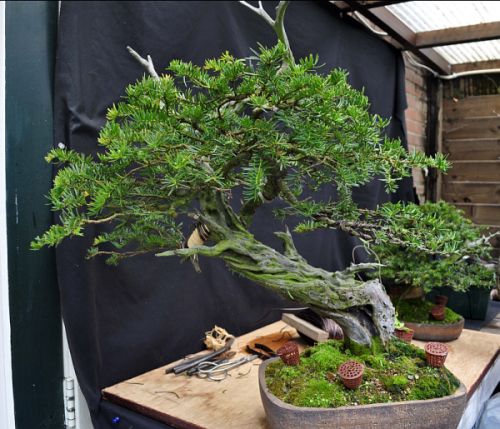
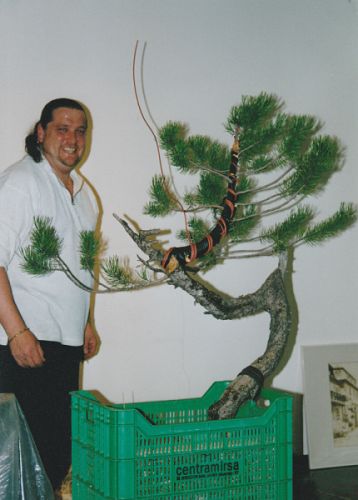
Below: The finished result of 3 hours of hard work. Before I started I had explained to the audience that I would not try to make a compact tree. Most of the foliage was simply too far away from the base of the trunk and I don’t like to twist and curl long branches just for the look of it. So I just created the desired outline of the long branches. And in the coming years, I will use the proper technique to force the tree to back bud so that over time I could shorten those long branches to the desired length! 

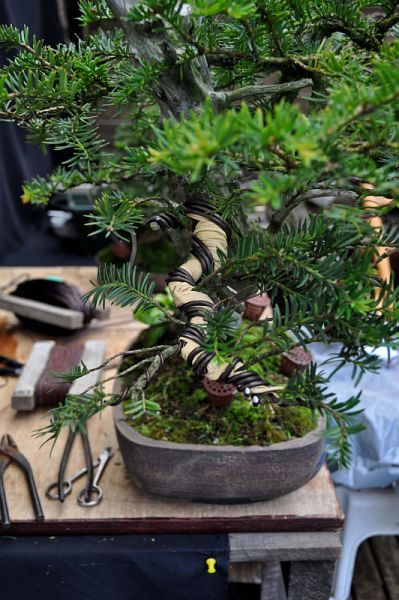
Last week, almost 10 years after its first styling,  I restyled “Z” once again. Below: 3 major branches were removed during this restyling.

Below: Close-up, as seen from the right side, of the strange but beautiful deadwood section on the lower part of the trunk.

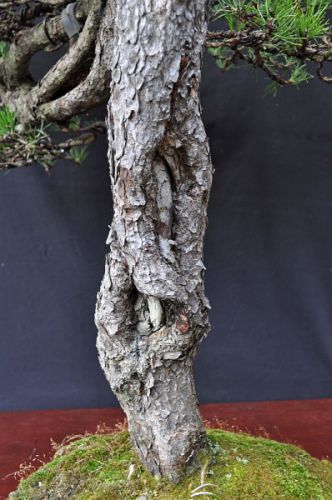
                                            Below: Close-up of the split trunk.

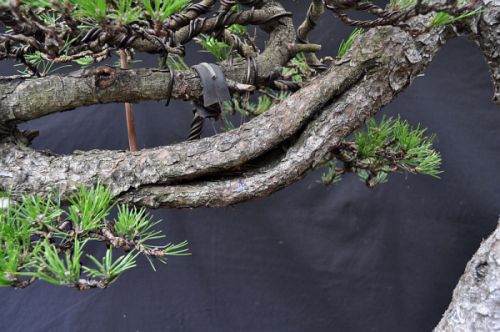
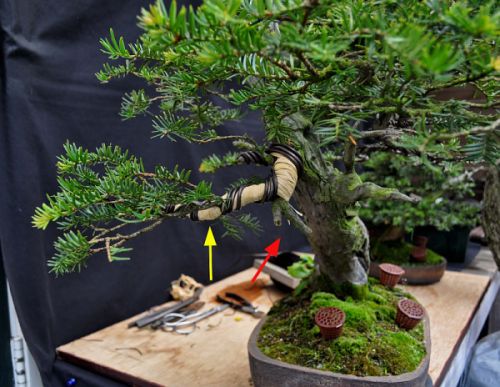
Below: Close-up of the thick branch that, with the help of a cut-out wedge, was controlled and ripped away from the deadwood. The green arrow shows the point up to where the branch was attached to the deadwood (yellow arrow).

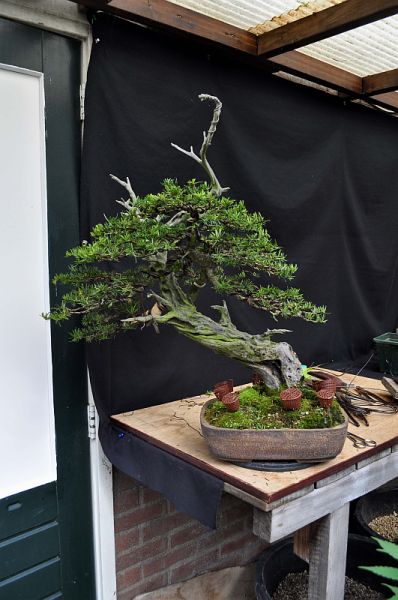
Below: Close up of the finished top section. Most needles are just 1,5 centimetre/ half an inch long!

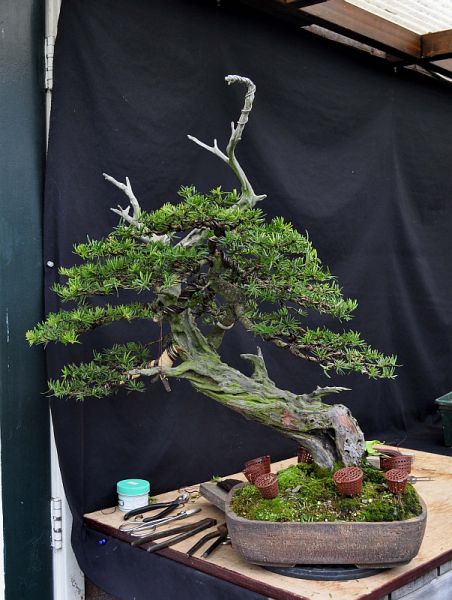
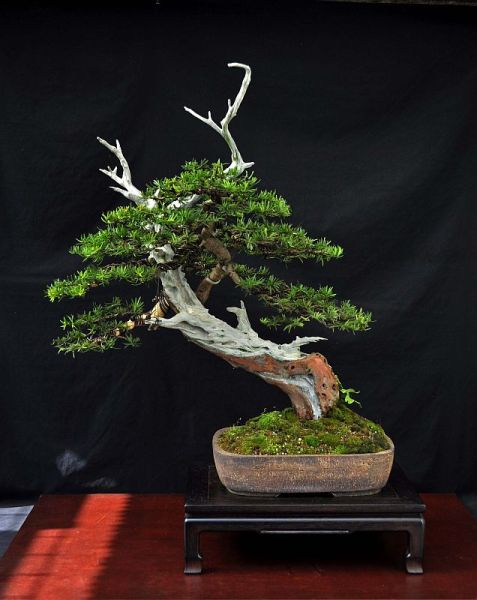
                          Below: The finished result in a pot by Brian Allbright.

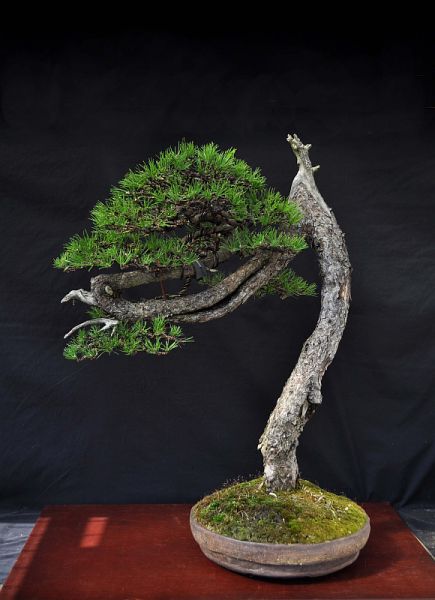
I am pretty pleased with the new image of “Z”! I like how she changed from an unwanted tree into an impressive Bonsai!

I hope you enjoyed this story?!

Cheers,

Hans van Meer.

————————————————————————-

Comment/question by Jack Sales.

Very interesting read.  Thank you for posting.  I was wondering if I could ask you a really quick question?  I have a mugo pine from a nursery with a lot of top growth and a small amount of weaker growth further down.  When would be the right time to prune the top branches away to allow the lower branches to develop?
http://www.flickr.com/photos/65635415@N02/6097606096/

Hi, jack,
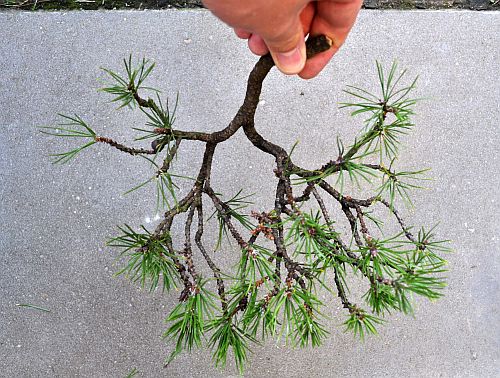
sorry for the late reply, but  I simply forgot to answer you! 🙂 I had a look at your picture and I saw a typical nursery Mugo with long thick branches with mostly only growth at the end! Getting foliage to grow closer to the trunk on Mugos like this will take a long time but it can be done and it is a good practice to understand the growing habits of this species! I don’t know where you live but this late in the season you can only cut back the too-long branches up to where a smaller branch grows from it. But don’t cut that thick branch too close to that smaller branch! Make sure to leave some room for the old branch to die/dry back! A stump of about 1 cm/0.4 inch will be more than enough to protect that small branch from harm! Seal the woods with cut paste. Later next season you can remove that dried-up stump with no problem! Now would there still have been older needles along those long branches, they stay on there for 2 or even 3 seasons then you could have cut back any branch right back into that old growth! This can be done from early in the growing season to mid-Summer! The tree will then react with loads of new buds all along your branches growing from the base of those older needles! That would have saved you a lot of time! With your Mugo it will be a case of lots of feeding and removing candles to promote back budding lower on those branches. If it helps you can find these techniques in an article that I wrote about two-needle pine care on my website! This article will explain most of these techniques in words and pictures! Hope that helps you some, if not you can always ask me for more advice, even if I sometimes forget to answer! 🙂
Good luck with your Mugo!
Cheers,
Hans van Meer.

Link to the article on my website: http://www.karamotto.org/?page=40

—————————————————————————–

RESTYLING MY OLD YEW.

Hi, everybody,
I would like to show you some pictures that were made a couple of days ago during the restyling of my old yew! This yew is very special to me because it is the first Yamadori that I ever collected. And this is how I was able to do so. During the first Ginkgo Awards in ’97, I met Tony Tickle and the gang for the first time. And let’s just say that it clicked from the start and leave it at that! Very Happy We had so much fun! So much so that we all together made the Japanese guest of honour faint during the prize presentation after the gala dinner! True story this! Anyway, during that same weekend, Tony had invited me to come and stay at his place for a weekend of fun and Yamadori trips! I gave it some serious thought for 0,009 off a second and then said in a high-pitched voice YES!!!! So in early 1998, I drove all the way to the North of England. And the Yew in this story was the very first tree that I collected on the first day! As you can see in the picture below that I was pretty happy and excited! Collecting this tree changed my future in Bonsai because it was the one that got me hooked on this way of doing Bonsai. So this tree holds a lot of warm memories in it! Not in the last place because of all the fun that I had with madman Tony!

Below: At the end of that same year, the upper part of the tree sadly died. Of
the few branches that survived on the lower part of the tree, only two strong
young branches were usable in my design! So I would try to shape this future
Bonsai is out of only two branches! And the part that died will also be incorporated
into the future design! It is after all a sign of this tree’s past! But my first
care was to get the poor Yew back to health!

Below: And by 2003 it looked like this. The picture is not that good, but it is
the best that I have from that time. The tree has recovered well from its
ordeal! The higher of the two remaining branches has grown into a trunk from
which new branches have grown. The second lower left branch is styled as a
cascading branch to fill that empty space. This hanging branch pushes the whole
tree upwards, making it more balanced!

Some 2 years later the tree started to lose its health and became very weak. It
took me up to now to get it back into its usual form! But it had sadly lost
most of the important left-hanging branches. Only the back part of that branch had
survived those bad years!

So today I am really pleased that this special tree is still with me and that after it had these few rough years it is healthy enough again for me to restyle it!
Below: The tree before styling. The live part of the left bottom branch is wrapped with a layer of water-soaked raffia. Then two lengths of 2.5mm aluminium wire were applied lengthwise on the outside of the future new curves. I need to bend this now backwards-growing branch as much to the front as possible. These two lengthwise placed wires will prevent the branch from breaking on the greatest stress point, the outside of the new
curves/bends that I will bring into the branch! That was followed by another layer of tightly applied raffia. And then finally two normal layers of 3,5mm aluminium wire were brought one! This should be enough to protect the branch from breaking, hopefully! Smile The long Jin you see in the front of that branch will be used as an anchor point for the
guide wires that I will need to hold that heavily bend branch into its new place.

Below: side view, the red arrow shows the remains of the part of that branch that use to grow towards the front. The yellow arrow shows the branch that now needs to get as close as possible to the former place of that important missing branch!

Below: Well it worked even better than expected! From where the branch is now it is possible to give that branch enough weight to balance the design. So I was really happy with that result!

Below: Basic outline is there. I like the bottom left branch, but the branch above it is overpowering it. It is too long and most of the smaller branches at its tip are long and weak with not much change for future new buds. So why wait for something that probably will never come?! So the branch was cut back drastically to change its appearance but also to redirect more energy into the strong zones!

Below: Here the branch is cut back to an intersection with a smaller side branch (yellow arrow). This branch will replace the cut-off branch as the new leader.

Below: Branch is more or less in place and I am glad about the result of cutting that thick branch off!

Below: Look at the difference open spaces and more separations in the foliage makes!

Below: And after a lot more work! This is the finished result for now! I had plenty more pictures, but I had to stop some and it is getting very late over here! Smile I am glad that I was able to bring some of the tree’s original image back into this new design!

In the future when new buds appear higher on the newly formed branches they can be shortened just that little bit more to make the tree look just that little bit more compact! And the Jin that now holds the wires for the bottom branch in place will be shortened and restyled as soon as those wires can be removed! But for now, I am glad that my old friend is back with his new haircut! Very Happy
I hope you enjoyed this little story!
Cheers,
Hans van
Meer.

PS: That little fern that you can see growing in that last picture, on the right side of the trunk, has landed there by pure change! I find them all over my garden and in many Bonsai pots as well! Normally I remove them and make them into accent plants, but this one…well it looks all right for now. And they play chess and poker together..so I really did not have the heart to separate them! Sad Very Happy

————————————————————————————————-

comment number 1 by: lacike

September 6th, 2011 at 6:07 pm e

Beautiful tree!

It might be a off-topic, but what was the cause of the die-off problems and how did you solve that?

Thanks

Hi Lacike,
I think that it was a combination of two things that weakened this tree. First: underfeeding and second: standing in the soaked ground for too long! Last season
I started to feed most of my trees weekly with a liquid Fertilizer and several times
during the growing season, I sprayed the foliage of my yews with fish emulsion.
That worked wonders on the weaker trees! I discovered the soaked ground problem
two years ago. I had repotted two trees, a fat trunk Acer buergerianum and a
Acer palmatum twin trunk in a shallow pot, because the water did not run out of
the pots like it was supposed to do. I shortened the well-established flat roots by
more than half and planted them back in their original pots. With, like always,
a bottom layer with large grain-sized akadama, Kiryu and Bims. Then a thick
layer with a smaller grain size in which the bonsai is planted. And then a thin
layer of smaller grain size to fill the pot up. Now you would normally expect
that the water would run right through using a loose and open-ground mixture like
this. Well, it didn’t! At least, not all of it! After repotting I watered both
trees and I placed them in a sheltered spot. The next day I tilted the pots and
placed a piece of wood under need them. After just a few seconds the water started to run out of the drainage and wire holes on the lower part of the pot. Now I could
imagine that this would happen with a wide and shallow pot, but not with a
regular pot with 3 large draining holes in them! So I started to test this on
all my bonsai, which all have more or less the same open soil mixture. And more
than half had the same problem! There was more water left in those pots than I
could ever believe. And one of the Bonsai that suffered from this drainage
problem was the yew in this story. So now every time after watering or when it
rains, I will put a small wooden block under one side of all the trees that
retain too much water! Tilted in this way much less water will stay behind on the
bottom of the pot and the water that stays behind only fills the corner of the pot
and not the whole pot! It is wise to check the drainage of your bonsai/pot every
now and then. Roots grow and fill out the pot, so things change all the time! I
know that those small blocks under need my problem trees/pots make sure that
they don’t drown anymore to prevent root rot!
Hope that this answers your question?!
Cheers,
Hans van Meer.

Info: karamottobonsai@hotmail.com

———————————————————————–

Still alive!

Hi, everybody,

just want to let you all know that I am still among the living! 🙂 A lot of things happen to me during the last couple of months, from which I am still recovering! Getting through that period in my life took all of my energy and because of that, I did not feel like doing any writing and posting! I did some other artwork and Bonsai styling work though, that I will post during the next couple of days! But not everything was bad, two weeks ago I finally met the latest addition to our family! His name is Twan and he brought a big smile to my face!

Bellow: Me, little Twan and his proud Mother and my niece Dory.

I will start posting Bonsai stuff in the next few days!

Cheers,

Hans van Meer.

Info: karamottobonsai@hotmail.com

—————————————————————————-

TWO “DUTCHS” HAWTHORNS AND A X-MAS TREE.

Hi, everybody,

here are some pictures of what I have been doing during the last week, in Bonsai that is!

Below: Here is an updated shot of the Dutch Hawthorn that I showed here two mounts ago. It needs a couple of years of growth to fill out the foliage, but the main frame is there already!


Below: This is another Dutch Hawthorn. Since I collected this one, some 10 years ago, it has been shortened from more than 1 meter/40 Inch to just above Shohin size. It still needs to fill out in the top section and the deadwood needs to be sculpted, but I am pleased with the image and the progress so far.

Below: Close up of the beautiful old bark. It proves that Dutch Hawthorn can show remarkable character as well.

Below: And here I am decorating the X-Mas tree! 🙂 I salvaged this and another Juniper from a cemetery where they were dumped in a garbage container. It took me 3  years to nurse them back to health and now that they are, it is time to air-layer the most promising ones. These Juniperus media Blaauw varieties have beautiful slow-growing foliage that resembles Juniperus Itoigawa foliage but is darker coloured. I made 13 air layers that if all goes well will become a forest planting in the future! Please note, just how stylish I dressed for this special occasion!  🙂

Cheers,

Hans van Meer.

Info: karamottobonsai@hotmail.com

———————————————————————————

TANUKI FUN.

Hi, everybody,

remember I told you about those Itoigawa cuttings that I have been collecting from 3 original cuttings over the last 6 years? Well here is what happened to one of those tree original cuttings. In 2005 I attached it to a beautiful piece of  Yew deadwood. This deadwood is what was left of a yamadori that sadly did not make it after collecting. But I did not want to throw such a natural sculpture away, instead, I used it to make a Tanuki. The deadwood and the Itoigawa cutting were merged in early 2005. The pictures below are from November of that same year.

Above:  First a groove was made, just big enough for the cutting to be squished into. Then the cutting was planted, leaning to the right, in the armpit of the deadwood that forms the base of the tree. Both the deadwood and the cutting were tightly secured in the pot and then the soil was added. Then the still bendable gutting was pushed into the groove and it was such a good fit, that no wire was necessary to hold it into place!

                                             Above: The beginning is there!

Above: September 2010, the shape that I was seeking is starting to come through.

                                 Above: Close-up of the amazing deadwood.

Above: Yesterday, and this is how it looks now. The main branches and a few of the smaller ones were wired and placed in the desired position. Then the deadwood was cleaned and treated with Lime Sulfur. And finally, the tree was repotted into the same pot but in a slightly different position. I think that this pot suits this tree very well! This small Tanuki needs more growth to get an optimal branch structure. But for now, I am really pleased with how it looks. And I am very happy that all those years ago I decided not to throw this beautiful piece of deadwood away! I think it is becoming a really elegant Bonsai.

Cheers,

Hans van Meer.

Info: karamottobonsai@hotmail.com

———————————————————————————————–


RESTYLING MY JUNIPERUS CHINENSIS (THE ITALIAN).

Hi, everybody,

I would like to share with you some before and after shots of my Juniperus Chinensis that  I named “The Italian”.  You will find out why I named it that way in the next story! This tree and I go back a long time! In ’95 or ’96 I  joined Farrand and Rene (today owners of the Bonsai Focus magazine) and three other Bonsai enthusiasts to drive in a rented bus all the way to Italy to see Kimura demonstrating for two days. We stayed that weekend in a very posh hotel, where after a great banquet, we even spend some drinking and having a fun time with the Master himself! Later that night he asked me to roll him a “Dutch tobacco” cigarette, like the ones my travel companions were smoking. I rolled him one and he took a puff and then he turned green and started coughing for ten minutes! 🙂 But that’s another story! Before all that, we spend a day in the famous Crespi Bonsai centre in Milan. As a group, we were able to buy trees there that later would be shipped to us. Walking through all these greenhouses, filled with all these amazing imported trees, was a dream come through.  It was there that I saw the juniper from this story for the first time and although it was not really my taste in Bonsai (even then!), I fell for the quirky curves in the lower section of this tree! Because it was not prized I had to ask for the prize. Then I was told that the tree was styled by Kaneko during a demonstration the year before!  And that was noticeable in the price!! But business was good that year for me so I bought the tree, together with two other trees,  regardless of the price! I think now that I bought it then because material like this was pretty rare in those early years in our parts of the world! And it was the first chance I had to buy such quality material from Japan! And I wanted to have at least one more traditionally styled Bonsai in my collection! And today together with an imported shohin Itoigawa they still are the only two imported Junipers in my collection! So now you understand where this Juni gets its name from, “The Italian”!

Since then I restyled the tree several times, removed the main bottom branch and about ten years ago I planted it in a lovely old shallow pot, where it lived happily for many years. But about five years ago the tree started to lose its normal health. So I repotted it into a deeper pot and it took me up to now to get it back to grow abundantly again! So I felt it was safe to give it a gentle restyling again!

Below: The oldest picture that I could find in a hurry! It was made in July 2006. Here the Italian is still in its old shallow pot and the straight first branch on the left and the long thin front branch are still on the tree!

Below: Before the work started. The problem was always that awkward placed the first branch on the left! It crosses over the trunk and I have no idea why they decided to do that all those years ago? Removing it in the future is an option but that would also mean that I would lose that beautiful live vein that swirls across the front of the tree! I might decide to do so in the future, but for now, I will still use that branch in the design that I am after! Just above that first left branch, where you can just see two lines of cut paste on the trunk, is where last year I created the start of a new Shari that runs upwards to the top. This was done to bring some more interest to that only straight part of the whole tree.


The first thing to do was clean the bark and the deadwood of the whole tree with different-sized brushes and sandpaper. Then the deadwood was treated with lime sulphur. And then the whole tree was wired and the branches were brought into their new position. Then finally, to make the contrast between live and dead even more obvious, the bark was coated with a mixture of water with a few drops of vegetable oil in it!  In the near future the brightness of the bleached deadwood will tone down en will look more natural. Which is more to my taste! The foliage is not thinned out and plucked as much as I would do with a healthier specimen, so it looks a bit fluffy. But I don’t want to risk the health of this old friend. If he reacts good to this styling, I will thin it out later this season to bring out more detail in the foliage layers.

Below: The end result for now. The balance needs to improve in the future, to realize that I need more foliage on the left top side of the tree. The left lower branch needs to fill out some more, to obscure the top boring part of that same branch. At the top, you can just see something light brown in the foliage. This is a piece of wood that holds up the top. But for now, I am really pleased with the outcome! And I am really glad that my friend “the Italian” has overcome his struggles and is thriving again! I look forward to the day that I can put him back into his old shallow pot!

I hope you like “the Italian” new image?!

Cheers,

Hans van Meer.

Info: karamottobonsai@hotmail.com

—————————————————————————————————


SOME PICTURES FROM MY WORKSHOP AT THE BONSAI CLUB RIJMOND.

Hi, everybody,

I received some pictures that were made a few weeks ago during the fun workshop I gave at the “Bonsai Club Rijmond” which has its base in Rozenburg(NL). And as promised I like to share some with you all!


I had a great day and look forward to the next time I work at this friendly club! I hope you enjoyed this small impression of that lovely day full of Bonsai!

Voor al de Bonsai enthousiastelingen die in de buurt van Rozenburg wonen en die nog op zoek zijn naar een gezellige Bonsai club! Dan kan ik de “Bonsai Club Rijmond” van harte aanbevelen!  Het is al vele jaren een Bonsai Cub met het Bonsai hart op de juiste plaats en er worden altijd leuke dingen georganiseerd! Klinkt dit goed? Neem dan gerust contact met ze op, ze kunnen nog wel wat enthousiaste leden gebruiken!!! check@tiscali.nl

Cheers,

Hans van Meer.

Info: karamottobonsai@hotmail.com

————————————————————————————-