Approuch graft on my Prunus mahaleb Yamadori.

Hi, everybody,

it has been a while …I know! But believe me, a lot has happened in my normal and in my, Bonsai life! I have over 60 trees to take care of in a very limited and crowded garden space (10 x 5 meters) and that makes it very hard to get around and to work on them! And taking decent pictures of it all, or these days videos is even harder to do! I am proud to say that in my normal life I have spent the last 6 mounts successfully detoxifying from 10 years of heavy neuropathic pain medication and 20+ years of antidepressant medication! And by cutting down on sugar and carbohydrates I have overcome my recently discovered diabetes and lost some 20 kilos! So you see…I have been busy! 😎 I am currently finishing the video of my big Yamadori Larch “The story of the Elephant” part I for youtube and it will be posted in a few days! Part I is all pictures and words, simply because I did not have a video camera in those early days! So watch this space! Part II is all video and shows the compleat story of the massive undertaking of repotting it from the big wooden box where it lived for 10 years, and into its first real Bonsai pot! And it shows “the Elephant” later on with new fresh green foliage….doing just fine! I hope to finish and post this part II in the next few weeks?! So again….watch this space!!!!

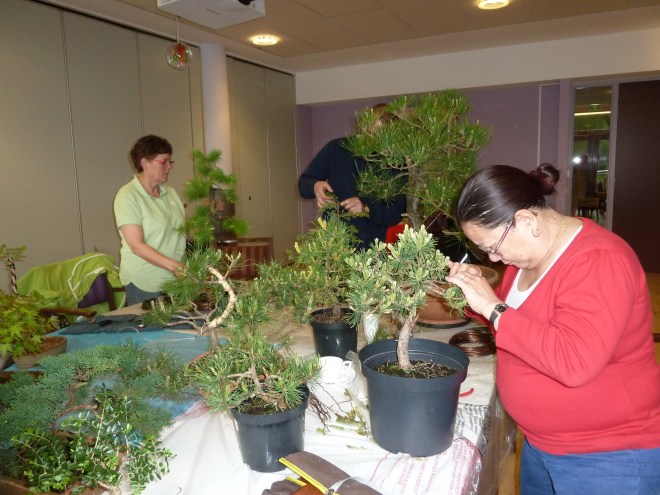
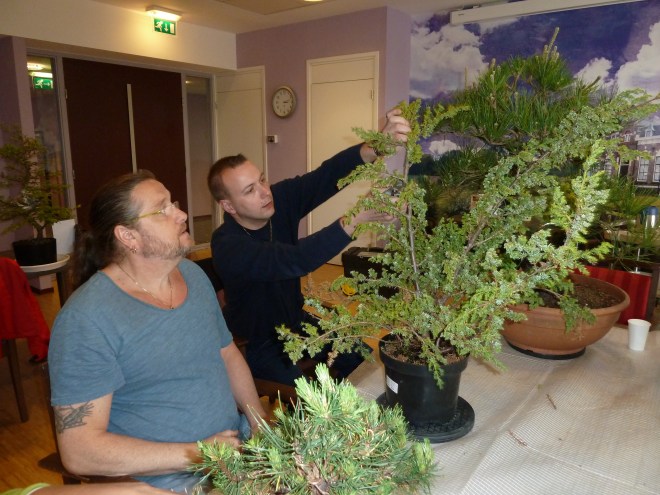
And what more? I have been busy with my workshop group and that is very fulfilling to do! Not a lot of styling has been done up to now, but I did do a lot of maintenance these last couple of mounts! And I will show some of that later on, but first I want to share some approach grafts that I made on one of my old Yamadori Prunus mahaleb from Slovenia!

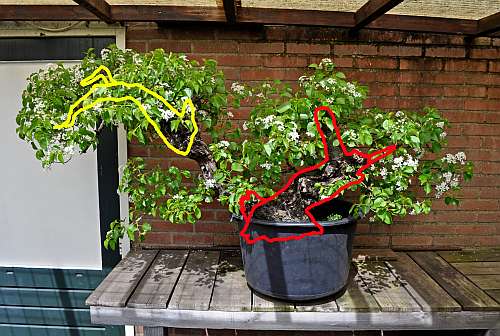
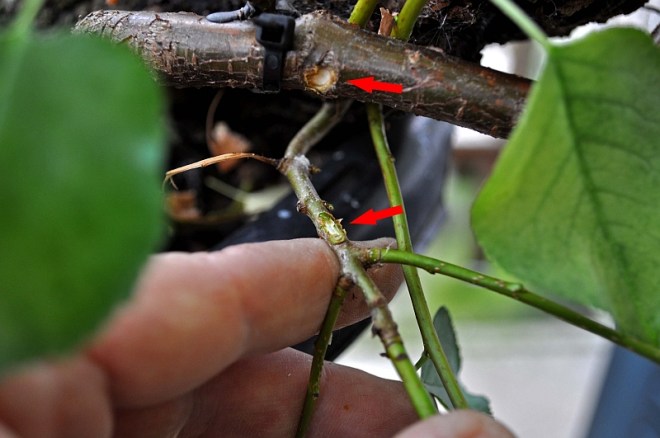
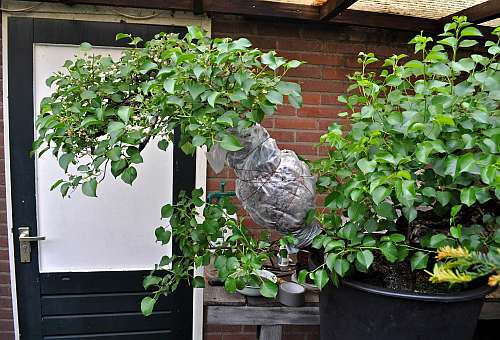
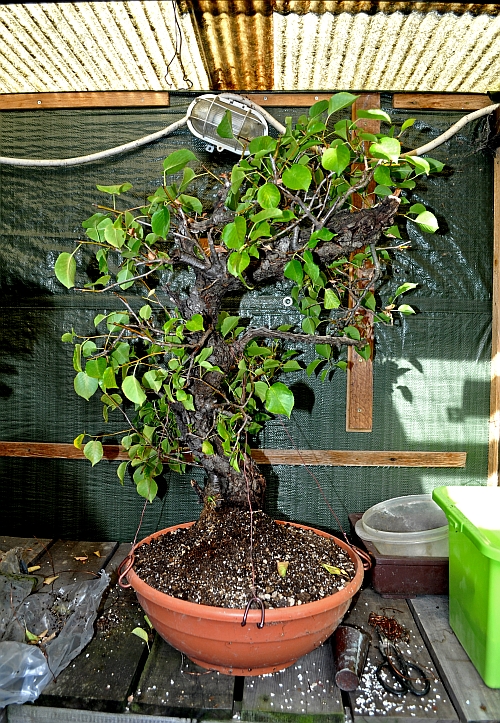
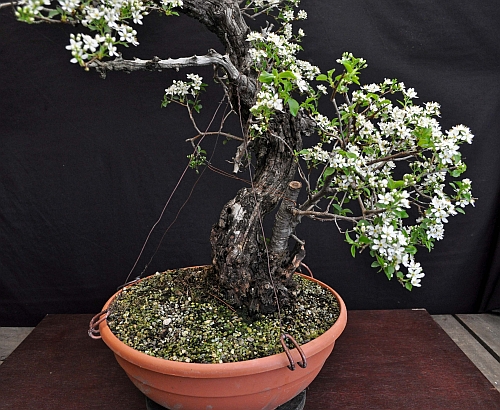
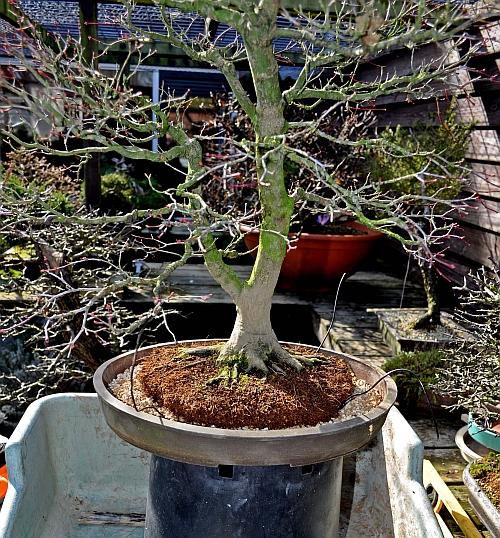
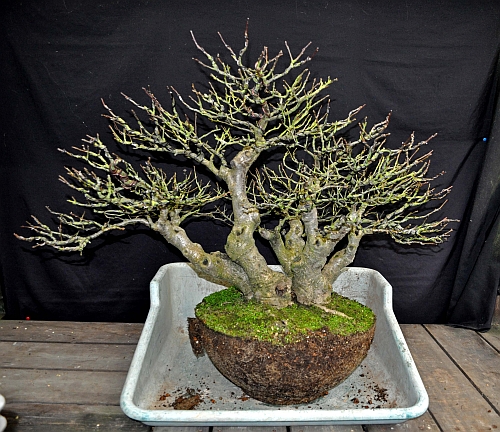
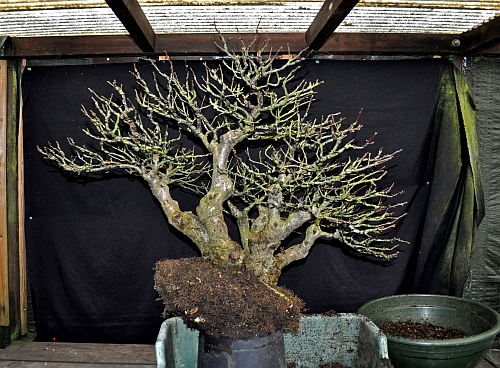
Below: Remember this picture showing the marcot (air-layering) that I was planning to make on this big old Prunus mahaleb?! Well, the left bottom branch that you see in this picture grows from just below the stump (red drawing) that was left when it was separated from the rest of the tree. On this, by now thick remaining branch, I made 3 approach grafts to get some new branches closer up to the trunk!

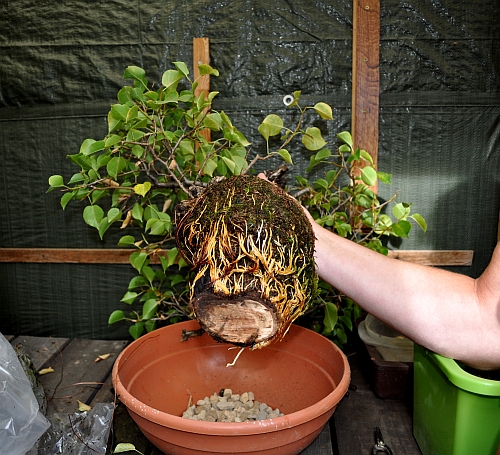
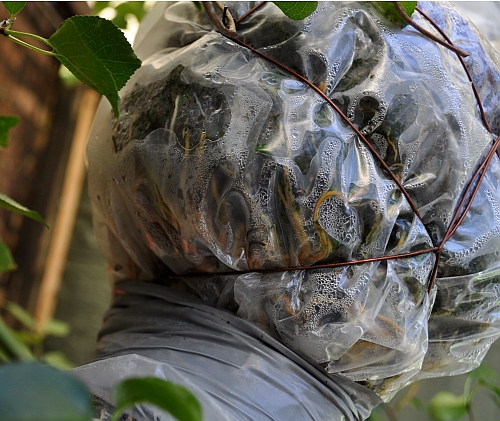
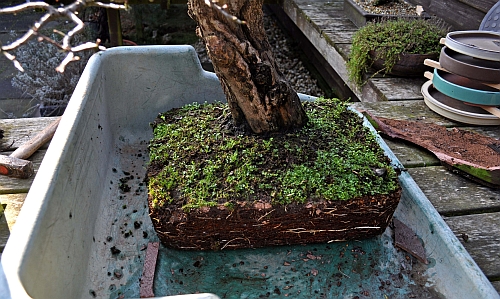
Below: the marcot after separation.

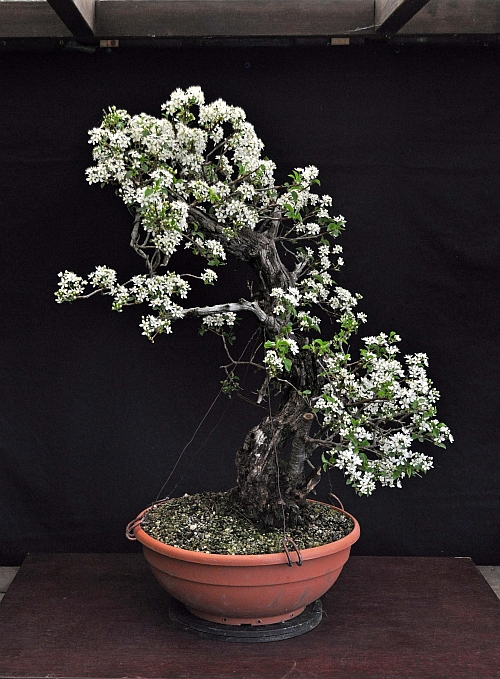
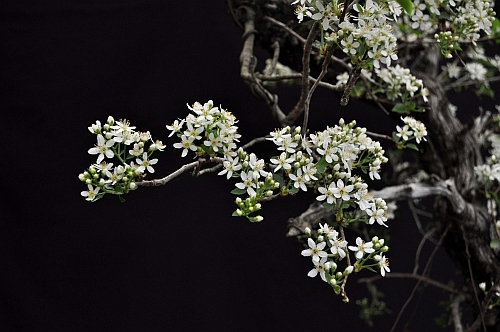
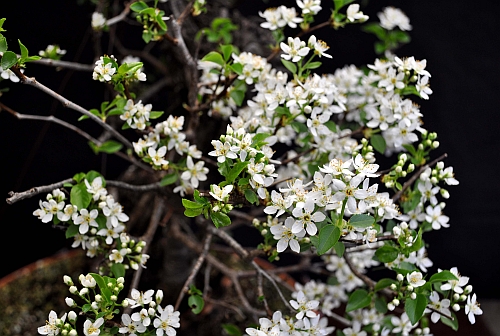
Below: a year later in full bloom.

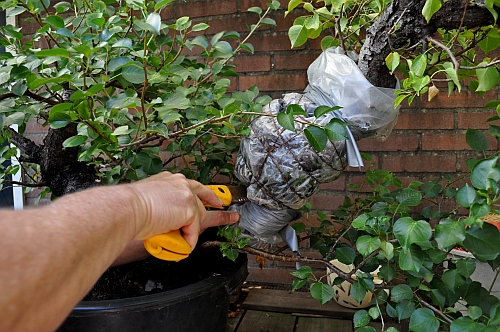
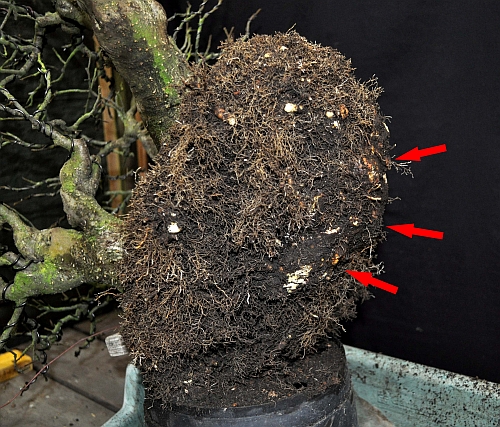
Below: (red arrows) With an sharp and clean curved chisel I made tiny wounds in both the mother branch and in the small sucker branches that grow from way down low on the trunk. These unwanted sucker branches would normally be removed constantly from anywhere on the trunk. Because they leave behind ugly scars if you let them grow too long….and Prunus mahaleb’s make a lot of them all through the growing season! Sometimes so much that when they just appear, I use my small burner to get rid of them!

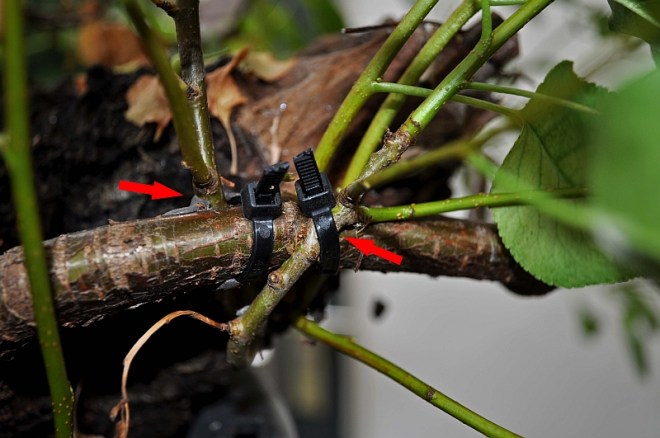
Below: (red arrows) left one shows the one that I made first. The right one shows the second one that’s like the first one tight down securely with the help of a tie-wrap and then is sealed with cut paste to prevent drying out!

Below: red arrow points at the third one that I made. Behind that arrow, you can see the big deadwood stump that needs some more shaping!

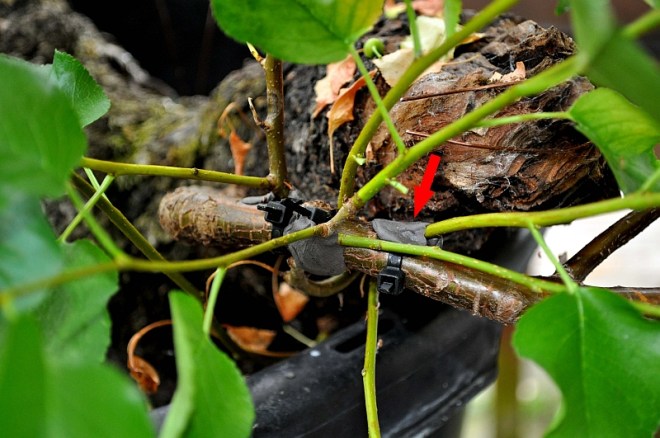
Now it is waiting for en hoping that they will fuse together properly so that I can create better ramifications in the desired design for this promising future Bonsai. If so, then I can shorten the thick mother branch you can see in the above picture by some 25 cm or more! So fingers crossed! I hope you enjoyed this little update on the life of this old Yamadori?!

The next post is about pruning and pinching my Yew Yamadori Bonsai…so watch this space!

Cheers,

Hans van Meer.

———————————————————————————————————

15-5-2017 FEYENOORD RECEAVING TROPHY AT CITY HALL IN FRONT OF 150.000 FANS!!!

Hi, again everybody,

I know it is off-topic…but I have to show you just how special FEYENOORD FANS and people from ROTTERDAM ARE! 150.000 supporters in front of our City Hall that waited since early in the morning and another 50.000+ that were watching it on big screens around the city, gave their heroes and the TROPHY a welcome they will never forget….and neither will we watching it live on the TV!!! Lee Towers sang our anthem “YOU NEVER WALK ALONE” and then 200.000 fans jumped on the booming sounds of happy hardcore, gabber and hardcore another great thing invented in Rotterdam! This was unique in Holland and I do believe that it is unique in the world of sports?! Especially if you realize that Holland is not that big a country!  I hope you enjoy the amazing images and forgive me that it is for once not about Bonsai?!

Thanks for letting me share this unique moment with you! This was a great moment of brotherhood and friendship in these difficult times we live in and I just wanted to share this positive moment with you all!

Cheers

Hans van Meer.

—————————————————————————————————-

MY FEYENOORD CHAMPIONS OF THE DUTCH SOCCER LEAGUE!!!

Hi, everybody,

I am a lifelong fan of the only real soccer club of Rotterdam, FEYENOORD!!! And today my dream of them winning the Dutch championship once again, after waiting for it for 18 years, finally came through!!! They were number one from day one of the competition and won the trophy today on the last day of the competition! Winning 3-1 on their home ground, the famous soccer stadium the “KUIP” is located on the south side of Rotterdam. Our hero, old-timer Dirk Kuit scored all goals…and then Rotterdam exploded!!! 45.000+ fans in de “KUIP”, 5000 fans in the indoor stadium “Ahoy”, that were watching it live on an enormous screen and in the centre of Rotterdam, in front of the city hall, the long “Stadhuis plein” square, were a lot of pubs are located was transformed to one big in an outdoor party centre. With several enormous screens so that 10.000+ fans could watch the game and get pissed!!! After they won, the party started for real and the city centre fountain and the normally busy roads around it were taken over by a few hundred partying fans!!!

See what happened at the “Stadhuis plein” (city hall square), when the first goal was made after less than 1 minute by Dirk Kuit!!! (this is where I use to be a DJ for many years)!

And the 2-0 by Dirk Kuit as seen from another point….brilliant!!!


What a great day for my hometown Rotterdam which I love so much and for all the Feyenoord fans that were so loyal for all those waiting years!!! A pleasing day indeed!!!

WE ARE THE CHAMPIONS MY FRIEND AND WE KEEP ON FIGHTING TO THE END!!! 🙂

My (Mijn) Workshops.

        Hi, everybody,

here are some fun pictures of my recent workshop that I did in Poortugaal (Holland) this year.  Every workshop started with a little lecture from me about Bonsai subjects. Ranging from: fertilising, wiring, styling, soil and Pine care. Everything, text, pictures and my drawings are printed out by Marijke for the students to take home! The first 6 workshops I did this year, were just like last year, staged by and for Bonsai Club “Rijnmond”. But after those were finished, the students were so enthusiastic about them that they asked me if I could stage one more, focusing on the subject of Pine care?! Covering Pine Candle selection, pinching, needle removing and styling? Well, last Sunday it took place, after the great help of my trusty organiser and helper Marijke, who was able to rent the workshop space again for us to work in! The pictures that Marijke made that fun Sunday give a good impression of the 8 students and the teacher having a wonderful time again! So much so, that jet another one is planned by us for July, and that was booked full to the 8 max in a flash!!! 🙂 And that made them and me very happy again! I love to work with students on their babies! It is very fulfilling work to pass on what I know! I hope you enjoy this little impression of the great hobby that Bonsai is for us?!

Cheers,

Hans van Meer.

—————————————————————————————

Hallo allemaal,

hier zijn wat leuke foto’s van de laatste in de rij van 6 workshops die ik afgelopen Zondag gaf in Poortugaal (NL). Net zo als tijdens de 6 die ik daar verleden jaar al deed, wordt elke workshop gestart met een korte lezing over van alles wat met Bonsai te maken heeft. Onderwerpen zoals bijvoorbeeld: bemesting, bedraden, vormgeving en Denen verzorging worden dan behandeld door mij. Alles: tekst, foto’s en tekeningen van mij worden altijd afgedrukt door Marijke, zo dat de studenten het thuis nog eens kunnen na lezen! De eerste 6 workshops van dit jaar, waren zoals de 6 van afgelopen jaar georginaseerd door Bonsai vereniging “Rijnmond” . Maar na dat de laaste afgelopen was waren de studenten zo enthousiast dat ze mij vroegen of het mogenlijk was er nog een te organiseren, met als ondewerp het verzorgen van de verschillende dennen als Bonsai?! Met de focus op het nijpen en verwijderen van de kaarsen, naald plukken en form geving! Wel afgelopen Zondag is hij succes vol gehouden, na dat mij trouwe helper en regelaar Marijke het voor elkaar had gekregen om de ruimte nogmaals te huren! De foto’s die Marijke gemaakt heeft van deze middag zijn een mooi voorbeeld van het plezier dat de leraar en zijn studenten hadden deze fijne Bonsai dag! Zo fijn, dat ik er nog een heb georganiseerd voor Juli, die gelijk weer vol zat met de maximaal 8 studenten voor zo’n dag! En dat maakte de leraar en de studenten heel blij!Ook hierbij was Marijke onmisbaar als bemiddelaar! Ik geniet enorm van het werken aan Bonsai met mijn studenten en het geeft me veel voldoening! Ik hoop dat jullie deze kleine impressie van het plezier dat de Bonsai hobby ons schenkt leuk vinden?!

Groetjes,

Hans van Meer.

Info and questions about workshops, demo’s and Bonsai material:

Info en vragen over workshops, demo’s en Bonsai materiaal:

karamottobonsai@hotmail.com

Prunus mahaleb “air layer” one year later.

Hi, everybody,

remember last year 29-4-2016 when I told you all about my plan to air layer a thick and old second trunk of my large Prunus mahaleb Yamadori that I collected a few years ago with my dear friends from Slovenia in Slovenia?!

Below: The red line shows the original massive trunk of the tree that would stay with me in Holland after the separation of the thick second branch ( yellow line). This branch section would be given later to my old Bonsai friend Tony Tickle to say thanks for all he has done for me over the last two decades! I can easily say that I would not have been where I am now in Bonsai without the help of Tony! He took me on my first Yamadori trips and arranged many demos and workshops abroad for me! Just to name a few: the E.B.A in Stratford (UK), 2 times Joy of Bonsai in Bath (UK) and last but not least 4 times at his own Bonsai extravaganza weekend workshop in Burrs (UK)! 6 of my best Bonsai that I have shown in many prestigious events, like the Ginkgo’s shows and the Noelanders trophy, I have because of Tony’s kindness….so I am finally glad that I can give something special back to this important friend of mine!!!

Well on 17-5-2016 I made the air layer as I wrote and showed here !!

Below: This is how the marcot/air layer looked that day.

Below: on 28-7-2016, just over 2 months later there were lots of new roots to see pushing against the plastic bag! So it was already time to separate the branch from the tree!

Below: I left the plastic on there to protect the fragile roots! With a saw and a bit anxious the branch was cut off! This took surprisingly long because the branch consists of 75 per cent hard deadwood!

Below: Finally finished! Only the duck tape was holding the branch in place here! The here still thin and young branch you see beneath the cut will play an important part in my design of the original tree! But that is another story!

Below: Just before the marcot is planted into its new temporary home. Just look at all those strong new roots! I could not be happier!

Below: The sphagnum moss was kept on there and the pot was filled with a mixture of Akadama, Kiryu, Bims en regular rough garden soil. It was not possible to secure the new tree in a regular way, so I tied it down with wire and hooks around the pot rim. And watered it well before I placed it out of the wind in a half-shaded and not-too-hot spot in my garden. From now it was praying and hoping for the best!

February 2017: Like every year Tony visited my house the day after the Noelanders trophy before he sails off to the UK again. We drink, eat, talk Bonsai and gossip like an old woman! And of course, he wanted to see my trees and the Prunus I promised him 2 years ago! 🙂 He liked it a lot and wanted to take it home that same day! But I convinced him that it would be better to leave it for another year in my garden so that the roots would be able to grow even stronger! That way the bumpy ride home could not harm the health of this new tree! But next February 2018 when he visits my house again it will be his! And I think that the next couple of pictures that I shot a few days ago of this new tree and future Bonsai in full bloom, will show just why I’m sure that he will!!

Natural deadwood is something we can never copy! That’s why working on and with these ancient Yamadori is such an honour and privilege to me!

Below: View of the stunning base. The spot where I made the air layer was carefully chosen just below this wides spot just below this little tree on the right side of it! This natural little tree is almost completely surrounded by really old deadwood and shows how resilient mother nature can be! From there on upwards, it is all very old and weathered deadwood with only a small live vein running right up to the top, that keeps the rest of the tree alive! This small tree on what is really a Literati tree is very unique in my vision and, if necessary,  I will convince Tony to keep it on there! 🙂

Below: Halfway up the tree. Just look at the cracked, burned and naturally bleached old deadwood. These trees grew in between the long man-made rock land divisions and were considered a pest by the farmers on whose land they grew and were chopped and burned regularly over many decades! That’s how they became so gnarly and full of this stunning deadwood!

Below: And finally a shot of the whole new tree and future, in my humble opinion, unique and stunning Literati Bonsai! I am really proud of it….and I hope my friend Tony will be pleased with it?! He deserves it!

I hope you enjoyed this little story?!

Cheers,

Hans van meer.

After a long time: finally some work I have don last month!

Hi, again everybody,

it’s has been a while (again), sorry for that…but I had some serious health problems to face and get through over the last couple of months so blogging or Bonsai work was on hold during that time! But things are a lot better now and I have already done a lot of Bonsai work that I would like to share with you all again from now on! I repotted a lot of my trees, even one very big one (the elephant Larch) after being 10 years in his wooden box! But that will be shown in a video story that I am currently working on to be posted on youtube soon! So watch this space if you are interested!!! For the guy’s who were so kind to comment over the last couple of months: I just saw them for the first time and will react as soon as I finished this post!!!

After a very mild winter, I was taking out my trees from the winter shelter in the back of my small garden so that I could check them out, remove weeds and clean their pots. I was very surprised to find out that one of the (expensive) custom-made pots was cracked on its four corners! This is very strange because we had hardly any frost this winter and these pots suppose to be frost prove?! And to be honest: it has never happened with any pots I have in my collection from many other potters?! This is the second one by these potters that I lost because of this….so I won’t be buying another one from them!

Bellow: the frost cracks.


Below: So I had to make an unexpected repotting and the only pot I had that would fit this large Dutch Crataegus Yamadori, was this (too big) Tokoname pot! But it would do for now and the tree has more room to grow quickly this way!

Below; The tree was removed from the broken pot. Now I could start to carefully remove the old soil.

Below: Thick roots that were left during the last repotting, were now shortened to just before where there were small healthy roots growing out from it!

The old soil was removed as much as possible and the smaller roots were shortened sufficiently so that the tree could grow strongly again for some years!

Below: The tree in its temporary new pot. This Dutch Hawthorn Bonsai was well over 2 meters when I collected it and is pretty rare because of its natural deadwood all along its trunk line! It takes forever to create a proper branch structure…but I am not going anywhere and neither is the tree…so who cares?! 🙂

Below: This Acer palmatum “deshojo” is one of my first Bonsai and is in my collection for well over 25 years now! It has grown almost twice in size and the root base is completely created during that time!

In my element! After suffering yet another #*X## sparrow attack on the roots and old flaky bark of many of my defenceless trees, I decided enough is enough!!! So I bought a birdcage net online and covered my whole garden with it! This was hard and somewhat dangerous work and I must have climbed up and down a ladder a hundred times! But after 2 days of work, my garden was finally bird-proof! No more exposed roots, loss of moss or bark destruction!

Repotting my Ilex vertillata. This is 50 years+ Dutch urban Yamadori in the multiple trunk style “Kabudachi”. Right from the start, I realised that this would be a difficult repotting, because, from an earlier repotting into its present plastic container,  I had discovered that the roots consisted mostly of one big massive root clump! But I still wanted to plant it into the beautiful early “Isabelia” Bonsai pot that I bought especially for it, out of the pot collection from my dear old friend Danny Use from the Bonsai centre “Ginkgo” in Belgium.

Below: The beautiful pot.  

Below: Prepare the pot with plastic gauze covering the draining holes and aluminium wire to secure the tree tightly into its new home.

Below: A layer of Bonsai soil containing Akadama, Kiryu and Bims is placed onto the bottom of the pot.

Below: The tree was relieved from its old home.

Below: The old top and bottom soil are removed and all fine roots are shortened. As you can see here: this will never fit into the shallow new pot?!

Below: All thick roots were shortened as far as possible. But the red arrows point at the huge massive root ball that was still sticking out at least 6 to 7 cm too far! I was able to remove some of it with an electric saw and with concave cutters, but this was as far as  I could get with those?! So it was time to get out my trusty Bosch power tool with my largest-size cutter in its mouth!

Below: Car fully carving away the centimetres of excess wood, constantly checking if I had done enough!

Below: Happy me! It was not easy to hold the heavy tree with one hand and to carve with the heavy bouncing power tool! That’s why it took me more than 20 minutes to safely remove enough to fit the tree into its new home!

Below: Carefully pushing in the soil into the roots with the help of a chopstick. Making sure that no air pockets remain! Almost finished! I am so glad that the tree is finally in its new pot! And now it is cleaning time and then of to the shower!

Now a few weeks after this repotting, I am glad to say that this tree is doing just fine and it has new foliage on all its branches! So no harm was done! I am even thinking of showing it in the next Noelanders trophy….but that’s for later! 😉

Hope you enjoyed these little stories? More to come in the next couple of days! So watch this space!

Cheers,

Hans van Meer.

——————————————————————————-

Still here!

Hi, everybody,

again….it’s been a while since I could get myself to sit down and write on my blog! I feel my blog should tell stories of joy…because most of the time, Bonsai brings nothing but joy! But I have been poor for a long time now, with a lot of ups and downs, so the short periods of being able to work were mostly used to maintain my Bonsai as good as possible at that time! Mind you though, my head and heart were always filled with Bonsai….but actually doing it was the hard part! Strange how those things can go in life?! It is like being Hugh Hefner… at his age… in the PlayBoy mansion… without any blue pills! I love it…but I don’t work well anymore! 😉 But I did do things (see picture above) and when I did, it was like discovering Bonsai all over again!! Simply because I still love it and creating and seeing those small trees grow into my vision is still priceless!!! I miss the travelling and my Bonsai friends though..! And I am planning and working hard towards catching up on all those things next year!!! 

One of the trees that is coming along nicely is the one below!  It is a Winter image picture I made last week of my (Still a bit too young looking)  Ilex verticillata (winterberry.) This is an Urban Yamadori from Holland and some 60 years old by now. It is saved from the blender when a 55-year-old train station was demolished and all old trees and shrubs were destroyed! It’s a Kabudachi (multiple 5 trunks) and the height is 57cm. It is here photoshopped into its future (next year?) beautiful Isabella pot, that I so luckily bought last month at my long-awaited first visit to my dear friends Danny and Ingrid from Bonsai centre “GINKGO” (B) in 10 years! And it is in training since 2009. It needs a few more years of fine ramifications to fill it more out and then it will be ready to show! The slab is found years ago at a car boot sale and needs to be made thinner and more presentable by me in the future! I hope you like this little forest as much as I do?!

I am still working on improving this new blog design, so bear with me, please!! I will be posting more soon! And I am working as best as I can on my new website as well…so lots of stuff happening ….and that is just fine!!!

Cheers,

Hans van Meer.

———————————————————————————————————-

Pictures of mine Pinus thunbergii Yamadori and a Tip.

Hi, everybody,

a few days ago I did some maintenance work on my old Pinus thunbergii Yamadori from Japan. I got this pretty tree some 20 years ago as a birthday present and I still think it is wonderful! She has been through a lot since she arrived in my garden! Like being blown right off the table by an uninspected storm…twice! The second time straight into the pond I then still hat in my garden! She laid several days completely submerged under water before we noticed that she was missing! And then there was the time that she after I had cut off the old needles, dropped all of her new growth! She was completely bold! But she soon made new buds and now some 12 years later is still doing fine! Although I love the small round pot she is in now, I am still planning to repot her next year in a slightly bigger and heavier square pot so that she can grow some more roots and so that she can stand more safely and secure by herself on my tables. Now she is still tight down with wire and a piece of bamboo to the upside-down pot that you can see under need its pot! This pot is there to hold and weigh her down to the table! Before these pictures were made I removed last year’s needles so that more light can reach the inside of the branches to promote back budding! Tomorrow I will remove the wire from all the branches! I will rewire her just before I will repot her next Spring! But I still wanted to show her to you all and I hope you like her just as much as I do?!

30-7-2016 226 hans van meer 500
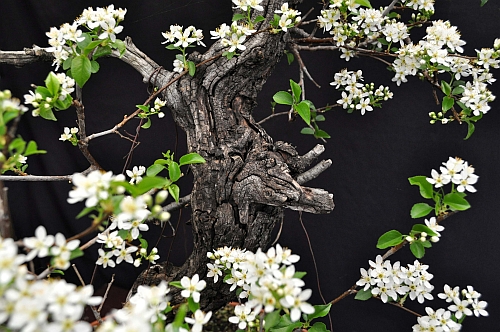
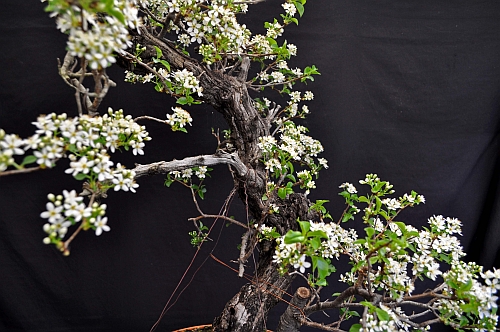
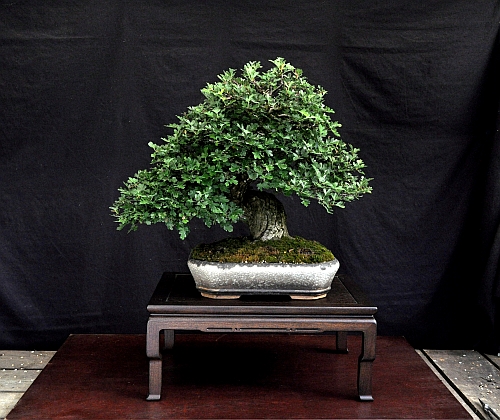
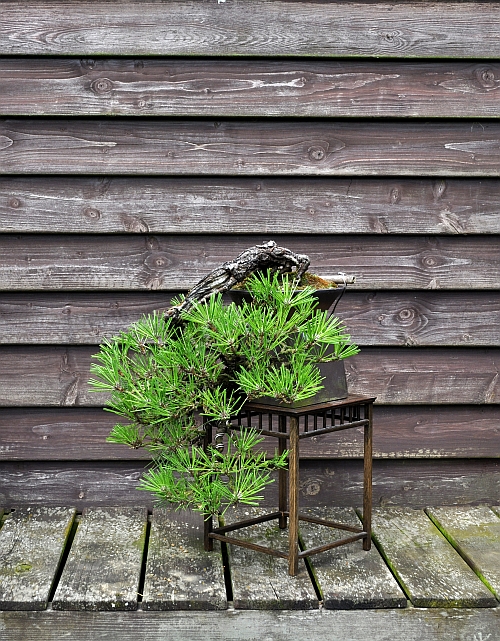
Close-up of the beautiful and all-natural deadwood/ Shari and old bare roots/ Neagari. The trunk winds halfway down the foliage you can see and then curls up again to just under the bottom of its pot!

30-7-2016 239 hans van meer 500
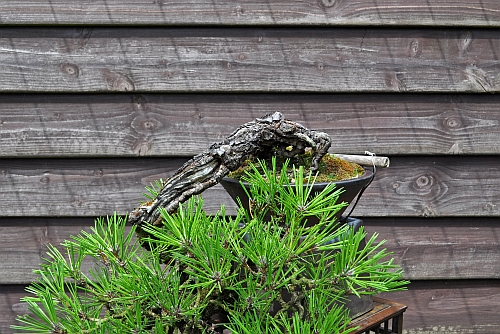
And then now another (I hope) helpful tip! A lot of us use aquarium tubing (see the picture!) to prevent the wire from digging into the bark of the tree when we are bending thick branches with tension wires between the two branches!

30-7-2016 255 hans van meer 500But then we have a problem because this tubing can only be used on one branch because if we want to use it around the second branch (see the picture!) to protect it, we can’t run the wire through it and tighten it?!

30-7-2016 263 hans van meer 500
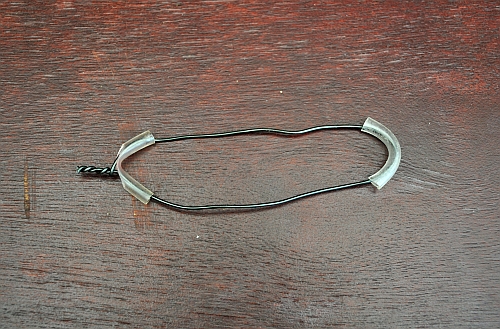
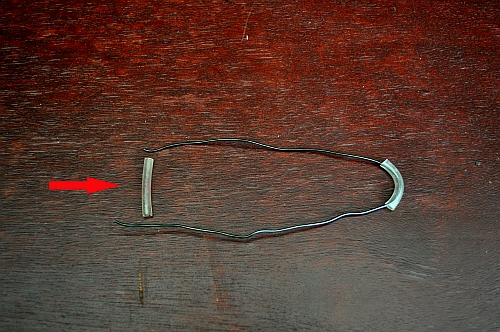
Well here is the solution! With the help of a concave cutter (see the picture!) cut out a small bite off one side of the tub!

30-7-2016 271 hans van meer 500So that you are left with a piece of tube that looks like this (see the picture!)!

30-7-2016 274 hans van meer 500

Now you can run both ends of the wire through both ends of the tube en run them through the hole you just cut out! Slide the tube down the wire as tightly against the bark as possible and with a tong twist both ends of the wire as tight as necessary to hold the branch/es in position!

30-7-2016 283 hans van meer 500

Hope this will help you and that you liked the quick view of my little old Pine?!

Cheers,

Hans van Meer.

Info: karamottobonsai@hotmail.com

———————————————————————————————-


Pictures of my small Yamadori Hawthorn and a Tip.

Hi, everybody,

last week I made some pictures of my small Hawthorn Yamadori that I collected many years ago with dear friends Tony Tickle and Terry Foster in Wales. Up to now it is almost always shown on the web and in shows without any foliage….so here it finally is with its Summer foliage!

4-7-2016 kleine meidoorn 172 hans van meer 500 
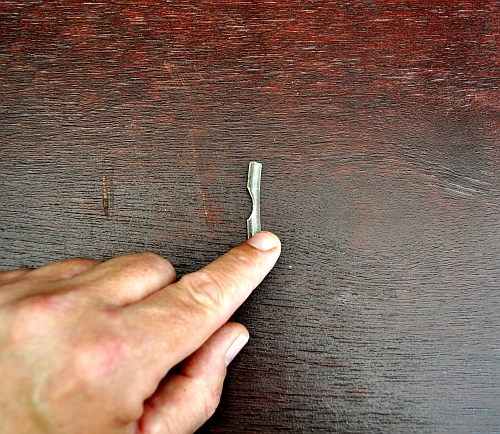
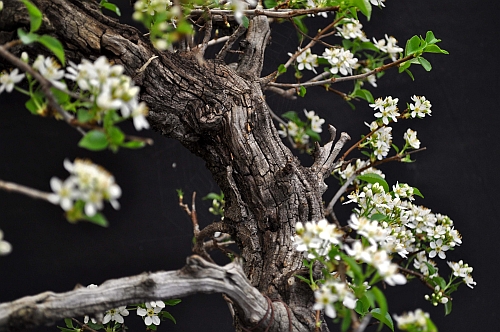
And a close-up of its nicely ageing bark.

4-7-2016 kleine meidoorn 173 hans van meer 500

Below: I know that just like me many of you use different kinds of plastic tubs or pots for your pre-Bonsai! Most of those containers have some sort of rim around them on top! When we need to secure a recent potted plant or tree in one of these containers or when we need to pull down a branch with wire, we have a problem! That is then solved by making some holes in those rims with scissors, knives or power drills to run the wires through and secure them! This is often hard work that needs to be done in exactly the right place to work and it means most times that this container can be used a second time because it is weakened! Well here is a simple solution that prevents this and makes it possible to adjust the wire when needed! Cut a 3MM up to 5MM (old piece) of wire to length and with a plier bent it like in the picture below! Secure your (in this case copper) wire to it as close to the needed length as secure it! Now if your wire is too short or too long and your branch needs to be bent more or less, just slide the hook you have made to the left or right side! Simple but effective! And those hooks are reusable so handy in your toolbox when you need them the next time!

7-7-2016 XL hans van meer 153 org 500
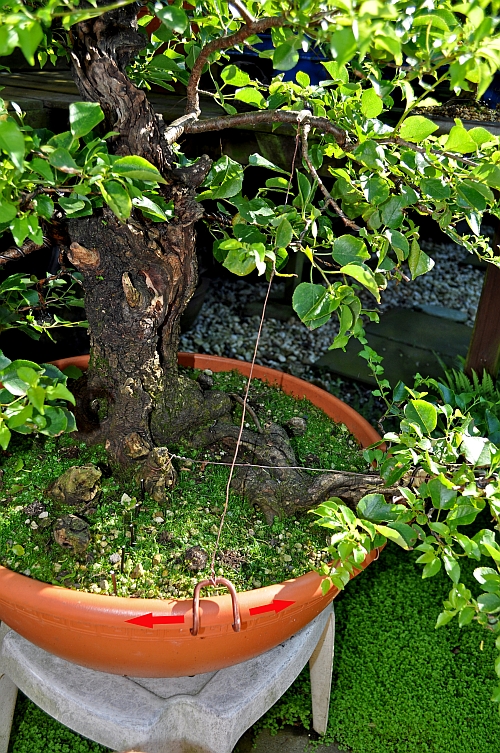
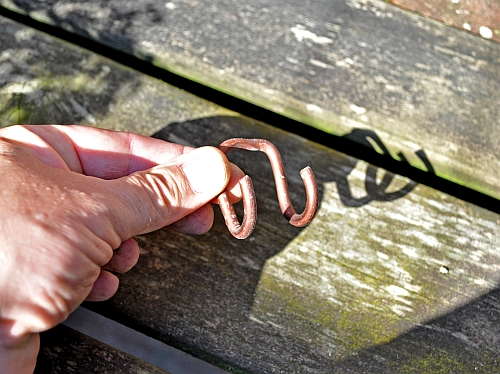
Below: this is how it works! More bend to the left! Less bend to the right! And no harm to the container!

7-7-2016 XL hans van meer 169 org 500

I hope you like the pictures of my Hawthorn and that this is a helpful tip you can use sometime?!

Cheers,

Hans van Meer.

Info: karamottobonsai@hotmail.com

————————————————————————————–

The last Part (IV) of The story of XL my Yamadori Larch is online!

Hi, again everybody,

I just to let you know that the last part of XL’s story is online! Something went wrong and one little segment of 15 seconds is missing and black, but that should not matter too much! I don’t know how to fix it, so I will let it be like it is before I do more harm! I hope you enjoy it anyway?! I will film 2 first styling sessions of 2 Scots pines that I have waiting for it and post them in the near future! So watch this space for that! And where I wrote Solden in Belgium, should be Heusden- Zolder in Belgium! Oops! 🙂

Cheers,

Hans van Meer.

Information: karamottobonsai@hotmail.com