INTERNATIONAL BONSAI SHOW NOELANDERS TROPHY XIV JANUARI 19-20-2013

Hi, everybody,

I will be showing my Larch (XL) at the next edition of the Noelanders Trophy XIV that is staged on 19-20-2013  at the Centrum voor Duurzaam Bouwen, Marktplein 1 in Heusden-Zolder, Belgium. If you really love Bonsai than you just have to visit this amazing event so I hope to see you all there!!!

Merry Christmas everybody and a happy new year!

Cheers,

Hans van Meer.

Info: karamottobonsai@hotmail.com

——————————————————————-

HAVING SOME WINTER FUN WHILE PREPARING MY LARCH (XL) FOR A SHOW.

Hi, everybody,

this afternoon I finished preparing my big Larch (XL) for his first show! It took me 5 day’s! Not because it was that much work, but because we had terrible weather for a whole week, it was raining and freezing most of the time! And I had no place to stand dry or warm and because of that, I gotta nasty head cold to make things even harder! Wink But today I felt a bit better and the sun was out for a change and that made, together with lots of hot coffee, the freezing temperature bearable! I am glad about how the end result looks and I am also glad that I only had to use a minimum amount of wiring to reach it! So now XL will finally go to his protected place in my winter shelter and will be left alone until a few days before the show in January. I can’t wait to finally show it! Very Happy Below: Fine wiring with 0,3 mm copper wire is rrrrealy hhhhard when you are this cold! Smile

Larix decidua by Hans van Meer.

                     Below: My Larch and I have so much fun together! Rolling Eyes Very Happy

Larix decidua by Hans van Meer.

Below: After the work was done, we went out for a walk along the seaside near to our house. Next, to where we always park the car we found this uprooted Buxus on the ground all exposed to the freezing temperatures. It was left when they had removed some larger trees earlier this week! So we load it in the car and after the walk, we took it home to give it a fighting chance. This short stay in my car made my car smell like 25 dogs and cats had pied on it and they probably did! Boy, we had to drive with the windows open! Smile I hope that smelly tree makes it through winter!

Buxus urban yamadori Hans van Meer.

Below: And some more pictures from “Burrs” that I like to share with you all, they were send to me or found on the web!

My new friend Simon “Bonsai Monkey”, looking very happy and so do I !!!

Below: The amazing transformation of Paul Spearman’s yamadori English Elm raft!

                                                                      Before.

                                                       Before: And after!

Happy X Mas!!!

Cheers,

Hans van Meer.

Info: karamottobonsai@hotmail.com

————————————————————————————–


RESTYLING MY MUGO PINE NAMED “LITTLE CHAPEL”.

Hi, everybody,

last week I rewired and restyled my Mugo Pine named “Little Chapel”. And since then I have been waiting for the weather to break open to shine a little light onto my little Photograph aria in the back of my garden, but no such luck! So the picture of the finished tree is not the best I ever made, but I hope it will do for now?!
Below: I collected this tree in 2004 in Austria and gave it it’s first styling in 2006.

Mugo pine "Little Chapel".

 Below: This is how it looked in September 2010 after it’s second styling session. Height: 57 cm/ 22,5 inch.

Mugo pine "Little Chapel" by Hans van Meer.

Below: Freezing my nuts off while styling! BBRRRRR! Sad And I am getting greyer and greyer, real fast! Shocked

Mugo pine "Little Chapel" by Hans van Meer.

Below: And this is how the tree looks after this last restyling. Height: 57 cm/ 22,5 inch.

Mugo pine "Little Chapel" by Hans van Meer.

The foliage mass has doubled and a lot of the new growth is closer to the trunk, so that is good! The old curling branch (second one on the right) that has an old natural Shari’s running along it, is not wired but supported in to place by wooden sticks to prevent it from damaging! The different foliage layers are hard to make out in this flat looking picture but believe me, they are there! Smile Next, if the weather allows, the deadwood will be worked over, cleaned and then treated with wood hardener were necessary. And then it is all treated with a double coating off lime sulphur. I do like how this little tree is progressing! I hope you enjoyed this little update?!
Read and see more about “Little Chapel” on my personal Bonsai Website Karamotto HERE!!! and HERE!!!
JUST A FEW MORE WEEKS TO BURRS!!! cheers cheers
Cheers,

Hans van Meer.

Info: karamottobonsai@hotmail.com

—————————————————————————————————–

DEADWOOD WORK ON “WOLFIE” MY MUGO PINE.

Hi, everybody,

as promised here are a few pictures from the deadwood work that I did a few day’s ago. All the deadwood was cleaned and treated with Lime Sulphur to bleach it. The large Jin on the left was refined some more with power and hand tools. I did not want to create to much fine detail work on this Jin because it would drown too much attention to itself and that would distract from the overall view that I am after! As “Wolfie” develops more in the future this Jin can always be refined some more when necessary! Then the freshly created work was worked over with a blowtorch and then brushed with a copper brush and treated with two coatings of Lime Sulfur. It all looks very bright at this moment but that will tone down in the next months, but “Wolfie” is not going anywhere soon, so that is no problem at all. When the dead root on the right side has dried enough it will be treated with wood hardener to preserve it for the future!

                                                 Below: Before work started.

                                                     Below: Halfway through.

                                            Below: Torching the deadwood.

                                      Below: And the finished work (for now).

 I really like how “Wolfie” is progressing. I hope you enjoyed this little story?! Until the next time!

Cheers,

Hans van Meer.

Info: karamottobonsai@hotmail.com

———————————————————————————————

RESTYLED “WOLFIE ” MY OLD MUGO PINE AGAIN.


Hi, everybody,

yesterday was the perfect day to rewire and restyle “Wolfie” my old Mugo Pine. After I applied all the necessary aluminium wire, which was not that much because most of the main branches stay in place pretty good, I could start to bring all the smaller branches into their desired positions. Two of the main and heavy branches needed some support, so I placed some sticks underneath them to help them to stay in place. Then I roughly placed all the branches at the top and the right side of the tree into place. After that was done I could more easily see, how what I had planned to do with the left side of the tree would look! Normally I would do the whole styling of a tree in one go, but I was careful with a good reason! Now that this little tree and it’s designed has progressed a lot over the last years, I became more and more sure that that straight long Jin that protrudes through the left side foliage needed to be shortened considerably! I waited this long because, in real life, that Jin gives a lot of visual speed to the already exciting movements of the trunk line! But like I sad, it is to straight and there is not much I can do to change that! So it was time to see just how short it hat to become to fit best in the more refined design?! This is exactly why I don’t finish my deadwood sections during the first years of styling! In most cases, I like to form the deadwood to compliment the design of the tree, not the other way around! You can always cut it off later, sticking it back on is a lot harder to do! 😀 So the Jin was shortened so that it just sticks out through the foliage, this way it still has a function in enhancing the trunk movement and direction and also creates a point of interest and it helps to tell the story of this trees harsh live high in the mountains! I think it looks great with the bright green small foliage! Coming Monday I will start to work on all the deadwood on this tree! The large Jin on the left side will be worked on to create some more refinement and details, to fit this new finer design! The right root on the base of the trunk will be treated with wood hardener and Jin seal (lime sulphur). And all the other deadwood will be cleaned and then also treated with Jin seal. I will post some pics when I am done with that!

Mugo Pine "Wolfie".

                The temporary pot is a Tokaname. Height is 42 cm/ 16,5 inch.

 I am really happy with the way “Wolfie” is progressing over the years! I can’t wait to see it in a nice pot!

Cheers,

Hans van Meer.

Info: karamottobonsai@hotmail.com

——————————————————————————————


REWIRED AND RESTYLED MY FICUS “ROOTS OVER ROCK” BONSAI .

Hi, everybody,

A few weeks ago I defoliated my Ficus root over rock Bonsai once again and then rewired and repositioned the branches into place again. I started this Bonsai more than 20 years ago from a 1 Euro, pinkie thick supermarket plant! It has been quite a challenge to work this tree in my climate, it has to live 8 months a year inside, but it is slowly getting better and looking older as the years pass!

Below: The tree some 20 years ago. I planted it on this moon rock 2 years earlier.

Its branches are multiplied since the last time I work on it, so that wiring took me 7 hours (PFFFFF), but it was worth it in the end! The roots have thickened a lot in two years and the bark is also showing more and more age! Even though taking care of it, is not always easy where I live, this tree is slowly starting to look more and more as a Bonsai and has come fare since I bought it as a pinkie thick plant in our local supermarket! The second right branch has become a bit disturbing because it grows from the inside of a curve and is now almost growing from the same height as the opposite left branch. This wasn’t this way when I started with this tree all those years ago, but both branches have thickened so much that they grow toward each other! A beginners mistake, but that’s normal! I was just starting with this hobby, when I started to form this tree!Smile Might I remove it in the future? But for now, it is just fine this way! But remember: branches thicken! Wink
Below: Before work started.

                                                Below: After a lot of wiring!

                              Below: Close up of the fast thickening roots.

                      Below: Close up picture of the ramification on this Ficus.

                                      Hope you enjoyed this update?!

Cheers,

Hans van Meer.

Info: karamottobonsai@hotmail.com

—————————————————————————–


——————————————————————————————————-


UPDATE ON MY OLD LARCH NAMEND “THE ELEPHANT”.

Hi, everybody,

 it has been a long while since the last update of my Larch named “the Elephant”! During all that time “the Elephant” was allowed to grow (almost) freely without any wiring on it! Most of the desired main branches are already there or almost there, including the finer branches! But almost the whole design is made out of new branches, that are still bending down under their own weight! So they still needed a bit of help from me, to stay in their desired positions! So to overcome that problem, I used wooden sticks, chopsticks and pieces of thick (second hands) wire, to lift and hold those young main branches in place, just above their desired position (to allow some room for gravity when their support was removed). In the meanwhile during this and last growing season, the tree was, and still is, spoiled with plenty fertilizer and water to let all these new branches grow/thicken rapidly! Well since then the branches have thickened considerably and are starting to fixate more and more into their places! And as a bonus, the bark on the branches is ageing more rapidly and looking much better! During this encouraged growing period, the work on improving the finner branch structure went on like always! Cut what needed cutting and let grow, where growth was needed! Just like with the new branches you can see sticking out on top, like an antenna! So forgive “the Elephant” for still looking like a static woolly mammoth, but it looks like this for a good reason! In the near future, all those foliage pads will be much smaller and more refined and open! So I hope, that in just a couple of more years time, I will be able to start to work on making “the Elephant” more presentable! It takes a while to get it right, but I am sure that it will be worth the wait and just to enjoy the seasons like “the Elephant” those!

Hope you appreciate the update and the picture?!

Interested in the whole story of  “the Elephant” and most of my other Bonsai?! Then please do visit “KARAMOTTO” my personal Bonsai website! HERE!

Cheers,

Hans van Meer.

Info: karamottobonsai@hotmail.com

—————————————————————————————————–


FINAL DISPLAY OF MY LITERATI HAWTHORN.

——————————————————————————————————-
comment number 2 by: Rui Marques

June 11th, 2012 at 3:35 pm e

Hi, Hans, Could you please post the pics you took for your literati haw? Regards.

——————————————————————————————————-

Hi, Rui, 

Sorry I.O.U all some pictures that I made during the try out of different display possibilities for my Literati Hawthorn! There was only 1-meter space available for my display at the “BONSAI FROM THE WEST” Bonsai show! So I made the display in my try out accordingly to that space. As you will see in the next pictures, most of the display options that I had in mind, needed more room to be right and there for most of the accents that I tried looked too big or wide!
Below: This old wooden plant-tray that I use underneath the tree, is sculpted out of one piece of wood by a Japanese artist/craftsman. We imported it from Japan some years ago to go underneath this amazing pot by Brian Allbright. It was a bit of a gamble, but it worked out perfectly! We think that is! 🙂

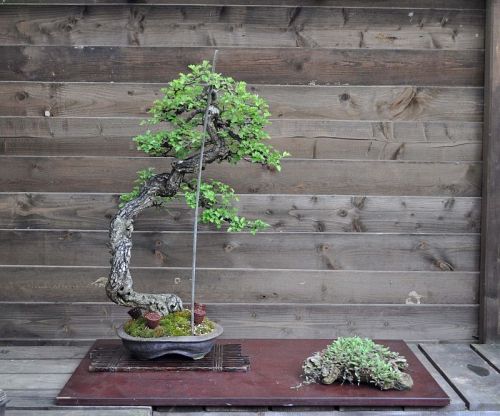
Below: The large wooden plate underneath is there to visually lift my display off the ground, in this case, the planks of my benches! Without it, the whole display would visually disappear into the ground! Brown is the wrong colour, at the show the long tables on which the Bonsai are displayed are blue! But this wooden plate is about the same size as the space available at the show and in this case, that is more important! The accent is a small fern like ground conferrer that I found in the local dune forest near our home. I planted it some 8 years ago on this piece of driftwood. It lives on there with out much ground, but it is perfectly happy! I like this option, but they should be wider apart to work. Like this, it overpowers the slender tree too much! And with more space, I would preferably use one of the perfect little scrolls that I have for it! But that option to use any kind of painting is in most of the bigger shows in Europe no longer allowed! This is very sad, but perfectly understandable. Many of perfectly styled tree was overpowered by a too large, wildly coloured and badly made scroll. And the organizers were just fed up to have to ask the artist to remove the scroll. Although this was mostly done, to more or less protect the artist, many of them got (understandingly) really upset! So they banned the use of scrolls completely! Sad, because I really loved to try and find a matching Scroll, Shikishi or Tanzaku painting for my display! When done in the right way, they ad something special to the total display!

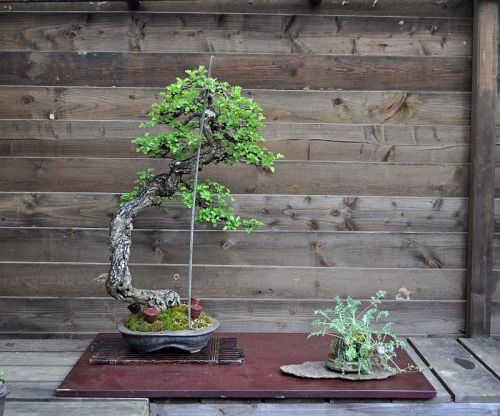
Below: This accent is a plant that is found in the North of Spain some 12 years ago. It has tiny little purple flowers and it grows in/on a tower, made out of mosses. And every year this little plant creates the next layer and it will get a little bit higher! It stands on a stone slab from Japan to lift it off the floor and for some contrast. I like it, but again, because of the wildness of the growth, it occupies/claims to much space and therefore overpowers the tree. Would there have been more space to work with, well than I would have tried hard to make this work? I like this accent/combo.

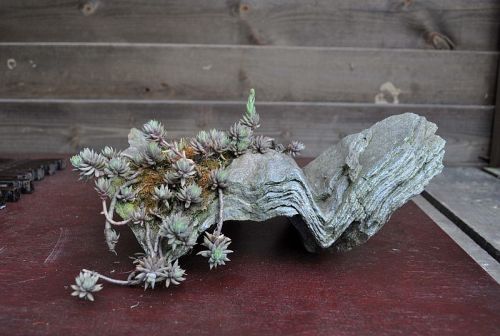
Below: This option is one of my favourites. This multi-layered rock was found by my friend Terry Foster, close to were this Hawthorn was collected all those years ago by me and my other dear friend Tony Tickle. And that same year I planted this Alpine plant, that I had found in Austria, on it. But again the same story, too big for this small space! But the next time I will use it when I can!

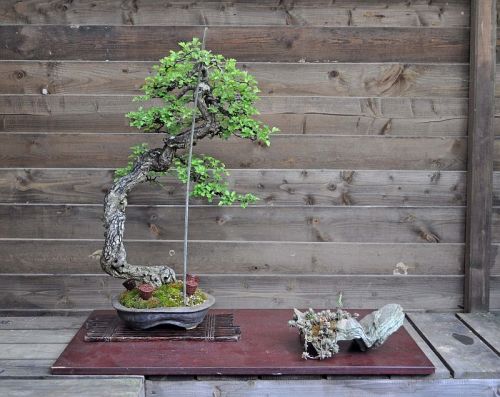
                                    Below: Close up of that beautiful stone.

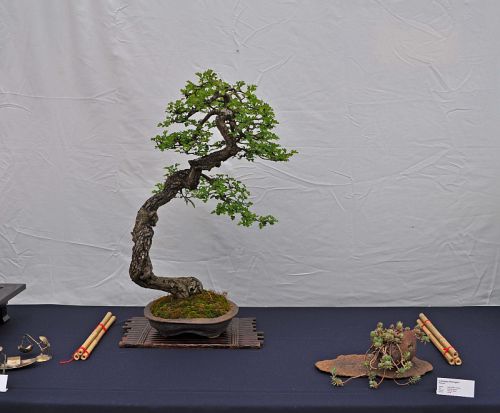
Below: And this is how my display finally looked like, without any wire, at the “Bonsai van het Westen” show in Delft (Holland). The final accent that I used is a Japanese rock slab, with an alpine plant that I collected in Austria,  in a globe like pot by Ron de Roo (NL). Even though it turned out that there was even less space available than expected, I still think that this small display looked all right! The Hawthorn got a lot of attentions from the crowd that visited this unique and very friendly Bonsai event, that is run purely by very enthusiastic Bonsai lovers! And even though the Sunday of this outdoor weekend show was wed and extremely cold for the time of year, it was colder (6 Degrees) than it was on the first day of last years Xmas, it was still a great event! And I will be there again next year, as a demonstrator and to show another one of my trees! So I will see you all again the 7Th edition of “Bonsai van het Westen” show!

My excuses for the poor quality of the pictures. But circumstances were poor! I hope you enjoyed them never the less?!

Cheers, Hans van Meer.

Info: karamottobonsai@hotmail.com

——————————————————————————————————-

comment number 1 by: Simon

May 31st, 2012 at 7:24 am e

Hi, Hans.

Beautiful tree, hawthorn is one of my favourite species. What was your feeding regime last year to promote so many flowers? hope you don’t mind me asking.

Hi, Simon,

I am glad you like my Hawthorns!

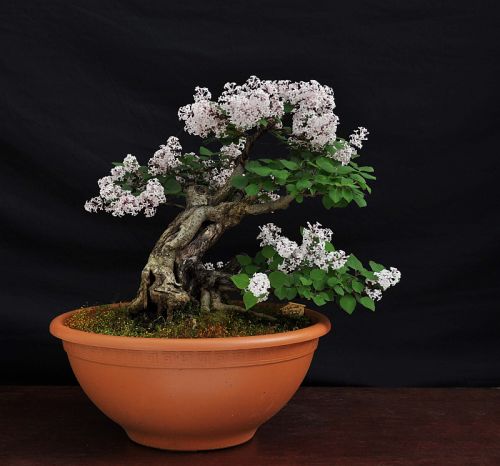
This is how/what I feed them: As soon as the weather alowes it,  I start to feed with a very mild liquid fish emulsion. As soon as the weather stays warm enough, I will start to feed every week! Changing between the same Fish emulsion and (Liquid) Bio Green fertilizer (4-3-6). Around the end of April (depends on the temperature) I will add Green King Fertilizer pallets to the soil surface. But the weekly doses of liquid fertilizer still goes on! Near the end of the growing season, I will remove the pallets and change the liquid fertilizer into liquid PK fertilizer (0-10-10). This is basically what I have been doing for the last two years now and it seemed to have worked wonders for my Hawthorns! I hope this helps you?!

Cheers,

Hans van Meer.

Info: karamottobonsai@hotmail.com

—————————————————————————————————–

MY OLD HAWTHORN IN FULL BLOOM.

Hi, everybody,

I would like to share with you all some pictures of my old Hawthorn in full bloom. The abundance of this year’s flowers game as a big pleasant surprise to me! It had not bloomed like this for many years, so the heavier feeding regime that I started last year has worked like a charm! This healthy and happy image looks so much different from the bare leafless image that it had at this years Noelanders! This changing of images through the seasons is the extra beauty of deciduous Bonsai!  It has been a pure delight for me, to be able to sit in front of it, with a coffee in one hand and a Cognac in the other! While thinking about how this little tree got to this point in time while enjoying it intoxicated perfume!  These little private moments with the trees that I work with are what makes this Art Form so unique and special to me! This little Hawthorn is more than 12 year in the making and it gets better with every year that passes! For those who want to read the story of this tree, right from the moment when I collected it in Wales with Tony in early 1999: HERE!!!

At this moment I am preparing my Literati Hawthorn for next weekends, 6Th edition of the “Bonsai van het Westen” (Bonsai of the West) show, that is staged on the 2 and 3 of June, in the botanical gardens in Delft (The Netherlands)! HERE!!!  This is the most important Bonsai Show in The Netherlands and I am proud that I am invited to judge the trees on display and to show one of my own trees (out of competition). And because my Literati Hawthorn was shown for the last time at the prestigious “Ginkgo Awards”, way back in 2005! I thought it was about time to show it again! Tomorrow I will make some pictures with different displays options that I am thinking of (mostly in the shower! Very Happy ). I will post some of those shots later, so you all can see, how I work! Well…. work, might not be the right word to describe what I do?! Playing might be a better one! Very Happy

I hope you enjoyed the images?!
Cheers,

Hans van Meer.

Info: karamottobonsai@hotmail.com

————————————————————————-

My Lilac “Syringa microphylla” pre Bonsai in full bloom!

Hi, everybody,

I would like to share with you all some pictures that I made of one of my little trees that is in full bloom. I bought this Lilac “Syringa microphylla” in September 2009 at my old Bonsai friend Teunis Jan Klein’s place “Deshima” HERE!

Today this Urban yamadori is still a pre-Bonsai, but this year’s exuberant flower show makes a very spectacular visual impression and they don’t smell bad either! Smile

I hope you enjoyed the flower show?!

Cheers,

Hans van Meer.

Info: karamottobonsai@hotmail.com

—————————————————————————————–