“THE FIRST STYLING OF DIEDERICK HIS PINUS SYLVESTRIS YAMADORI” on YouTube! This is the story of the two fun sessions that we did to style this tall and unique Yamadori that I collected some 5 years ago. My friend and student Diederick and his wife fall in love with this tree when they visited my garden for the first time and they were happy to buy it from me and we then made an appointment to style it together at his place and film it all! This Yamadori is a tall formal upright uniquely shaped Pine with a long first branch that somewhere in its distant past was almost completely broken off by either snow or falling rocks! Somehow this almost fatally cracked branch stayed alive and healthy over with a beautiful Shari and was now all those years later the reason why I fell in love with it that day on that mountain…I just had to save this old guardian from falling into the closing dept just in front of him! It might be a bit controversial as a Bonsai, but we both really loved the story this tree had to tell because of this branch and would not thick off removing it! Thanks to Diederick and his lovely wife for their trust and for taking good care of me and the “Guardian”. I hope you all enjoy this little story of this pre-Bonsai?!
First here is the link to Ryan Neal’s BONSAI MIRAI LIVE website where you can find lots of wonderful Bonsai related video’s! And HERE is the link to the amazing video about Winter Preparation on Ryan Neal’s Bonsai Mirai Live! Thanks Ryan for helping so many Bonsai enthusiasts around the world!
Promo: Early Spring and days are getting longer, the weather is warming – spring is a pivotal time to maximize your bonsai’s development. Use this video to learn what to prioritize and where you should be placing your efforts in the month of April. Join us as Ryan covers different reasons for pruning, whether or not to repot, and how to approach fertilization at this point in the season.
This is what I wrote on YouTube after seeing this amazingly helpful video late yesterday night.
Wow! I have watched this 2-hour video totally captivated in one go until 3 in the morning! It is by far the best educational video around because Ryan has a way of teaching, explaining and showing that makes it all logical, understandable and stick! I have always been a big fan of his work….but his teaching easily equals his artistry. I will post a link on to my blog so that even more students of Bonsai can find their way to this uniquely valuable source of Bonsai information. Thanks, Ryan and all who made this Video possible! I can’t wait for the next edition!
I know of no other video or book that covers all the basics of Spring Fundamentals like this 2-hour video from Ryan, so please do your self and your Bonsai a favour and watch it!
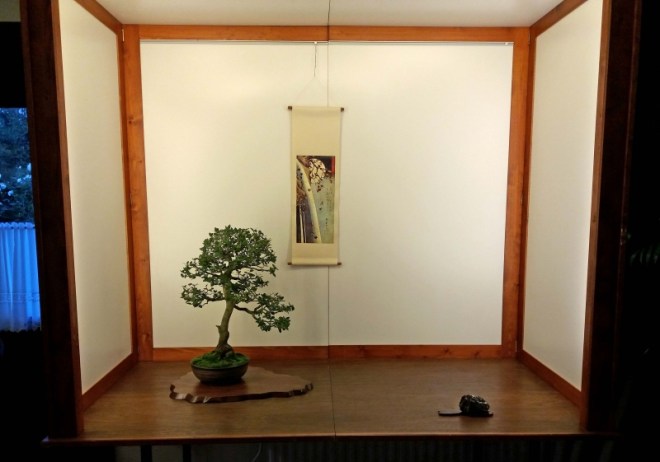
yesterday I did a Bonsai discussion at my first Bonsai club “KOYA” which is located in Rijswijk the Netherlands. I became a member there way back in 1991 and stayed there for 6 or 7 years. During those years there I organized with Farrand Blog en Rene Rooswinkel (now from BonsaiFocus) en many volunteers from KOYA one of the first big Bonsai exhibitions in Holland! And I was head of the activity committee for a while. And last but not least, I gave there my first and second demonstration ever! That first demo tree was a garden centre “Chamaecyparis nana” that a few years later won the “Dutch Bonsai days” and was later shown at the very first “Ginkgo Awards” and the “Crespy Cup”! I have fun memories of this club so it was great to go back there after all these years to help and teach the new and old club members with their questions and to give advice about maintenance and styling. I was welcomed at the door by a beautiful (portable) Tokonoma with a very mature delicate Holm (Quercus Ilex) that you don’t see as often as Bonsai in our part of the world. It was accompanieth by a nice scroll with a winter image and a suiseki. I had a great afternoon and the day was over before we knew it! The reactions were very positive and we agreed that I would come back early next year to give a workshop! After all the hearty goodbyes I drove back home…tired but very happy! Thanks to all the members of “KOYA” for their warm welcome and trust! I hope to see you all soon again?!
Cheers,
Hans van Meer.
——————————————————————————————-
Hallo allemaal,
gisteren heb ik een Boom bespreking gehouden bij mijn eerste Bonsai vereniging “KOYA” in Rijswijk. Ik ben daar lid geworden in de begin jaren negentig en ben er zo’n 6 a 7 jaar gebleven. Gedurende die tijd heb ik met Farrand Bloch en Rene Rooswinkel (van BonsaiFocus) en veel vrijwilligers van KOYA een van de eerste grote Nederelandse Bonsai shows georganiseerd. Tevens was ik een tijd hoofd van de activiteiten commisie en ik gaf er mijn eerste en tweede domonstratie ooit! Die eerste demo boom een tuin centrum “Chamaecyparis nana” won een paar jaar later de land dagen en heeft nog op de “Ginkgo Awards” en de “Crespy Cup” gestaan. Onnodig om te zegen dat ik leuke herrineringen heb aan mijn tijd by KOYA, dus het was fijn om eindelijk weer eens terug te kunnen gaan om de leden te helpen met al hun vragen over de verzorging en het stijlen van hun Bonsai. Ik werd bij de ingang verwelkomt door een hele mooie portable “Tokonoma” met een hele mooie en volwassen Steeneik (Quercus Ilex) en een prachtige scroll met een winter motief en een goed bij passende Suiseki. Ik had een fantastische dag en hij was voorbij voor dat we er erg in hadden! De reacties waren erg positief en we zijn overeen gekomen dat ik begin volgend jaar terug kom om een workshop te geven. Na een erg hartelijk afscheid ging ik moe maar voldaan weer op huis aan. Bedankt “KOYA” voor jullie vertrouwen en warm welkom en hopenlijk tot volgend jaar maar weer?!
ik wil jullie even laten weten dat ik binnenkort een boom bespreking heb bij mijn oude en eerste Bonsai vereniging “KOYA”. Hier onder de gegevens en misschien tot ziens?!
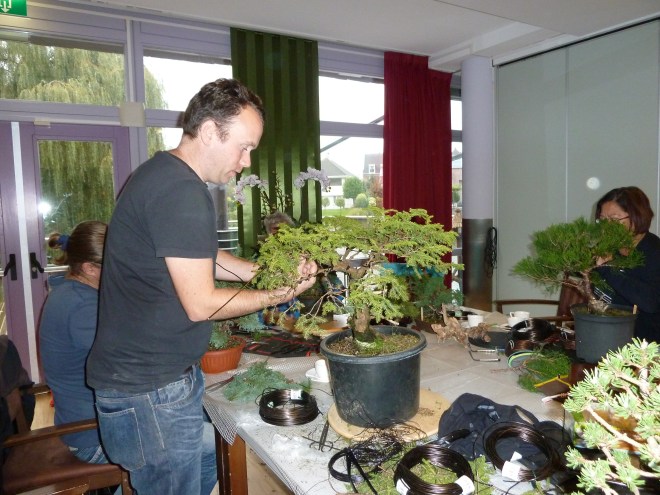
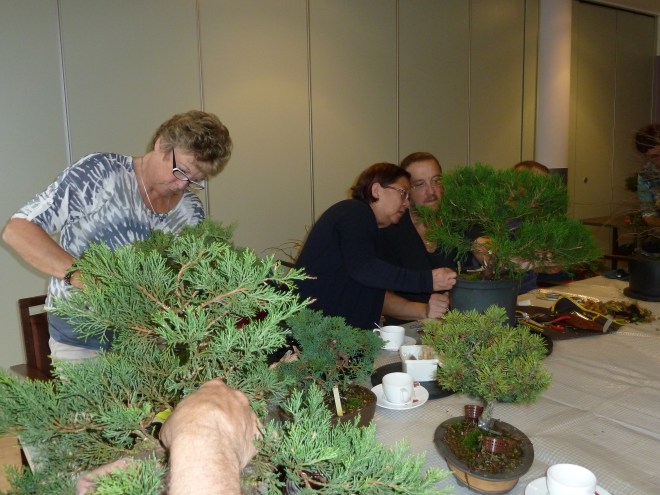
here are some pictures from last Sunday of my Poortugaal workshop group. With more than a dozen student it was hard work to spend enough time with everybody and their trees but I managed it…although I forgot to eat anything during that whole day! Everybody was happy after a long day of Bonsai fun and the next edition is already almost fully booked! 🙂
Thanks to Marijke for taking so good care of us all and for these pictures!
Hallo allemaal,
hier zijn wat foto’s van de afgelopen Zondag Poortugaal workshop groep. Met meer dan een dozijn studenten was het hard werken om iedereen en zijn bomen genoeg tijd en aandacht te geven, maar het is me toch gelukt….al was ik wel de hele dag vergeten om iets te eten! 😉 Iedereen was blij en te vreden na een lange dag Bonsai plezier en de volgende editie zit al bijna weer helemaal vol! 🙂
Bedankt Marijke voor al je hulp en voor deze fotos!
I got home very hungry and tired but in a good way! I love to spread the love for Bonsai and my knowledge, it is immensely fulfilling and uplifting! I can’t wait for the next edition!
Early next Wednesday morning I am off to the North of Holland to my new Bonsai friend Diederick to help him to style his beautiful big Yamadori Scotts Pine that he recently bought from me. This exciting massive job will be photographed and completely filmed to be posted later on to YouTube. I am looking forward to this and happy to be able to help with the ( in my opinion) promising future of this Pine that I collected some 4 years ago! And I know that enthusiastic Diederick will take good care of him…and that is a good thing to know!!! 🙂
This next post has been posted here before Juli 2009. But after using it again a few months ago during a workshop for my students and all the positive reactions that I got afterwards I decided to post it again here on my blog! I hope it will help those who struggle with the principles of downsizing the large image of a real tree into a Bonsai size.
Hi, everybody,
I wanted to tackle the subject of downsizing the image of a full-size tree into a compact miniature version. Off course, Bonsai is not the simple copying of trees from nature, but understanding how it works can help you to realize your own ideas. I will use an imaginary example of a 50 cm/20 Inch high Bonsai and will, later on, use two of my own Bonsai of that same height to make things clear!
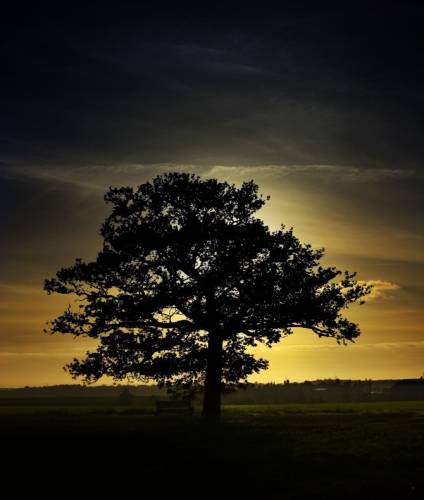
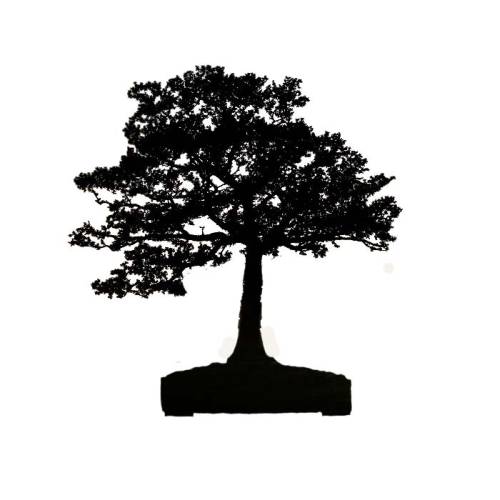
After surfing the web, I found a wonderful dark silhouette image of a tree to use as an example.
The above silhouette gives us enough info we need to recognize what it is. Even without the wooden bench underneath the tree, we can figure out how tall, big and far away from us this tree is. So if we use these same features that give us all that info in our Bonsai, we will at least end up with the right proportion in our little tree. And that is not a bad start, believe me!
Above: So here is the silhouette of this tree clearer to see. I have removed the two small branches that were growing low on the trunk, to make things even clearer to see. And while I was at it, I planted the tree in a Bonsai pot. Looks good already, doesn’t it?
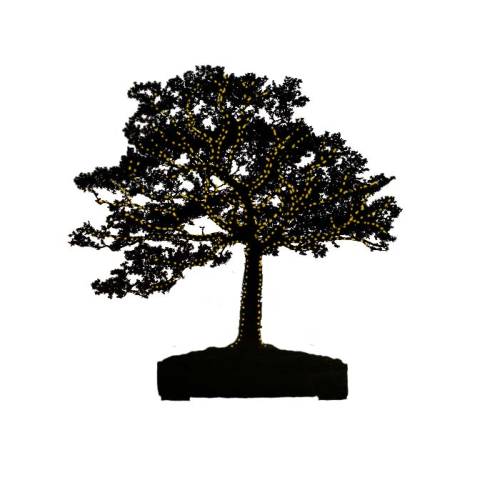
Above: The yellow dots show the outlines of the frame/skeleton of this tree. This design as Bonsai would be about 20 inch/50 cm high and material with a trunk and branches like this can easily be purchased from any Bonsai dealer that imports Acer palmatum or Ulmus but for example, a Beech or Hawthorn would do just as easily! But the amount of foliage you see here would be hard to archive with the too-large foliage of most deciduous species we could use to create this image with as a Bonsai. So we should divide the messy foliage into more compact and well-outlined foliage pads. By doing this, we will create more open spaces, that clearly open up the foliage pads from each other.
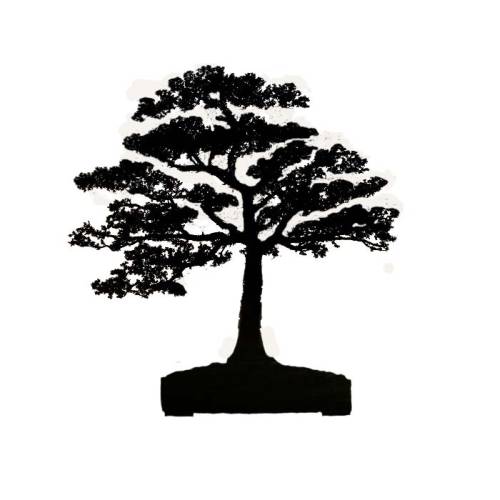
Above: Here I created some clearer open spaces between the foliage layers. It is the same image, but this time it is doable to shape it as a Bonsai. In principle, you only have to fill those outlined foliage pads with the larger leaves of the species you use to create this image.
Above: Here I filled these foliage pads with the foliage I borrowed from my own Carpinus betulus with exactly the same size as this imaginary Bonsai 50 cm/ 20 Inch. I placed the silhouette and a picture of my Carpinus next to each other and then cut and pasted the foliage onto the silhouette. So the size of this foliage in comparison to the trunk and height are accurate. So as you can see this could already be doable and believable as a Bonsai.
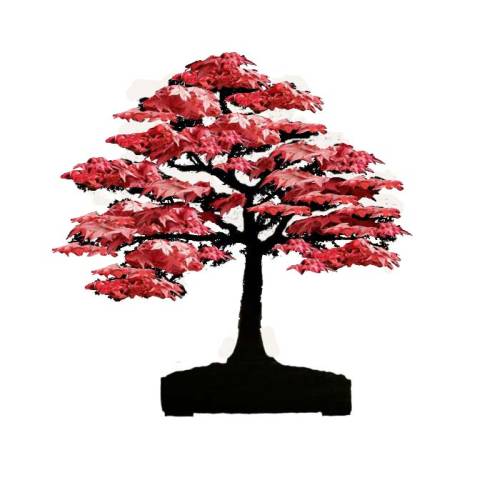
Above: Here I filled those foliage peds with the foliage of my same-sized Acer palmatum. Again the size of the foliage is accurate. So again, doable and believable!
Even though like in most Bonsai, the leaves are monstrously big in comparison to the tree image we have created, the outlines of the trunk, branches and foliage pads are correct, making it a believable image that reminds us of the trees we see in nature. Just like the painter, who only uses a few brush strokes to paint all the foliage of a large branch, we sometimes only use a few leaves to create all the imaginary foliage of a large branch.
GREAT NEWS!!! On Saturday 26 May 2018 Danny & Ingrid Use from the Bonsai centre “GINKGO” in Laarne Belgium will stage the second edition of the amazing “KEI BONSAI KAI” TEN and TEN “DANNY USE & FRIENDS” in Laarne Belgium!!! First of all, there is Danny’s huge world-class private collection to see and like in the first very amazing edition in 2016 Danny and his loyal students from “KEI BONSAI KAI” will show literally hundreds of their best Bonsai in amazing arrangements throughout the whole “Ginkgo” Bonsai centre! And like if that would be not enough?! Just like before Danny also invited many of his old Bonsai friends from the famous and legendary “GINKGO BONSAI AWARDS” series to show their best work!!! And I am once again very honoured and proud to say that I am one of them! 🙂 This great news was told to me last week when after a too long time I finally was able to visit my old and dear friends Danny and Ingrid again in their wonderful Bonsai centre!
As always we were warmly welcomed as lost friends and during a cordial conversation and coffee, Danny told me about his plans for the new Show and invited me to be a part of it again. Well, I wholeheartedly say YES!!! I WOULD LOVE TO!!! Even if this upcoming edition is half the success and the fun of the first one…well then I would still love to be a part of it all!!! If you love Bonsai? Well, then you simply can’t afford to miss out on this opportunity to visit this amazing “GINKGO” Bonsai centre where everything you ever need or want in Bonsai is for sale + the chance to see hundreds of some of the best Bonsai in Europe!!! Oh, and did I mention that there is a huge indoor rebuilt wooden American roadhouse bar for drinks and snacks!!! 😉 I hope to see and meet you all there!
Here you can see two video’s that I shot during the first edition in 2016:
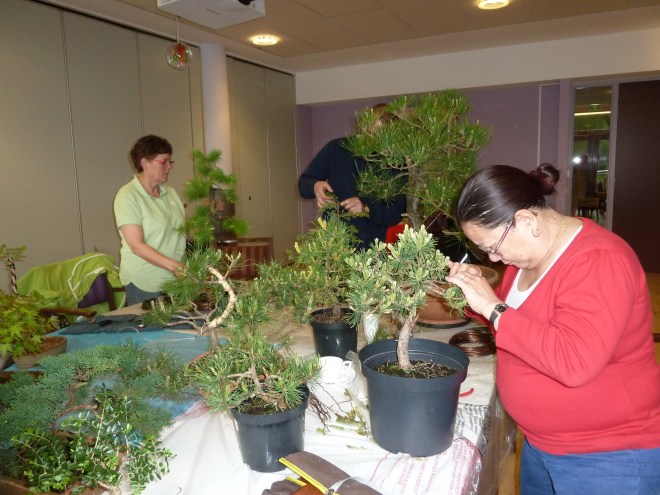
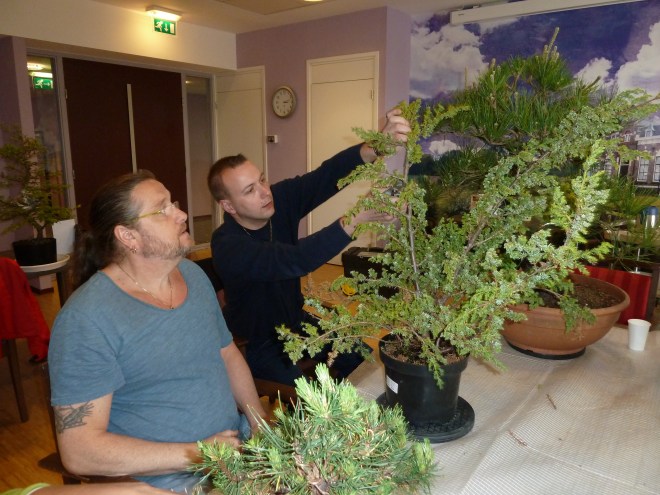
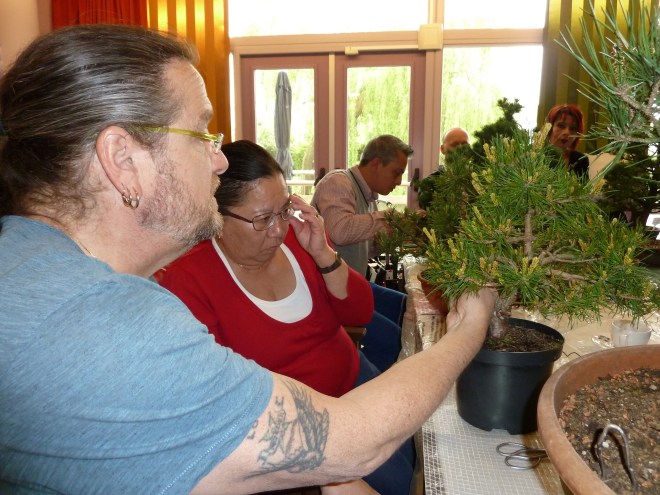
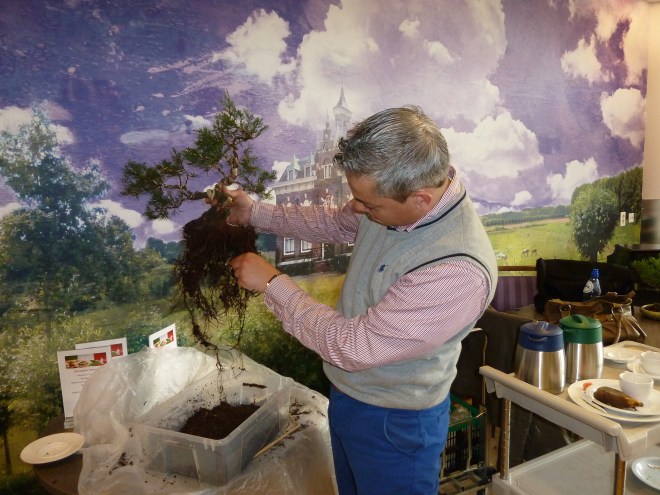
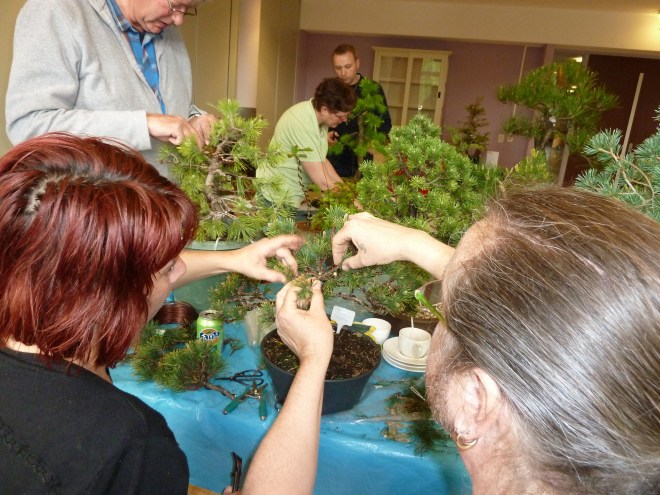
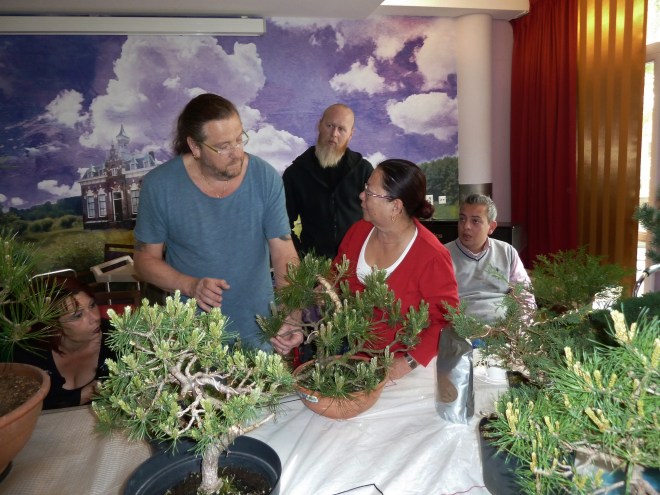
here are some fun pictures of my recent workshop that I did in Poortugaal (Holland) this year. Every workshop started with a little lecture from me about Bonsai subjects. Ranging from: fertilising, wiring, styling, soil and Pine care. Everything, text, pictures and my drawings are printed out by Marijke for the students to take home! The first 6 workshops I did this year, were just like last year, staged by and for Bonsai Club “Rijnmond”. But after those were finished, the students were so enthusiastic about them that they asked me if I could stage one more, focusing on the subject of Pine care?! Covering Pine Candle selection, pinching, needle removing and styling? Well, last Sunday it took place, after the great help of my trusty organiser and helper Marijke, who was able to rent the workshop space again for us to work in! The pictures that Marijke made that fun Sunday give a good impression of the 8 students and the teacher having a wonderful time again! So much so, that jet another one is planned by us for July, and that was booked full to the 8 max in a flash!!! 🙂 And that made them and me very happy again! I love to work with students on their babies! It is very fulfilling work to pass on what I know! I hope you enjoy this little impression of the great hobby that Bonsai is for us?!
Cheers,
Hans van Meer.
—————————————————————————————
Hallo allemaal,
hier zijn wat leuke foto’s van de laatste in de rij van 6 workshops die ik afgelopen Zondag gaf in Poortugaal (NL). Net zo als tijdens de 6 die ik daar verleden jaar al deed, wordt elke workshop gestart met een korte lezing over van alles wat met Bonsai te maken heeft. Onderwerpen zoals bijvoorbeeld: bemesting, bedraden, vormgeving en Denen verzorging worden dan behandeld door mij. Alles: tekst, foto’s en tekeningen van mij worden altijd afgedrukt door Marijke, zo dat de studenten het thuis nog eens kunnen na lezen! De eerste 6 workshops van dit jaar, waren zoals de 6 van afgelopen jaar georginaseerd door Bonsai vereniging “Rijnmond” . Maar na dat de laaste afgelopen was waren de studenten zo enthousiast dat ze mij vroegen of het mogenlijk was er nog een te organiseren, met als ondewerp het verzorgen van de verschillende dennen als Bonsai?! Met de focus op het nijpen en verwijderen van de kaarsen, naald plukken en form geving! Wel afgelopen Zondag is hij succes vol gehouden, na dat mij trouwe helper en regelaar Marijke het voor elkaar had gekregen om de ruimte nogmaals te huren! De foto’s die Marijke gemaakt heeft van deze middag zijn een mooi voorbeeld van het plezier dat de leraar en zijn studenten hadden deze fijne Bonsai dag! Zo fijn, dat ik er nog een heb georganiseerd voor Juli, die gelijk weer vol zat met de maximaal 8 studenten voor zo’n dag! En dat maakte de leraar en de studenten heel blij!Ook hierbij was Marijke onmisbaar als bemiddelaar! Ik geniet enorm van het werken aan Bonsai met mijn studenten en het geeft me veel voldoening! Ik hoop dat jullie deze kleine impressie van het plezier dat de Bonsai hobby ons schenkt leuk vinden?!
Groetjes,
Hans van Meer.
Info and questions about workshops, demo’s and Bonsai material:
Info en vragen over workshops, demo’s en Bonsai materiaal:
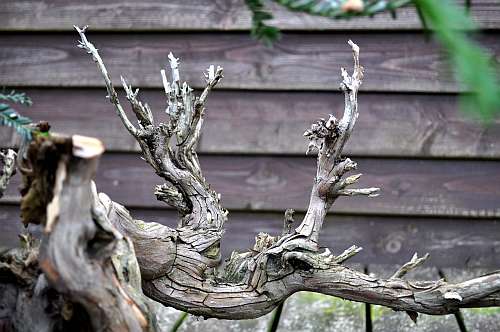
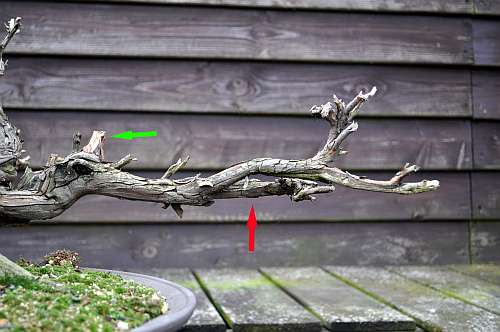
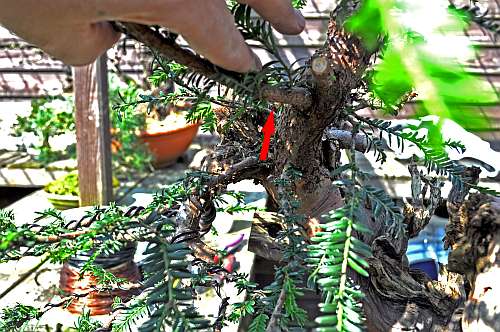
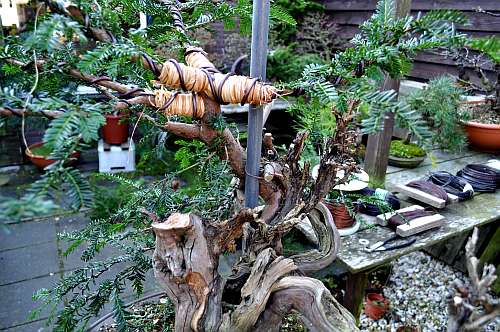
The first thing I wanted to do before I started to style the tree, is improving major large Jin on the right of the tree! It needs a whoosh flow to the right without too much visual distraction in a different direction! The especially straight angular movement away from the flow are a no-no and needs to be changed or completely removed! The straight upwards going Jin in the middle of this picture creates an almost perfect angle with the movement of long Jin to the right side and is clearly obstructing and shouting for attention when we follow the visual direction of long Jin! So it needs to be shortened considerably, but it needs to look like a force of nature had broken it off!
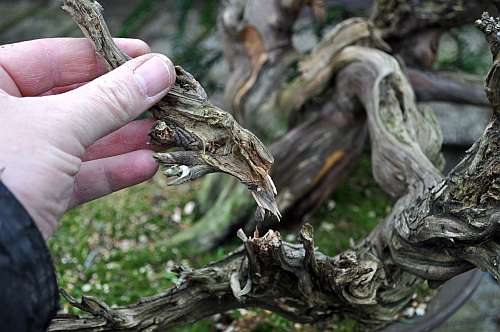
With a little-controlled force, the branch is broken off in just the right place leaving a natural-lookingsmall stump that needs little or no more work to look completely natural!
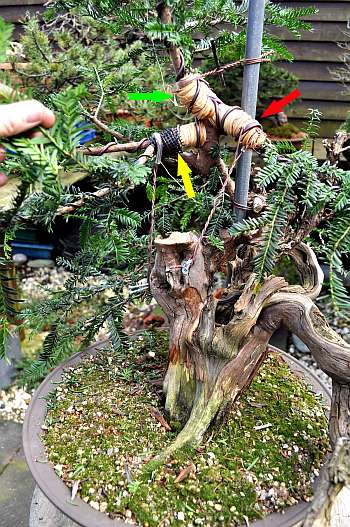
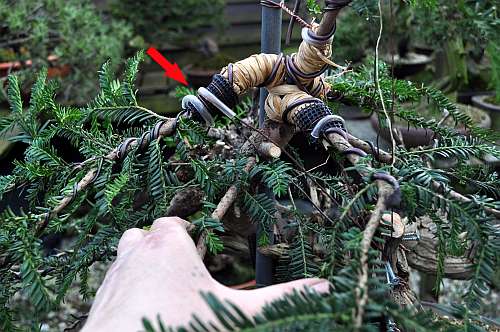
Green arrow pointsat the stump of the Jin that just is broken off. The red arrow points at an almost straight Jin that distracts the flow and movement ofJin just above and in front of it! So again: it needs to go!
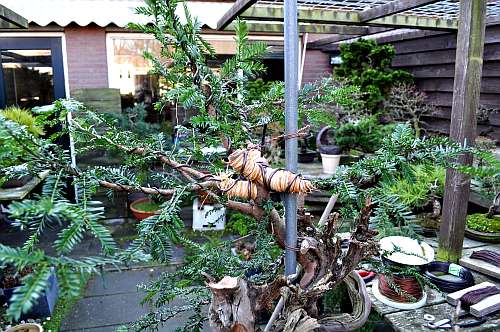
Again this Jin is controlled and broken off by hand and again Jin breaks right off at the desired place! In the background, you can already see just how the movement of that long Jin is now more clear and morevisible without any straight lines distracting it like before!
Much better all ready! But the red arrow points at a Jin that also grows upward in an angular fashion and obstructs at the tip of this long branch the eye movement, flow and natural tapering of that long Jin!
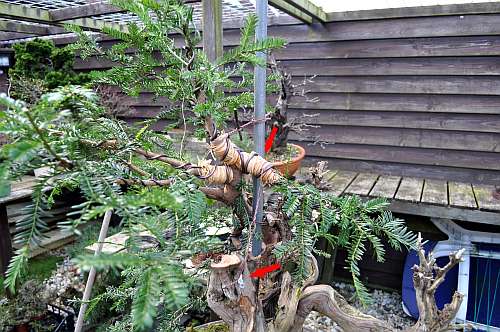
So again it is carefully broken off by hand! Leaving a stump that afterwards needs some more work with hand tools to go along even better with that last part oflong Jin! That will be donewhen the major styling is finished!
By now that long Jin looks much better and the eye movement to the right is without any obstructions! it is starting to look like a bolt of lightning! Just like I wanted it to look! It brings visual speed to the tree and that is in my eye very exciting for the future of this tree! the red arrow points at a section on that thicker Jin section that needs improving! It is too long in some parts and there are too many small Jins sticking out from it…like tin fingers! This Jin section is not a part of that long Jin and stands on its one! It goes off in a different and those not obstruct the movement of that long Jin!
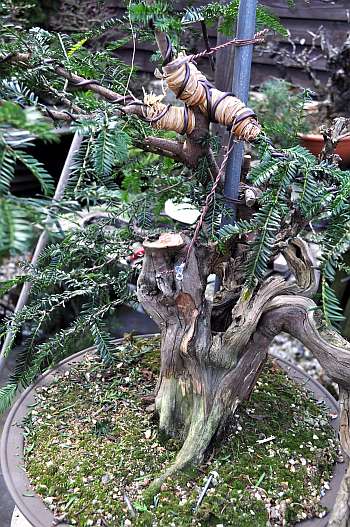
Like before the Jin that protruded straight into the air is removed by breaking it carefully off with my hand! Making that whole Jin less crowded and more open!
As you can see in this shot that Jin is now much more open and less busy! In the future when the branches are brought into their desired position and when that large, now still not worked on Shari aria is created, they might be worked on more and or shortened! But those important decisions can only be made when they can be compared with a more finished tree!
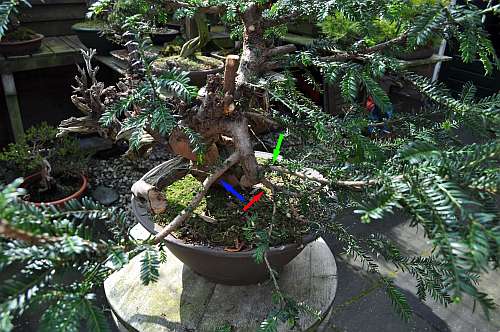
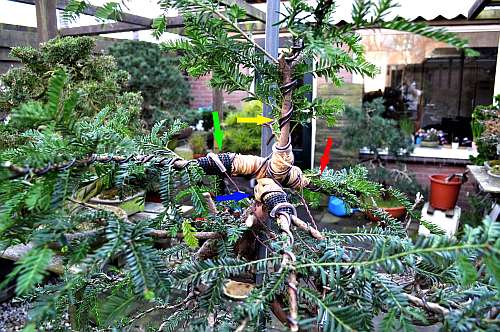
OK! Now it is time to make the final branch selections and then wire them and bring them into their desired position! First the left-hanging branch! The green arrow points at the branch that will form the left front branch. The red arrow will become the more left-orientated branch. The blue arrow points at the branch that will become the left backwards orientated branch!
Top view of that left side hanging branch. The left thicker and the one to the right that grows from it are wired in a way that offers the best protection against breaking. Applying the wire like this with room between them covers more of the branch surface than when you apply the wire needle against each other! Although it looks messy, it was precise work to avoid damaging all the buds and young growth! The tinner branches that grow from it on the right lower side are fanned out! know it doesn’t look like much yet, but remember all branches in this first styling are still way too long (some more than 40 cm) and they will be shortened considerably when the now juvenile growth and buds on them have grown sufficiently! This first styling is not to win any beauty contest, but to bring the basic shape and direction into all the branches so that the skeleton to later work from in more detail is solid!
The red arrow points at a branch that is nicely placed but where I am still not sure of if it will be used?! that really all depends on how far the higher placed left side branch will come down?! So I leave it for now! Just above it, you can see a stump from a branch that was the same as the one below it so that could be removed earlier! The two smaller branches below the red arrow are up to now not necessary, but are left just in case! Just see how much new growth is all over them!
The red arrow points at that same branch, It is a nicely placed one, but it is a bit too low on the trunk and too close to the bottom left branch! Imagine it bending down to the left…it would cover that first left branch….but still I keep it just in case! Better safe than sorry!
Close-upof the top branches that were left after removing two others once earlier. The wounds are covered with cut paste to prevent dieback that could harm the 3 branches that are left! The right one of the 3 is the one that might come down far enough to take the place of the one below it in the picture, the one we have just discussed in the picture before this one! The left one in the picture will become the back branch and the one in the middle will become the top.
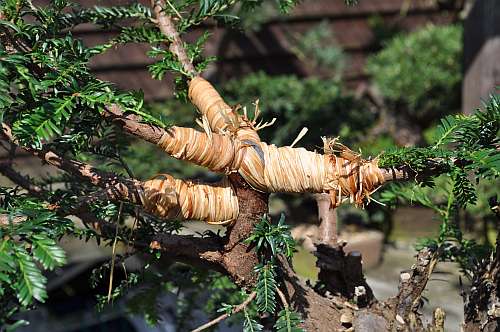
A layer of in-water-soakedraffia is tightly applied and held in place with little pieces of aluminium wire, this is handy when you are working alone! When this raffia dries it will shrink and protect the branches even more from breaking or cracking!
Onthe left, the branch below the future top is also covered with a layer of raffia. It is always handy to have enough water-soaked raffia prepared and ready so that you can work on it without having to stop in the middle because you have run out!
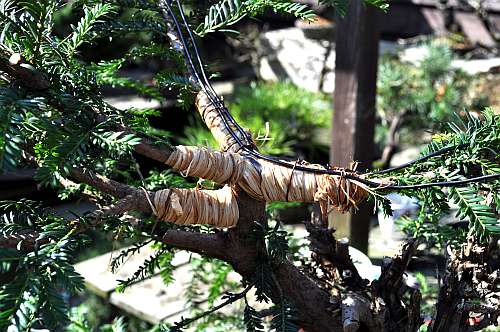
Then two wires are placed on top of the raffia that is also held in place with pieces of wire. This wire needs to be placed tightly onto the raffia without any space under need them! These two branches will be bent down so the wire on top will offer protection from breaking where the most stress is occurring! You might have knottiest that the wires are too long and will stick out from under the raffia?! Well, this is on purpose…they are used to wire the rest of the branch! Clever or what!? 🙂
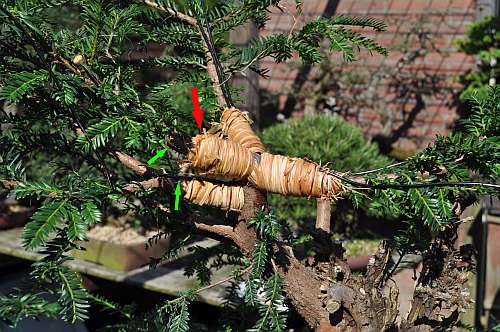
The treetop branches have the second layer ofraffia applied to them, to hold the wirer under need it as tight as possible! The red arrow points at the future top branch that will be severely bent up-wards so it needs protection from a wirer under it to protect it! That’s why a U-shaped wire is placed (green arrows) under need that branch, to protect it and the branch below it, which will bend downwards! That branch that goes downwards is here still waiting for its second layer of raffia to hold that U-shaped piece of wire tightly into place!
After that last layer of raffia is applied, and just one single MM aluminium wire is used to cover it! I figured that this is enough to safely bend the branches because strong copper wires will be used to hold them firmly into place! A (too long) iron pipe is inserted into the ground and secured firmly (with pieces of rubber between it) against the trunk with strong copper wire. This iron pipe will be used to bring the future top (on the left) upwards.
Here the future top is already on its way upward towards the iron pipe! This is carefully done in stages…there is no rush when doing these major bends! Especially when working alone, you are short off 2 hands! It takes some force and technique to bend and turn and tighten the wire with a nipper!
The top red arrow points at the future back branch that is brought down and to the left (in this picture) and is held down by a 3 MM copper wire that is attached to two screws that are brought into the Shari (bottom red arrow)! Just look how far it has already come down!
Close-up of the wire that is connected to the screws that hold everything into place.
That is, with intervals, more and more tightened with the help of a short piece of thick wire (like you can see on the right off the top)!
In this way, the branch is slowly and as safe as possible brought into the desired position and at the end hold in its place!
In this shot, you can also see just why in the future the large Jin on the left, where the screws are inserted, needs to be largely removed and then naturally formed! It gives the tree a reverse taper (smaller at the base and wider at the top)! It also hides the view of large Jin at the back!
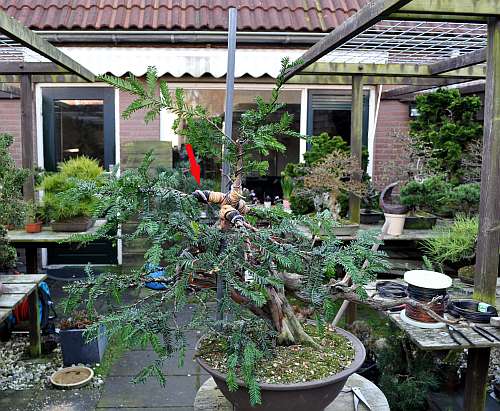
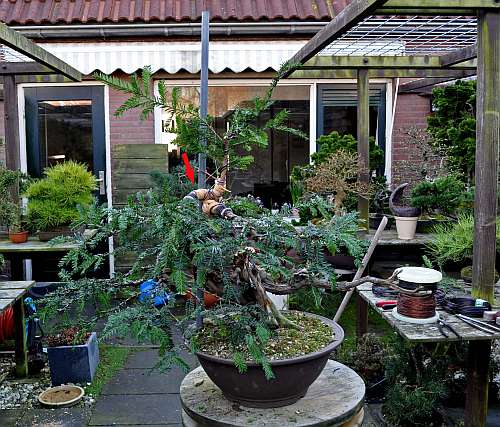
The red arrow pointsat the top that is finally into place, just look how far it is bent upwards…amazing! the green arrow point at the top left branch that is about to be carefully bent down into its desired position! Things are so far coming along nicely! I am completely in my element again…I missed that feeling for so long! 🙂
The green arrow points at the new top. The red arrow points at the back branch. The yellow arrow point at the new right hanging branch after it is in stages brought down into its new position! The green arrow points at the top that is even brought more toward the iron pipe!
The yellow arrow point at the top is by now in its desired position, but is here still straight and therefore needs bending to create a more natural movement. The red arrow points at the back branch. the blue arrow points at the new first right side branch that also needs additional bending to create curves and the green arrow points at the left first branch that needs some more downwards bending!
The red arrow points at the first left-side branch that still needs to be brought down a considerable bit! This is done by carefully pushing it down with my left hand, while the right hand tightens the heavy copper wire! You have to be very handy when you work alone! 🙂
The red arrow points at that same left-hand first branch. Just look how far it has come down when you compare it with the picture above! It still amazes me how far you can safely bend stiff branches when you protect them with raffia and wire!
Red arrow points at the branch that is just brought down and held in its new position with the help of 2 strong copper wires! Pieces of aquarium tubs and pieces of pot screens are used to prevent the wires from cutting into the bark of the branches! This is very important and must always be done!!!
Red arrow points at the branch that was kept on with a question mark?! It could be a left branch, but it would hide the branch below it! And now the branch above it, which has just been brought down, has taken over the place of that branch in a better way…so it can be removed as well !!
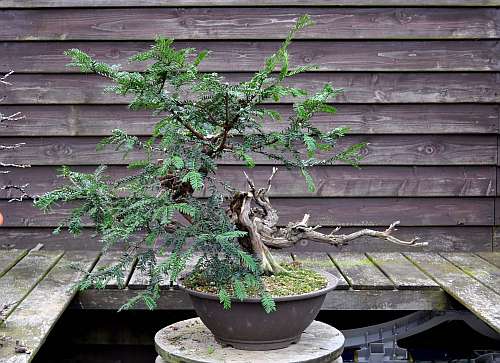
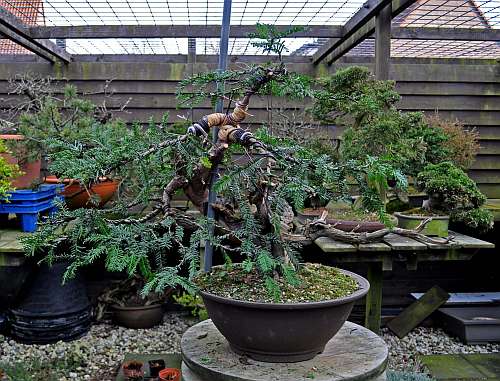
And this is, for now, the final resold after a day of work! Remember that all the branches are left way too long on purpose to protect the inner buds and small growth! This extra length with all its lush growth will work as a sucking engines to maintain the sap flow and growing power and will only be shortened as soon as I am completely sure that there is enough growth on them closer to the trunk to maintain the branches! The long top will also be shortened in the future and one of its lower-placed small branches will become the new leader and top! But again: only when there is more growth lower to maintain its health! I don’t want to lose any branches, they are all needed and health and growth are much more important now than the wild image of this very old tree!
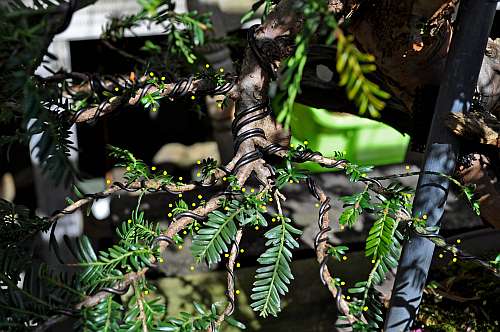
I made this picture on 5-5-2016 just to show and prove to you what I mend by tons of buds and new growth all over the insides of all the selected branches! This is a close-up of the first hanging branch on the left of the tree! I placed yellow dots next to each bud and new growth to make it more clear for you all to see! When this new growth has grown sufficiently on all the now still way too long branches, they will be all shortened considerably! Some by more than 35 cm!
I hope you enjoyed this story as much as I did making it?! I will keep you all updated on the progress of this future Bonsai and hope you come back for my other Bonsai stories andadventures?!
I know it is a bit late…..but I would still like to wish for all of you out there in Bonsai world a very happy and healthy 2015!!!!
I started this year with a lot of good intentions and resolutions! One off them: spending more time on my own trees, has already started and another one: feeling a bit better, started because I started with the first one! I miss working on my own trees! Sound funny, yes?! But it isn’t…really! On with the good news now: My dear friend Tony Tickle surprisingly invited me again as a teacher for the next edition of “BURRS 2015”. This “X” anniversary edition will be staged on 18 and 19 April instead on the usual weekend in November and there are still some places available (see poster)! I will be working together with my good friend Enrico Savini from Italy and the “Man” Tony Tickle and Terry Foster again! There are still some places left so if you are interested in an amazing weekend full of Bonsai fun….well!!