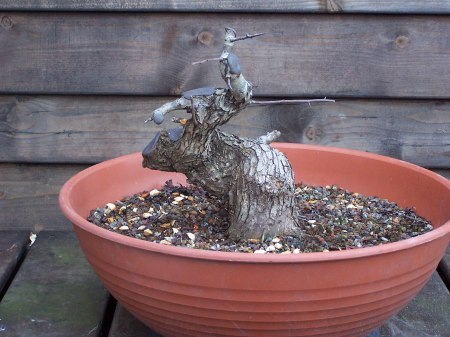
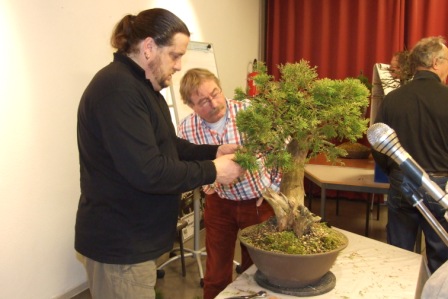
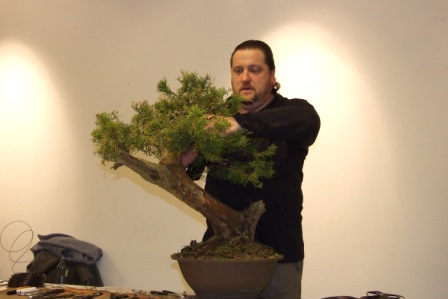
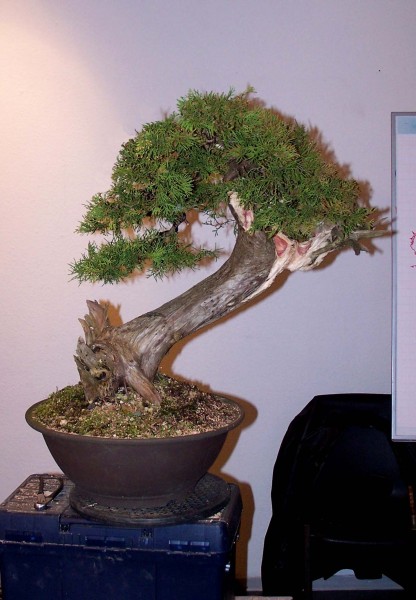
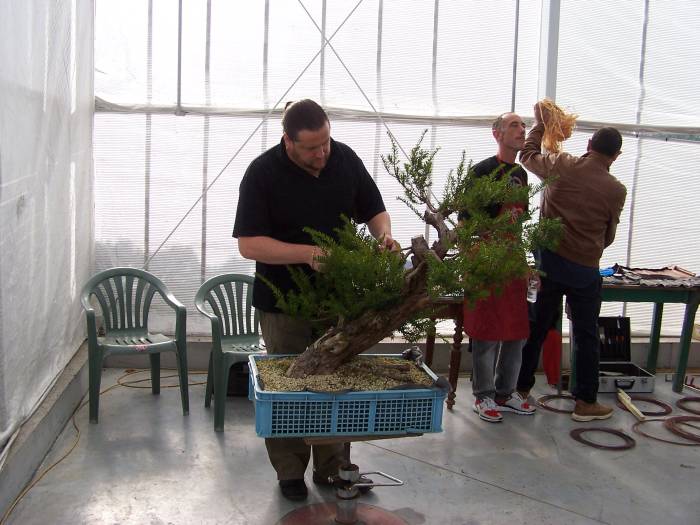
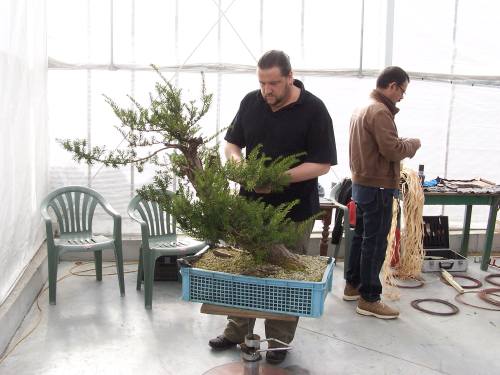
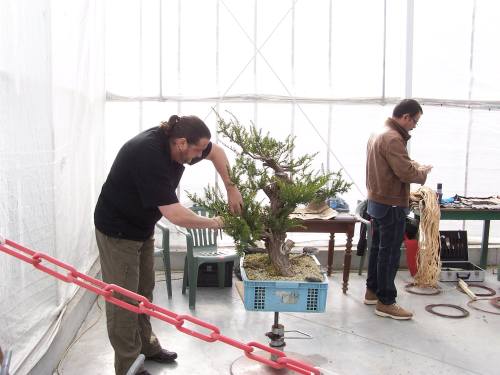
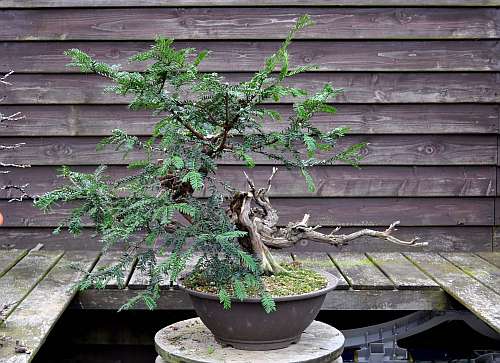
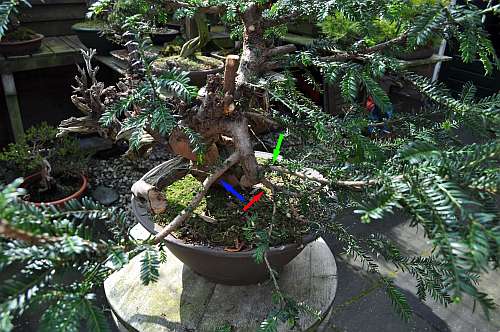
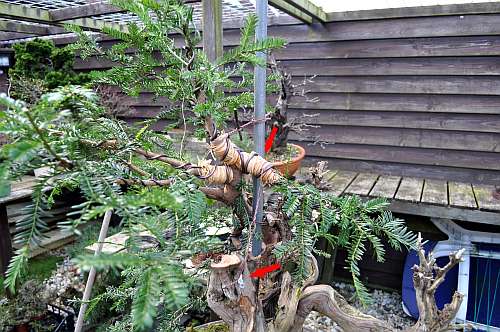
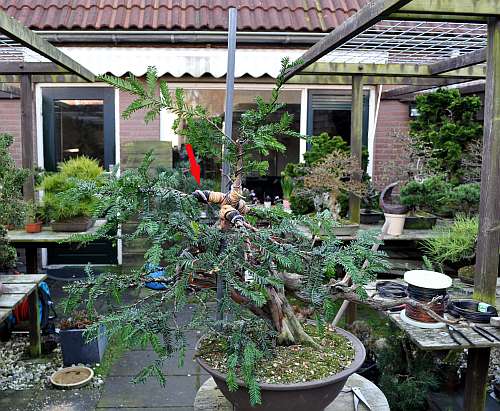
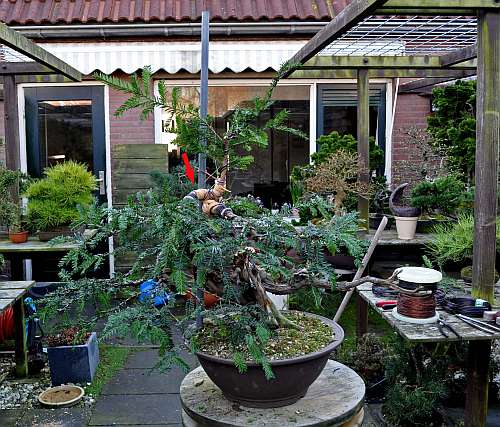
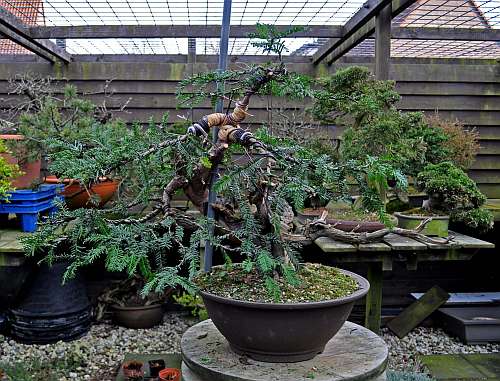
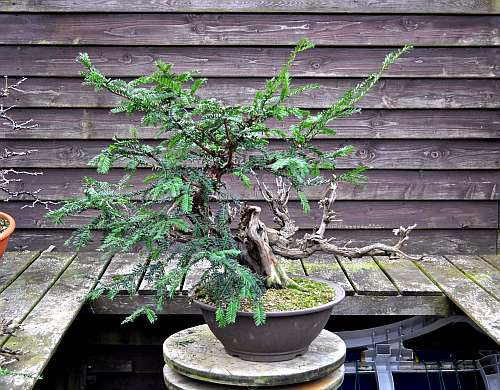
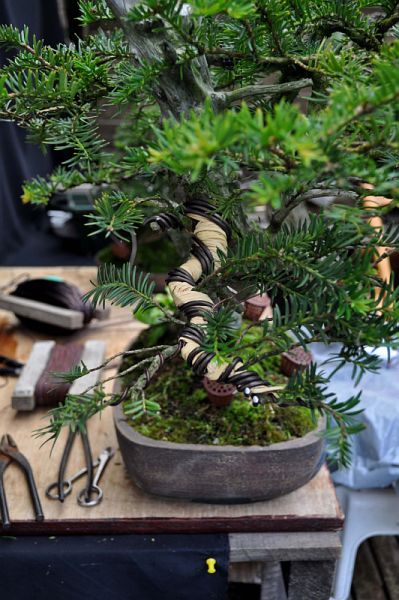
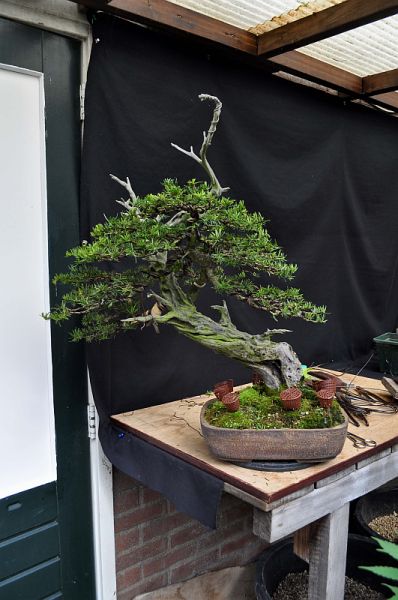
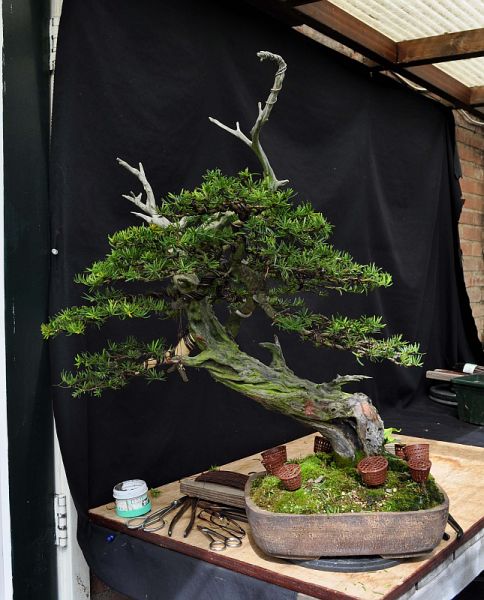
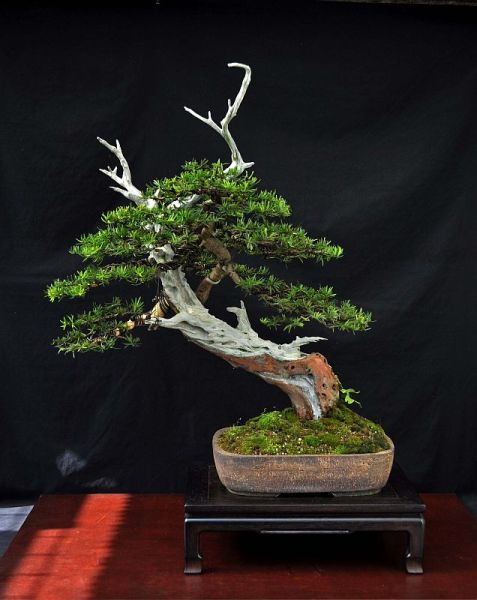
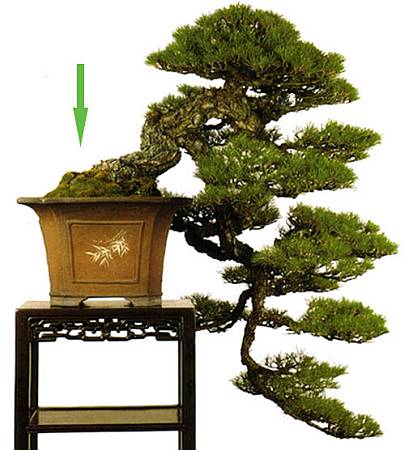
a few days ago I did some maintenance work on my old Pinus thunbergii Yamadori from Japan. I got this pretty tree some 20 years ago as a birthday present and I still think it is wonderful! She has been through a lot since she arrived in my garden! Like being blown right off the table by an uninspected storm…twice! The second time straight into the pond I then still hat in my garden! She laid several days completely submerged under water before we noticed that she was missing! And then there was the time that she after I had cut off the old needles, dropped all of her new growth! She was completely bold! But she soon made new buds and now some 12 years later is still doing fine! Although I love the small round pot she is in now, I am still planning to repot her next year in a slightly bigger and heavier square pot so that she can grow some more roots and so that she can stand more safely and secure by herself on my tables. Now she is still tight down with wire and a piece of bamboo to the upside-down pot that you can see under need its pot! This pot is there to hold and weigh her down to the table! Before these pictures were made I removed last year’s needles so that more light can reach the inside of the branches to promote back budding! Tomorrow I will remove the wire from all the branches! I will rewire her just before I will repot her next Spring! But I still wanted to show her to you all and I hope you like her just as much as I do?!
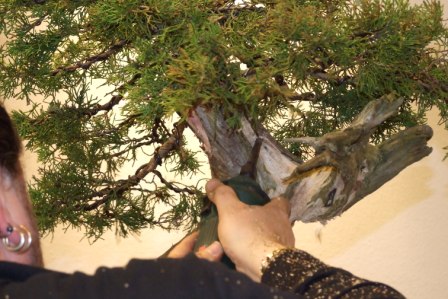
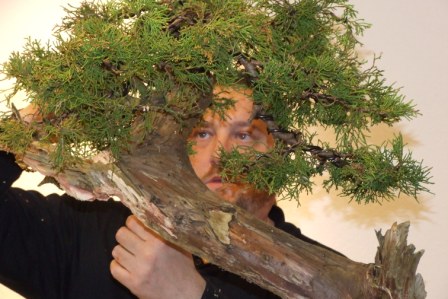
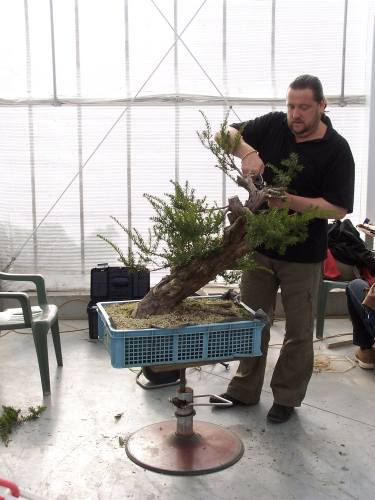
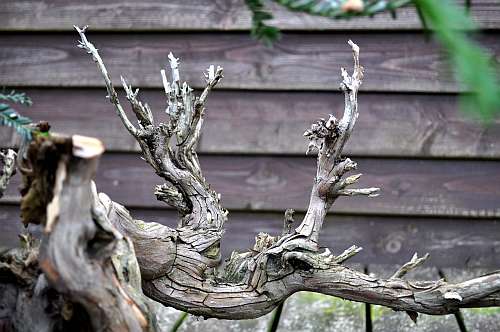
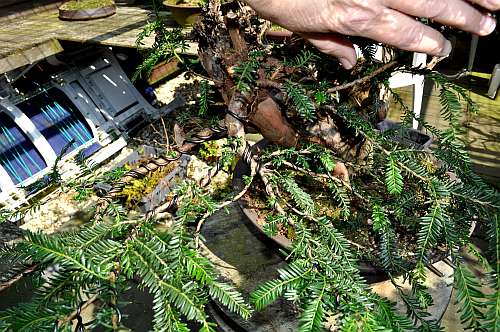
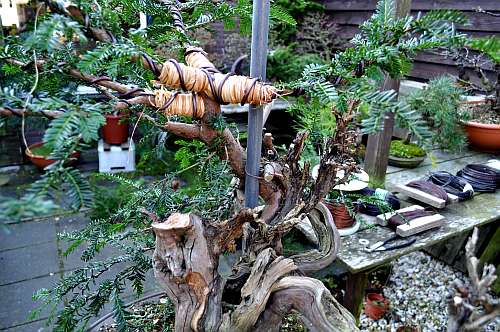
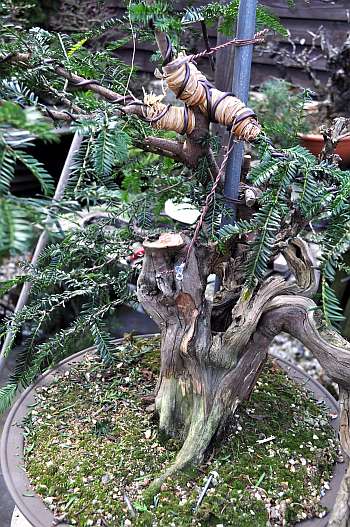
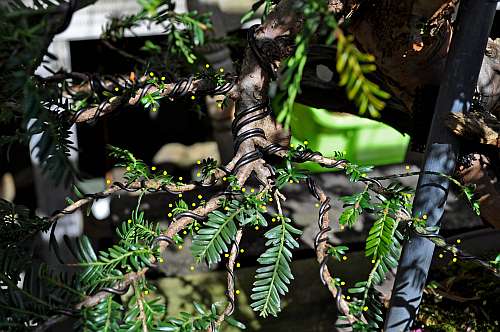
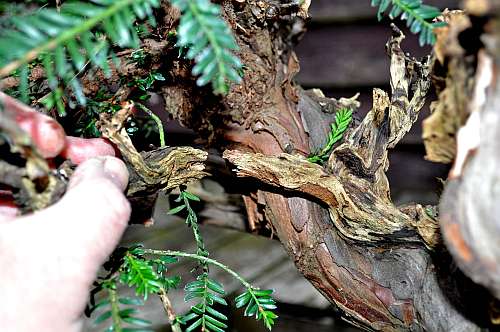
Close-up of the beautiful and all-natural deadwood/ Shari and old bare roots/ Neagari. The trunk winds halfway down the foliage you can see and then curls up again to just under the bottom of its pot!
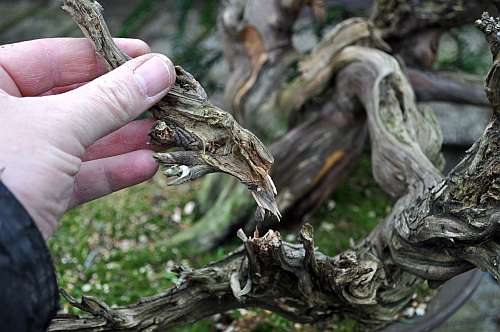
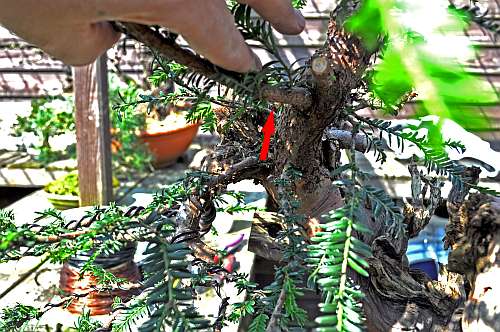
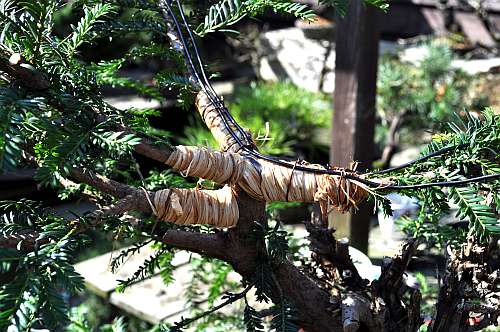
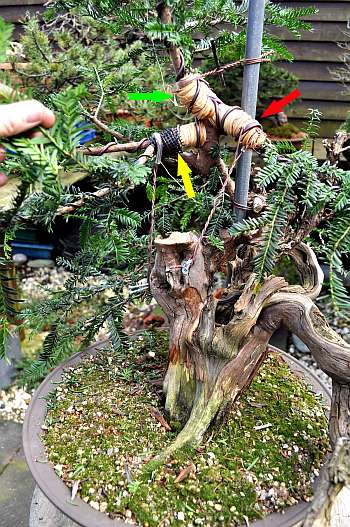
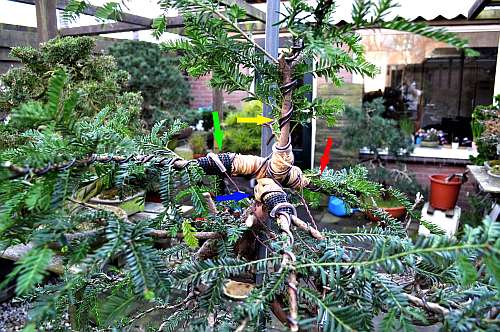
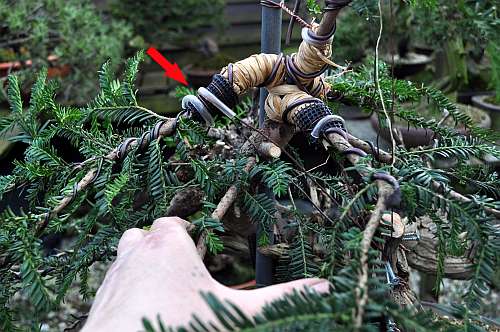
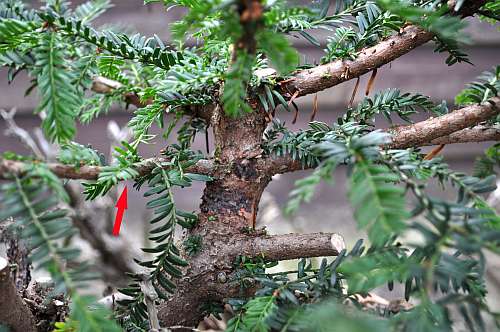
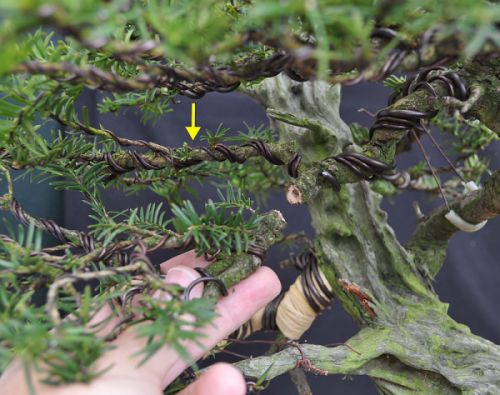
And then now another (I hope) helpful tip! A lot of us use aquarium tubing (see the picture!) to prevent the wire from digging into the bark of the tree when we are bending thick branches with tension wires between the two branches!
But then we have a problem because this tubing can only be used on one branch because if we want to use it around the second branch (see the picture!) to protect it, we can’t run the wire through it and tighten it?!
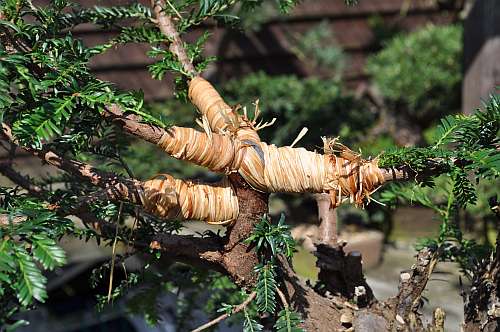
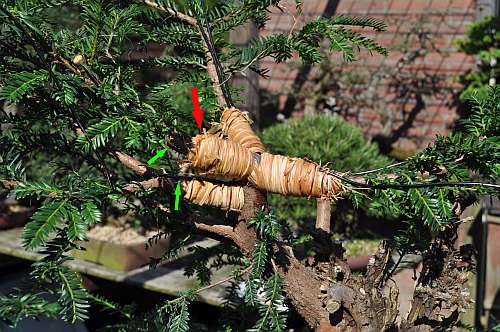
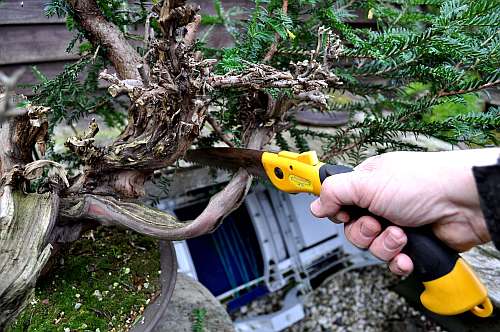
Well here is the solution! With the help of a concave cutter (see the picture!) cut out a small bite off one side of the tub!
So that you are left with a piece of tube that looks like this (see the picture!)!
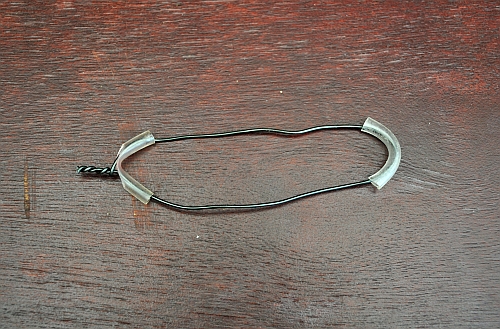
Now you can run both ends of the wire through both ends of the tube en run them through the hole you just cut out! Slide the tube down the wire as tightly against the bark as possible and with a tong twist both ends of the wire as tight as necessary to hold the branch/es in position!
Hope this will help you and that you liked the quick view of my little old Pine?!
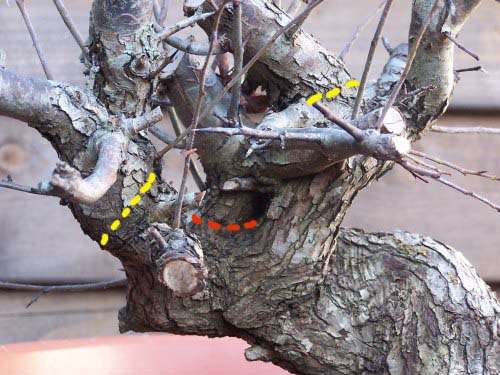
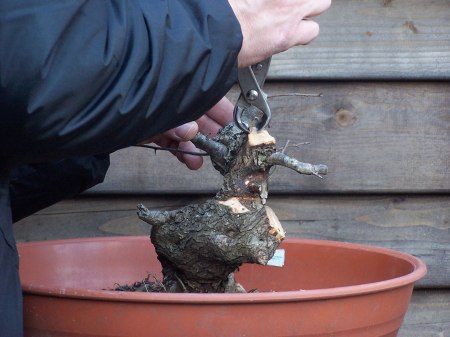
The first thing I wanted to do before I started to style the tree, is improving major large Jin on the right of the tree! It needs a whoosh flow to the right without too much visual distraction in a different direction! The especially straight angular movement away from the flow are a no-no and needs to be changed or completely removed! The straight upwards going Jin in the middle of this picture creates an almost perfect angle with the movement of long Jin to the right side and is clearly obstructing and shouting for attention when we follow the visual direction of long Jin! So it needs to be shortened considerably, but it needs to look like a force of nature had broken it off!
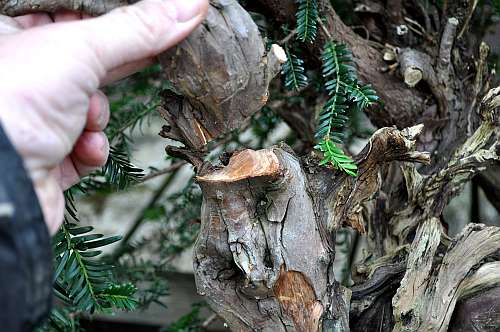
With a little-controlled force, the branch is broken off in just the right place leaving a natural-lookingsmall stump that needs little or no more work to look completely natural!
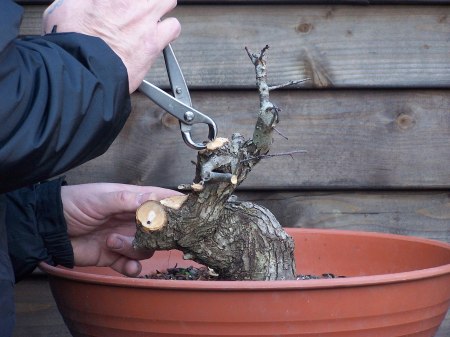
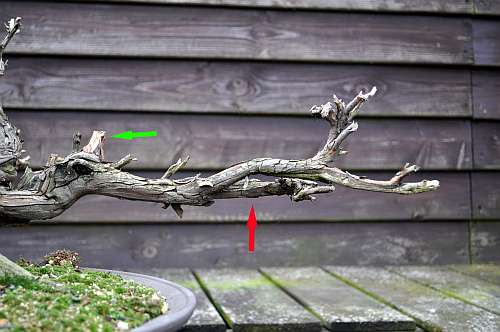
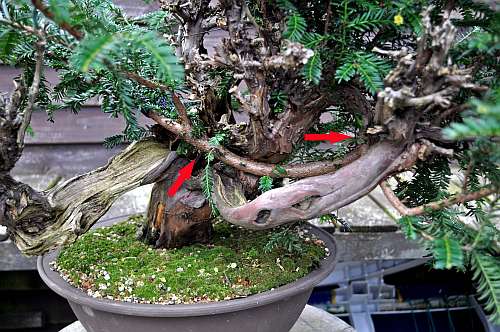
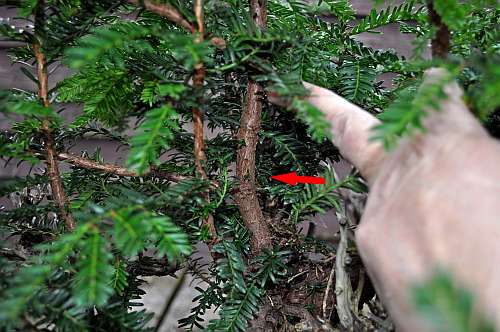
Green arrow pointsat the stump of the Jin that just is broken off. The red arrow points at an almost straight Jin that distracts the flow and movement ofJin just above and in front of it! So again: it needs to go!
Again this Jin is controlled and broken off by hand and again Jin breaks right off at the desired place! In the background, you can already see just how the movement of that long Jin is now more clear and morevisible without any straight lines distracting it like before!
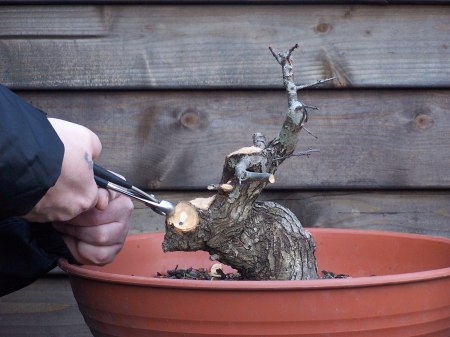
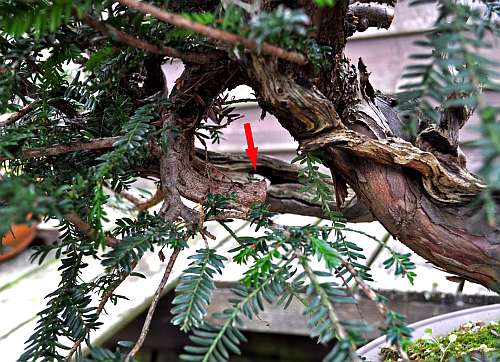
Much better all ready! But the red arrow points at a Jin that also grows upward in an angular fashion and obstructs at the tip of this long branch the eye movement, flow and natural tapering of that long Jin!
So again it is carefully broken off by hand! Leaving a stump that afterwards needs some more work with hand tools to go along even better with that last part oflong Jin! That will be donewhen the major styling is finished!
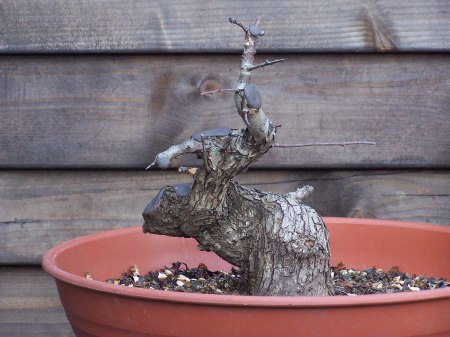
By now that long Jin looks much better and the eye movement to the right is without any obstructions! it is starting to look like a bolt of lightning! Just like I wanted it to look! It brings visual speed to the tree and that is in my eye very exciting for the future of this tree! the red arrow points at a section on that thicker Jin section that needs improving! It is too long in some parts and there are too many small Jins sticking out from it…like tin fingers! This Jin section is not a part of that long Jin and stands on its one! It goes off in a different and those not obstruct the movement of that long Jin!
Like before the Jin that protruded straight into the air is removed by breaking it carefully off with my hand! Making that whole Jin less crowded and more open!
As you can see in this shot that Jin is now much more open and less busy! In the future when the branches are brought into their desired position and when that large, now still not worked on Shari aria is created, they might be worked on more and or shortened! But those important decisions can only be made when they can be compared with a more finished tree!
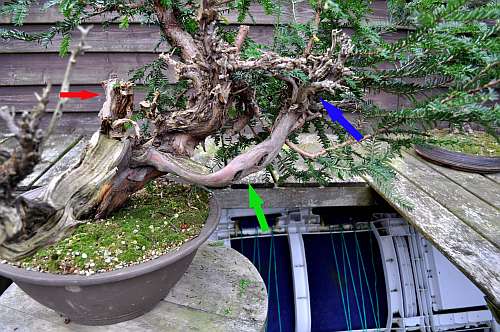
OK! Now it is time to make the final branch selections and then wire them and bring them into their desired position! First the left-hanging branch! The green arrow points at the branch that will form the left front branch. The red arrow will become the more left-orientated branch. The blue arrow points at the branch that will become the left backwards orientated branch!
Top view of that left side hanging branch. The left thicker and the one to the right that grows from it are wired in a way that offers the best protection against breaking. Applying the wire like this with room between them covers more of the branch surface than when you apply the wire needle against each other! Although it looks messy, it was precise work to avoid damaging all the buds and young growth! The tinner branches that grow from it on the right lower side are fanned out! know it doesn’t look like much yet, but remember all branches in this first styling are still way too long (some more than 40 cm) and they will be shortened considerably when the now juvenile growth and buds on them have grown sufficiently! This first styling is not to win any beauty contest, but to bring the basic shape and direction into all the branches so that the skeleton to later work from in more detail is solid!
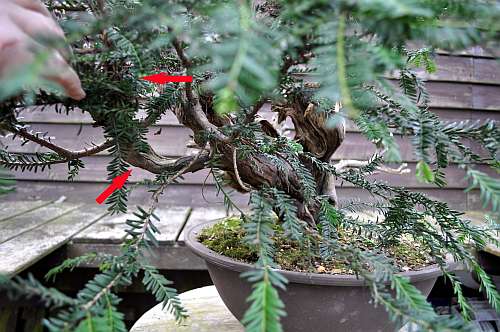
The red arrow points at a branch that is nicely placed but where I am still not sure of if it will be used?! that really all depends on how far the higher placed left side branch will come down?! So I leave it for now! Just above it, you can see a stump from a branch that was the same as the one below it so that could be removed earlier! The two smaller branches below the red arrow are up to now not necessary, but are left just in case! Just see how much new growth is all over them!
The red arrow points at that same branch, It is a nicely placed one, but it is a bit too low on the trunk and too close to the bottom left branch! Imagine it bending down to the left…it would cover that first left branch….but still I keep it just in case! Better safe than sorry!
Close-upof the top branches that were left after removing two others once earlier. The wounds are covered with cut paste to prevent dieback that could harm the 3 branches that are left! The right one of the 3 is the one that might come down far enough to take the place of the one below it in the picture, the one we have just discussed in the picture before this one! The left one in the picture will become the back branch and the one in the middle will become the top.
A layer of in-water-soakedraffia is tightly applied and held in place with little pieces of aluminium wire, this is handy when you are working alone! When this raffia dries it will shrink and protect the branches even more from breaking or cracking!
Onthe left, the branch below the future top is also covered with a layer of raffia. It is always handy to have enough water-soaked raffia prepared and ready so that you can work on it without having to stop in the middle because you have run out!
Then two wires are placed on top of the raffia that is also held in place with pieces of wire. This wire needs to be placed tightly onto the raffia without any space under need them! These two branches will be bent down so the wire on top will offer protection from breaking where the most stress is occurring! You might have knottiest that the wires are too long and will stick out from under the raffia?! Well, this is on purpose…they are used to wire the rest of the branch! Clever or what!? 🙂
The treetop branches have the second layer ofraffia applied to them, to hold the wirer under need it as tight as possible! The red arrow points at the future top branch that will be severely bent up-wards so it needs protection from a wirer under it to protect it! That’s why a U-shaped wire is placed (green arrows) under need that branch, to protect it and the branch below it, which will bend downwards! That branch that goes downwards is here still waiting for its second layer of raffia to hold that U-shaped piece of wire tightly into place!
After that last layer of raffia is applied, and just one single MM aluminium wire is used to cover it! I figured that this is enough to safely bend the branches because strong copper wires will be used to hold them firmly into place! A (too long) iron pipe is inserted into the ground and secured firmly (with pieces of rubber between it) against the trunk with strong copper wire. This iron pipe will be used to bring the future top (on the left) upwards.
Here the future top is already on its way upward towards the iron pipe! This is carefully done in stages…there is no rush when doing these major bends! Especially when working alone, you are short off 2 hands! It takes some force and technique to bend and turn and tighten the wire with a nipper!
The top red arrow points at the future back branch that is brought down and to the left (in this picture) and is held down by a 3 MM copper wire that is attached to two screws that are brought into the Shari (bottom red arrow)! Just look how far it has already come down!
Close-up of the wire that is connected to the screws that hold everything into place.
That is, with intervals, more and more tightened with the help of a short piece of thick wire (like you can see on the right off the top)!
In this way, the branch is slowly and as safe as possible brought into the desired position and at the end hold in its place!
In this shot, you can also see just why in the future the large Jin on the left, where the screws are inserted, needs to be largely removed and then naturally formed! It gives the tree a reverse taper (smaller at the base and wider at the top)! It also hides the view of large Jin at the back!
The red arrow pointsat the top that is finally into place, just look how far it is bent upwards…amazing! the green arrow point at the top left branch that is about to be carefully bent down into its desired position! Things are so far coming along nicely! I am completely in my element again…I missed that feeling for so long! 🙂
The green arrow points at the new top. The red arrow points at the back branch. The yellow arrow point at the new right hanging branch after it is in stages brought down into its new position! The green arrow points at the top that is even brought more toward the iron pipe!
The yellow arrow point at the top is by now in its desired position, but is here still straight and therefore needs bending to create a more natural movement. The red arrow points at the back branch. the blue arrow points at the new first right side branch that also needs additional bending to create curves and the green arrow points at the left first branch that needs some more downwards bending!
The red arrow points at the first left-side branch that still needs to be brought down a considerable bit! This is done by carefully pushing it down with my left hand, while the right hand tightens the heavy copper wire! You have to be very handy when you work alone! 🙂
The red arrow points at that same left-hand first branch. Just look how far it has come down when you compare it with the picture above! It still amazes me how far you can safely bend stiff branches when you protect them with raffia and wire!
Red arrow points at the branch that is just brought down and held in its new position with the help of 2 strong copper wires! Pieces of aquarium tubs and pieces of pot screens are used to prevent the wires from cutting into the bark of the branches! This is very important and must always be done!!!
Red arrow points at the branch that was kept on with a question mark?! It could be a left branch, but it would hide the branch below it! And now the branch above it, which has just been brought down, has taken over the place of that branch in a better way…so it can be removed as well !!
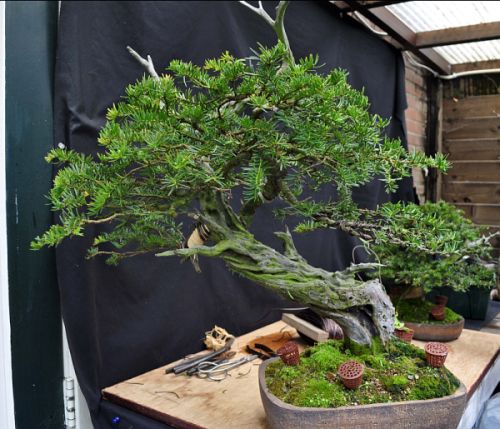
And this is, for now, the final resold after a day of work! Remember that all the branches are left way too long on purpose to protect the inner buds and small growth! This extra length with all its lush growth will work as a sucking engines to maintain the sap flow and growing power and will only be shortened as soon as I am completely sure that there is enough growth on them closer to the trunk to maintain the branches! The long top will also be shortened in the future and one of its lower-placed small branches will become the new leader and top! But again: only when there is more growth lower to maintain its health! I don’t want to lose any branches, they are all needed and health and growth are much more important now than the wild image of this very old tree!
I made this picture on 5-5-2016 just to show and prove to you what I mend by tons of buds and new growth all over the insides of all the selected branches! This is a close-up of the first hanging branch on the left of the tree! I placed yellow dots next to each bud and new growth to make it more clear for you all to see! When this new growth has grown sufficiently on all the now still way too long branches, they will be all shortened considerably! Some by more than 35 cm!
I hope you enjoyed this story as much as I did making it?! I will keep you all updated on the progress of this future Bonsai and hope you come back for my other Bonsai stories andadventures?!
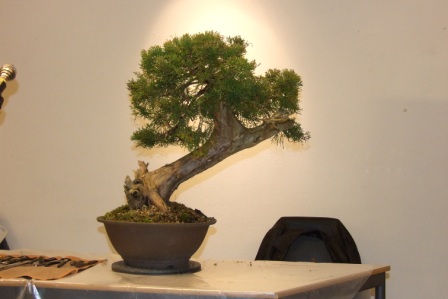
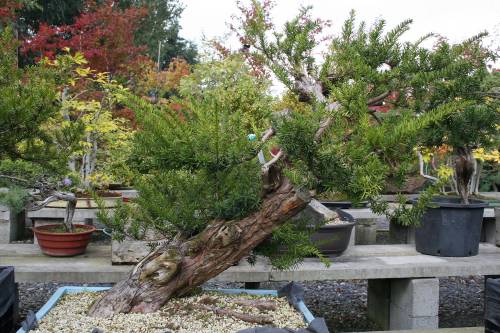
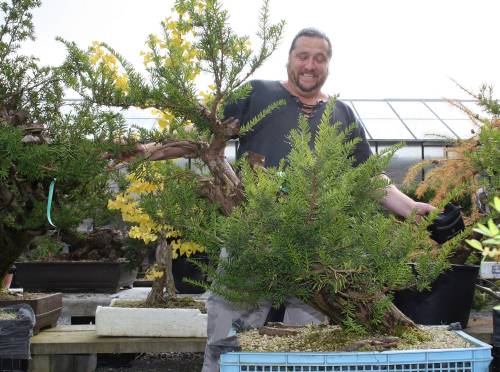
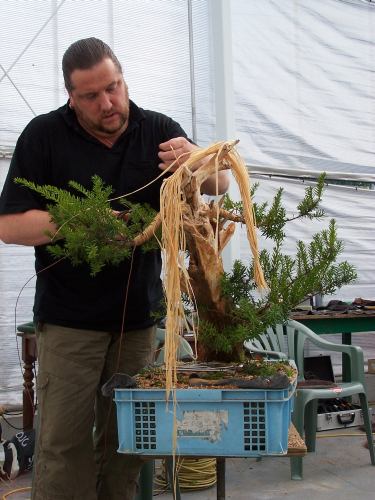
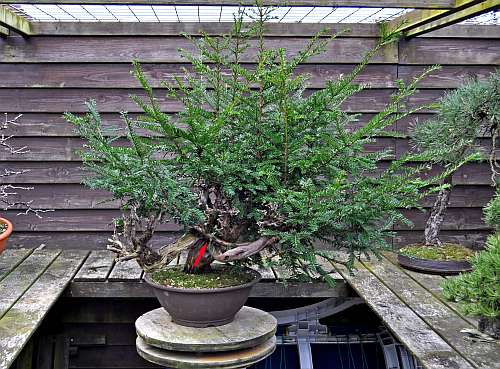
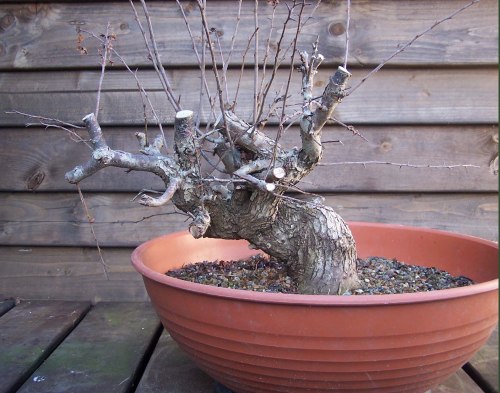
I would like to share the story in pictures and words of the first styling of my old Taxus Yamadori! It was ready for it’s first styling at least 2 years ago….but because of my poor state of mind during that time, I did not dare it somehow!? I just could not make up my mind those days and my natural ability to see a Bonsai in even a piece of straight wood seemed to be completely gone! So the tree grew and grew and without really realising it, it got better and better! Mind you, this was never an easy tree to design! There was so much going on in this ancient tree and so many thing and possibility are to consider and the longer I waited, the harder it seemed to get to find the tree among all those branches, foliage and amazing but difficult deadwood?! But about a month ago my shutters were finally opened and more of the old me came back…and one of the first things I did was creating a workspace in the open air and pick up this Taxus and without any plans, I started to work like I use to do in the old days! And this is the story of that amazing afternoon in my garden and the birth of a future Bonsai! Hope you enjoy it as much as I did?!
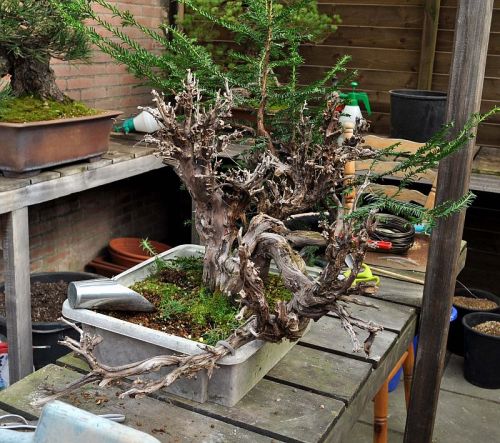
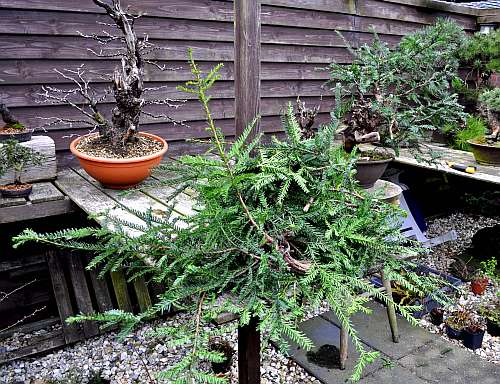
Here are some old pictures from 31-3-2012 when the Taxus was repotted into its present pot. It had grown an amazing amount of healthy fine roots and I had no problems repotting it!
Here it is already planted in its new home. I used a mixture of Akadama,Kiryu and Bims. This is what I use with success for all my Taxus and other evergreens! When I was sure that all possible air pockets were filled with soil, I watered until the water that came out from the holes in the pot was clear!
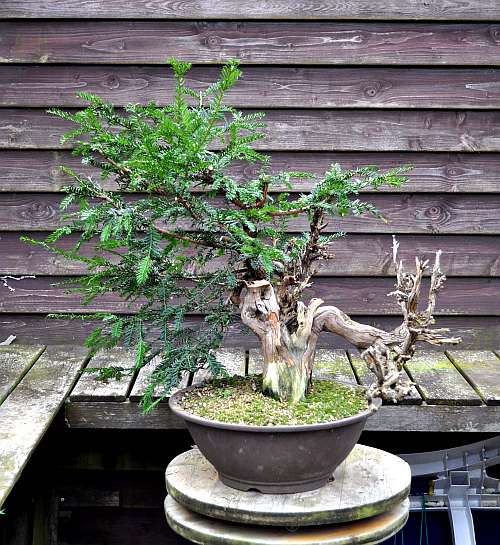
Here it is in its new home just before watering it. Just look at that amazing and unique deadwood that was created when the poor tree was almost cut in half by a large boulder that still covered most of the tree when I found it all those years ago! That covered section amazingly stayed alive for many decades, before it finally died back to leave all this natural deadwood! No matter what, I wanted this artwork from mother nature somehow in my future design…but it would not be easy! In this picture, the branches on the left were not bigger than my pinky and one of them was brought into place to the right to later form the trunk and top out of! And one branch on the bottom left was bent behind the trunk too, in years, end up as a branch just above the long jin on the right side! My plan then was to somehow create a windswept tree! In the following pictures from a few weeks ago, you will see just how fast a healthy yew can grow!!!
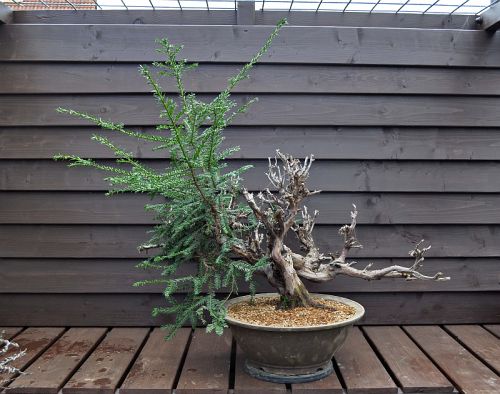
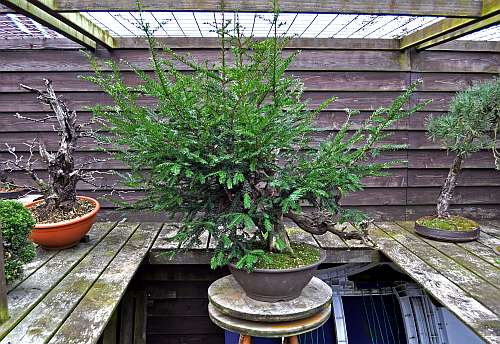
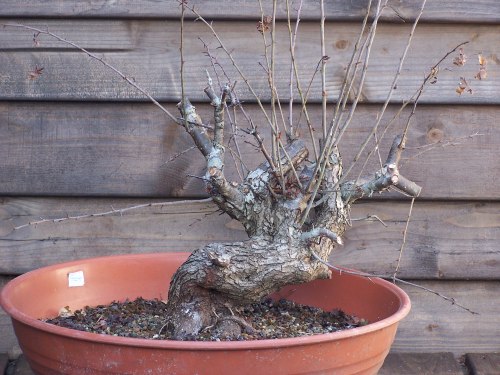
The present front side of the tree. How amazing is that?! It has grown into a bush! Some of those branches were almost a meter long and the former pinky-thick trunk/top branch is now almost as thick as my wrist! That new trunk needed over the past years a lot of force and heavy copper wire to be bought and held into its desired position!
The right side of the tree with a view over the long jin. Just how amazing are all that beautiful deadwood and all those healthy branches to choose from! I can’t wait to go in there to find out!!!
Backside view of the tree. The red arrow points at the back branch that I had let grow from the (here right) front side to end up as a branch over that long jin (here on the left of the red arrow)! That branch had grown at least 50 cm in the last 4 years!
Close up from behind the tree of that same long branch (red arrow). The right red arrow points to where this branch originates from at the front left side! By now I already had my doubts about this branch?! It those not looks naturally and it those not fulfil the purpose I had in mind when I came up with that idea! By now I realise that it would always look man-made and strange…so!!!
Front view. Red arrow: this is the point on the left front side where that same branch grows from, you can just see it disappearing behind the trunk. It’s just those do not look right…right?! The small branches that grow toward us from just below that red arrow look just fine to create the first hanging branch out off!
Red arrow: here that branch is already cut off, leaving a stump to allow die/dry back so that those promising small branches won’t die! Better safe than sorry!
Front side view. The red arrow points at the point where the cut-off branch used to be, just above that long Jin. Now there is a more natural open space and a clear view of that unique long Jin!
Red arrow: these branches that grow on the left middle side of the trunk just above the branch that I just cut off, are too straight and grow directly upwards and therefore impossible to bend in a believable way! And they were not needed, there were other branches to fill that gap! So off with their heads!!!
Backside view: The branch I am holding is a useful left or front branch. The left red arrow point at a stump left from the middle right side branch that was already cut off because the right side branch where the right side red arrow is pointing at was better placed on the trunk to fulfil that same purpose! The middle red arrow points at a Jin that is in the way of just that branch and feels very weak …so!!!
Red arrow: Here that Jin is already broken off by hand. As you can see it was just hanging on by a small piece and would probably have been broken in the future anyway!
Front side views again. White arrow points at the future top left branch. Green arrow points at the future top branch. The yellow arrow is pointing at the first right-hand branch. The red arrow points at an in-the-way front branch stump that was removed. Blue arrow points at a better-placed front branch. And the purple arrows point at the long Jin section that is beautiful but in the way of the branches that need to fill that space!
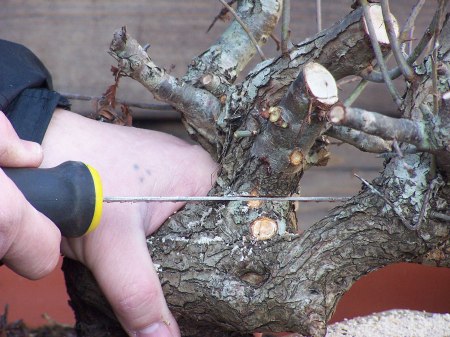
Purple arrow points at the place where Jin will be cut off with a saw! Leaving enough off it to bring in some strong screws to support the thick copper wire that will be needed to hold down the branches in their place when they are bent down with great force! I know that this is a great-looking Jin, but removing it is necessary so that the branches can be brought into their desired position! It will also open up the view to the rest of the dead wood in the back and the branches that otherwise will be hidden! And open space is very important in my Bonsai designs so .. some time you have to break the egg to make an omelette!
So thick Jin is sawed off with a hand saw. That took some force because Taxus wood is very strong and this piece was very old. Big decisions, but necessary for my design!
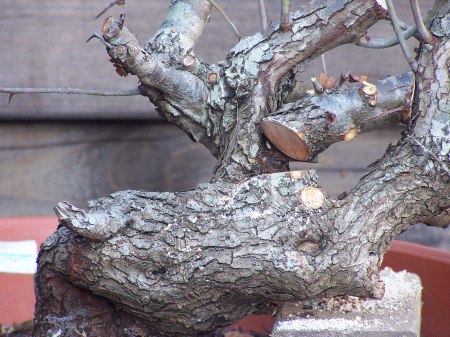
Cut off after hard work. Amazing that just a few weeks ago I could not make any decisions or had any ideas or even interest in this work…now I am very happy that this period is behind me…I missed this so much and it was so far out of reach at one point! I’m a happy man!
The cutoff Jin. It was necessary to be removed, but now I find it hard to throw it away!!! Yews make such beautiful deadwood and this piece is so stunning! I will keep it at least for a while to hold it every now and then and use it as a model for my deadwood work or students! I must be getting a bit sentimental at my old age !!! But seriously it those not becomes any easier to decide to remove something old that mother nature has created so wonderfully!
Backside view again. The red arrow points at the just cut-off stump. The green arrow points at a nice branch with a large Shari running over the full length of it. Blue arrow point to the spar’s little tin branches that grow only on the tip of this old branch! Although it is a great unique branch, it can not be used in any way in the design and would even look silly seen from the front! It would always be a long bare branch with some foliage on the tip of it! And bending it is also not an option…believe me, I thought long and hard if there was a way to use it, but there wasn’t! So then you have to make a decision and I did!
Left red arrow: Here you can see from the front how awkward this branch is placed and how strange it looks, it dwarfs the trunk! The top arrow point at the only small branches that grow on the tip of it!
Here the branch is sawed off. I leave a long piece that might be shaped into a Jin, I can always remove it more or completely in the future if necessary!
The sawed-off section. As you can see: it only had a few tin branches growing on the thick tip…but still it wasn’t an easily made decision! Creating a Bonsai often means that you have to make big decisions! If you don’t do that it will bite you in a few years’ time and life is too short to do that!
Red arrow points at a branch that grows directly opposite to the other one! The other one is important to the design, so this one loses and needs to be cut off!
This Jin is half-rotted and loose! It is broken off by hand, and this leaves a natural look as if it was always so! this tree has beautifully deadwood everywhere…I am so lucky with this material!!!
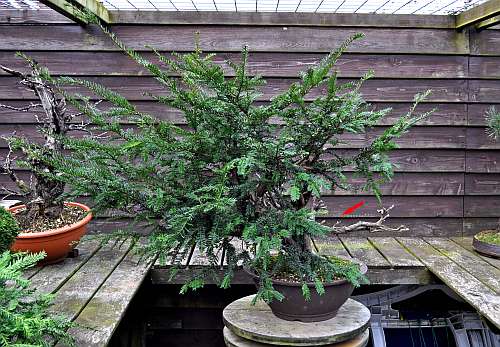
The front side of the tree. Most branch selection is now done and I shift my focus for a while to the deadwood sections! There are a lot of distractions in the flow of that long jin that need to be dealt with!
The right side of the tree, looking over that long Jin. Here you can clearly see just how many branches and foliage are removed from the tree! But still, there are one or two branches that might have to go when I am bringing it all into the desired positions!?
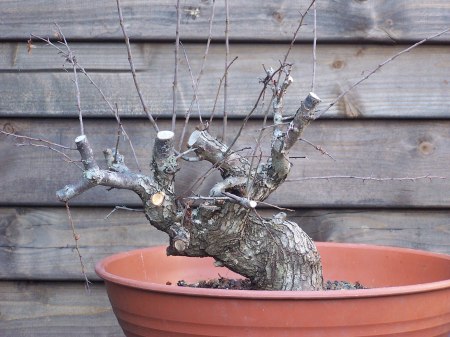
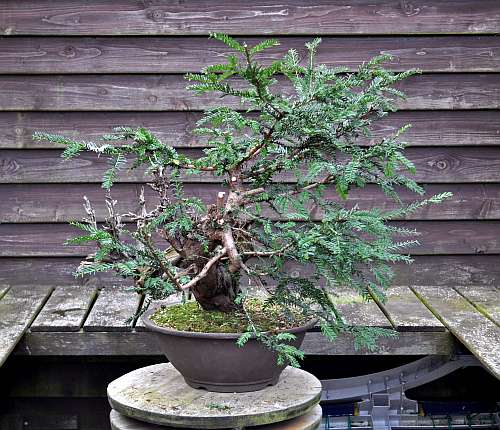
The back side of the tree. Now that all obscuring stuff and branches are more or less removed, all become much clearer! It now is so much more obvious where I am going with my plans!
The left side of the tree. In this shot, the branch structure is very clear and even the open spaces are nicely visible from this angle! The branches are way to long now, but they will be shortened in the future when there is enough foliage to work closer to the trunk on those branches. For now, there is more than enough foliage removed to keep it safe…the tree’s health is important now!
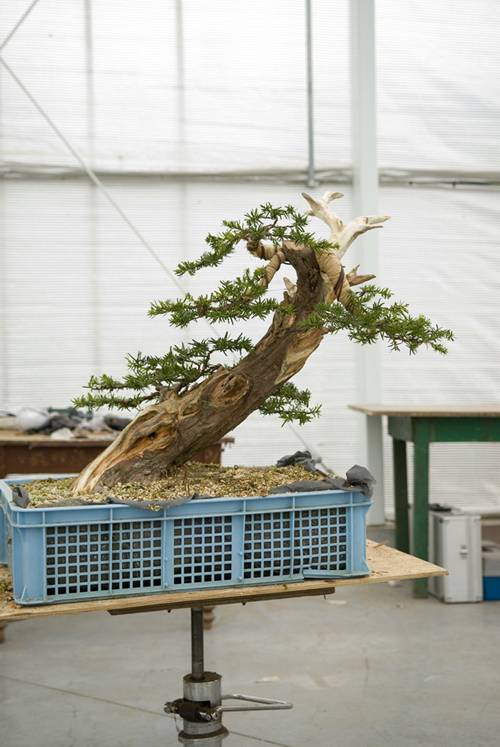
Wow just look how much branches and foliage are removed…must be more than 75 %! Now light and air can reach the hundreds of tiny buds and small branches that are on branches that remain on the tree! I am sure she will do just fine and will recover quickly! Next is the styling of this great tree…but that is for part II! I hope you enjoyed it so far and join me in the next edition?!
Hi, everybody,
I would like to show you some pictures that were made a couple of days ago during the restyling of my old yew! This yew is very special to me because it is the first Yamadori that I ever collected. And this is how I was able to do so. During the first Ginkgo Awards in ’97, I met Tony Tickle and the gang for the first time. And let’s just say that it clicked from the start and leave it at that! We had so much fun! So much so that we all together made the Japanese guest of honour faint during the prize presentation after the gala dinner! True story this! Anyway, during that same weekend, Tony had invited me to come and stay at his place for a weekend of fun and Yamadori trips! I gave it some serious thought for 0,009 off a second and then said in a high-pitched voice YES!!!! So in early 1998, I drove all the way to the North of England. And the Yew in this story was the very first tree that I collected on the first day! As you can see in the picture below that I was pretty happy and excited! Collecting this tree changed my future in Bonsai because it was the one that got me hooked on this way of doing Bonsai. So this tree holds a lot of warm memories in it! Not in the last place because of all the fun that I had with madman Tony!
Below: At the end of that same year, the upper part of the tree sadly died. Of
the few branches that survived on the lower part of the tree, only two strong
young branches were usable in my design! So I would try to shape this future
Bonsai is out of only two branches! And the part that died will also be incorporated
into the future design! It is after all a sign of this tree’s past! But my first
care was to get the poor Yew back to health!
Below: And by 2003 it looked like this. The picture is not that good, but it is
the best that I have from that time. The tree has recovered well from its
ordeal! The higher of the two remaining branches has grown into a trunk from
which new branches have grown. The second lower left branch is styled as a
cascading branch to fill that empty space. This hanging branch pushes the whole
tree upwards, making it more balanced!
Some 2 years later the tree started to lose its health and became very weak. It
took me up to now to get it back into its usual form! But it had sadly lost
most of the important left-hanging branches. Only the back part of that branch had
survived those bad years!
So today I am really pleased that this special tree is still with me and that after it had these few rough years it is healthy enough again for me to restyle it!
Below: The tree before styling. The live part of the left bottom branch is wrapped with a layer of water-soaked raffia. Then two lengths of 2.5mm aluminium wire were applied lengthwise on the outside of the future new curves. I need to bend this now backwards-growing branch as much to the front as possible. These two lengthwise placed wires will prevent the branch from breaking on the greatest stress point, the outside of the new
curves/bends that I will bring into the branch! That was followed by another layer of tightly applied raffia. And then finally two normal layers of 3,5mm aluminium wire were brought one! This should be enough to protect the branch from breaking, hopefully! The long Jin you see in the front of that branch will be used as an anchor point for the
guide wires that I will need to hold that heavily bend branch into its new place.
Below: side view, the red arrow shows the remains of the part of that branch that use to grow towards the front. The yellow arrow shows the branch that now needs to get as close as possible to the former place of that important missing branch!
Below: Well it worked even better than expected! From where the branch is now it is possible to give that branch enough weight to balance the design. So I was really happy with that result!
Below: Basic outline is there. I like the bottom left branch, but the branch above it is overpowering it. It is too long and most of the smaller branches at its tip are long and weak with not much change for future new buds. So why wait for something that probably will never come?! So the branch was cut back drastically to change its appearance but also to redirect more energy into the strong zones!
Below: Here the branch is cut back to an intersection with a smaller side branch (yellow arrow). This branch will replace the cut-off branch as the new leader.
Below: Branch is more or less in place and I am glad about the result of cutting that thick branch off!
Below: Look at the difference open spaces and more separations in the foliage makes!
Below: And after a lot more work! This is the finished result for now! I had plenty more pictures, but I had to stop some and it is getting very late over here! I am glad that I was able to bring some of the tree’s original image back into this new design!
In the future when new buds appear higher on the newly formed branches they can be shortened just that little bit more to make the tree look just that little bit more compact! And the Jin that now holds the wires for the bottom branch in place will be shortened and restyled as soon as those wires can be removed! But for now, I am glad that my old friend is back with his new haircut!
I hope you enjoyed this little story!
Cheers,
Hans van
Meer.
PS: That little fern that you can see growing in that last picture, on the right side of the trunk, has landed there by pure change! I find them all over my garden and in many Bonsai pots as well! Normally I remove them and make them into accent plants, but this one…well it looks all right for now. And they play chess and poker together..so I really did not have the heart to separate them!
It might be a off-topic, but what was the cause of the die-off problems and how did you solve that?
Thanks
Hi Lacike,
I think that it was a combination of two things that weakened this tree. First: underfeeding and second: standing in the soaked ground for too long! Last season
I started to feed most of my trees weekly with a liquid Fertilizer and several times
during the growing season, I sprayed the foliage of my yews with fish emulsion.
That worked wonders on the weaker trees! I discovered the soaked ground problem
two years ago. I had repotted two trees, a fat trunk Acer buergerianum and a
Acer palmatum twin trunk in a shallow pot, because the water did not run out of
the pots like it was supposed to do. I shortened the well-established flat roots by
more than half and planted them back in their original pots. With, like always,
a bottom layer with large grain-sized akadama, Kiryu and Bims. Then a thick
layer with a smaller grain size in which the bonsai is planted. And then a thin
layer of smaller grain size to fill the pot up. Now you would normally expect
that the water would run right through using a loose and open-ground mixture like
this. Well, it didn’t! At least, not all of it! After repotting I watered both
trees and I placed them in a sheltered spot. The next day I tilted the pots and
placed a piece of wood under need them. After just a few seconds the water started to run out of the drainage and wire holes on the lower part of the pot. Now I could
imagine that this would happen with a wide and shallow pot, but not with a
regular pot with 3 large draining holes in them! So I started to test this on
all my bonsai, which all have more or less the same open soil mixture. And more
than half had the same problem! There was more water left in those pots than I
could ever believe. And one of the Bonsai that suffered from this drainage
problem was the yew in this story. So now every time after watering or when it
rains, I will put a small wooden block under one side of all the trees that
retain too much water! Tilted in this way much less water will stay behind on the
bottom of the pot and the water that stays behind only fills the corner of the pot
and not the whole pot! It is wise to check the drainage of your bonsai/pot every
now and then. Roots grow and fill out the pot, so things change all the time! I
know that those small blocks under need my problem trees/pots make sure that
they don’t drown anymore to prevent root rot!
Hope that this answers your question?!
Cheers,
Hans van Meer.
I wanted to tackle the subject of downsizing the image of a full-size tree into a compact miniature version. Off course Bonsai is not the simple copying of trees from nature, but to understand how it works can help you to realize your own ideas. I will use an imaginary example of a 50 cm/20 Inch high Bonsai and will, later on, use two of my own Bonsai of that same hight to make things clear!
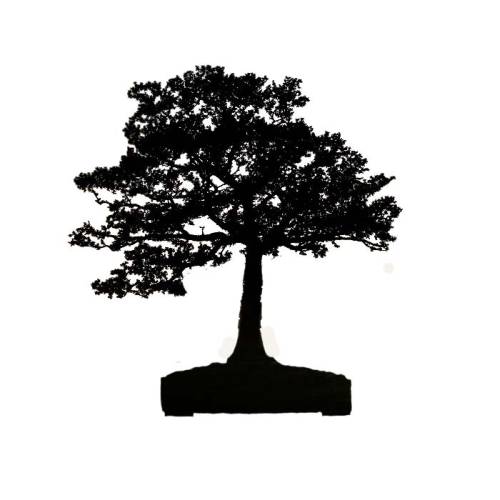
After surging the web, I have found a wonderful dark silhouette image of a tree to use as an example.
The above silhouette gives use enough info we need to recognize what it is. Even without the wooden bench underneath the tree, we can figure out how tall, big and fare away from us this tree is. So if we use these same features that give us all that info in our Bonsai, we will at least end up with the right proportion in our little tree. And that is not a bad start, believe me!
Above: So here is the silhouette of this tree more clearer to see. I have removed the two small branches that were growing low on the trunk, to make things clearer to see. And while I was at it, I planted the tree in a Bonsai pot. Looks good already, doesn’t it?
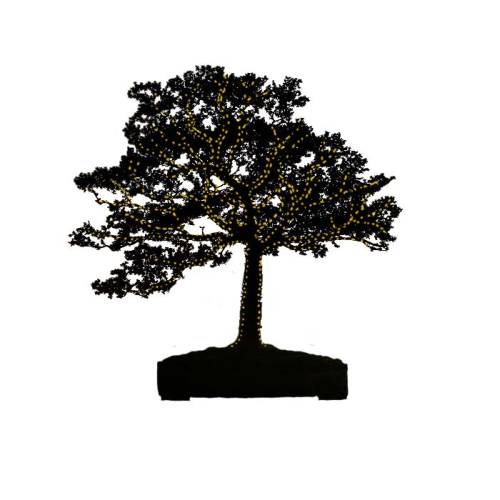
Above: The yellow dots show the outlines of the frame/skeleton of this tree. This design as Bonsai would be about 20 inch/50 cm high and material with a trunk and branches like this can easily be purchased from any Bonsai dealer that imports Acer palmatum or Ulmus but for example, a Beech or Hawthorn would do just as easily! But the amount of foliage you see here would be hard to archive with the too large foliage of most deciduous species we could use to create this image with as a Bonsai. So we should divide the messy foliage into more compact and well-outlined foliage pads. Doing this, we will create more open spaces, that clearly open up the foliage pads from each other.
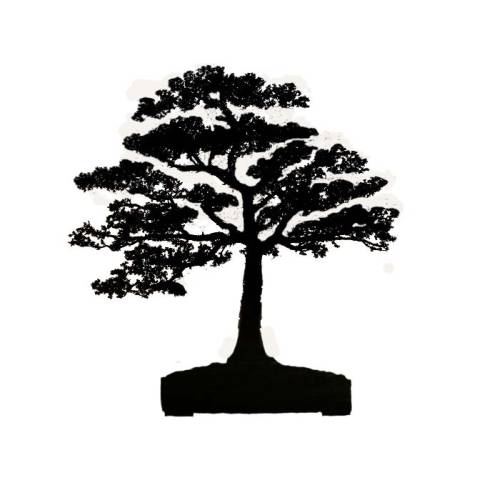
Above: Here I created some clearer open spaces between the foliage layers. It is the same image, but this time it is doable to shape it as a Bonsai. In principle, you only have to fill those outlined foliage pads with the larger leaves of the species you use to create this image.
Above: Here I filled these foliage pads with the foliage I borrowed from my own Carpinus betulus with exactly the same size as this imaginary Bonsai 50 cm/ 20 Inch. I placed the silhouette and a picture of my Carpinus next to each other and then cut and pasted the foliage onto the silhouette. So the size of this foliage in comparison to the trunk and height are accurate. So as you can see this could already be doable and believable as a Bonsai.
Above: Here I filled those foliage peds with the foliage of my same sized Acer palmatum. Again the size of the foliage is accurate. So again, doable and believable!
Even though like in most Bonsai, the leaves are monstrously big in comparison to the tree image we have created, the outlines of the trunk, branches and foliage pads are correct, making it a believable image that reminds us of the trees we see in nature. Just like the painter, who only uses a few brush strokes to paint all the foliage of a large branch, we sometimes only use a few leaves to create all the imaginary foliage of a large branch.
More tomorrow, I really have to get some sleep now! 🙂
today, while chilling in the warm sun, I thought a lot ( again) about what I wrote the night before about the importance of empty spaces in Bonsai design. And I came to the conclusion that I wanted to share some more of my ideas on this subject with you.
Bonsai is an illusion, a fantasy. Some one’s impression of a full grown tree in nature, that is living in a small pot. The size of the foliage of any plant or tree, in comparison to the height of the Bonsai, will always be way off. No matter what species you use. Still, if the overall appearance of this small tree gives us the impression that we are actually looking at a tree growing in the distance, we all gladly overlook this oddly oversized foliage. And that is because the artist is creating a believable illusion! He downscaled the tree, making sure that were possible all the proportions between the trunk and the branches mimic the growth of a large tree! And that is just the area were empty spaces play such a prominent part! As long as the silhouette or outline of your Bonsai tells a believable story, you can get away with a lot of illogical things, like oversized foliage.
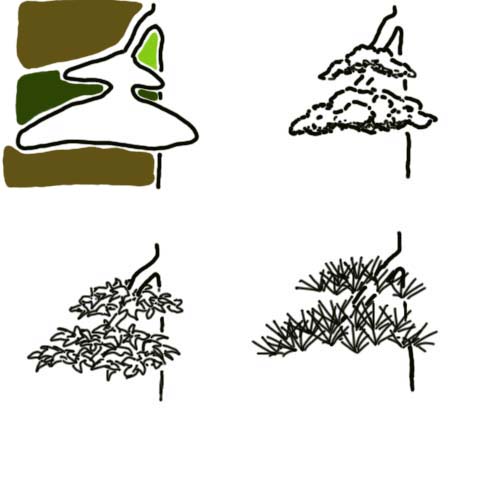
Top left: I have drawn a silhouette of a branch to make things clearer. But off course, the same thing goes for a whole tree! Imagine that this is the outline of a branch that fits perfectly into your Bonsai design. It has some very beautiful and informative open spaces, that divide the foliage layers in a way that is very pleasing to look at. And at the same time. they give us a lot of information about the size of this branch. It is a well-balanced branch, compared with the overall image and size of your Bonsai and it shows the story you like to tell!
The light green open space, tells us that this branch is growing down from the trunk. Giving us clues about the size and age of the tree and what species it is or style it is shaped in.
The darker green open space, tells us there are separate layers of foliage in this branch. A sign of maturity and age. But they also give us a clue of the distance, between us and the tree we are looking at, making it easier for us to calculate how tall this Bonsai image is meant to look in comparison to a tree in nature!
The top brown open space, almost pushes the branch down, like a load of invisible snow. Emphasizing the downward movement of this branch. While the bottom brown open space is supporting the weight of this branch.
Top right: Your perfect branch silhouette filled with the foliage of a Juniper Itoigawa. This foliage is very small and allows you to bring much detail in this branch.
Bottom left: Your perfect branch silhouette filled with the foliage of an Acer Buergerianum. These leaves are relatively small and show great detail.
Bottom right: Your perfect branch silhouette filled with the relatively short needles of a Pinus Sylvestris.
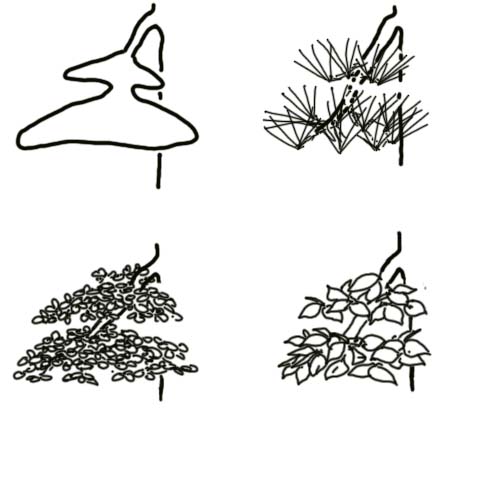
Top left: Your perfect branch silhouette.
Top right: Your perfect branch silhouette filled with the relatively longer needles of a Pinus Densiflora. with foliage of this size, you only use a few needle clusters to fill out your wanted silhouette. With a lot of trans parity, to keep it light. But even in this case, where the size of the needles is way out of proportion, the all-important outline of the foliage ped tells the same story as with the smaller foliage!
Bottom left: Your perfect branch silhouette filled with the very small foliage of a Buxus, Ulmus or Olive. Again this means you can bring more detail into your branch, but the outline stays the same!
Bottom right: Your perfect branch silhouette filled with the relatively larger leaves of a Fagus.
Peaking through your eyelashes helps to see the outline of your work easier!
The outlines of this branch give us a lot of information about what we are looking at, like size, height and type of tree or style. They help us to understand what the Bonsai artist wants us to see. So Bonsai is a lot of silhouetteisme (if that’s a word?). And empty spaces are vital to bringing detail and info into a silhouette!
I hope this all makes sense? It is not an exact science, they are just my thought and it is so hard to explain my ideas like this, so I sure hope they come over a bit?!
Again it is 4 in the morning, I spent 3 hours on this PPFFFF! I am off to bed!
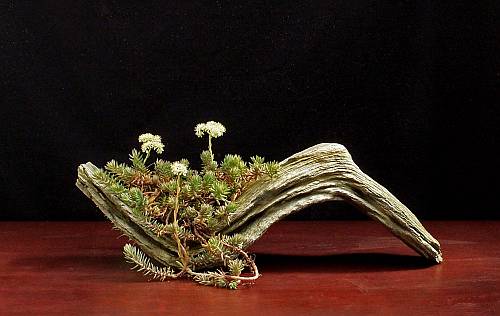
I like to make/create new things out of everything that lies or grows around in my garden. In early March I planted a small Alpine plant on a beautifully shaped rock from the U.K. HERE
A couple of nights ago, it must have been around midnight after a long and hot day, I was chilling in the back of my garden, laying on a sunbed listening to some roots reggae. It was pretty dark and because I only had a small lamp burning behind me, only a small part of my garden was visible against a dark background. Then I found myself looking for a long time at the rock planting from this post. Because I was lying down, my eyes were at the same height as the rock planting. That stood, only 2 meters away, on my workbench in front of me. There is so much to see in this simple composition, things that are so important in a successful Bonsai design as well, that I could not stop looking to analyse it all! Here are some of the things that struck me, that I would like to share with you all.
Maybe it is a nice idea to look at this picture for a while for yourself and analyse it before you look further! And remember this is not an exercise in beauty or anything like that, it is more a study of principles that are very useful and of great importance in Bonsai design. If you learn to recognize those principles in any design you look at, be it in Bonsai, painting, sculpture or architecture! It will be easier to create things of beauty your self and you will appreciate and or understand the work of others much more. I am not a big fan of over-analyzing Bonsai, but sometimes it is very interesting to find out why certain things work and others don’t! Being accustomed to these principles, which you can find in this simple rock planting, will help you better understand and create your own Bonsai as well as analyse others’ work!
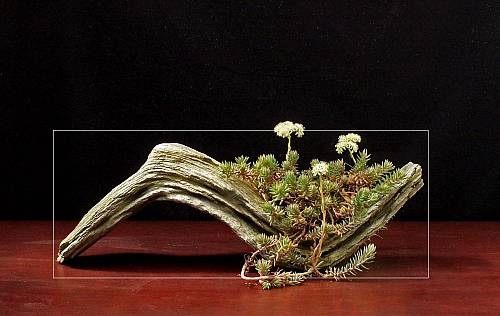
To make things more visible and clearer I have drawn an outline around the subject. Immediately certain things become more visible and obvious. Do you see them?
But first, this: I don’t know if there is any proper word for it? But I like to call it “the natural viewing direction”. If you look at the above picture, what do you see first? If you learned to read from left to right, most likely the plant on the left side! Now you might think, so what?! Well, now look at the picture below that is flipped over horizontally.
Well, what did you see first now? The arched part of the stone on the left, right? We tend to look at everything from the left to the right, but why is that important to Bonsai’s design? Look at the next two pictures and see how our visual habits play tricks on us.
This above original image of a stunning cascading Pine is a perfect example of a tree that is in perfect balance with the pot it grows in. The table ( in real life longer than in this picture) and the pot on the left, are the first thing we see when we look at this Bonsai. They together occupy the same space on the left half, as the foliage mass of the tree on the right side. Even the empty space ( green arrow) on the left, is about the same size as the empty space under need the right bottom branch. As I said, perfect balance! Now, look what happens when I flip over the image of this perfectly balanced Bonsai!
Some difference Huh! The first thing you see now, when you look at this tree, is the now too-heavy, foliage mass. And even though everything is the same as in the original picture, the balance seems to be lost. It almost seems like the pot is too small to hold the tree upright! So knowing this phenomenon helps us when we decide in what direction we wish to style a Bonsai or what size and style of pot to use to balance the image or when we are working on our Bonsai display for an exhibition. Imagine a tall slanting tree, that can be styled, growing to the left or growing to the right. If we want the foliage of this future Bonsai to be the focal point, from where the eye travels the trunk downwards to the pot. It should be styled growing to the left side. If we want the pot to be the first thing that is knottiest, from where the eye follows the trunk upwards toward the foliage of the Bonsai, it has to be styled growing to the right side!
OK back to the rock planting and its empty/negative spaces!
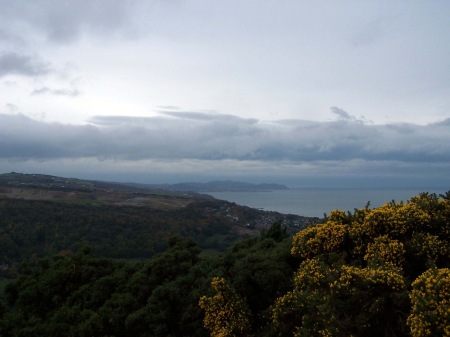
That same night in my garden, but one beer later, I started to admire all the empty spaces surrounding this stone, that make it so special! If you divide this image, from top to bottom into half, you could see how similar both halves are, yet the left side has a plant growing, whereas the right side has nothing but empty/negative space! Still, the empty green space on the right side is occupying the same space as the plant on the left balancing it out. Even the empty/negative space on the left bottom side is similar to the one on the right top side. So if you look at all these empty/negative spaces surrounding this rock planting, you can see how important this often misunderstood and a bit abstract principle really is! Is it the actual shape of this stone itself or is it the empty/negative spaces surrounding it, that give us a true sense of what it looks like? Especially when used properly in Bonsai, these empty spaces will give us so much information about vital things like size, distance and age of the tree we are looking at, that I dare to say that they are properly the most important part in Bonsai designing. Picture this: you have just reached the top of a small hill (green arrow), and in the distance growing slightly below you, you can, despite the fading light, just make out the silhouette of a distant tree. You are looking straight ahead at this distance tree, and your eyes are looking at a point about 20/25% from the top. Just like we are used to doing, when we look at a Bonsai, only on a smaller scale!
Above: So what can this silhouette of a distance tree tell us? The empty spaces in this silhouette show use where the branches are placed and how long they are and how they grow and how many there are and from what height they start growing and how much space is between all the branches in comparison with the thickness of the trunk. In an instant, all this info is then sent to the brain. And this brain will compare this to all the memories we have of trees similar to this silhouette we see in the distance. The link is quickly made and then we have a pretty good idea of what kind of tree it might be, so we then know how tall it probably is, from which we can deduce how far away it is growing from the point where we are standing! Do you get my point? If these similar empty spaces are well used in your Bonsai design, the brain of the viewer will recognise them, just like in the open field and it will tell him exactly from what distance and height he is watching your Bonsai image of a distant natural looking tree! Because they give us important information about the scale the artist is working in, a Bonsai should never be without some empty spaces among the branches and foliage. The proper use of empty spaces is invaluable for a believable and natural-looking Bonsai!
It is not one good branch, nor is it two. It is the space in between them that is important!
I hope you don’t mind me rambling on like this, but I have a lot of time to kill and not much else to do than think! So why not share my thought with you all! It is half past 3 in the morning now so I will finish my “Screwdriver” and then it is off to bed! I will share some more of my idea with you tomorrow if that’s OK that is?
in November 2006, my dear friend Tony Tickle invited me to come to England to do the (now famous) all weekend “BURRS” workshop. I arrived a few days before all that fun would start because Tony would take me and Morten into the beautiful “Wells” mountains for a walk and to try to find some collectable “Crataegus” yamadori. Well, I got very lucky when I discovered a small one with a lot of potential! I have no pictures of the actual collecting of the tree, but this is the view from that same place where the “Hawthorn” of this story was found and without much trouble collected by me.
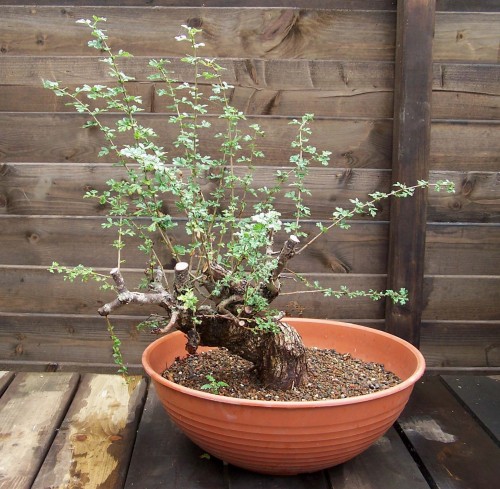
She grew on a steep mountainside in soil, consisting of almost nothing else than small rocks and gravel, from which I could almost entirely collect her with nothing more than my bare hands (that looked and felt like they had been looking for a pin in a pin stack)! Never the less, she had managed to grow surprisingly good roots, with a lot of small feeder roots growing close the base of the trunk. So I could cut the to larch roots back without causing to much harm to the health of the tree. From experience, I know that next Spring the tree will react to this hard root and branch cut back, with much growth of small feeder roots, that will secure the health of the tree, during this time it is recovering from the stress caused by collecting it and potting it. As soon as the tree was lifted from the ground the bare roots were wrapped in wet sphagnum moss and then put into a plastic bin bag that was tightly wrapped with plastic tape. Early next day at the venue in “BURRS” my good friend Terry Foster helped me to plant the tree in a plastic training pot, making sure that the tree was firmly secured to the bottom with aluminium wires. The Hawthorn stayed in Tony’s care during that winter. He placed the tree in his greenhouse on a heating bed. In February the following year, Tony came, just like me and many others, to the “Noelanders trophy” in Belgium to show his Bonsai and to meet up with all our bonsai friends from all over Europe that come there every year as well. He kindly brought along my Hawthorns I collected and so after the show they finally came home with me to my little garden in Holland. The Hawthorns ( I collected two) were placed in my greenhouse for protection during the rest of that Winter. In Spring I was delighted to see that the trees literally burst out with new buds all over. I removed all the buds that were unnecessary for my design from the trunk, simply by rubbing them off with my fingers. Leaving unwanted buds to grow will take the strength away from other more important buds and will leave unwanted scares in your trunk. The tree was allowed to grow freely the next growing season, in a semi-shaded place in my garden. In the next picture from August that year, you can see that she was doing really well and I knew then that I could safely give it here first styling at the end of the winter before the buds start swelling.
And this is how the tree looked in February 2008 before the work started.
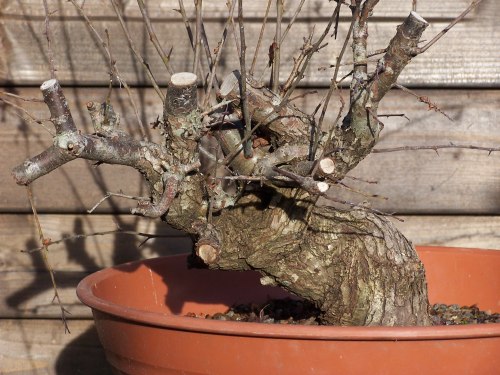
OK, before I start to work: have a look at the next two pictures of the front and back of the tree and try to discover the future design I discovered in this little “Hawthorn”
Have you found it? This is what I have in mind:
To reach this ideal profile or frame, I had to do some major branch cutting! Always trying to leave as little wounds as possible, where there was no room for some deadwood/Shari on the trunk.
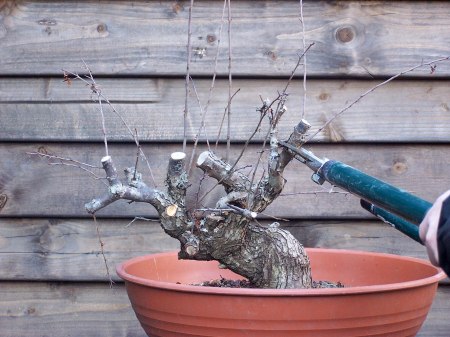
As you can see in the pictures below, the yellow cuts were not much of a problem to do, but the red cut was a bit harder to reach with cutters or normal saw!
First, all the excess branches were cut off, so I could get a good firm hold on the tree, while I was sawing away, without pricking myself a thousand times! Then, with the help of a very sharp small bladed woodcutters knife, that is used by foresters, I was able to remove the thick branch in one go.
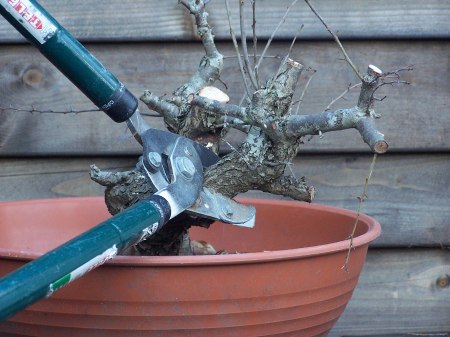
Then one by one and bit by bit all the other useless branches were cut back.
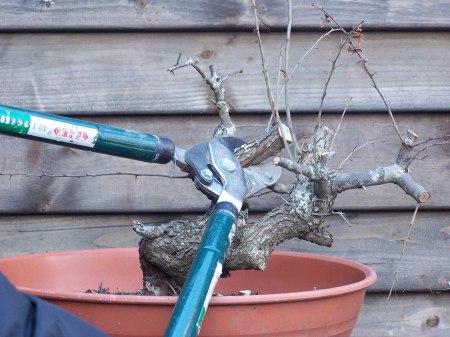
A large branch cutter, like I use here, is a priceless tool for this kind of work! It makes a clean cut in one go, without placing to much sideways force on the tree and roots, like a saw or power tool does. No matter how good you think you hold the tree in place!
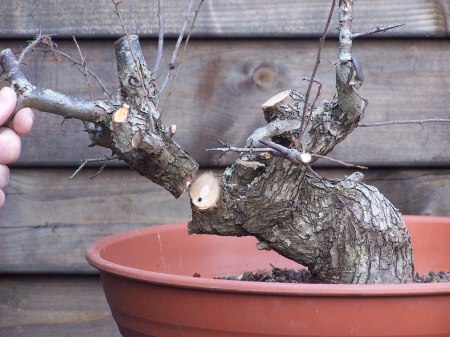
Slowly, with every cut, the new shape of this tree is revealed! All wounds are worked over with concave cutters to promote better wound healing. So that in a few years, the tree is left with large, but natural looking scares, that can be seen on every Hawthorn here on the coastline.
After all the wounds were cut back sufficiently, they were sealed with cut paste. The large wound on the left of the tree (middle picture) is cut back to about 2,5 cm/1 inch of the truck. In the future, this stump will be worked into a small Jin + Shari or maybe only a Shari? But this work is left for the future! Because doing it now and then leaving such a large open scare, right on the trunk line, could cause die back in the trunk! Every large wound that is left exposed to the elements; will dry/die back, interrupting the sap flow between roots and branches! Which could kill your branches and roots or even your whole tree! Because I left the bark on this little stump, it will stay alive for a long time, preventing the possibility of trunk die/dry back! The tree will probably even throw out a bunch of strong shouts along the rim of the wound, the tree’s own bandage! A sign the tree’s sap stream is pumping along the wound. Only after the tree has shown these signs of full recovery, will I start to take that stump away, bit by bit.
Below: Now only the top needs to be shortened right above the second right small branch leaving some room for the die/dry back!
For now, I’m really pleased with the outcome of this little Hawthorn, I love it’s movement and bark texture. I am really looking forward, to next season to see where all the buds will appear! If I’m lucky they will grow just about where I need them. And if not….who cares? Together, we will think of something.
I hope you liked what I did so far? And I will keep you all posted on this little tree’s progress.
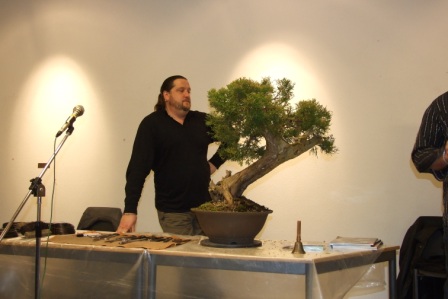
On Wednesday 6 February I was invited to do a (short) demo at the monthly evening club meeting of the B.A.B (Bonsai Association Belgium). This great club, which was founded by Bonsai master Mark Noelanders is responsible for staging the now famous yearly “Noelanders trophy” in Zolder Belgium. That’s why I know most of their members for many years now and I enjoyed myself immensely in this home away from home for me (and I like their beer).
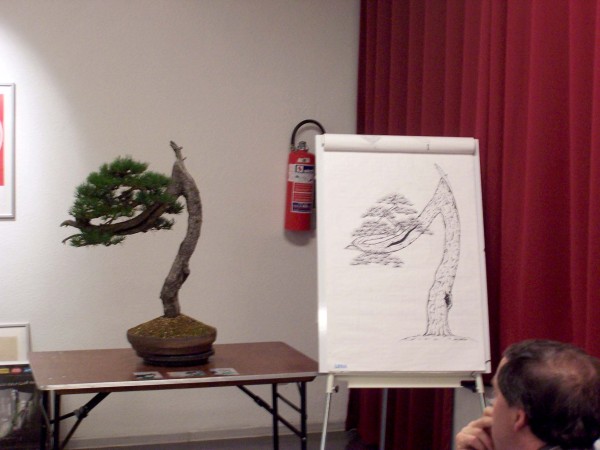
I demonstrated on a Juniperus “media Phitzeriana Aurea” that I have been preparing for this first major styling for many years now! I found this tree in the cemetery where my dear old Mother I visit every week. The little tree was dug up from the ground with an excavator when some of the older graves were emptied. It laided there above ground, almost completely bare-rooted and frozen solidly for weeks on end. So I went to the caretaker and asked him what was going to happen to this old tree? He told me that it would be destroyed with all the other scrubs that were pulled from the ground, as soon as the ice was gone from the ground so that they could use their trucks again. So I asked him if I could save the trees live to make a Bonsai out of it? Luckily he gave me permission! Then I happily even managed to lift it onto my shoulders as well! But getting it into my car was something else! Man the place was like an ice rink and it looked more like skating than walking, but I made it to my car safely! I planted the tree in the pot it still is in now and from then on I gave it a lot of love and care. All the 8 or 9 years up to this demo were used to get the foliage to grow closer to the trunk and to get the same type of mature soft foliage on the whole of the tree’s foliage. Because the tree was so severely cut back when it was removed from the ground it had made a lot of immature and prickly foliage on the lower branches, it took me a lot of time to correct that stress response. This more than 60 years old tree is of a strange variety that reacts very poorly to the normal techniques I have used on other Juniperus Phitzeriana trees. Even the bark is of a strange greyish/light brown colour. So this tree was well prepared for this demo and was doable in the 3 hours I was supposed to have for my demo, but after Mark was through with the introductions and stuff, I was left with just 2 and a half hours! So I explained to the audience that this would be the first real styling of this prepared tree and then started to wire the tree like a madman. During my work, I explained how the tree was prepared to reach this point. I even managed to get some important deadwood work done to enhance the movement of the trunk and then quickly brought the main shape into the branches. I ended just in time and was happy that I was able to show this first stage in this future bonsai in this short time. Because there was no time to do fine wiring, the final image looks still rough, but you can see clearly where this tree is going in the future. I did a demo 5 years earlier here at this club on a yamadori Pine (last small picture). I made a drawing then to show how I was going to try to style this tree and how it would look in the future. I brought this same demo Pine tree I made then to this demo, together with the original design drawing. It was good to see and hear the positive reactions from the people when they saw that it is possible to make a future bonsai at a demonstration! I promised to show this Juniper at their club in about 5 years. But I hope to be back sooner here in this friendly club,
Above: The tree before the 2,5-hour demo started.
Above: Waiting anxiously for Mark (on the right) to stop talking so that I could begin my introduction talk and stylings work!
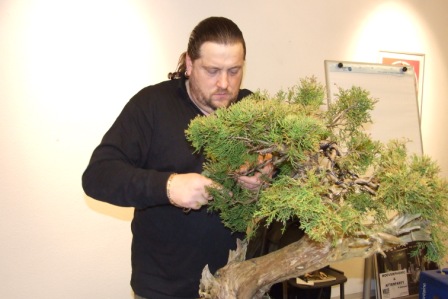
Above: Yes finally and now it is wiring like a madman to get finished in time!
Above: close inspection from knowledgeable club members!
Above: Only the main branches were wired to safe time!
Above: Than Jin and Shari were reworked or created, especially the straight right Jin needed work to give it some movement!
Above: Then wiring the last few branches so that I could start the actual styling of the whole image!
Above: Bringing all the branches and foliage into the desired position.
Above: And then a well-deserved very nice cold Belgium beer!
Above: The end result for now. Note that no fine wiring was done so I was actually very pleased with how the tree looked despite that! And note the optical trick I did to give that completely straight Jin some visual movement! Not bad for only 2,5-hour!
Above: On the right the drawing that I made 5 years ago for the first styling of this Mugo Pine Yamadori that I did here at this club and on the left how this Bonsai (named Z) look to date. Looks pretty close to the original design…he said a bit proud! 🙏👍 I enjoyed myself immensely again at Mark’s very friendly club and I hope to be invited again in the future?!
I can clearly remember the day that Danny User asked me to demonstrate at his 2007 “Ginkgo award”! He called me (which he never those) at work and asked if I had something to do in September of next year? And if not, would I like to demonstrate at his next and last “Ginkgo awards”? He knocked me right off my feed and I accepted withafull-hearted YES!!! The “Ginkgo award” holds a special place in my heart and to demonstrate there is and was a dream come true for me, so I could not be any happier!
Two days before the event I drove to Danny and Ingrid Bonsai Centre “Ginkgo” in Belgium to bring in my 4 bonsai that were selected for the show, and to find a suitable tree for me to demonstrate on among the literary many hundreds of raw materialsthat you can find there. After I brought my Bonsai to where they were photographed for the commemorative “best Bonsai in Europe” book, I headed outside to look among the many hundreds of trees to find an inspiring tree. But even with this many choices, finding a tree among the many that Danny has in his enormous place is not as easy as it might seem! I searched for the right tree as if I was buying it for my own collection. The tree had to appeal to my taste in Bonsai and tickle my imagination at the same time. My demonstration trees always reflect where I’m at that moment in Bonsai and it must always end up looking the same as when I had styled it in my own garden as a future Bonsai for my private collection! A big part of my Bonsai collection today, still consists of my former demo trees. After a long search, I ended up with two possible candidates! Both Yamadori “Yews” are from Japan. One with a lot of fantastic deadwood to work on with heavy machines, but almost now foliage to work with. And one with a lot of problems to solve, but enough foliage to work with. They both had a good possibility to demonstrate and to become a good pre-Bonsai that reflected my approach, taste and style. Because working on the first tree mend, I had to be doing wood carving for most of the two-day demonstration, making a lot of noise with my power tools, and bothering the other demonstrators and the stand workers that were all in the same big greenhouse with me! So I chose the second tree, it was more challenging for me anyway, with a lot more nice Yamadori problems to solve or incorporate into the design that I envisioned when I first looked at this lovely tree. The tree gave me lots of good Bonsai vibes!
Picture 1: shows the chosen front of the tree.
Picture 2: shows me when I just discovered my demo tree.
Picture 3: shows the very hot demonstration airier. Some big names with on the far right, U can just see William “Bill” Valavanis from the USA, next to him Udu Fisher from Germany, next to him Sandro Signeri from Italy and I’m the one on the left and I’m from Holland.
Picture 4,5,6: The start of my demo, Here I am cleaning and plucking the branches to prepare them for wiring.
Picture 7: here you can see me removing the too-longand too-highly-placed top branches. Leaving some stumps that might be useful later, when I start working on the deadwood design!
Picture 8: Here I am looking where the all-important live lines of the tree are running. I do this with a small sharp chisel, peeling away the bark until I reach the live parts. In this case that was quite difficult to determent, because of the little difference in colour between the life and the dead part. So needless to say: I had to be very careful.
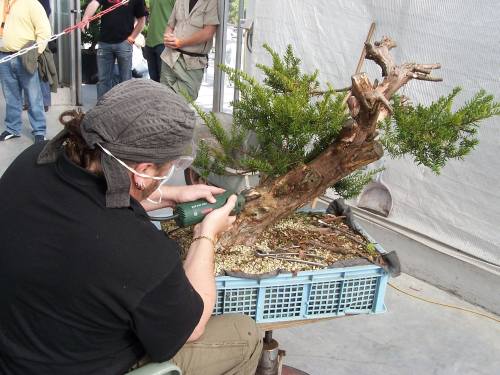
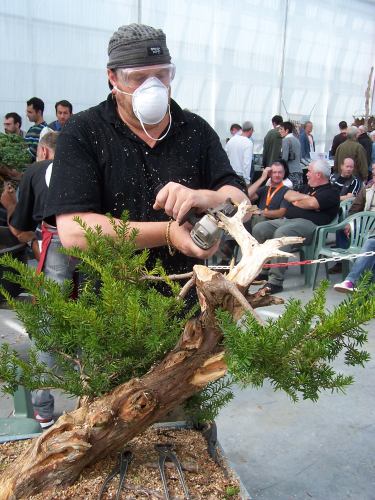
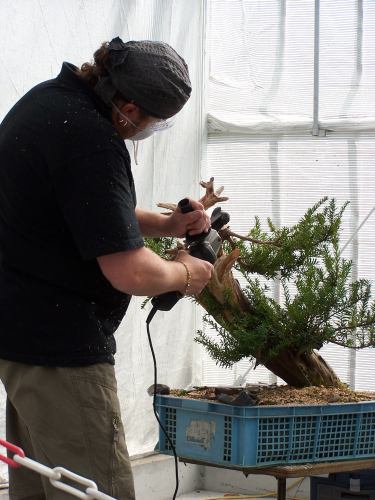
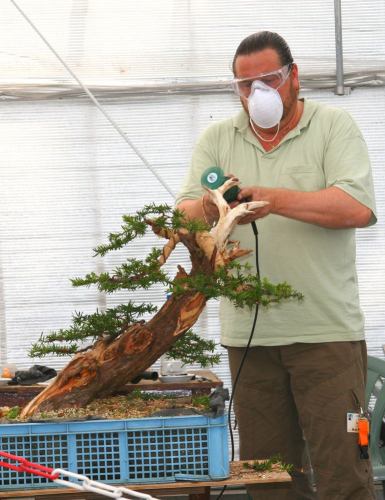
Picture 9: After I was really sure where it was safe to work, I could start working freely, without any fear for the health of the tree in the back of my mind. All I just had to do, was stay between the lines! I worked with both power tools and hand tools to first remove all the rotted wood and other unwanted parts. Then I just started to free flow, taking bits away, discovering a point of interest or beauty, a Little creating or revealing. But always working very carefully, following the grain of the wood. Gradually I worked towards the point where smaller bits were necessary on my power tool, to create, or reveal more detail in the deadwood. It is advisable to always wear Eye protection and always use a mask! The dust from working on a Yew with power tools is irritating to your eyes and can give youbad chest pain and cough for days! BELIEVE ME!!! I know what I’m talking about! (ugh ugh) :).
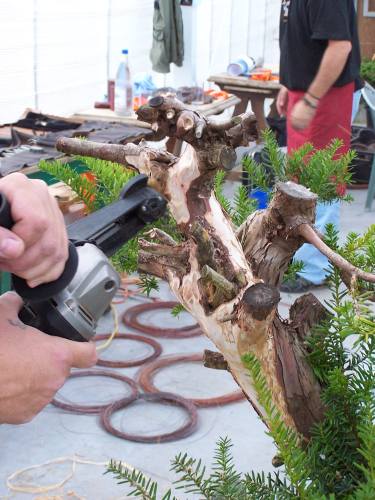
Picture 10, 11,12: My good old friend William van Vlaandre (inventor of the “SAMURAI” power tool bit), gave me one of his specially made power tools, loaded with his biggest “Samurai”, to use on the bigger parts of deadwood at the top of the tree. And it went like a warm knife through butter! Amazing you could make a small canoe out of a big tree in half an hour with this monster! Even the otherwise almost unworkable fresh and therefore wet wood, was no problem! It left a smooth surface! And with some care it was even possible to create more subtle details as well, it worked great! Only both my arms would disagree with these statements, they looked like I had been carrying 3 hedgehogs on fire! LOL! 😬😊
Picture 13: More detailed carving on the top “JIN”.
Picture 14: View of the demonstrating area.
Picture 15: The three top branches that would make up the whole top part of the tree, we’re way too thick to be bent with just wire! So they first had to be protected with tight applied layers of in water-soaked Raffia. Then4 strings of copper wire were placed lengthwise along the part of the branch that needed to be bent. Then another layer of wet Raffia was applied and then some more normal wiring with thick copper wire on top of that layer. Now I was sure that I could bend the branches with minimal risk of harming the tree. It would only need great force!
Picture 16, 17, 18: Now I could safely start, to gradually bend the very tough branches into their desired positions. Taking my time, piece by piece, until I could secure them with the help of some thin copper wire attached to a couple of Jins and one small screw.
Picture 19: After a wild long night playing snooker (pool) with my Bonsai friends and only 4 hours of sleep, I started with the detail wiring of the tree. Trying to keep in pace with the marching band in my head!🥴
Picture 20: Finally the real fun part of styling a tree hat arrived. When I am bringing all the branches into position, I am totally in the zone, I love it, it is magical to almost paint with foliage until I feel it looks good. Trying to create something I like and find beautiful in Bonsai, within the boundaries of what each tree has to offer to me, is always a wonderful experience. To do it on this stage with this valuable material Danny entrusted me with, made it even more elevating and meaningful to me!
Picture 21: Close-up of the basic first deadwood on the back part of the tree and the branches.
Picture 19, 20: Some last detail works on the deadwood using a very hard plastic brush, that left a grain-like texture on the still soft fresh part on the top.
Picture 21: YES! I finished and was drained, but happy with the result and the beer that was waiting on the other side of the camera!
Picture 22: The final result. I hope you liked this little demo story and the final image of this pre-bonsai? It was, as I said before, a great honour to do! Especially because this was the last “Ginkgo award”!It was a very happy and a bit melancholic experience!

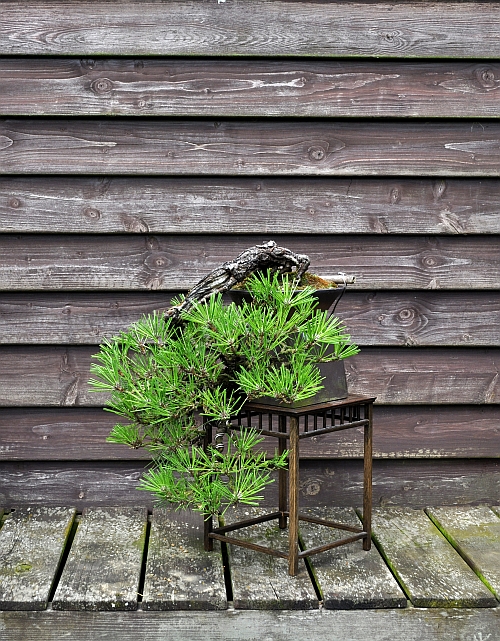 Close-up of the beautiful and all-natural deadwood/ Shari and old bare roots/ Neagari. The trunk winds halfway down the foliage you can see and then curls up again to just under the bottom of its pot!
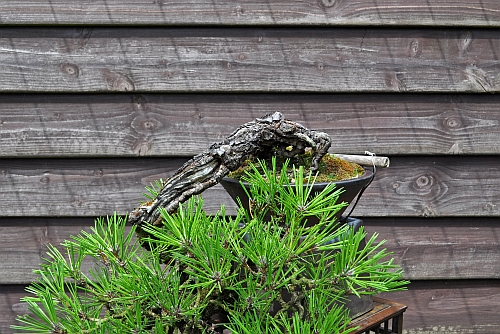 And then now another (I hope) helpful tip! A lot of us use aquarium tubing (see the picture!) to prevent the wire from digging into the bark of the tree when we are bending thick branches with tension wires between the two branches!
 But then we have a problem because this tubing can only be used on one branch because if we want to use it around the second branch (see the picture!) to protect it, we can’t run the wire through it and tighten it?!
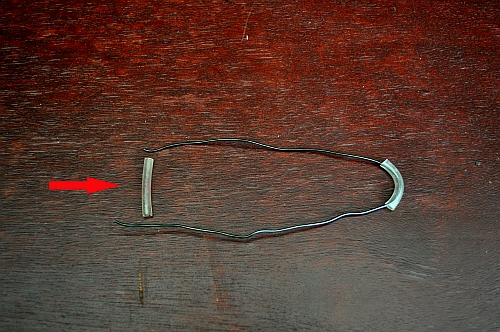 Well here is the solution! With the help of a concave cutter (see the picture!) cut out a small bite off one side of the tub!
 So that you are left with a piece of tube that looks like this (see the picture!)!
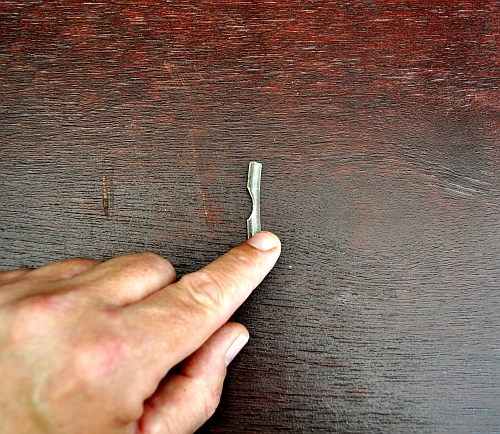


 Have you found it? This is what I have in mind: