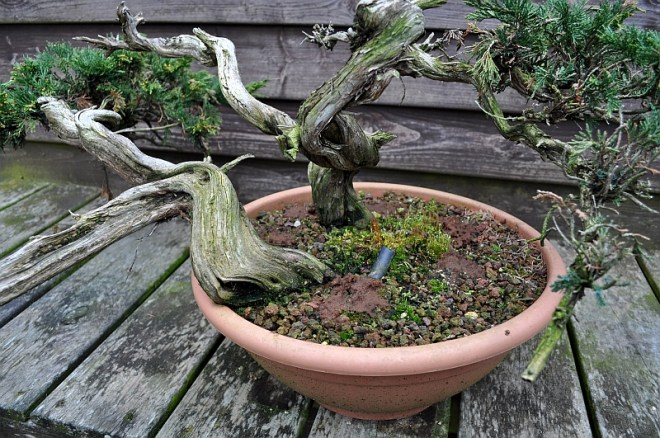
this is the story about the repotting of one Yamadori Sabina that will end up with two?! I bought this nice mid-sized Yamadori a year ago and left it untouched all this time to make sure that it was enough settled and strong enough to repot safely. I acquired it because of its stunning movement with a lot of deadwood and because there was (maybe) the possibility to separate it into two beautiful small trees! Buth early this year I started to see a decline in this little tree’s health and I decided that I would take it out of its plastic container because I wanted to see what caused this?! And now looking back, I am glad that I did because it was planted after collecting in some sort of very compact sticky muddy soil with not much-draining capability?! So with a lot of frightened anticipation, I took it out of its container to find what I was afraid of…poor soil! So even though it was not in a good condition I had to act before the tree would suffer even more, so I decided to free it from all this bad soil and plant it in a proper Bonsai soil mixture in which it could recuperate to become healthy and happy again!
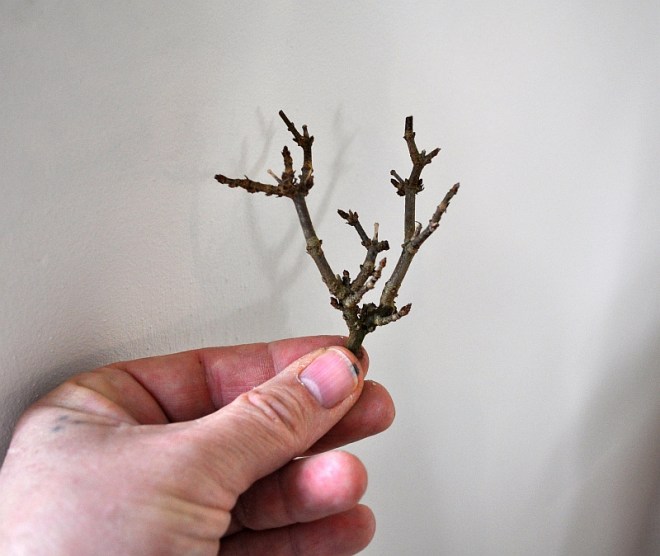
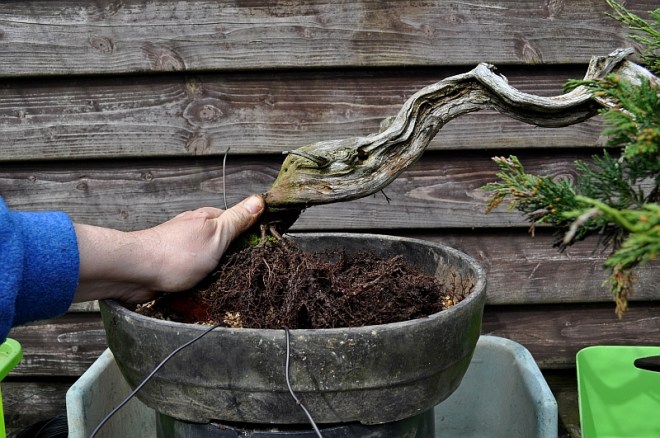
Below: the two trunks of Sabina Yamadori.
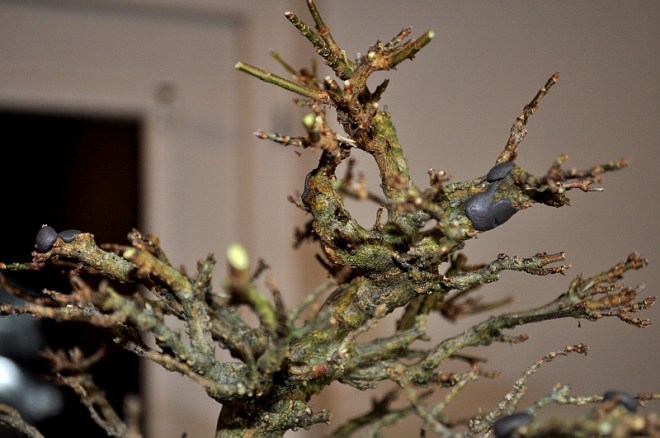
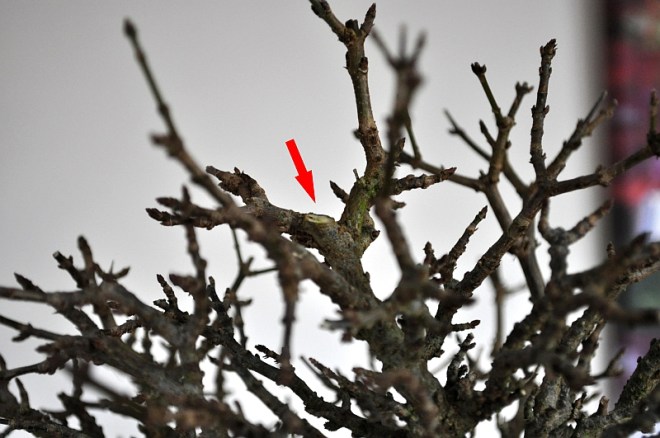
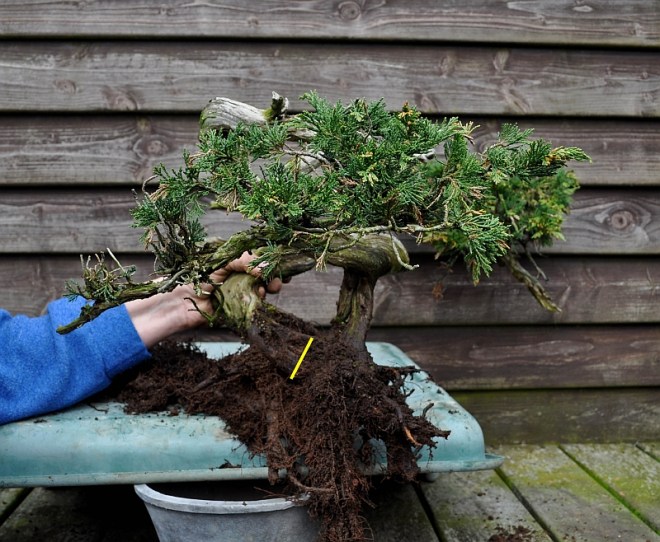
Below: close-up of two separate trunks. One all twisted and turned with a long twisted Jin and the other one slanting more straight and gently twisting with a foliage crown at the end.
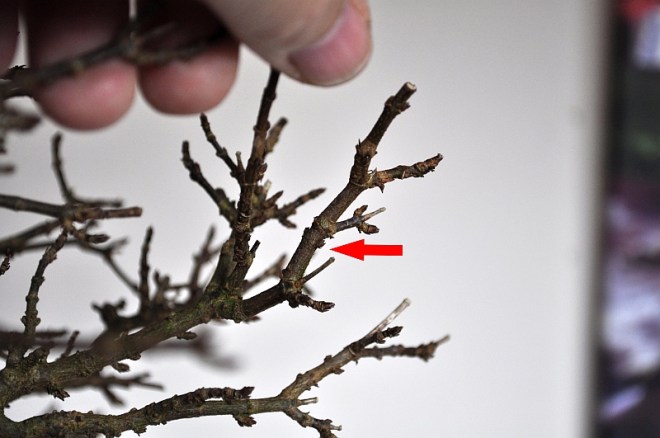
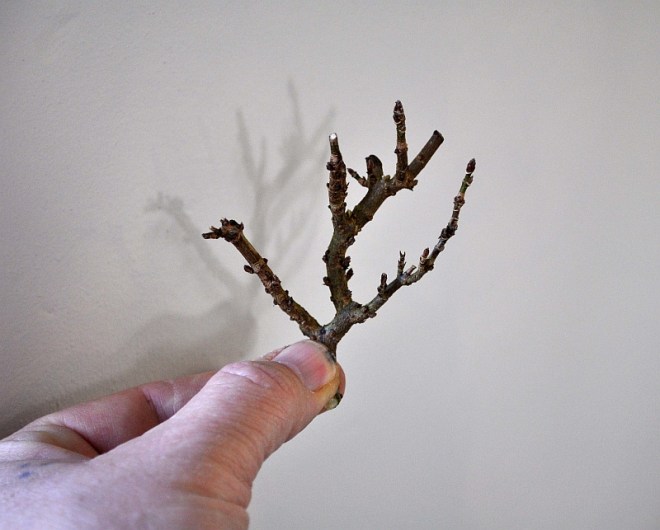
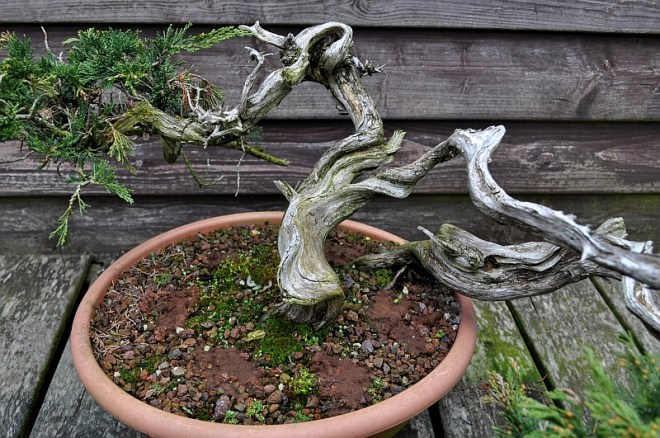
Below: viewed from another angle.
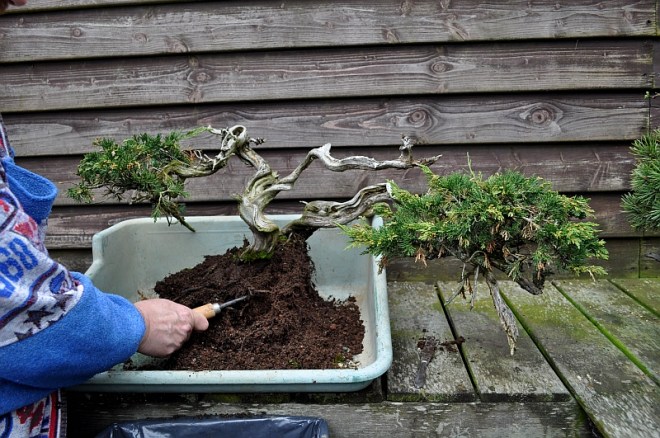
Below: released from its plastic container.
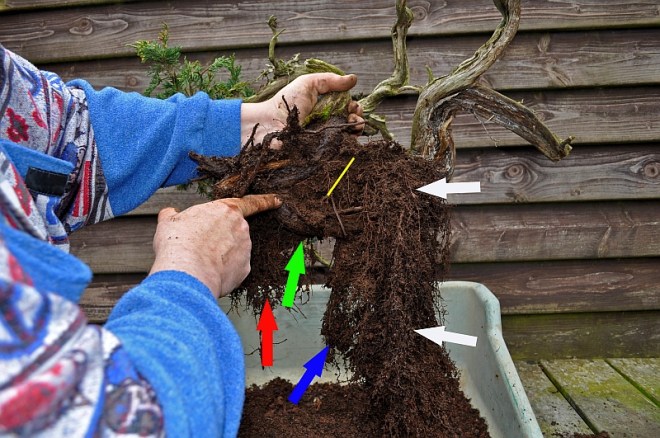
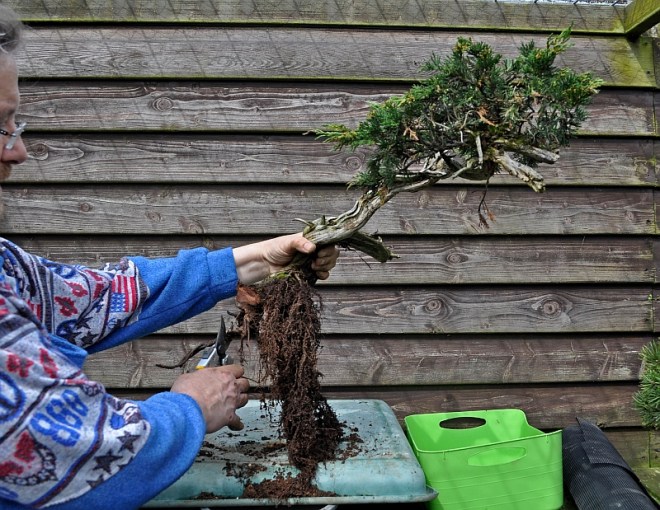
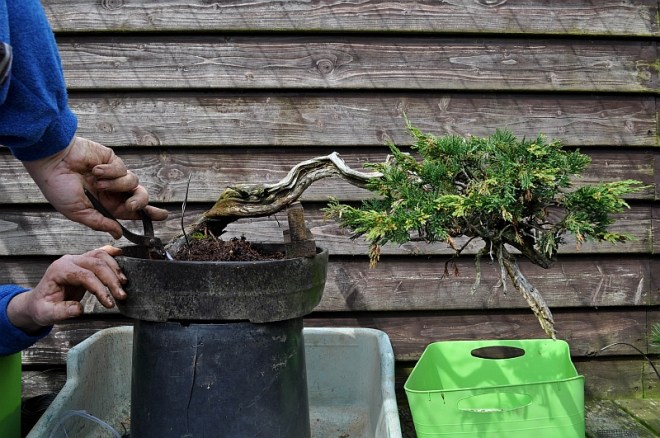
Below: Carefully and anxiously combing out the roots hoping for plenty of healthy roots and for roots on both trunks so that they could be separated from each other without any danger or problems?!
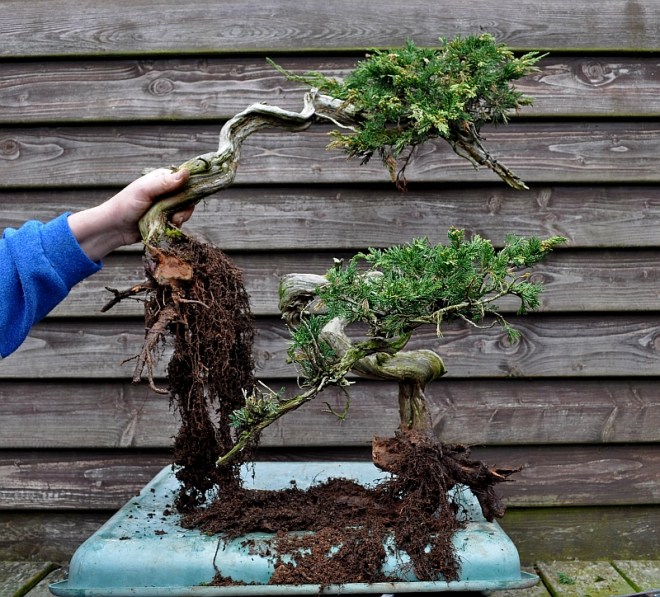
Below: looks promising with plenty of roots!
Below: look at all those roots on the left and the right trunk…but is it enough so that the two trunks can be separated?!
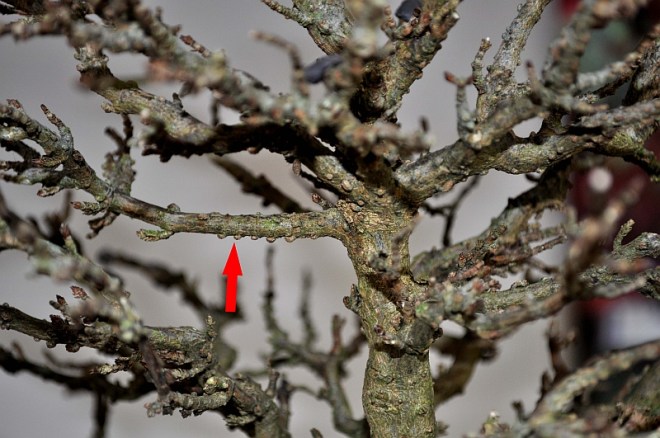
Below: red arrow points to roots growing from the curly trunk. Green arrow points at a thick root that grows to the right from the curly trunk. Blue arrow points to roots that grow from this thick root…so there are more than enough roots to keep the curly trunk alive and healthy when it could be separated from the second straight trunk! The white arrows point at the root mass that grows from that second straight trunk! The yellow line in the middle of the picture shows the spot where the two trunks could be separated from each other!
Below: seen from the other side. Red arrow points at the roots that grow from the end of that thick root that grows from the curly trunk. The yellow line shows the spot where the two trunks will be separated.
Below: the cut will be made from this side right across that yellow line.
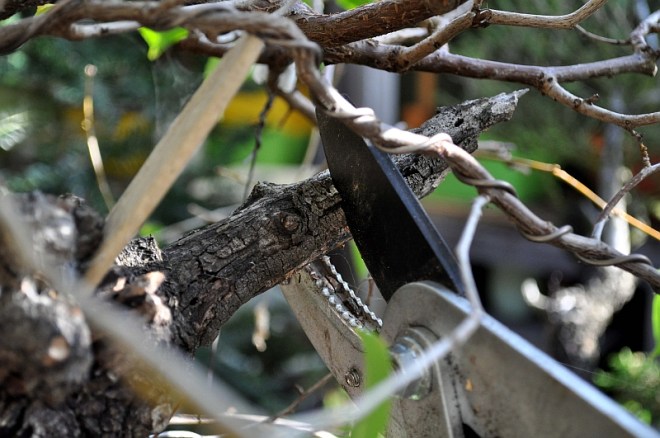
Below: carefully cutting with the help of a power saw.
Below: mission accomplished! The two trunks are separated successfully! The straight trunk on the left has more than enough roots. And the right side curly trunk roots are spread out on the plastic green surface and look more than enough…so I am relieved and very happy! Now I have to keep the exposed roots moist of one of them while I plant the other into its new home away from his brother or sister?!
Below: this repotting and separation even reviled a more than welcome unexpected wide root base on the curly tree!!! Making it even better than it already was!!! And this provided a better anchor point to secure it to the pot with wires!
Below: with the help of a chopstick the soil mixture containing Akadama, Kiryu and Bims is pushed in between all the roots, making sure that now are pockets are left!
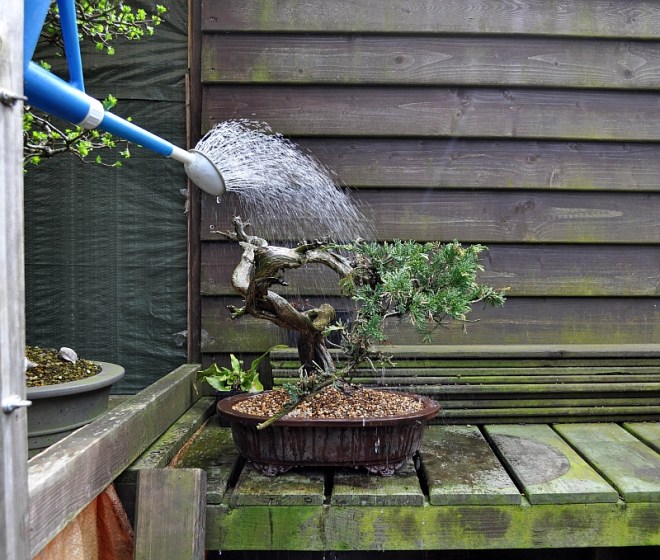
Below: then the tree is watered thoroughly until the water that runs out of the pot is clear of any dust!
Below: next the straight trunk is prepared to go into its new home. Here a long thick death root is cut off so that it will fit easier in its pot.
Below: the tree was placed on the bottom layer of large particles of soil for extra drainage. Just look at all those roots that fill almost the whole pot!
Below: two wooden blocks are placed under the right side to support the tree into its new desired position and then it is firmly anchored to the pot with thick wires.
Below: carefully bringing in the soil.
Below: then watering it like before. In the next couple of weeks, the trees will be kept in a warm spot with filtered sunlight and their foliage will be misted a couple of times a day to help them safely through this period
Below: separated but still together they stand here at their start as two future Bonsai.
I hope you enjoyed this little story of one Sabina Yamadori that became two pre-Bonsai with hopefully a bright future ahead of them?!
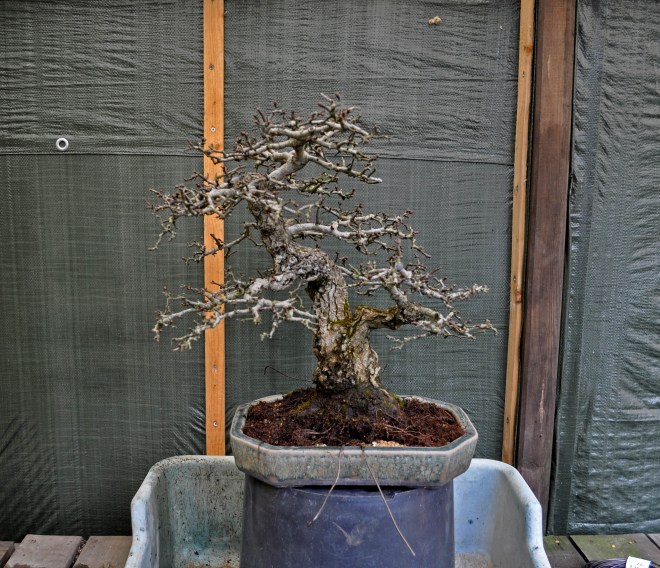
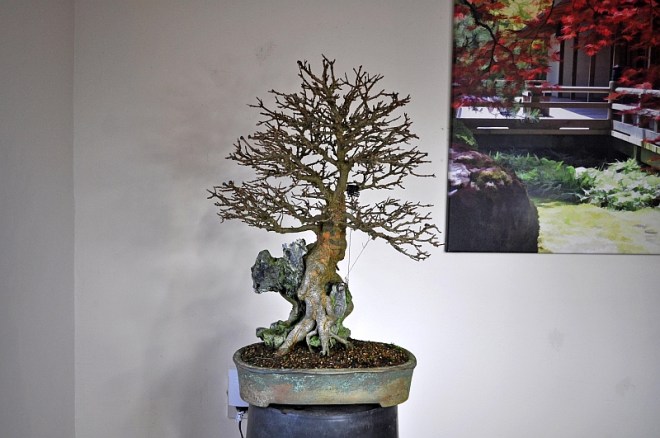
last week I had finally two repotting sessions after the long abnormal frost period we had for a few weeks and that was about time for most trees that I had to do because the buds on some of them were already opening! First up was my easy-to-repot old Hawthorn Yamadori ( Crataegus monogyna) in his beautiful Dan Barton pot.
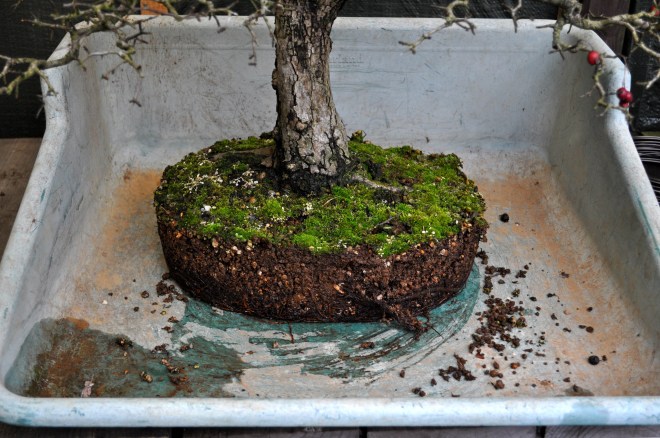
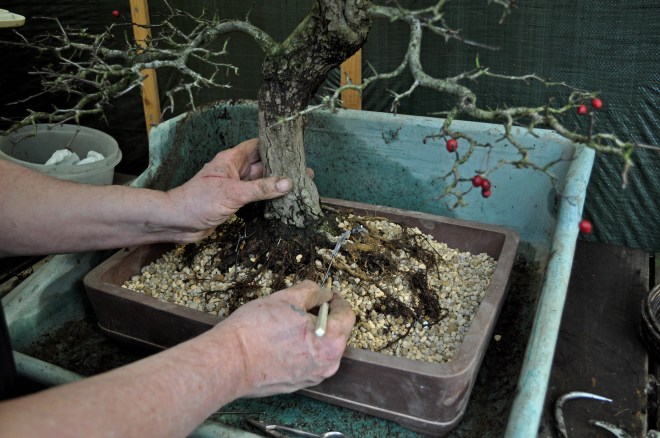
Below: Everything that I could possibly need for this repotting is in place and my old Hawthorn is patiently waiting for his haircut and fresh soil.
Below: Out of his pot and ready to remove as much of the old soil from in between the roots as possible and safe! My objective is to remove all downwards growing roots so that I can replant him even lower in its pot!
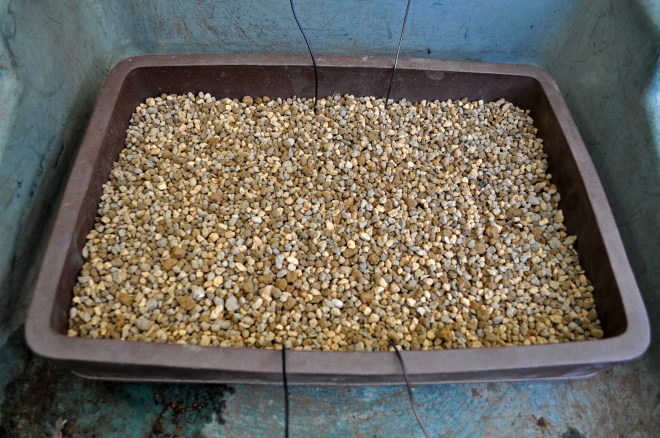
Below: A layer of my soil mix containing Akadama, Kiryu and Bims is spread out over the bottom of the pot.
Below: Then a small pile of the same soil mix is made more or less in the middle of the pot on which the tree is pushed down with a turning motion. This way all the cavities in the bottom of the rootball are automatically filled with the soil! Stop with the downwards turning motion when the tree has reached the acquired height in the pot and stands in the right direction and angle etc.
Below: Then the wires are tightened loosely so that necessary soil can still be brought in under need the roots with chopsticks.
Below: When that is successfully done the wires are tightened some more to secure the tree firmly in the pot!
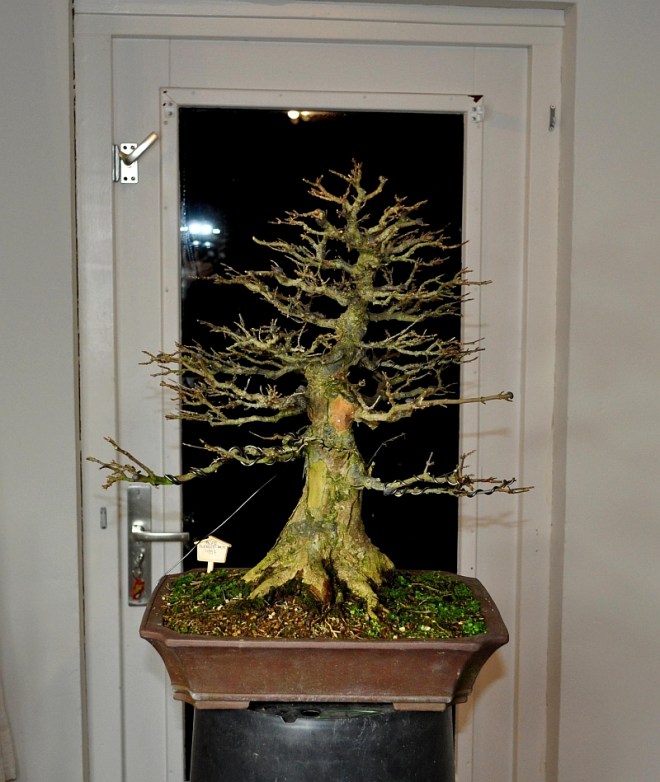
Below: Next is this rare Dutch Hawthorn (Crataegus monogyna) that I collected many many years ago in a wet dune forest close to the beach and not far from where we live. It was chopped and all branches and the top that you see in this picture are all later grown completely new. It stands now about 75cm high and it is time to release it from the plastic training pot where it grew happily for the last 6 years! The top will be shortened by some 10cm after the repotting!
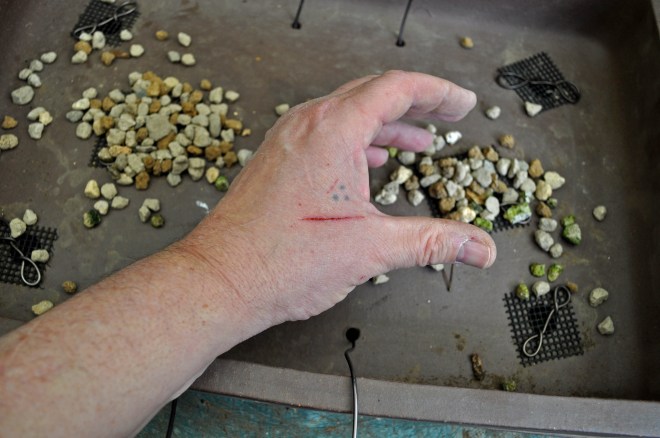
Below: The wholes of the new pot are covered by mesh and I am just applying the first layer with large-sized soil mix to the pot when I notice yet another scratch on my hands from one of those ####ing sharp Hawthorn needles that will turn in another inflammation…gggrrr!! 😉
Below: First large particles mix applied.
Below: Second finer soil layer applied.
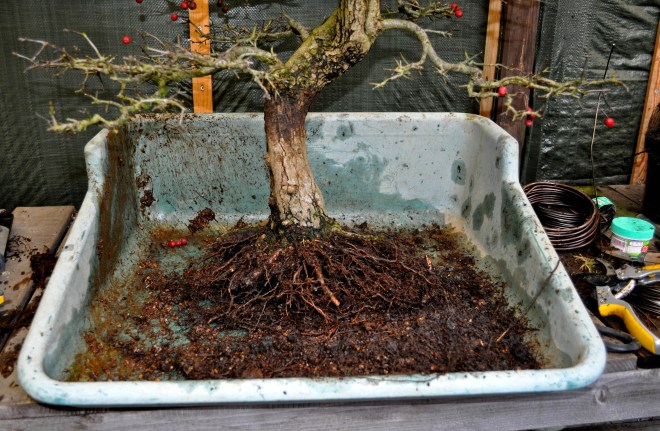
Below: The Hawthorn freed off its old training pot.
Below: The roots are freed from most of the old soil and the long roots are shortened right up to where finer roots grow from them! Red arrow points at a thick root that was preventing the tree from being potted lower in its new pot so it was removed!
Below: Downwards growing thick roots were also removed.
Below: Even larger ones were cut back to create a flatter root system (Nebari)!
Below: The tree can now already stands on its own with its new flat roots base and that is just what I was aiming for the last 10 years or so!
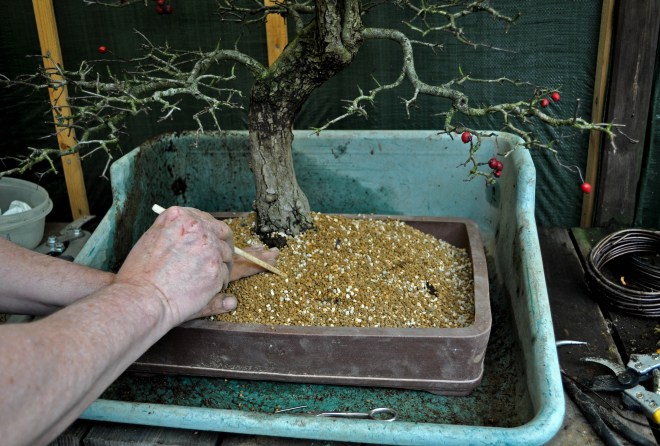
Below: With the help of a chopstick soil is brought carefully into the roots making sure no air pockets are left behind! Roots that pop up to high are pushed/held down with little upside-down U-shaped pieces of wire to hold them in place.
Below: The final top layer is carefully brought in and is then taped even more in with the palm of my hand so that the last cavities are filled with soil!
Below: Close-up of the root base. The tree is just thoroughly watered until the water that runs out is transparent and free of dust!
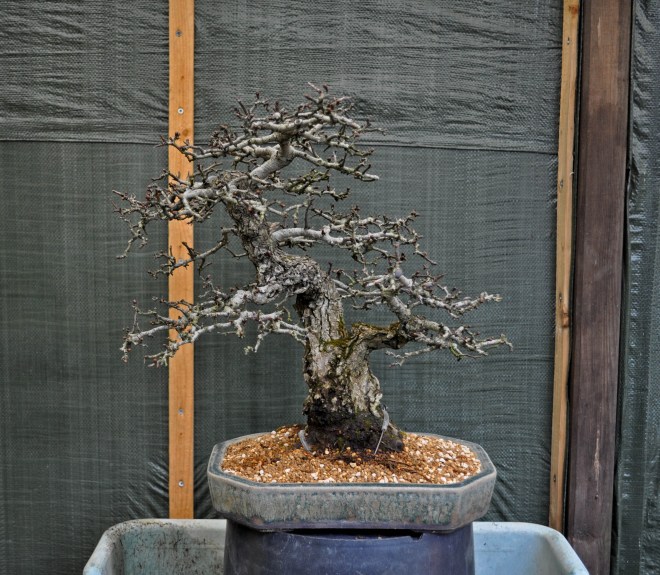
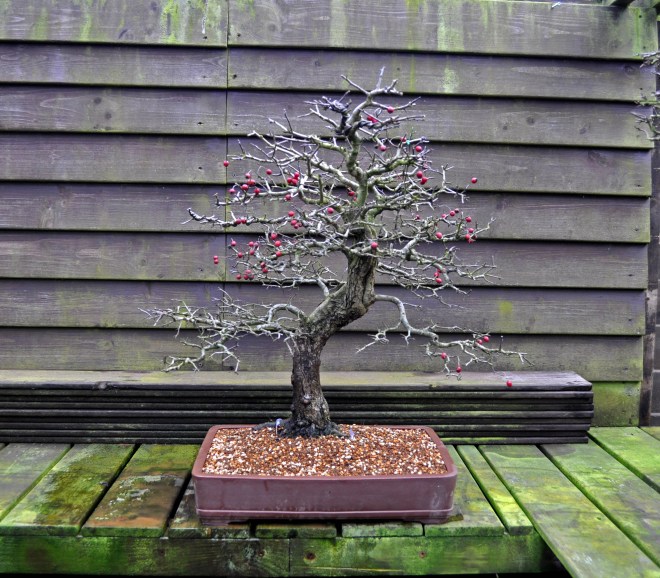
Below: The tree in his new home and I am happy with how it looks in it! The top will be shortened soon and then I will make some more pictures to share here on my blog.
I will post tomorrow the massive repotting of “XL” my big Yamadori Larch so watch this space! I hoped you liked this little post about a long-awaited repotting session?!
I just want to let you all know that I posted the video that I made at Teunis Jan Klein’s “DESHIMA” Bonsai Studio (NL) of the amazing demo from Bonsai Master Kunio Kobayashi-san !!! He transforms a big field-grown Pinus thunbergii from China into a wonderful Bonsai! You just got to see it too believe it, just how fast this almost 70 years old Master works with most of the time 3 scissors in one hand?! And still finds time to explain everything and to constantly crack jokes! The quality of the sound and film is sometimes a little bit of…but I still hope you will enjoy this amazing master and the amazing transformation?!
I would like to share with you all this LINK to Ryan Neal’s super video “HOW TO MAKE A BONSAI”!!! It is by far the best tutorial Bonsai video that I have come across on the internet and a must-see for all beginners and intermediate Bonsai enthusiasts alike! Ryan takes us along to a nursery to find with us a potted Christmas tree that he can use to create an amazing Bonsai! He then shows us what to look for in nursery material, how to find the front, the inclination of the trunk, what branches to choose, how and why to prune, how to wire and how to bring all branches into place etc. etc. !!! He is by far the best online Bonsai teacher I know of and he truly inspired me to go that extra mile with my own student group! Bravo and thank you, Ryan, and everybody else from “MIRAI” for all your good work for the worldwide Bonsai community! And a happy New Year from me to you all!
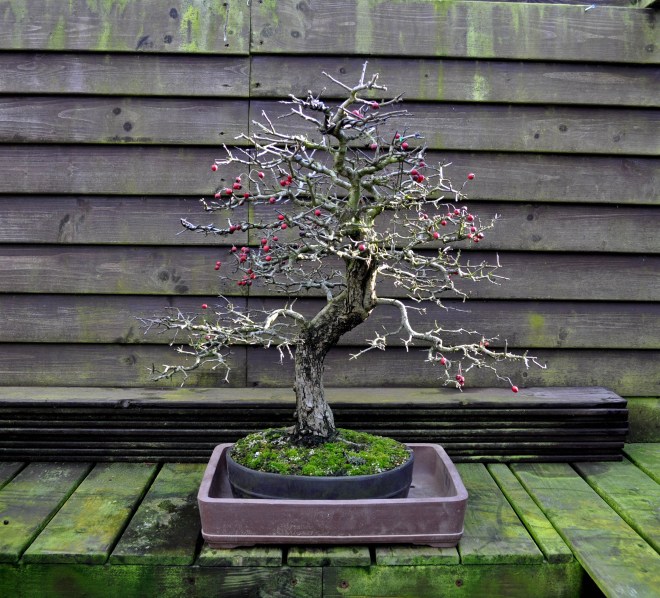
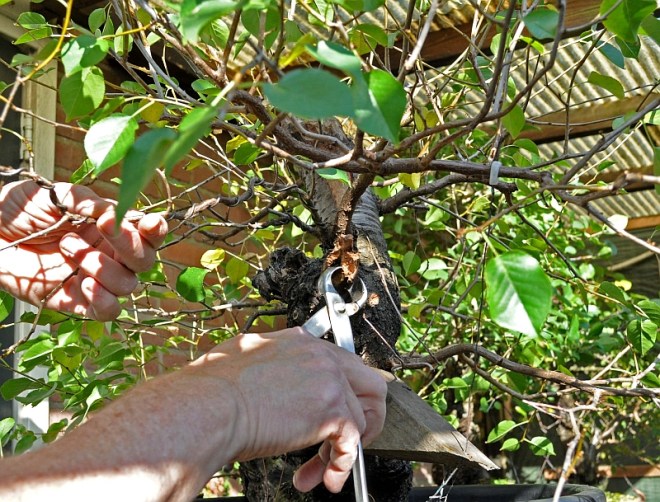
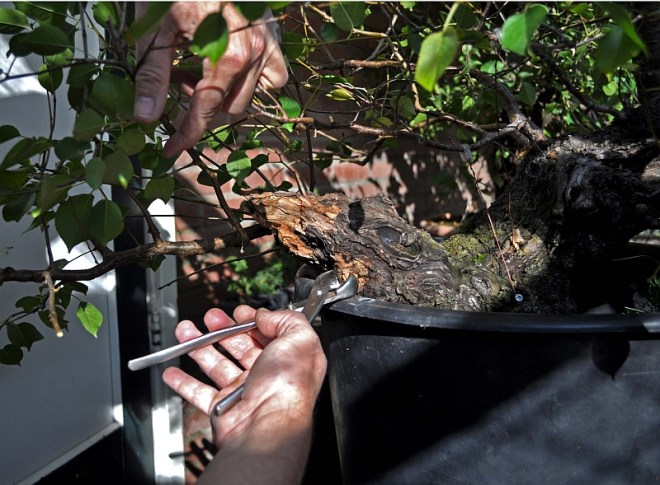
last week I did some delate indoor wiring and Winter pruning. Late because of having to look for and buy new furniture for the living room and when that was finally done having to paint it twice! And indoors because it has been snowing like crazy here for the last couple of days! I just got in covered with snow because I had to remove the piled-up snow from the bird’s netting that covers my small garden! It started sagging under all the weight and I had to remove it by pushing the net upwards with a broom…so needless to say that most of the snow ended up in my naked neck BBRRRR!!! But first, some pictures that I made of some deadwood and Jin work that I did on my big Prunus mahaleb Yamadori the sunny day before the snow started to fall.
Below: The too-long Jin that needs to be shortened and shaped.
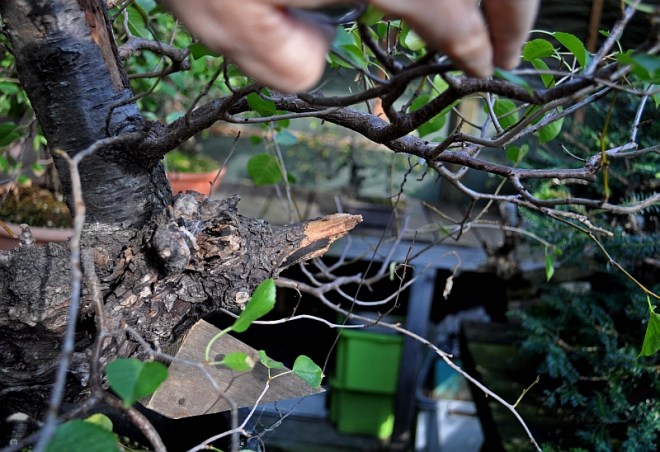
Below: The long old natural Jin is shortened.
Below: The remaining stump.
Below: Breaking off pieces of wood with concave cutters to get a natural-looking result.
Below: I love to do this creative work without much thinking or planning… justgoing with the flow!
Below: The end result for now.
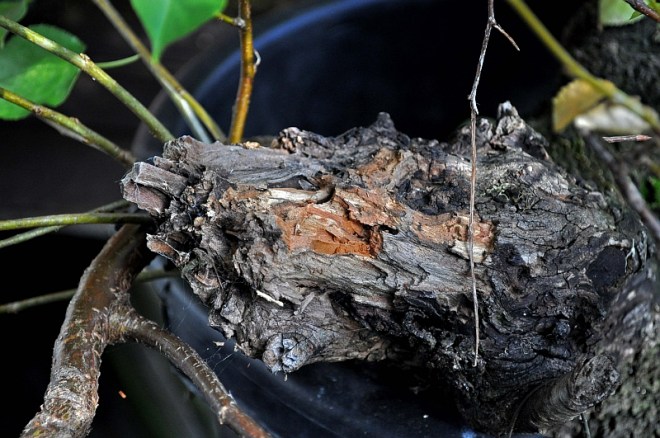
Below: This is the stump that was left after the air layering was removed two years ago. It has been worked a little before with hand tools to reduce it, but it is still too bulky and massive for my liking so time to remove some more! The branch you can see on the left grows from the back of this deadwood and will be shortened in the future when it is thick enough, leaving a cascading branch appearing from behind that deadwood.! The 4 small branches that you can see growing upwards from it are crafted onto it last year, they will create in the future a small grown just above this deadwood
Below: Still not there yet, but looking much better all ready!
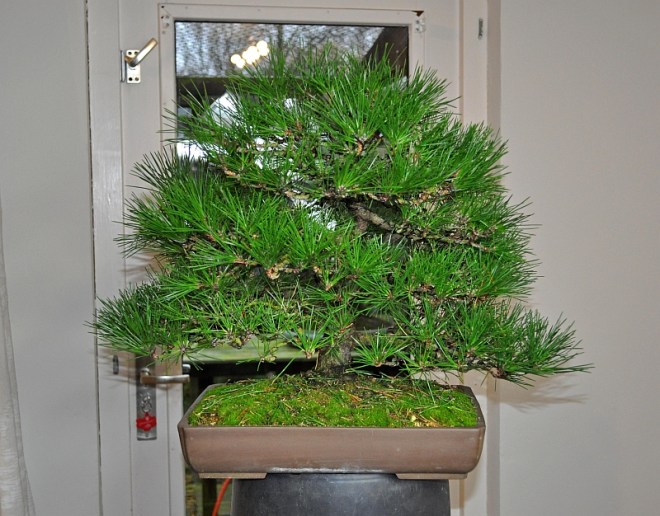
Below: Then the snow started to fall and I moved indoors where I first finished the wiring of this old Pinus thunbergii (Japanese black pine) that has been in my collection almost right from the start of my life in Bonsai…I guess since 1991 0r 1992?! Back then it was still a thin Shohin, but I still decided to shorten it and replace the too-thick top with a more suitable and thinner side branch! Now all those years later it has become a 44 cm/17.6 Inch high mid-size Bonsai! The needles are a bit too long, but that is to thicken the higher-place branches some more! After all those years it has beautiful flaky bark and a mature overall appearance. It is one of many of my Bonsai that I will let go and is for sale at the next Noelanders trophy!
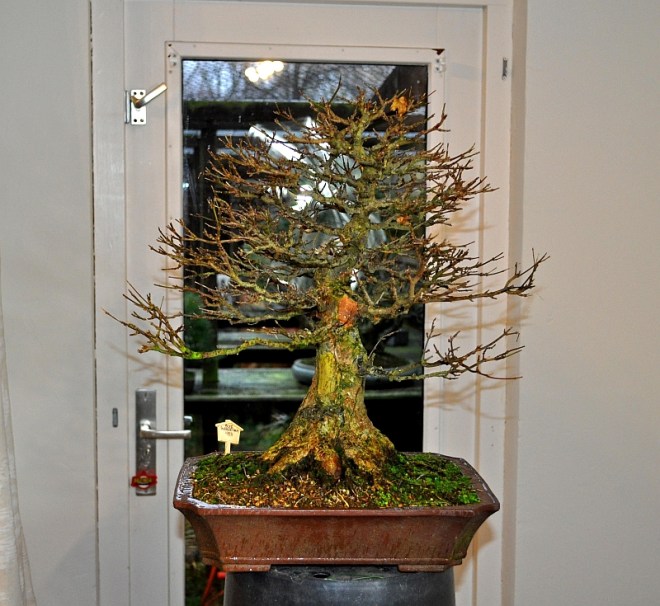
Below: This Fat Boy Acer buergerianum has been in my collection and care since 1997! Then it was just a trunk with a few too-thick roots on just one side and a few very thin misplaced branches and a lot of ugly and poorly health scares all along the trunk! Since then it has grown almost twice in size with a completely new top and branches! The Nebari is much much better now and looks amazingly strong and in balance with the whole tree! And now it is time to bring back the balance in all the branches so that I can steer and regulate the growth of the whole tree!
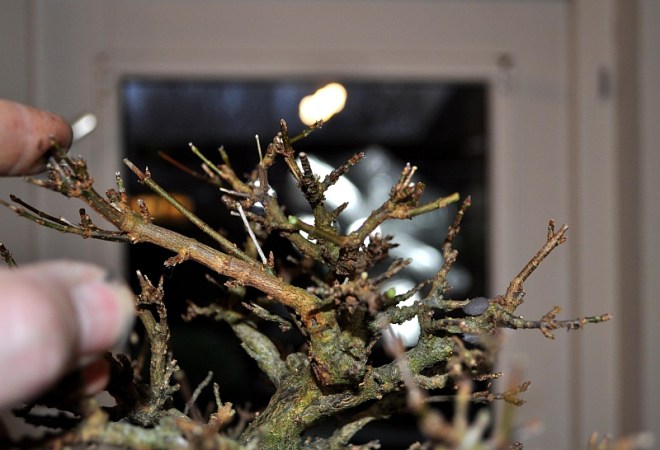
Below: This branch that grows from behind the planned top section was allowed to grow straight and thick to thicken the whole top section! That is more than enough by now so it needs to be cut back to the suitable small side branch that you can see on the right bottom side of it!
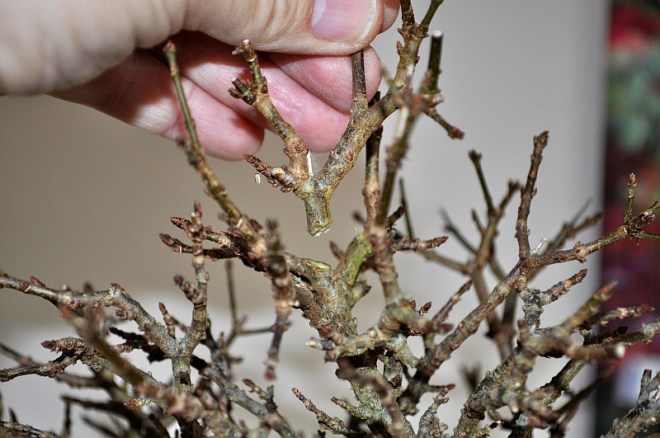
Below: My finger point at another example of a branch that was allowed to lengthen to thicken the whole branch! Now it will be shortened right to its base so that the branch under my finger will become the new branch tip, restabilising proper branch tapering!
Below: The cut-off branch thickening machine!
Below: A close-up of the top section showing just how much is shortened and removed.
Below: The end result for now. Other branches were cut or shortened to improve the tapper or branch structure. After all that the overall image and balance of the whole Bonsai are restored. The two bottom branches are wired back into their places. These last two were the last couple of years allowed to grow in thickness and now they need to grow side branches and a proper branch structure!
Below: This roots over rock Acer buergerianum from Japan has been in my collection for some 20 years now. When I bought it all those years ago it had a few short and thin branches without any structure and a really short top section! Now after all these years the basic branch structure is getting better and is it about time to do some more branch refinement and selection to improve the overall image and promote better energy distribution throughout every section of the tree! This way sunlight will reach all parts of the tree and that will tricker more back budding and that will lead to better ramification, foliage and overall health of the tree!
Below: An example of how this works. The arrow points at a too-thick and strong branch that is also placed in the armpit of two better-suited branches…so it needs to be removed completely!
Below: The too-thick former top was removed! The wound will, of course, be sealed with cut paste.
Below: After it is removed I am left with on the left a short slightly thicker side branch and on the right with a perfectly tapering top… and some nice movement as well!
Below: The red arrow points at a branch that is too fat, straight and long! The branch is at the height of that arrow just as thick as just above that pink piece of my finger at the bottom of this picture…so now taper!!! So I will cut it off just above that first strong right-side branch below the arrow.
Below: Cut off, creating an instant taper to that branch!
Below: Another branch that is removed and sealed with cut paste, creating an instant taper to that branch!
Below: Another one that needs to go in favour of the one that is in between my fingers. That last one will then be shortened to just above a strong bud.
Below: This branch is well shaped and with good taper…but it growing straight upwards and looks like a second apex…so you guess what? It has to go too!
Below: The cut-off branch.
Below: Arrow points at another to long branch with not enough taper. It will be cut back to the nice side branch, just left below the arrow.
Below: That branch cut off.
Below: This branch grows just below where two others originated from, in time that will turn into a nasty bulging section on the trunk! I need those branches above this branch in my design…so it needs to go to prevent something that is hard to fix when it is too late!
Below: Close-up of the almost finished top section. A lot has improved and the future is promising again for this tree. These actions will over the next couple of years bring it closer to the desired outcome, a Bonsai with good mature and beautiful ramifications. And that is a great part of a successful deciduous Bonsai…a part that is so often forgotten in modern Bonsai!
Below: Not the best of pictures but I hope it shows enough of how the ramification looks after all the work?! From here it will be more working towards improving the finer ramification and structure of all the branches. I am happy to see that this long partnership is getting closer to the image of a mature Bonsai…I can’t wait to see how it looks in a few more seasons’ time!
“THE FIRST STYLING OF DIEDERICK HIS PINUS SYLVESTRIS YAMADORI” on YouTube! This is the story of the two fun sessions that we did to style this tall and unique Yamadori that I collected some 5 years ago. My friend and student Diederick and his wife fall in love with this tree when they visited my garden for the first time and they were happy to buy it from me and we then made an appointment to style it together at his place and film it all! This Yamadori is a tall formal upright uniquely shaped Pine with a long first branch that somewhere in its distant past was almost completely broken off by either snow or falling rocks! Somehow this almost fatally cracked branch stayed alive and healthy over with a beautiful Shari and was now all those years later the reason why I fell in love with it that day on that mountain…I just had to save this old guardian from falling into the closing dept just in front of him! It might be a bit controversial as a Bonsai, but we both really loved the story this tree had to tell because of this branch and would not thick off removing it! Thanks to Diederick and his lovely wife for their trust and for taking good care of me and the “Guardian”. I hope you all enjoy this little story of this pre-Bonsai?!
First here is the link to Ryan Neal’s BONSAI MIRAI LIVE website where you can find lots of wonderful Bonsai related video’s! And HERE is the link to the amazing video about Winter Preparation on Ryan Neal’s Bonsai Mirai Live! Thanks Ryan for helping so many Bonsai enthusiasts around the world!
Promo: Early Spring and days are getting longer, the weather is warming – spring is a pivotal time to maximize your bonsai’s development. Use this video to learn what to prioritize and where you should be placing your efforts in the month of April. Join us as Ryan covers different reasons for pruning, whether or not to repot, and how to approach fertilization at this point in the season.
This is what I wrote on YouTube after seeing this amazingly helpful video late yesterday night.
Wow! I have watched this 2-hour video totally captivated in one go until 3 in the morning! It is by far the best educational video around because Ryan has a way of teaching, explaining and showing that makes it all logical, understandable and stick! I have always been a big fan of his work….but his teaching easily equals his artistry. I will post a link on to my blog so that even more students of Bonsai can find their way to this uniquely valuable source of Bonsai information. Thanks, Ryan and all who made this Video possible! I can’t wait for the next edition!
I know of no other video or book that covers all the basics of Spring Fundamentals like this 2-hour video from Ryan, so please do your self and your Bonsai a favour and watch it!
This next post: downsizing the image of a full-size tree into a compact miniature Bonsai version. PART II) has been posted here before Juli 2009. But after using it again a few months ago during a workshop for my students and all the positive reactions that I got afterwards I decided to post it again here on my blog! I hope it will help those who struggle with the principles of downsizing the large image of a real tree into a Bonsai size.
Hi, everybody,
today, while chilling in the warm sun, I thought a lot ( again) about what I wrote the night before about the importance of empty spaces in Bonsai design. And I came to the conclusion that I wanted to share some more of my ideas on this subject with you.
Bonsai is an illusion, a fantasy. Someone’s impression of a full-grown tree in nature, that is living in a small pot. The size of the foliage of any plant or tree, in comparison to the height of the Bonsai, will always be way off. No matter what species you use. Still, if the overall appearance of this small tree gives us the impression that we are actually looking at a tree growing in the distance, we all gladly overlook this oddly oversized foliage. And that is because the artist creating a believable illusion! He downscaled the tree, making sure that we’re possible all the proportions between the trunk and the branches mimic the growth of a large tree! And that is just the area where empty spaces play such a prominent part! As long as the silhouette or outline of your Bonsai tells a believable story, you can get away with a lot of illogical things, like oversized foliage.
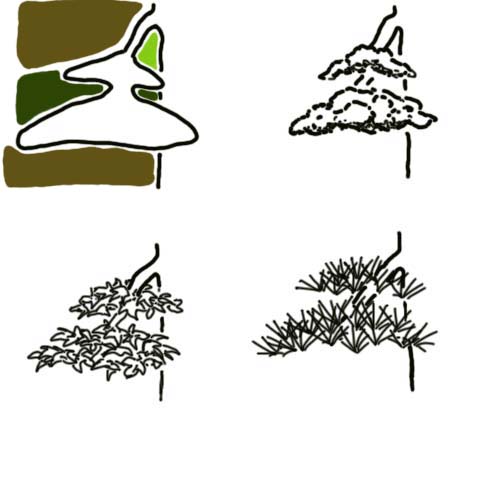
Above: Top left: I have drawn a silhouette of a branch to make things clearer. But of course, the same thing goes for a whole tree! Imagine that this is the outline of a branch that fits perfectly into your Bonsai design. It has some very beautiful and informative open spaces, that divide the foliage layers in a way that is very pleasing to look at. And at the same time, they give us a lot of information about this branch. It is a well-balanced branch, compared with the overall image and size of your Bonsai and it shows the story you like to tell!
The light green open space, tells us that this branch is growing down from the trunk. Giving us clues about the size and age of the tree and what species it is or the style it is shaped in.
The darker green open space, tells us there are separate layers of foliage in this branch. A sign of maturity and age. But they also give us a clue of the distance, between us and the tree we are looking at, making it easier for us to calculate how tall this Bonsai image is meant to look in comparison to a tree in nature!
The top brown open space, almost pushes the branch down, like a load of invisible snow. Emphasizing the downward movement of this branch. While the bottom brown open space is supporting the weight of this branch.
Top right: Your perfect branch silhouette filled with the foliage of a Juniper Itoigawa. This foliage is very small and allows you to bring much more detail to this branch.
Bottom left: Your perfect branch silhouette filled with the foliage of an Acer Buergerianum. These leaves are relatively small and show great detail.
Bottom right: Your perfect branch silhouette filled with the relatively short needles of a Pinus Sylvestris.
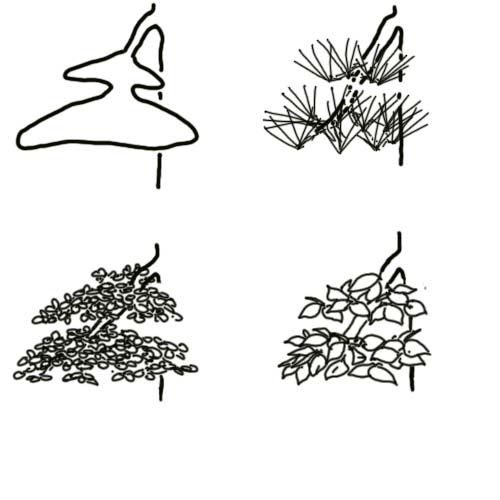
Above: Top left: Your perfect branch silhouette.
Top right: Your perfect branch silhouette filled with the relatively longer needles of a Pinus Densiflora. with foliage of this size, you only use a few needle clusters to fill out your wanted silhouette. With a lot of trans parity, to keep it light. But even in this case, where the size of the needles is way out of proportion, the all-important outline of the foliage ped tells the same story as it those with the smaller foliage!
Bottom left: Your perfect branch silhouette filled with the very small foliage of a Buxus, Ulmus or Olive. Again this means you can bring more detail into your branch, but the outline stays the same!
Bottom right: Your perfect branch silhouette filled with the relatively larger leaves of a Fagus.
Tip: Peaking through your eyelashes helps to see the outline of your work easier!
The outlines of this branch give us a lot of information about what we are looking at, like imaginary size, age, height and type of tree or style. They help us to understand what the Bonsai artist wants us to see. So Bonsai is a lot of silhouettes. And empty spaces are vital to bringing detail and info into that silhouette!
I hope this all makes sense? It is not an exact science, they are just my thought and it is so hard to explain my ideas like this, so I sure hope they come over a bit?!
This next post has been posted here before Juli 2009. But after using it again a few months ago during a workshop for my students and all the positive reactions that I got afterwards I decided to post it again here on my blog! I hope it will help those who struggle with the principles of downsizing the large image of a real tree into a Bonsai size.
Hi, everybody,
I wanted to tackle the subject of downsizing the image of a full-size tree into a compact miniature version. Off course, Bonsai is not the simple copying of trees from nature, but understanding how it works can help you to realize your own ideas. I will use an imaginary example of a 50 cm/20 Inch high Bonsai and will, later on, use two of my own Bonsai of that same height to make things clear!
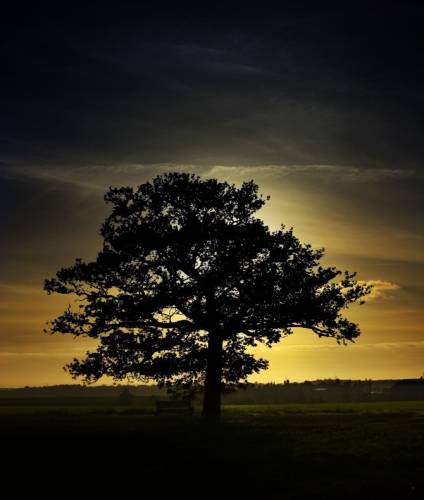
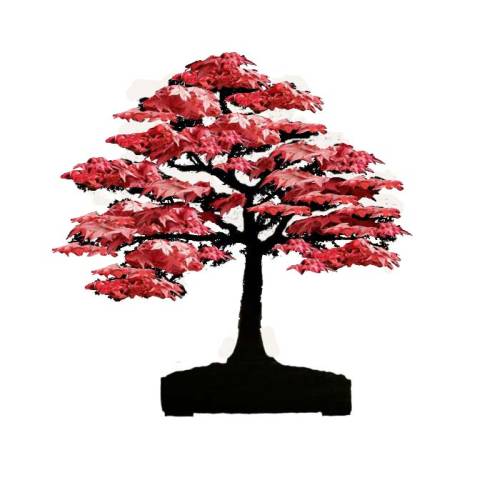
After surfing the web, I found a wonderful dark silhouette image of a tree to use as an example.
The above silhouette gives us enough info we need to recognize what it is. Even without the wooden bench underneath the tree, we can figure out how tall, big and far away from us this tree is. So if we use these same features that give us all that info in our Bonsai, we will at least end up with the right proportion in our little tree. And that is not a bad start, believe me!
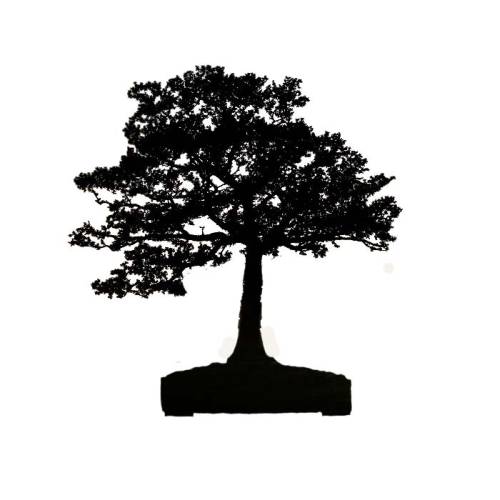
Above: So here is the silhouette of this tree clearer to see. I have removed the two small branches that were growing low on the trunk, to make things even clearer to see. And while I was at it, I planted the tree in a Bonsai pot. Looks good already, doesn’t it?
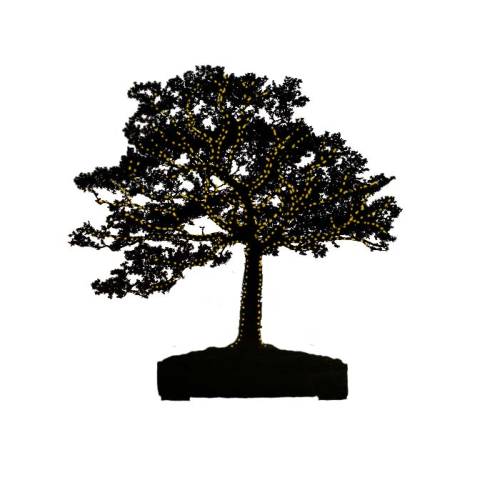
Above: The yellow dots show the outlines of the frame/skeleton of this tree. This design as Bonsai would be about 20 inch/50 cm high and material with a trunk and branches like this can easily be purchased from any Bonsai dealer that imports Acer palmatum or Ulmus but for example, a Beech or Hawthorn would do just as easily! But the amount of foliage you see here would be hard to archive with the too-large foliage of most deciduous species we could use to create this image with as a Bonsai. So we should divide the messy foliage into more compact and well-outlined foliage pads. By doing this, we will create more open spaces, that clearly open up the foliage pads from each other.
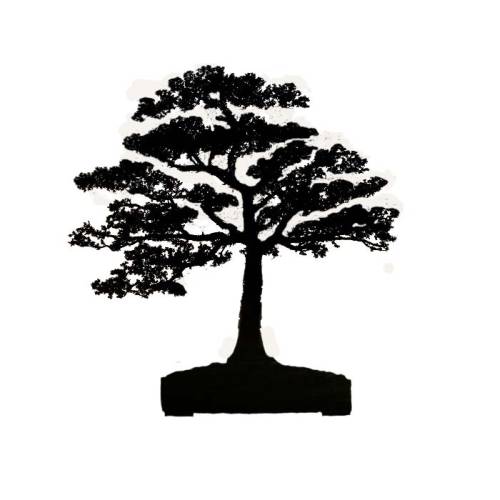
Above: Here I created some clearer open spaces between the foliage layers. It is the same image, but this time it is doable to shape it as a Bonsai. In principle, you only have to fill those outlined foliage pads with the larger leaves of the species you use to create this image.
Above: Here I filled these foliage pads with the foliage I borrowed from my own Carpinus betulus with exactly the same size as this imaginary Bonsai 50 cm/ 20 Inch. I placed the silhouette and a picture of my Carpinus next to each other and then cut and pasted the foliage onto the silhouette. So the size of this foliage in comparison to the trunk and height are accurate. So as you can see this could already be doable and believable as a Bonsai.
Above: Here I filled those foliage peds with the foliage of my same-sized Acer palmatum. Again the size of the foliage is accurate. So again, doable and believable!
Even though like in most Bonsai, the leaves are monstrously big in comparison to the tree image we have created, the outlines of the trunk, branches and foliage pads are correct, making it a believable image that reminds us of the trees we see in nature. Just like the painter, who only uses a few brush strokes to paint all the foliage of a large branch, we sometimes only use a few leaves to create all the imaginary foliage of a large branch.
last week it was time to cut back all the strong new growth on all my Yamadori Taxus baccata’s that I collected many, many years ago in Wales with my dear friends Tony Tickle, Terry Foster and Mike Sullivan. Last year they were all heavily fed and allowed to grow freely to build up their strength and that resulted in this year in strong growth all over all of them! So like I mentioned before, last week was the right time to cut back all the new strong growth! How do you know when the right time has arrived? Easy, when the new growth has become harder and stiffer to the touch and has become a darker colour green! Then it is time to cut back into that new growth with very sharp and clean scissors, leaving 3 pairs of needles on a strong shoot and 4 or 5 pairs of the weaker ones! But IMPORTANT: you don’t cut back the new growth on branches that are weak or the ones that you want to thicken or extend!!! But even on branches that need to grow, you should remove some/most of the old needles to promote back budding!!! After all, this is done, you give the trees at least a week time to recover from the stress and to close all the wounds from cutting them! Then you carefully pick/pull off the old needles from last season, making sure that you pull in the direction they grow! This reduces the chance of damage to the often thin branches! After all, if this is done and all goes well then many new strong buds will start to appear at the end of this season, and for sure in the next growing season! The other advantage is that because most branches are now without needles sunlight can reach all areas better and it has become much easier to select and wire them all! All this will result in healthy and strong growth closer to the trunk and main branches and the fuller appearance that we seek in Yew Bonsai and Bonsai in general!
Here are my own Yew Bonsai as an example of how it is done.
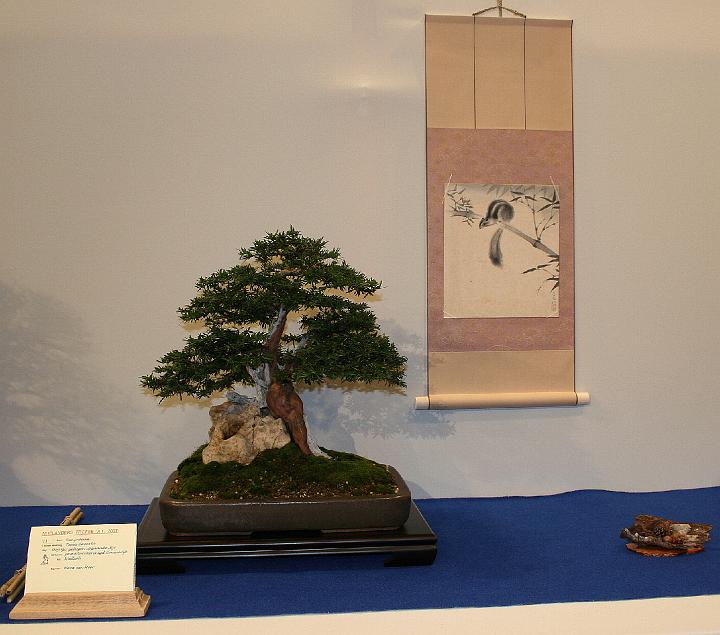
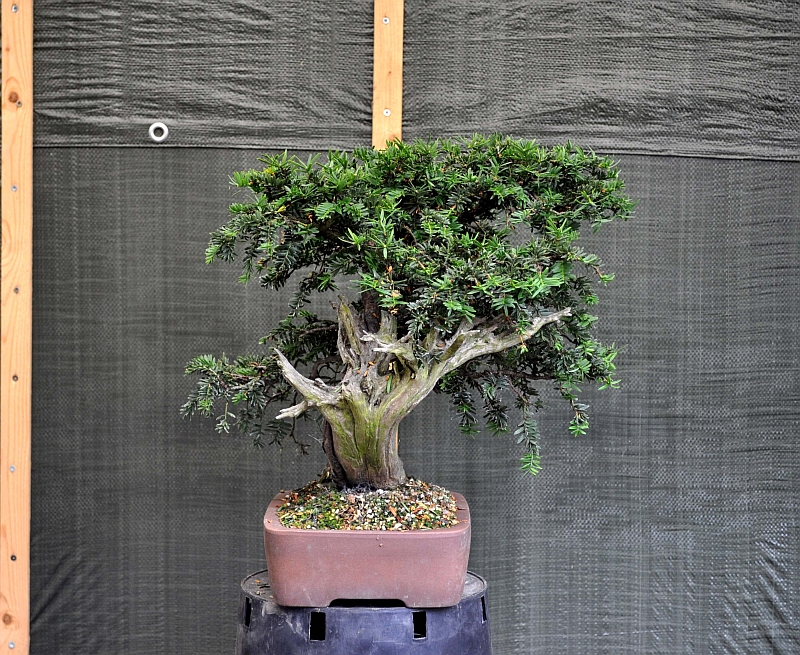
Below: The first one that I like to show you is a Yamadori baccata that was given to me as a present by Tony Tickle when he visited my house almost 20 years ago now! He had collected it himself a few years earlier and I remember him smiling when he gave it to me and said: “let’s see what you can make out of this”?! When I later took it out of its plastic training pot, I understood exactly what he meant when he said this! Underneath the wide base of the tree grew a 15 cm long thick root with only roots at the end….it looked like a lollypop! It took me the better part of 4 years to force the tree to make roots higher and closer to the trunk base so that I could finally shorten that long root and plant the tree in a more normal pot! But during those years I had already started to style the tree and found a solution to make good use of that bulging trunk section and the Jin that emerged from it on the left! And that solution was all the time lying on my garden floor! It was a viewing stone from Indonesia which, when I held them together, fitted like a clove! The small base of the tree fell exactly into a cavity in the stone and the Jin rested on top of it, like a big branch that had died back many years ago….amazing! 🙂 Then in February 2007, the Bonsai made it through the tough pre-selection of the prestigious “Noelanders Trophy” in Heusden/Zolder Belgium. The lollypop Yew had become a Bonsai! 🙂
Height 55 cm/22 Inch. Table, scroll and Shikishi Japan.
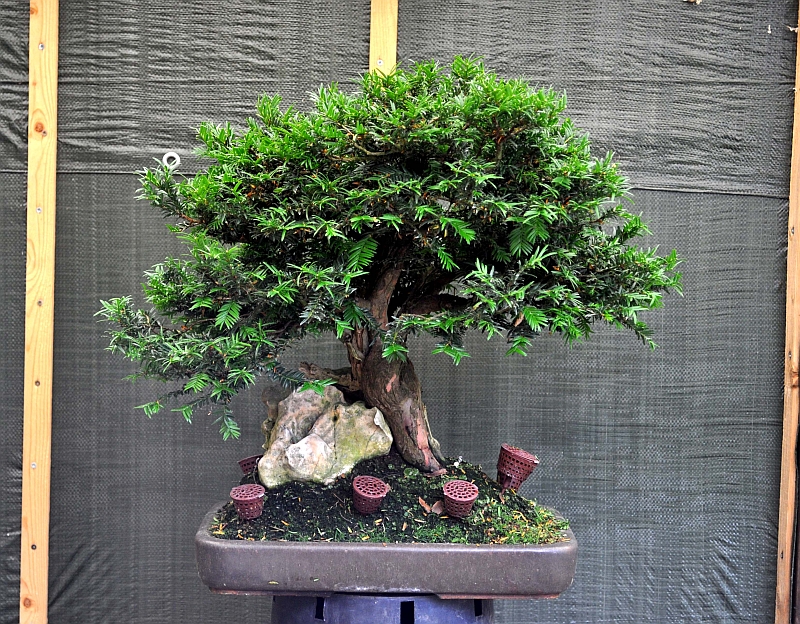
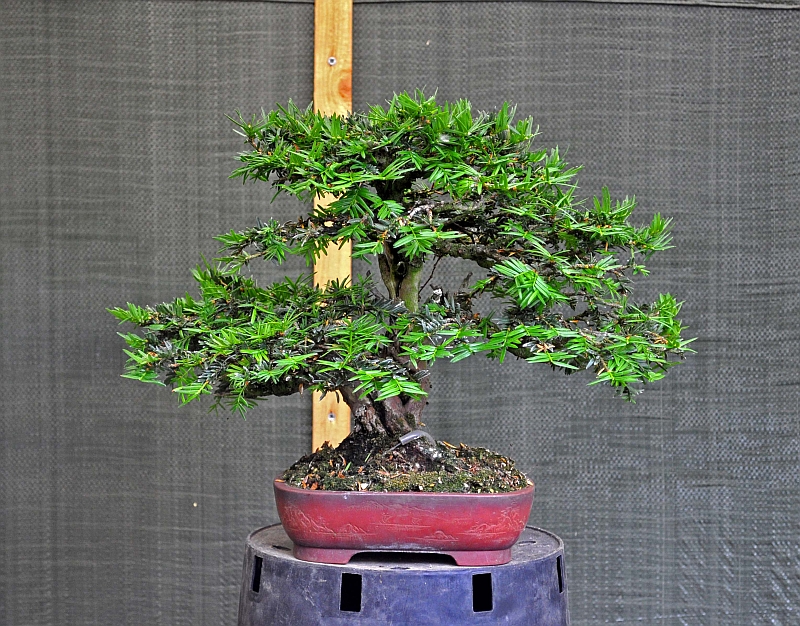
Below: The same tree 10 years later! Healthy…but in need of a haircut and complete wiring!
Below: Side view
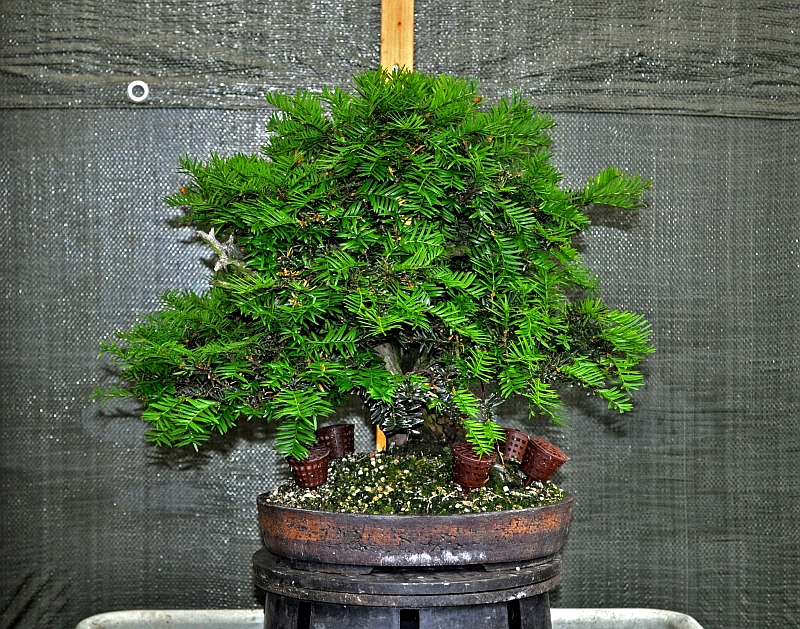
Below: After shortening all the healthy shoots! Next, on the agenda is pinching most of the old needles and then rewiring the whole tree and cleaning the live section and the deadwood section and applying lime sulphur.
Below: Side view. Out of model….but he looks healthy enough!
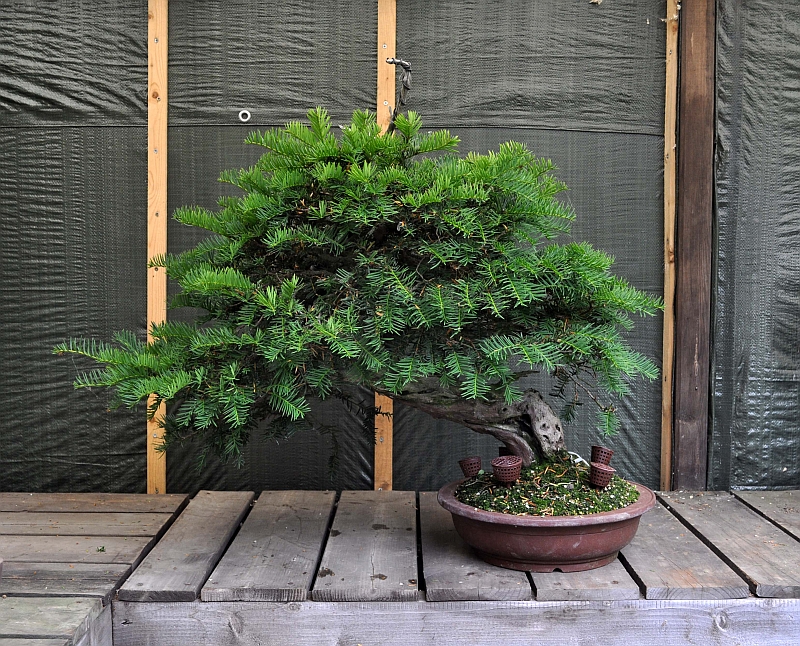
Below: The second one that I like to show was in 1999 given to me (again) as a gift from Tony Tickle when we said ower goodbyes at the end of the historic second “Ginkgo Awards” in Belgium. This next year’s picture was taken in my garden just after I repotted it. The left arrow points at the large Jin that you can see on the left in the second picture below. The bottom arrow points at the large branch that I removed completely so that I would be able to create a more compact middle-size Bonsai (Chuhin)! The large Jin/Shari section that you can see in the middle of the trunk in that same second picture is all that remains of this large branch!
Below: September 2007. The same tree, but now as a Bonsai! It was earlier also shown in one of the “Noelanders trophies” together with another small size Yew that I will show you next! Height: 35 cm/14 Inch. Pot: Klika & Kuratkova Table: CHR furniture (B)
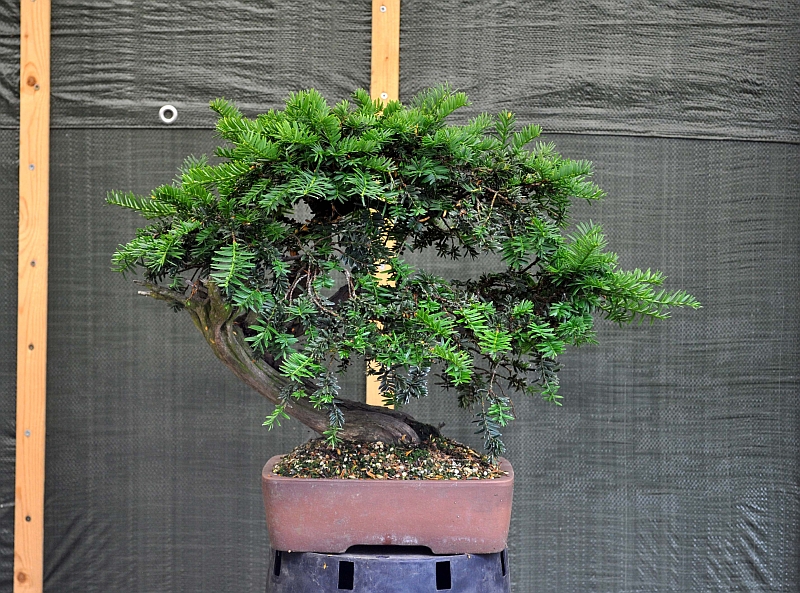
Below: The same tree before cutting the new shoots. The right bottom branch has lost some thicker branches on the backside that need to be replaced and filled with new young branches in the next seasons! The ones growing from there are left alone to thicken and extend, so no cutting or pinching! The rest of the tree will be treated as explained before!
Below: Right side view of the tree. Note how the top leans towards the front…like in most of my Bonsai designs!
Below: After cutting the new shoots. The length of the branches is like in the first tree too long and the desired silhouette is lost! But after the new buds that will appear have opened and grown enough, well then all these too-long branches will be cut back so that the proper silhouette will return!
Below: 1999. A young and thinner me and my dear old friend Tony Tickle on a collecting trip in Wales…good times! 🙂
Below: The third example. Here is one that I collected myself during one of those exciting trips late last century with Tony, Terry and friends!
Below: And this is how it looked in September 2007. In a custom-made pot by old friend Brian Allbright (UK) and another table custom-made by CHR furniture (B). Height 28 cm/11.2 Inch. This Bonsai was shown together with the one before this in the Noelanders trophy.
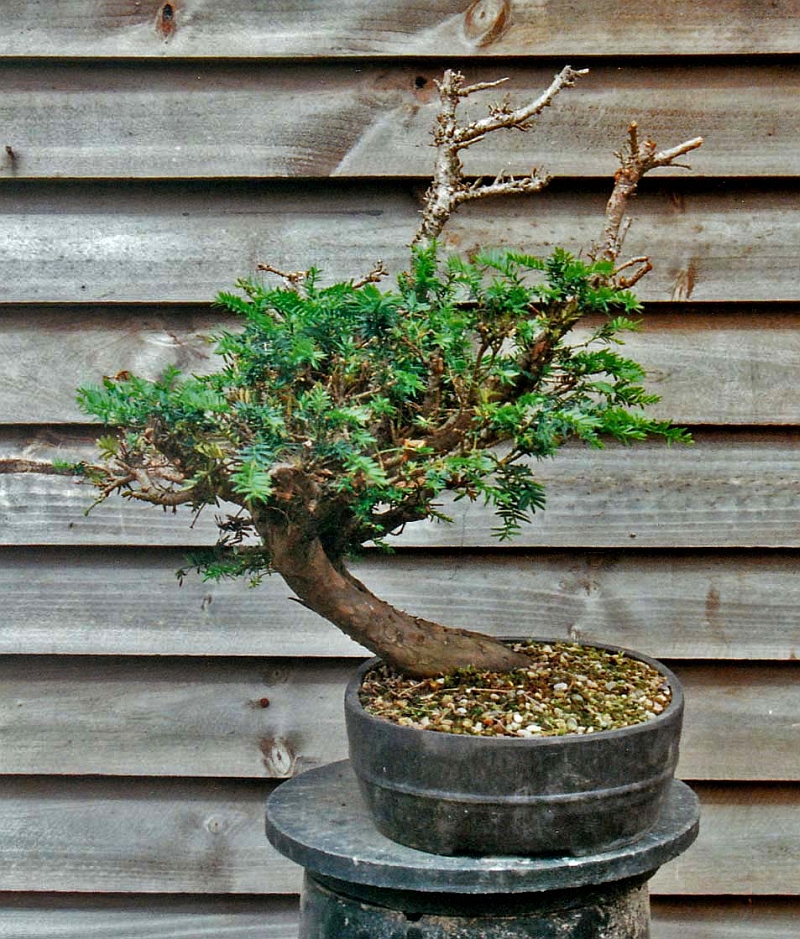
Below: And this is how it looked before pruning began. It has outgrown its beautiful Tokename pot, where it has been growing for almost a decade! So I have to start looking for a new beautiful and more spacious one!
Below: Right side view.
Below: After cutting the new shoots. It is obvious that the left side of the top needs to be wired and repositioned!
Below: In this left-side shot it is even more obvious that the left side of that top needs to be filled up by lowering the branch above that big gap! This open space arose when a major branch died back!
Below: Collecting one of the Yews from this post!
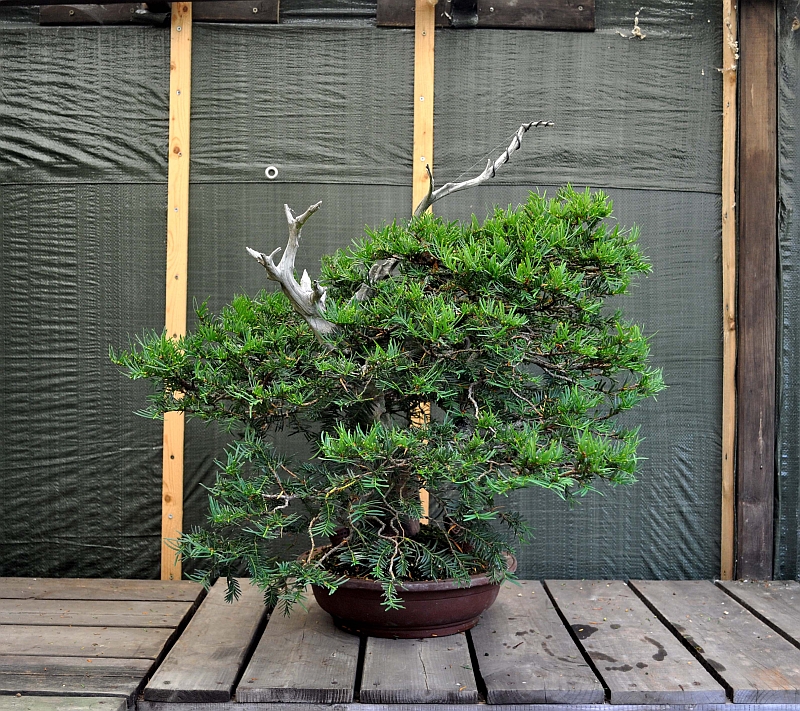
Below: The fourth example. This one was collected by myself during one of the collecting trips I made with Tony and friends during the late nineties in Wales. As soon as I got home it was planted in a hard plastic Bonsai container and then left alone to recover!
Below: After the first signs of recovery I removed all the useless growth of those long branches so that all the energy would go to the foliage that matters! And then the tree was left alone again to get stronger for its first real styling!
Below: The tree consists of left and right sections with a strip of deadwood running in between from top to bottom. A year later, when the tree was looking very vigorous, I decided that it was safe to perform a drastic pruning! So I cut off all the foliage and branches from the left section of the tree, leaving the stumps so that they could be turned into Jins. And I removed all the bark from that left section, creating a nice contrast between the live (brown) section and the deadwood (white) section! The branches that were useful for my design were wired and then the tree was left alone (as long as it needed) to recover from it all!
Below: A year later it was doing just fine so I planted it in a proper Bonsai pot.
Below: And this is how that same Bonsai looked in September 2007. That same year it was proudly exhibited in the fifth and last edition of the now legendaries “Ginkgo Awards” in Belgium. I like the contrast of colours in this tree and the circular design! Almost like yin yang…live and dead! But what I like most is that I created a design with an otherwise big no-no….the right bottom branch that grows directly out of the inside of that curve! And still, it works and makes you look twice because it is so unconventional! And that was just what I hoped to achieve with this design!
Below: The tree before shortening most of the new growth. And after that, it is time to rewire and restyle the whole tree again!
Below: Left side view showing the deadwood/Shari and Jins.
Below: After cutting most of the new shoots.
Below: It is thinned out a lot! Now it is time to remove most of the older needles from the strong branches so that light can reach in and new buds can appear!
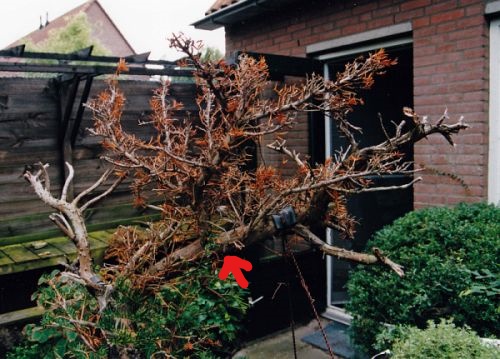
Below: The fifth and last example. This Yew was actually the first tree that I ever collected and yes it was Tony Tickle again who made that possible for me! I met Tony for the first time in 1997 at the first-ever “Ginkgo Bonsai show” in Belgium and we have been great friends ever since and had some amazing Bonsai adventures together since then! It was during that first meeting that Tony invited me to come to collect with him in the UK! I could not believe my luck and sure enough in early 1998, I drove all the way to the north of England! And the next day, the first tree I ever collected, was the Yew that I am next going to show and discuss!
Below: Happy me with my first collected Yamadori ever!!! This Yew marks an all-important turning point in my Bonsai life….sins then on I decided that this was what I wanted to do Bonsai! And since then I have nearly always worked exclusively on raw unstyled material that I often found and collected myself! I wanted to have all the excitement from the beginning to the end…I choose the long way…but my way! And this Yew started that all of, so you can imagine that it holds a warm spot in my heart! 🙂
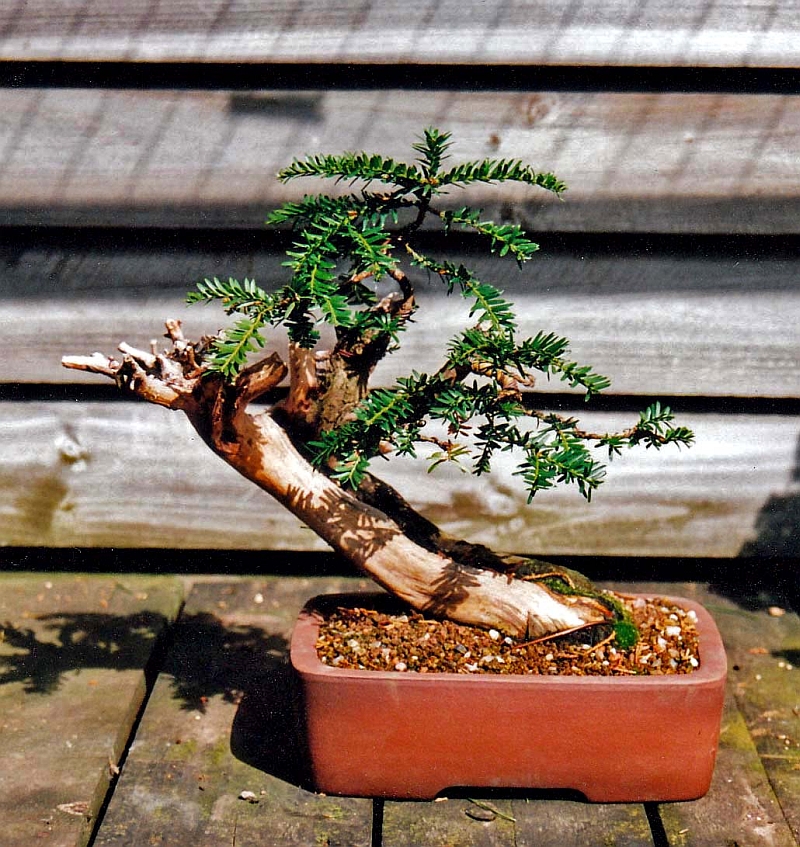
Below: In my garden, it lost the whole top section, but luckily the bottom foliage survived!
Below: A not-so-good picture made inside my house in 2003. As you can see that half of the dead top section was removed right up to the red arrow in the above picture, and only a small Jin remains! The large upwards-going Jin you see in the below picture is the dead upwards-going branch that starts just above that red arrow in the above picture!
Below: September 2007. Just rewired, repositioned, live wood cleaned and Jins and Shari’s treated with lime sulphur. Table: CHR furniture (B)
Below: Early 2008 in its present pot. From here on it was all keeping it very happy, and healthy with the main focus on fuller and better branch structure! Growing, cutting, pinching and wiring etc. etc…..ect.😉
Below: Just look at how full the tree is today! Now there is more than enough foliage to work with and to bring the Bonsai further and closer to the end image that I had in mind all those years ago when I gave it its first styling! This pot is by now a bit too small, but is in the style that I would like to use when the Bonsai is finally ready to show…so the search is on! And the tree needs to be tilted more to the right when it is repotted back in this or in its new pot!
Below: After cutting and pinching. The copper wire in the top of that Jin is there to prevent it from accidentally breaking when I move it around! My garden is covered with galvanized iron gauze (normally used in concrete walls), so a mistake is easily made when lifting up a tree too high!
Below: Left side view of the tree. Again notice how far my Bonsai lean forwards! This, in my mind, creates a lot of depth and creates a feeling as if the tree leans over you. If I learned one thing from looking at hundreds of Japanese Bonsai in books and in real life then it is this principle! Depth creates a sense of reality…even in pictures!
In between writing this, I spent a lot of fun time with the all-important task of the branch and new growth selection and branch shortening or removing on all the Yews! And although it is a sign of good health, a lot of growth of small and larger branches is useless or unwanted. It blocks out sunlight for the new growth and the branches that are important in your design! So it should be removed or shortened! Then there is branch shortening to reduce the overall size and mass of your design! And last but not least, branch shortening to create better branch structure and ramifications! By cutting back a larger branch right up to where there is a strong shoot or even bud, you will create shorter and better ramification branches and better taper! This should be one of the main objectives of Bonsai and is in modern Bonsai often neglected! You should not be only proud of the outside image of your Bonsai, but also of your branch structure!!! And it is very important for the well-being of your Bonsai! For example, the first Bonsai from this post was after this (long) branch selection round reduced by some 20% !! After all the here discussed Bonsai have gone through this same procedure, they will all be wired, styled, cleaned and treated with Lime sulphur. After that, I will make new pictures and show them to you! I hope you enjoyed this post and found it useful and interesting?!
Now I will start to work again on my new Bonsai video that is almost finished…it only needs music underneath it! That might sound easy to some…but for a novice like me, it all is a big difficult puzzle?! 🙂 It is Part I of the story of “the Elephant” my big Yamadori Larch. So watch this space!


 Below: then watering it like before. In the next couple of weeks, the trees will be kept in a warm spot with filtered sunlight and their foliage will be misted a couple of times a day to help them safely through this period