My chamaecyparis obtusa “nana gracilis”.


Hi, everybody,


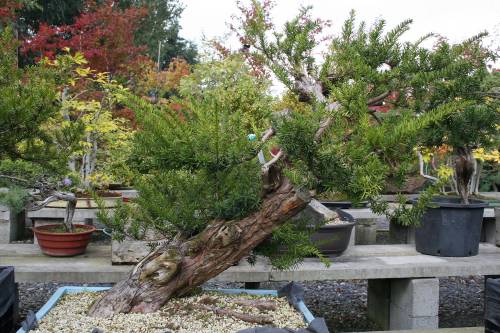
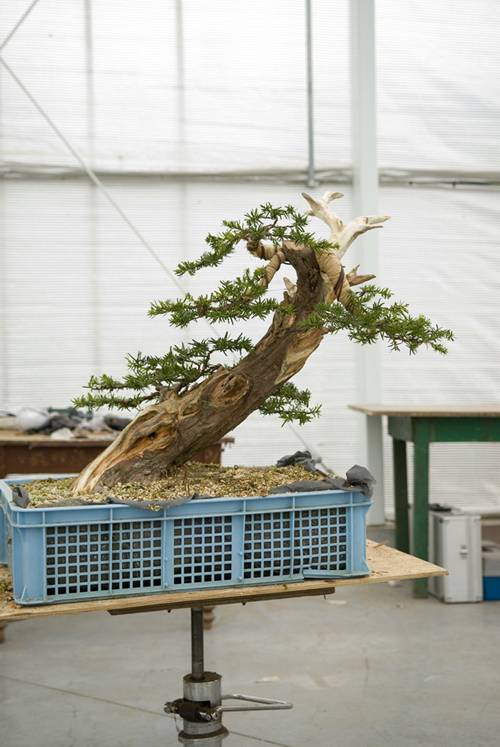
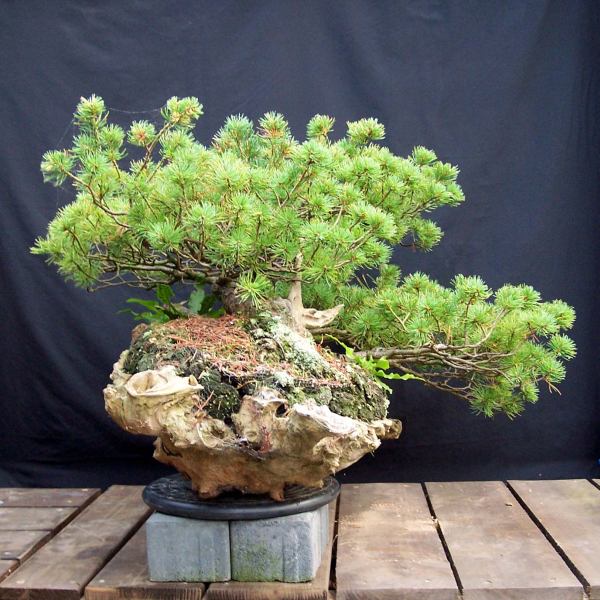
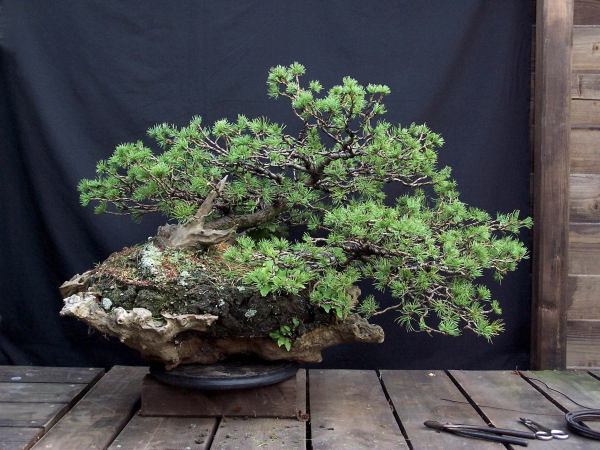
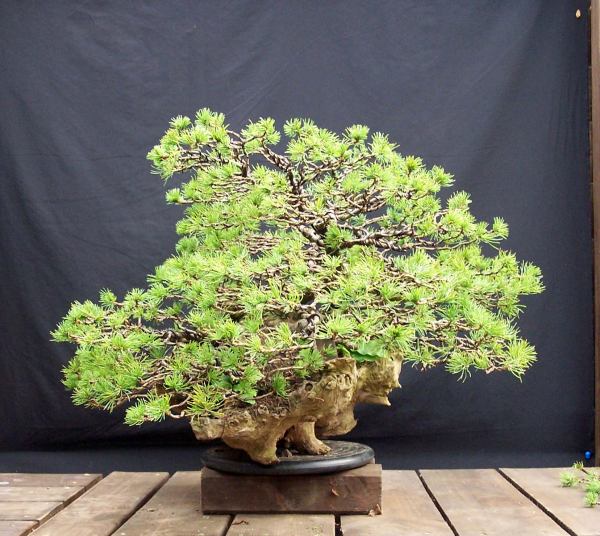
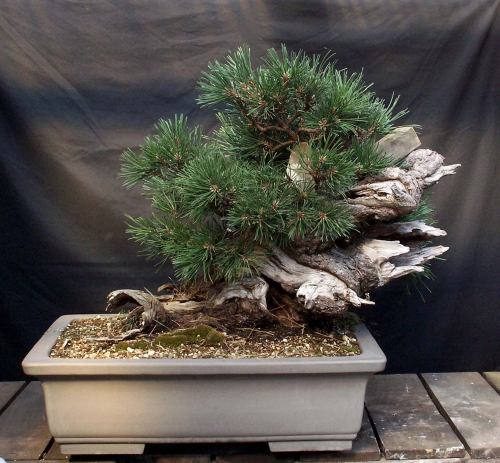
yesterday I finished the final styling of my “Hinoki cypres” Chamaecyparis obtusa ‘Nana Grasciles’ 95 cm/38 inches.
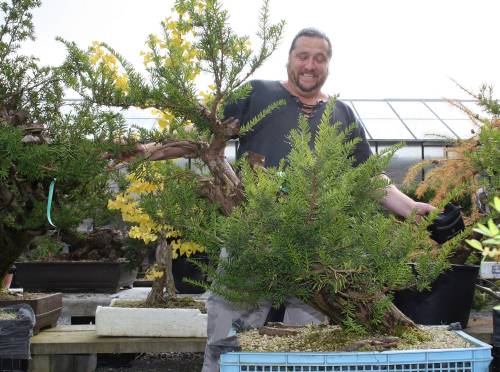
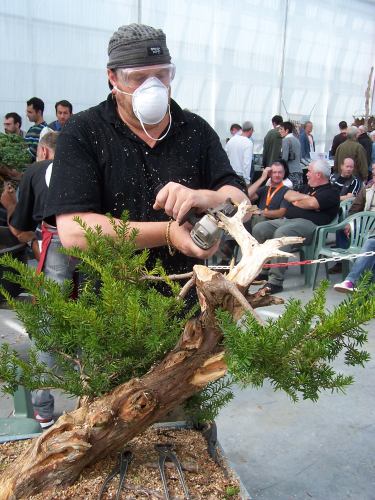
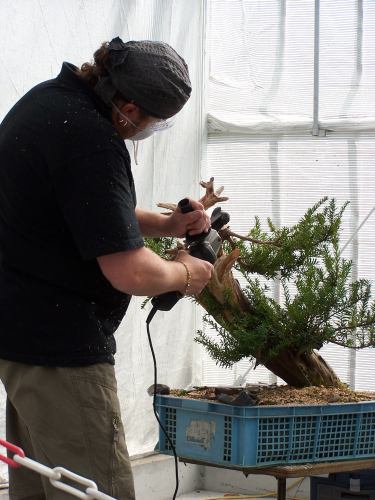
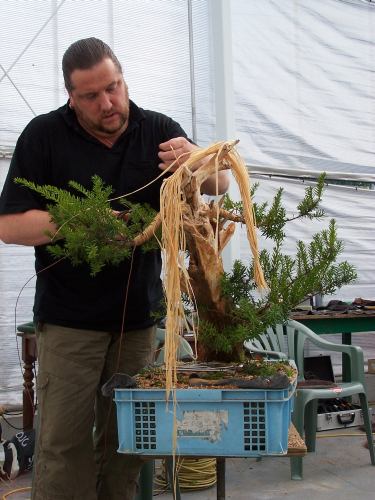
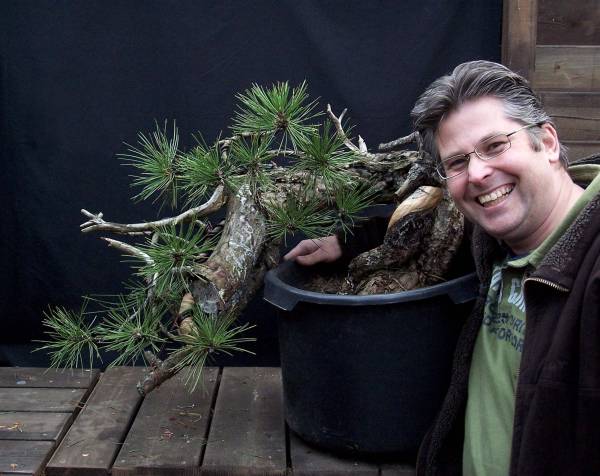
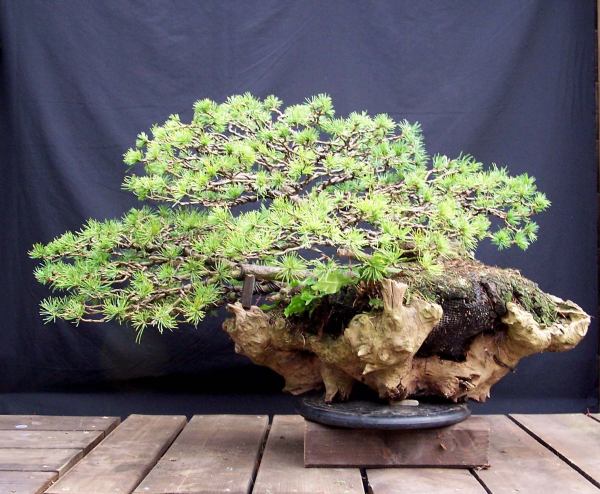
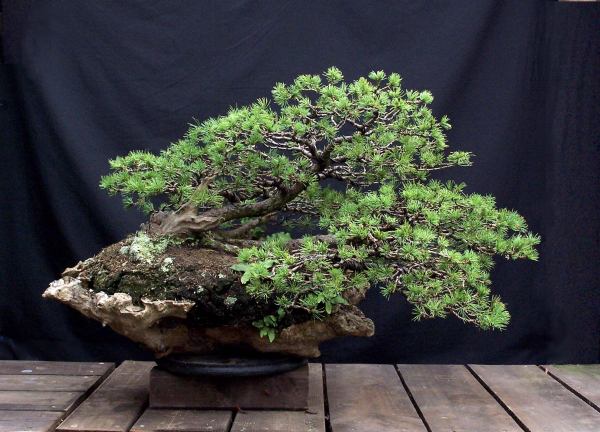
About 12 years ago, I was very lucky to buy 4 or 5 of this old “Hinoki’s” directly from a professional grower in “Boskoop” (Holland). He had planted them together with his father some 50 years ago when he was still a young boy. He seemed to like the idea of having them restyled into Bonsai! All these long years, the small scrubs were used as “Mother plants”, every year all the strong growth was cut off to be used for grafting or as cuttings. So the trees had remained small for all those years and most of the foliage grew close to the trunk. But this was not the case with this tree, it was tall, straight and all the foliage was located in the top part of the tree. So I only had some branches in the top that I had to bend down and let grow for many years. So I had to style the tree in a way, that made those hanging branches believable. This “Hinoki” would be a fantasy tree (they don’t exist as large trees) and styled as an Old Pine/Larch/Picea solitaire, that lost its top section somewhere in the past and all of its bottom growth and all of the branches were forced down by the weight of the winter snow. I have seen examples of those old soldiers on many a high mountainside in the Alps. So, to give the trunk more interest, I made a Shari over the full length of the trunk. And then waited for all these years, until now, for the foliage to grow and the branches to thicken, in the meanwhile the Shari aged very nicely and the bark grew beautifully over the deadwood in some places, making it all look aged and mature. I really love the foliage of these “Hinoki’s”, you can create wonderful foliage pads, without it becoming too overly styled, it looks really natural, like a tree in the distance. I think this fantasy tree gives off a good impression of an aged mountain dweller now and I decided to enter it into the “Noellanders Trophy” next January! Although this species is not so commonly used in Bonsai anymore, I do believe they are wonderful material for good bonsai! Even this, not so good starting material, turned out into a believable old looking tree. This tree has become a good representative of what I seek for in my designs and styling, I hope you like it to?
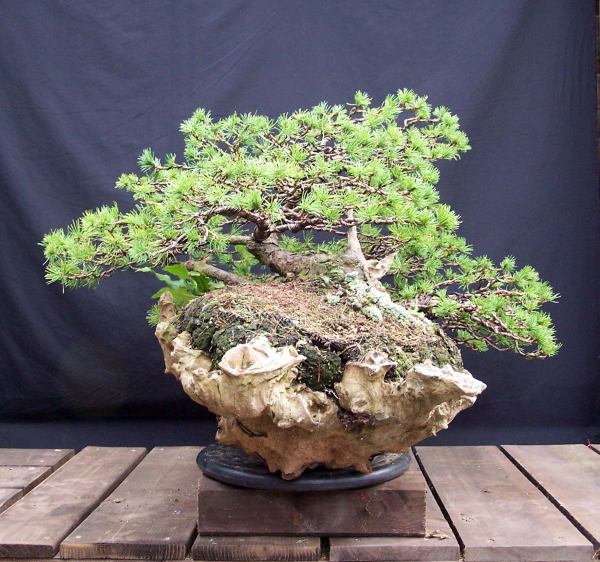
I found this wooden slab to place it on in the show, do you think it goes well with this tree?
Regards,
Hans van Meer.

*
Info: karamottobonsai@hotmail.com
——————————————————————————————————————-

I FINALLY FINISHED THE WORK ON MY PINUS UNCINATA.


Hi, everybody,

Yesterday I finally had the change to finish the work on my Pinus Uncinata. Although it took me a month or so too long to do it all, I am glad about the outcome of my work. The tree had enough growth and new foliage for me to give the image more height and width, I even removed a major branch from the left bottom branch. There was no more need for heavy wire, every main branch is fixated, more or less, in its right place. I tried to create more layers in the separate foliage pads and more open spaces between the foliage, these details create a whole new feeling when I look at it. The tree, now, looks taller and more like it is growing in the distance. I feel this is very important part of the future process of trying to find some sort of believable balance in this extreme Bonsai design I have in my mind for this Pine! The right Jin on the ground is already half cut to give me a better impression of how it will look in the near future! I left it like this because that part of the Jin that is left on is used to tie down the tree to the rim of the pot to hold it upright and secure!

More to come!


*

*

Above picture: I placed the tree in a virtual pot to get a feel of how it will look, in a more upright position. As you can see, the open spaces increased a lot between the bottom branches and the soil level. And that is something to take along in the next restyling session. This is not a pot I would go for, but it will do for this purpose.

I hope you like this old Pine as much as I do,

Hans van Meer.

Info: karamottobonsai@hotmail.com

———————————————————————————————-


THE FIRST STYLING OF ED’S PINE.

Hi, everybody,

last Thursday my student Ed van der Reek brought his latest find, a Pinus uncinata, to my garden to give it it’s first styling. This small Pine showed all the typical Yamadori futures we look for in good Bonsai material, But on the other hand, it showed just as many typical Yamadori problems, that needed to be solved, or better yet, incorporated into the overall Bonsai design, in a way that would actually make the tree look better. There is a lot of beauty to be found in imperfection! 

More text to the pics will follow tomorrow!

*


Left picture: Sorry for this poor picture against that bad background. Those two chairs were there for me, I had to go sit down every now and then! Point A:  Shows one of the only 2 branches on the battered Pine. It is a to long branch, that grows from an ugly spot on the back side of the tree. It will be a major problem, to use this weak branch in any design we might come up with! Point B: Shows the second (Cascading) branch. This is a very hard to bend straight and thick branches, from which, way down 3 secondary branches grew. 1 strong and long and 2 smaller and weaker once. Above this branch, you can see a large dead wood stump that needs to be reduced and shaped in the future after the tree has its new image!

Right picture: A: Close up of the weak back branch.


Left picture: Side branches B and C are the weakest 2 of the 3 growing from the main branch, and they are placed to low down. ED uses wet raffia to tightly wrapped the place where the thick branch endures the most pressure when it is brought into the desired position. Than 2 lengths of copper wire are, with the help of pre-cut small pieces of thin wire, placed lengthwise along the side of the outside curve of the branch. The small pieces are there to help you attached the lengths of wire along the side of the branch, even if you work alone. Just hold them in place with one hand and use the other to swing the little piece around the area you are holding and then tighten it by hand and then by pliers. You repeat this process along the rest of the branch, very easy this way and it ensures that the lengths of wire are very tightly bound to the part where the branch needs protection from breaking! Then, as tight as possible, another layer of wet raffia was applied and over that layer normal wire was applied to hold everything tightly into place!

Right picture: A normal wood clamp was used to, very easily, bend the thick branch, bit by bit, into its desired position. The 15 minutes break we took in between the bending of this all-important branch, were used to wire the rest of the smaller branches and to drink some more coffee.


Left picture: Point A: The base of the branch was secured by a piece of copper wire to the dead stump. To prevent it from being torn off at its base! Here you can also clearly see the large deadwood stump that hides most of the main branch. This deadwood needs to be reduced and shaped in the future. In a way that fits the tree design as well as hiding the straightness of that same main branch.

Right picture: WOW! Look how far it has come and without any problems. Ed still can’t believe it! 🙂


Left picture: Side branch B is bent down and appears here from under need the trunk.

Right picture: Here Ed is carefully bending the cascading (side) branch into position.


Left and right picture: The now useless side branches are removed by Ed.


Left picture: without hesitation, Ed removes the useless branch on the right (back) side of the tree. Leaving a stump for a future Jin.

Right picture: After an afternoon of fun, Ed can really smile with the outcome of his work. The deadwood carving will be don later when Ed is more used to the trees new image. He has to charge his fantasy first for a while, so to speak. I am sure this tree will turn out just great in the future!

Most of the times I make a drawing, but this time I made this virtual of this future Bonsai for Ed. There are no back branches visible in this drawing, but there are 3 of those in the real design. Out of experience with my own trees, I have learned, that when the proper technique to stimulate back budding are applied on these Yamadori Pines, a design like this can be visual in 7 to 10 years. I know it sounds like a long time, but every step in the life of a Bonsai is worth taking, believe me!  

Ed is happy so I am very happy, so it was a good Bonsai day again!

Regards,

Hans.

Info: karamottobonsai@hotmail.com

————————————————————–

The styling of my new Shohin Yew, “Little Terry”!


Hi, everybody,
a few weeks ago, when I was in the UK to do another “BURRS” weekend, I stayed as a guest in the warm home of my dear friends Charlot and Terry Foster. Every year they spoil me half to death when I visit them and this year I even was surprised with a real Halloween party (my first), with great food and light refreshments! 🙂  All too soon this weekend with my talented friend ended and I probably won’t see him until next year, for the next “BURRS” event. But he took care of that problem as well for me! The last morning, during a wonderful breakfast, he surprised me completely again! He gave me this lovely little Yamadori “Yew”, he collected himself 6 years ago. He said, here is something to remind you, of this fun time we spent together. Once again this modest man had struck a nerve in me and I just had not enough words to take him for his wonderful gift! You got to love him!
I am because of my back problems, still not being able to do much work at once, so I decided to work on this little gem. Trying to honour Terry’s design, but with a little twist of the Hans. 🙂

I removed unnecessary foliage and some branches that did back, then wired every branch, which, because of the dense foliage, was not so easy as it sounds. I had to be extra careful with those big hands of mine. I put all the branches into there desired place. I cleaned the deadwood and live bark with a toothbrush and some water then applied lime sulphur to protect and whiten the deadwood. Took these picture for my weblog and of course, I named this Shohin: “LITTLE TERRY”!!!
Thanks, Terry!!!!

                                        Above picture: Before the work began.

Above picture: Here you can see how small she actually is.


                                        Above picture: Left side of the tree.

                                        Above picture: Back side of the tree.

                                   Right picture: Right side of the tree.

Above Picture: A branch has died back, so the live bark will shift more to the right in the future, but this is something the tree will do by itself!


                       Above picture: Close up of the deadwood.

                                                          “LITTLE TERRY”


Hope you like it?

Cheers,
Hans van Meer.

Info: karamotto@hotmail.com

————————————————————————————-


RESTYLING MY JAPANESE WHITE PINE TRIPLE TRUNK.

Hi, everybody

Because of my lower back troubles, the wiring of this tree was stretched out over much of last week. I had to do most of the work sitting down, simply because I can’t stand upright for very long at one time and I just hate to work like that, it is so clumsy! But yesterday I finally could start repositioning the branches and it took me 4 hours to do. I had to rethink the way I styled the tree in the first place all those years ago, not so much the feel or image of the tree, but the way the small branches had to be placed. Japanese With Pines hardly bud back on old wood in my climate and so most of the smaller branches had grown out a bit too long to style the tree as compact as I prefer to do in my styling. I could have made the image of the foliage pads more dense, bud that would have meant that I have to curl and twirl the branches to bring them closer in, and that is something I will always try to avoid in my designs. I planted this (then 5 trunks) Pine on this piece of petrified wood to create a coastal rock image, somewhat in the middle of a more classical Japanese style and the once I used to see and play on as a child on the French Riviera during our vacation there. The outcome of that demonstration, back then, was pretty compact because the foliage pads could be build up in the traditional way, making the tree look full, in the more traditional way. But now, with the usable foliage growing much further away from the main branches, I had to rethink my design and try to get a more or less same feeling, but build in a different way. This time around the tree would look much more open, more like the battered Pines that I have seen growing along the coasts and the beaches in southern Europe, showing more open space between the small branches that now play an intricate part of the design, instead of covering them up with dense foliage layers. This way of placing the thin long branches reminds me of some of the techniques that the Japanese artists use to style literati Japanese White and especially Red Pines, were the open light branch structure becomes the main focal point of the image of the tree.

                                                 Below: Front before styling.

                                                Below: Left side before styling.

Below: Detail of the backside before styling. You can see the mesh that holds all the ground into place because all the Kato (river muck) has fallen off from this side, this Kato will be replaced later and will then be covered with moss.

                                            Below: Backside before styling.

                          Below: Wiring, sitting down like this, takes forever.

                                   Below: The cascading front branch wired.

                             Below: Too long branches were removed as well.

Below: Useless long branches with hardly any foliage on them were removed.

Below: Here the basic shape is brought in to that same centre front cascading branch.

                                             Below: And some more shape.

Below: And the other branches are being slowly brought into their desired position.

Below: Close up of the two branches that rest on the ground, like the one I remember did, on those coastal Pines from my childhood. A piece of wood is just to raise the one in the back to create depth.

      Below: Left side after styling. And the same goes for this view of the tree.

Below: Right side after styling. In this view of the tree, you can appreciate the dept/distance between the front branch and the back branch. 


The picture above: So this is how the tree looks after this long restyling. But sadly, because of the poor lighting conditions when this picture was made, it appears to have not much depth to it from this front side! It looks Rather flat and without much separation between the different layers of foliage. As soon as the rest of the work is don and the lightning is better, I will make some new once to show the end result a bit better! Now the (bottom) sides, were the ground has fallen off, needs to be re-plastered with fresh Cato (Japanese clay) and powdered Akadama mixed in water. After this messy job is don, It will be covered, like the rest of the ground surface, with all kinds of mosses. But that is a nice job for later this winter! first, as long as the weather permits it to work outside for a long period of time, I will wire another tree that needs to be restyled.

Hope you like it so far?

Hans van Meer.

Info: karamottobonsai@hotmail.com

——————————————————————————

——————————————————————————————————————-


Some Lazy Sunday Work On A Acer Buergerianum.

Hi, everybody,

I did a lot of joy full Bonsai work on this unexpected Sunny Sunday afternoon. Just little things, here and there. Some cutting, some bending, some cleaning of old needles and leafs, just the fun Bonsai stuff on a perfect lazy afternoon. One of the trees I worked on today was the Acer buergerianum in the picture below. This tree is more than 12 years under my care now and during that long time, it was always one of my favourite projects that came along nicely. When I bought the tree, it had just a few little and ugly placed and deformed branches. And a lot of ugly scares from bad wound treatment! So I worked all those years towards better ramification and everything looked very promising until 3 years ago! During that winter, the tree lost 1 important branch and most of it smaller ramification! So its image was destroyed!

But with a lot of love and care, the tree recovered and today again shows a lot of healthy growth! It those needs some more small branches and finer ramification to get to the image I have in mind. But I am already very happy to see that the tree is willing to give me a second chance, it made me smile! I hope you like it?

Cheers,

Hans van Meer.

Info: karamottobonsai@hotmail.com

—————————————————————————————————

A UPDATE ON THE “SWAN”.


Hi, everybody,

27 July 2008

Above picture: The last major work that was done on this old Pine dates back to its first styling in *2004! All this time up to now, the tree was pampered to encourage back budding as close as possible to the trunk line. Well, as you can see, I got more than enough new foliage and buds to give the tree it second major styling in late fall this year! But there were some major decisions to be made right now as well!

In the first styling, 2 back branches were used to build up the lower left front section, so I could visualise and check my vision of the future bonsai. But now, because of all this incredible growth, I have so much more better-placed branches and foliage to replace them with, that they have become unnecessary. In the above picture, where I raise this frond branch, you can see just how much beautiful deadwood was hidden from view!

Above picture: Left side view of the tree, you can see just how much deadwood is blocked from view.

Above picture: Lifting up the heavier frond branch makes a big improvement. You can see the other branch that has to go, on the left of my fingertips.

Above picture: Here you can see the second branch better. It is blocking out all the empty backspace, that you need to see from the front side.

Above picture: Here you can clearly see the difference it makes when I lift it up!


Above picture: This is the thick branch I need to remove first. Under need it, you can see the second one that needs to go.

                            Above picture: Judging were to cut that branch.

Above right: Heavy cutters were used to cut off that branch in one go.

                                Above picture: So, the first one is removed!

                            Above picture: Looks better already from the front.

Above picture: You can see clearly here, that when we now stand in front of the tree, there is almost a clear pathway under need the foliage, for the eye to wander off into the distance.

Above two pictures: Yes, that branch definitely has to go to!

                             Above two pictures: Right and backside view.

                                                 Above picture: Backside view.

Above picture: The yellow dots show how long this branch really is. Because of the constant cutting back into new growth and pinching back that I did in the seasons after it’s first styling, the 3 small branches, just above the red line, have grown enough to now be used as the new branch tips of the future first branch.

                           Above picture: Close up of those 3 small branches.

Above picture: The branch is cut leaving a small stump so that there is enough room for it to dry back naturally, without harming those all important small branches.


                       Above picture: The wounds are sealed with cut paste.

                                  Above pictures show the removed branches.

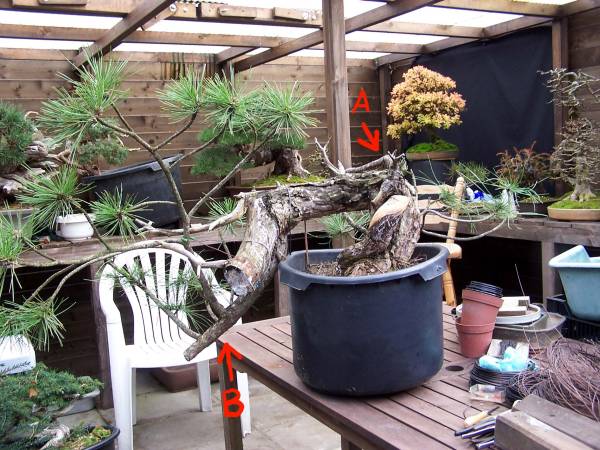
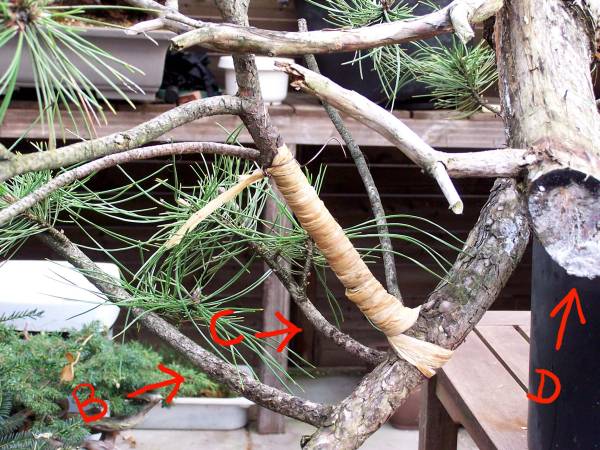
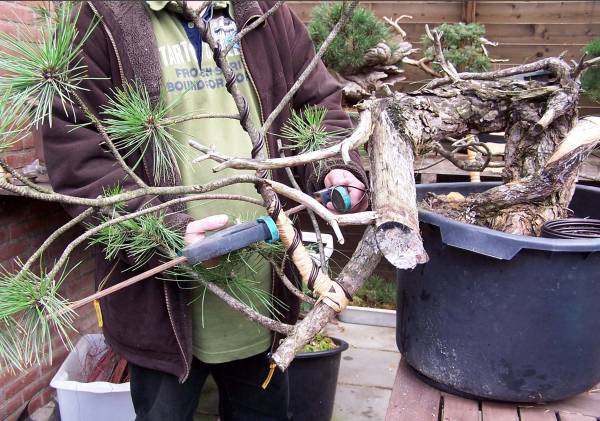
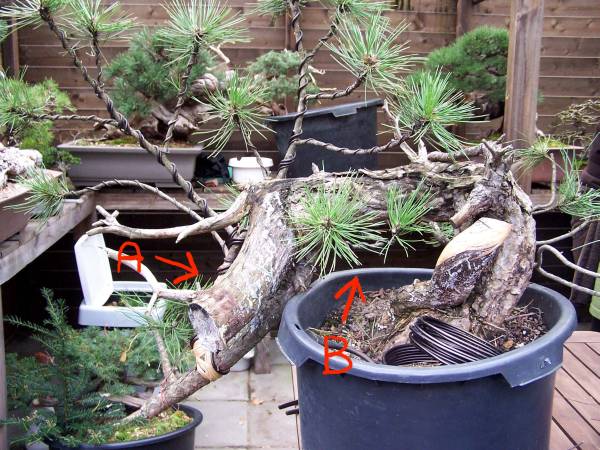
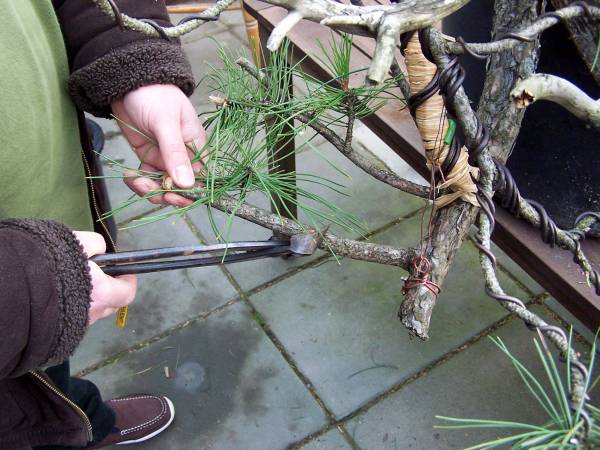
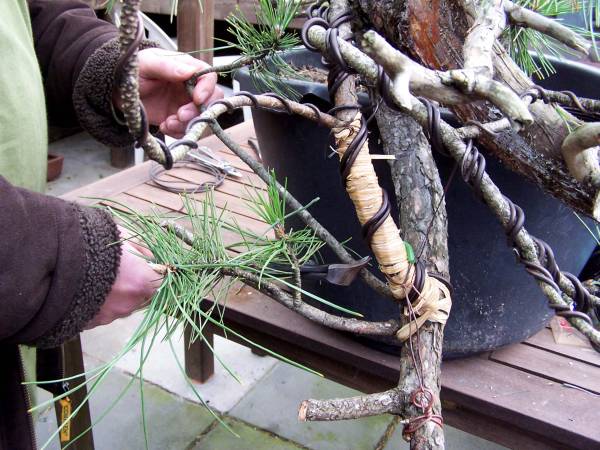
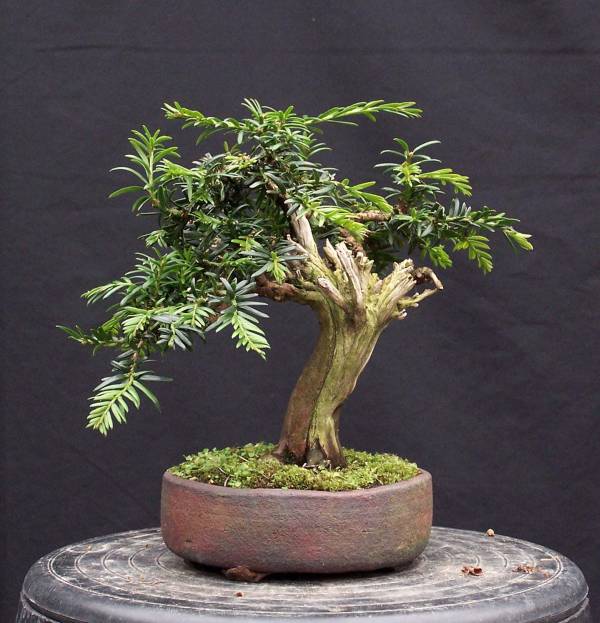
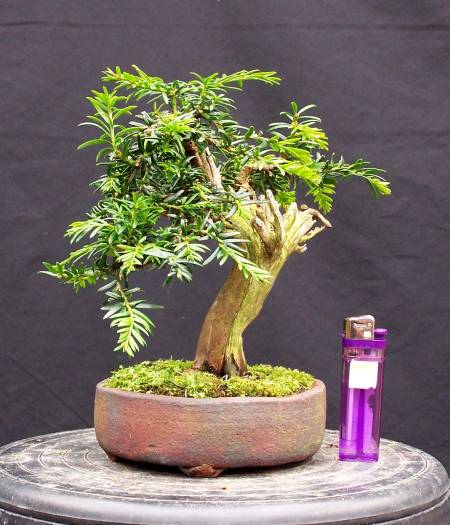
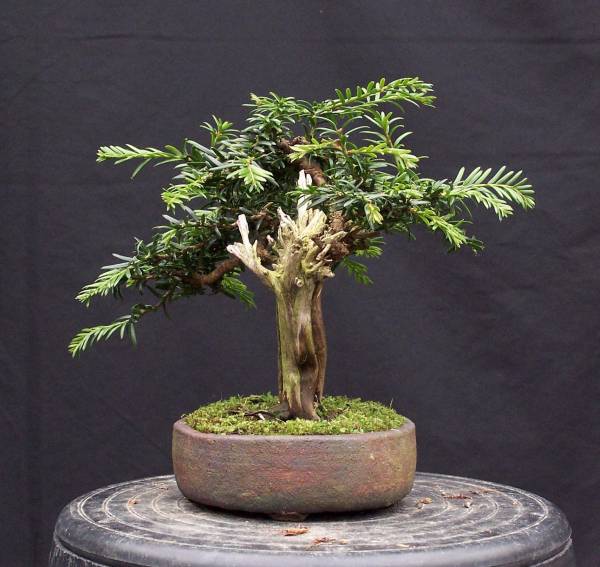
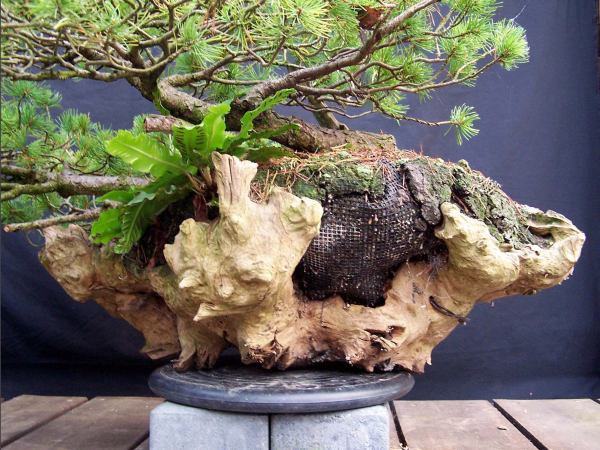
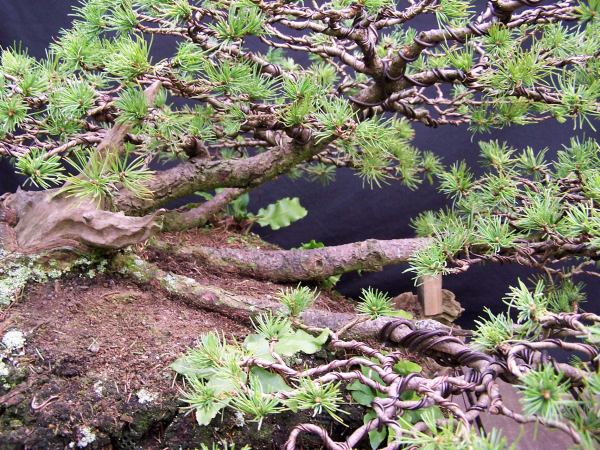
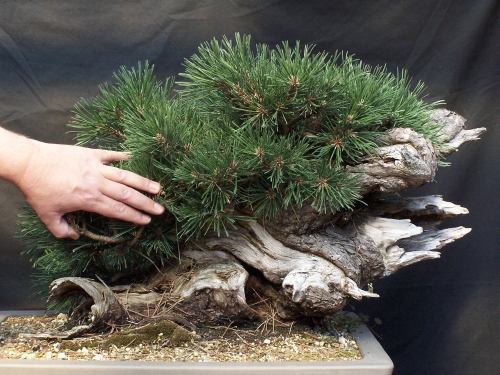
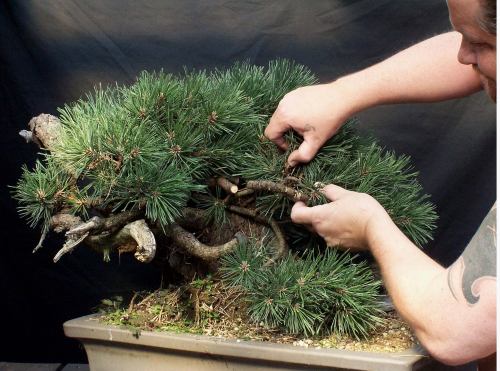
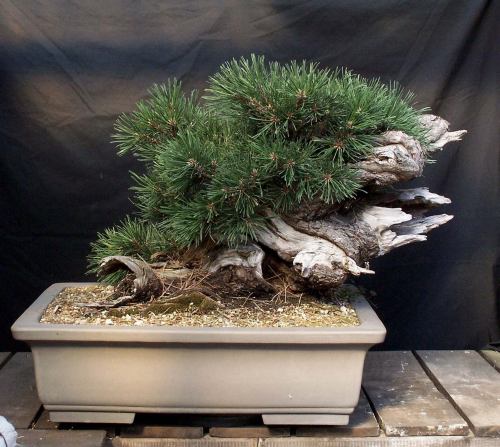
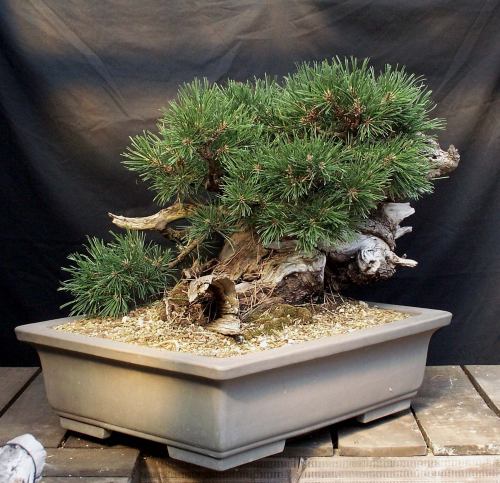
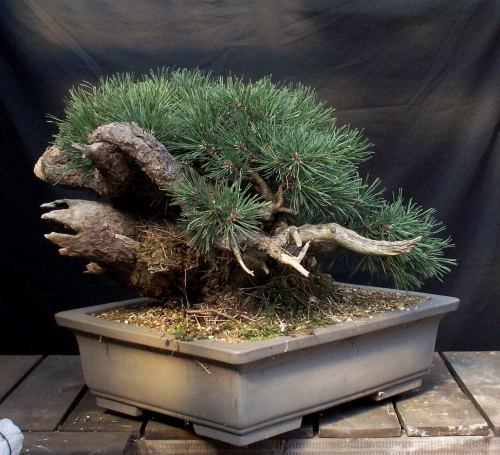
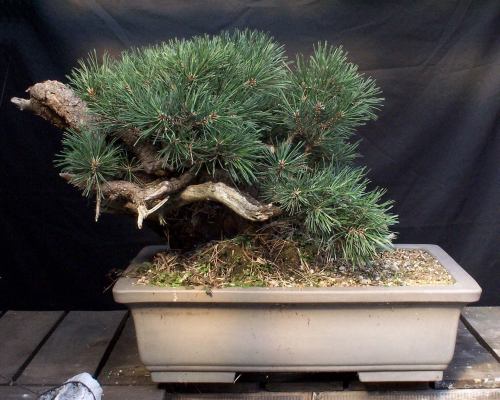
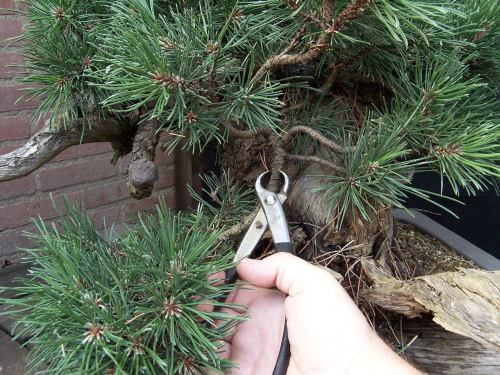
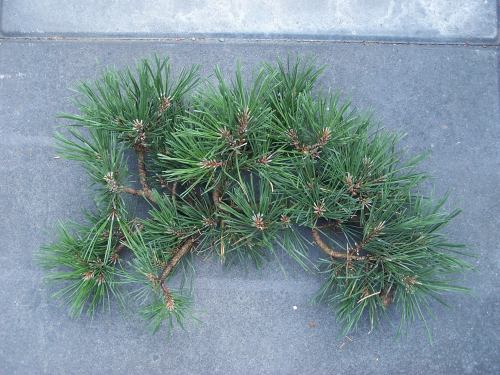
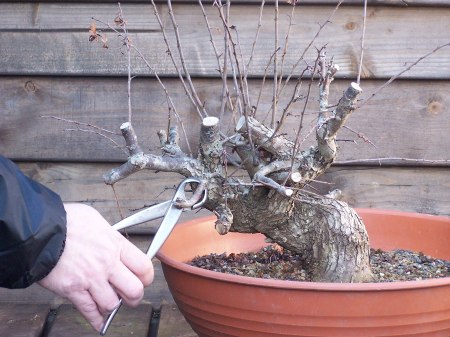
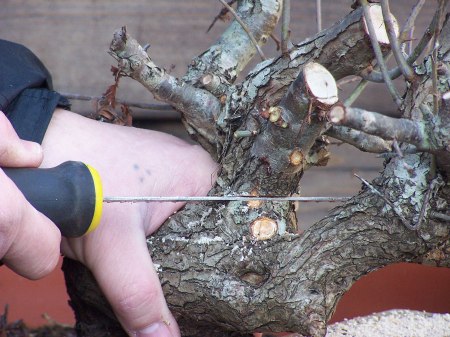
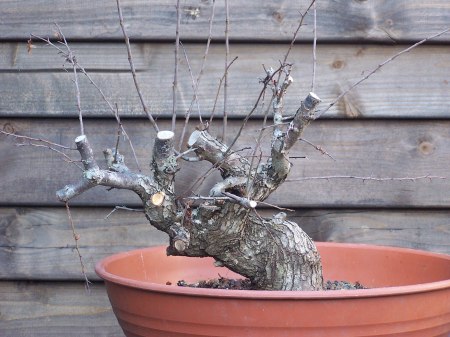
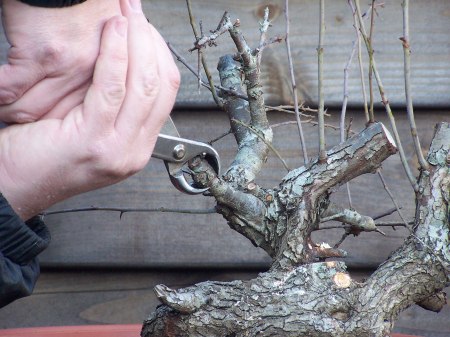
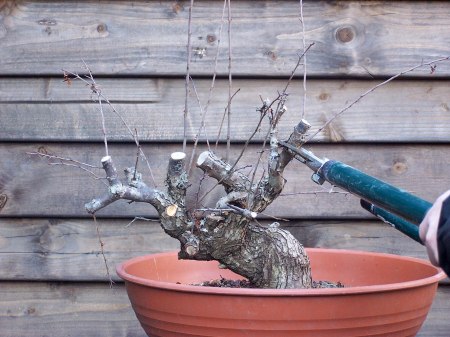
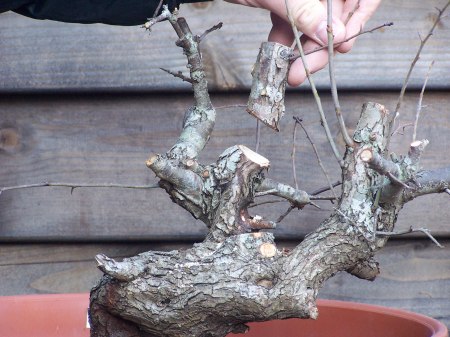
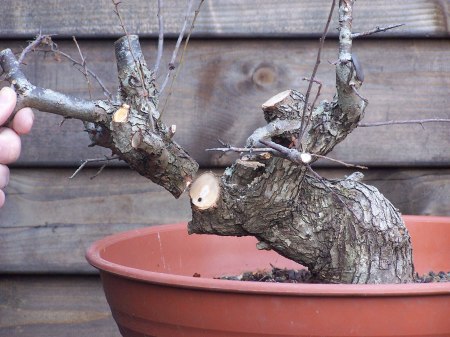
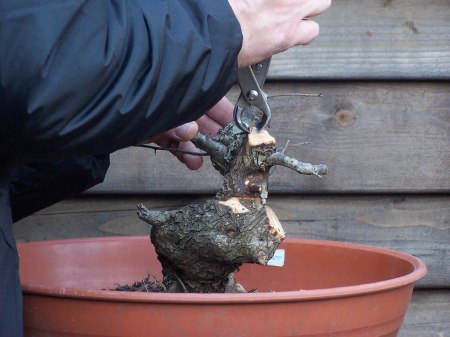
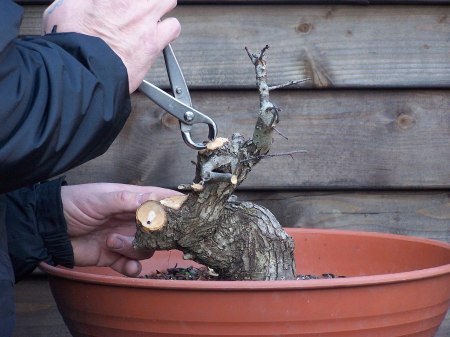
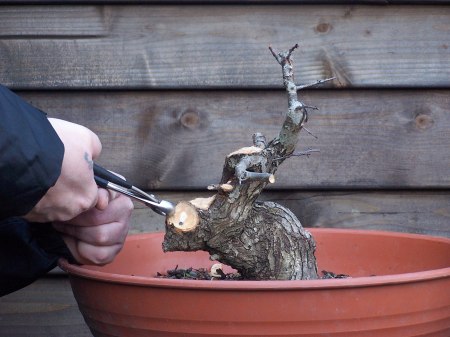
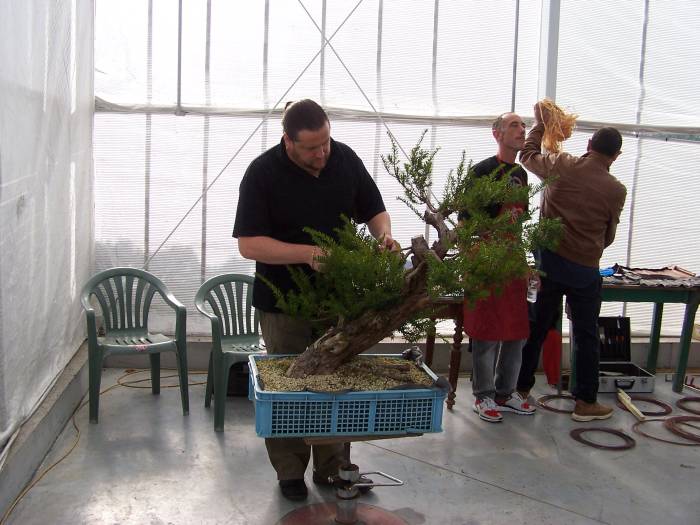
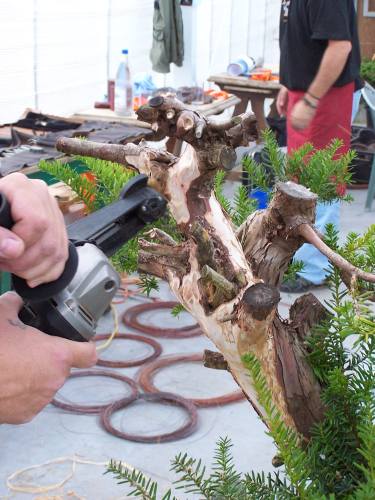
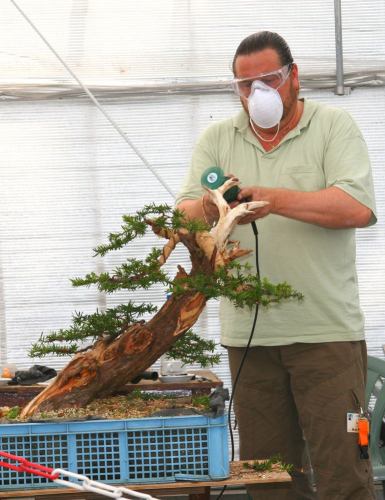
Above pictures show, that by just removing those two branches the beautiful deadwood is more open. The open space that now is created, provides the necessary see trough, that creates dept and open space under need this future first branch.

Above picture: With the help of 2 wooden blocks, some branches were lifted, so that light and air can better reach the inner buds and smaller branches that I need for my second styling.

Above picture: These blocks created new height in the foliage and a new image!

Below picture: So that triggered me, to make a quick drawing of a possible design. Having done this, I realise that the foliage is too high in this new idea and that the tree image should be more compact. So this drawing helped me to decide to stick to the original plan I made when I started to style this tree.

Now the tree is left alone until I will start the second styling in early Winter. I can hardly wait for that time to arrive!

Cheers,

Hans van Meer.

Info: karamottobonsai@hotmail.com

—————————————————————————-

A short “Crataegus” story.


Hi, everybody,

in November 2006, my dear friend Tony Tickle invited me to come to England to do the (now famous) all weekend “BURRS” workshop. I arrived a few days before all that fun would start because Tony would take me and Morten into the beautiful “Wells” mountains for a walk and to try to find some collectable “Crataegus” yamadori. Well, I got very lucky when I discovered a small one with a lot of potential! I have no pictures of the actual collecting of the tree, but this is the view from that same place where the “Hawthorn” of this story was found and without much trouble collected by me.

burrs-uk-2006-033-hans-van-meer.jpg

She grew on a steep mountainside in soil, consisting of almost nothing else than small rocks and gravel, from which I could almost entirely collect her with nothing more than my bare hands (that looked and felt like they had been looking for a pin in a pin stack)! Never the less, she had managed to grow surprisingly good roots, with a lot of small feeder roots growing close the base of the trunk. So I could cut the to larch roots back without causing to much harm to the health of the tree. From experience, I know that next Spring the tree will react to this hard root and branch cut back, with much growth of small feeder roots, that will secure the health of the tree, during this time it is recovering from the stress caused by collecting it and potting it. As soon as the tree was lifted from the ground the bare roots were wrapped in wet sphagnum moss and then put into a plastic bin bag that was tightly wrapped with plastic tape. Early next day at the venue in “BURRS” my good friend Terry Foster helped me to plant the tree in a plastic training pot, making sure that the tree was firmly secured to the bottom with aluminium wires. The Hawthorn stayed in Tony’s care during that winter. He placed the tree in his greenhouse on a heating bed. In February the following year, Tony came, just like me and many others, to the “Noelanders trophy” in Belgium to show his Bonsai and to meet up with all our bonsai friends from all over Europe that come there every year as well. He kindly brought along my Hawthorns I collected and so after the show they finally came home with me to my little garden in Holland. The Hawthorns ( I collected two) were placed in my greenhouse for protection during the rest of that Winter. In Spring I was delighted to see that the trees literally burst out with new buds all over. I removed all the buds that were unnecessary for my design from the trunk, simply by rubbing them off with my fingers. Leaving unwanted buds to grow will take the strength away from other more important buds and will leave unwanted scares in your trunk. The tree was allowed to grow freely the next growing season, in a semi-shaded place in my garden. In the next picture from August that year, you can see that she was doing really well and I knew then that I could safely give it here first styling at the end of the winter before the buds start swelling.

1-augustus-076-hans-van-meer.jpg

    And this is how the tree looked in February 2008 before the work started.

februari-2008-127-hans-van-meer.jpg

OK, before I start to work: have a look at the next two pictures of the front and back of the tree and try to discover the future  design I discovered in this little “Hawthorn”

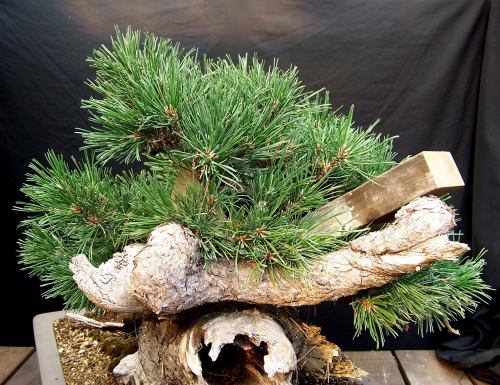
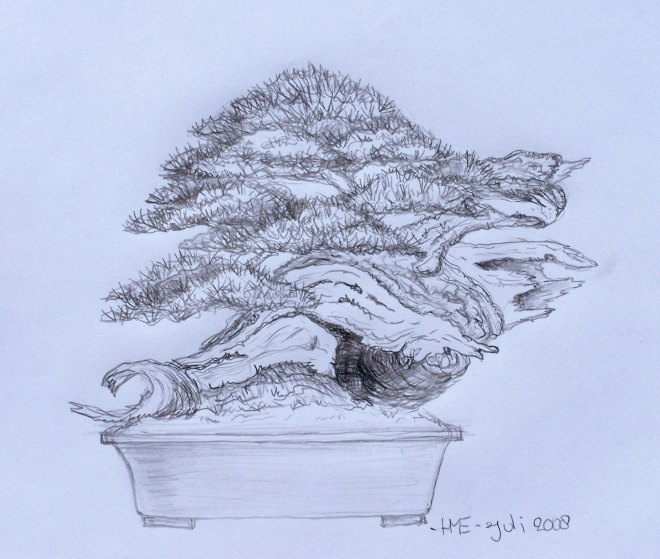
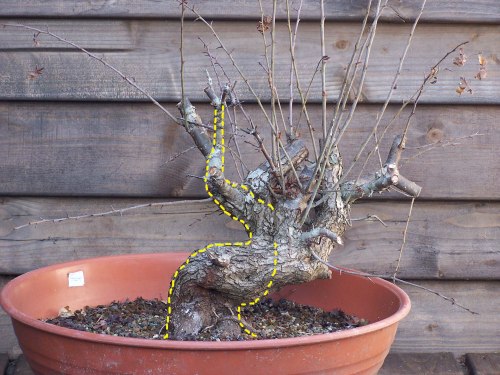
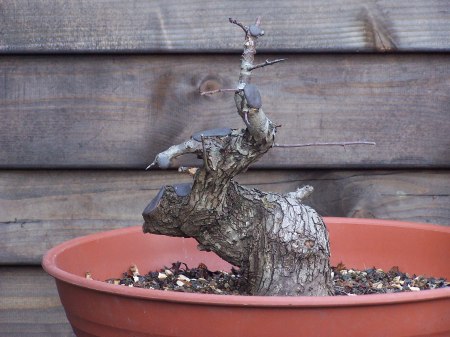
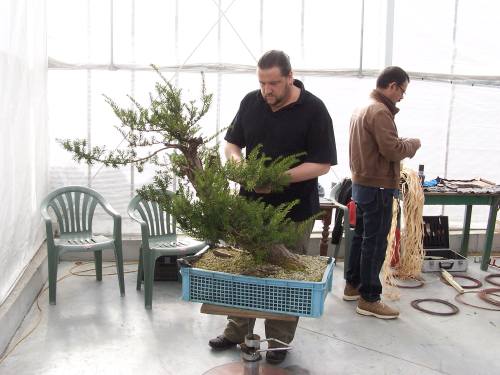
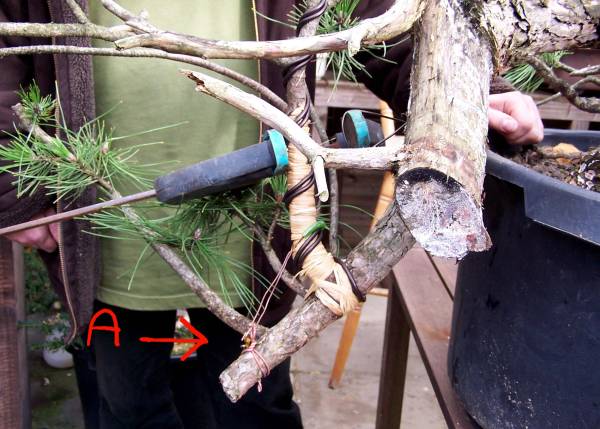
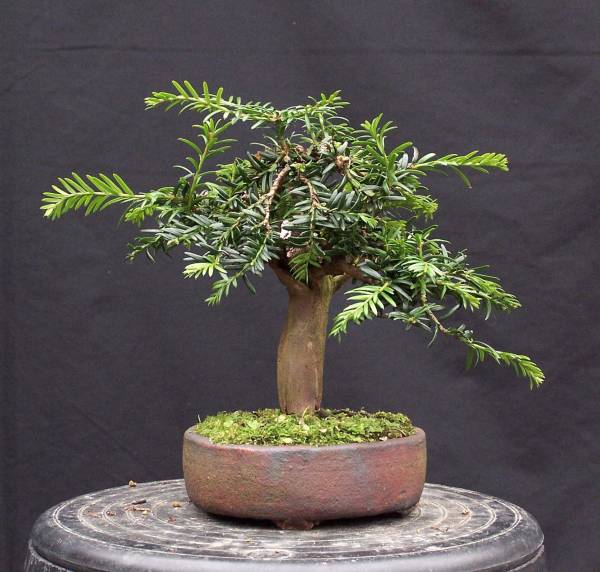
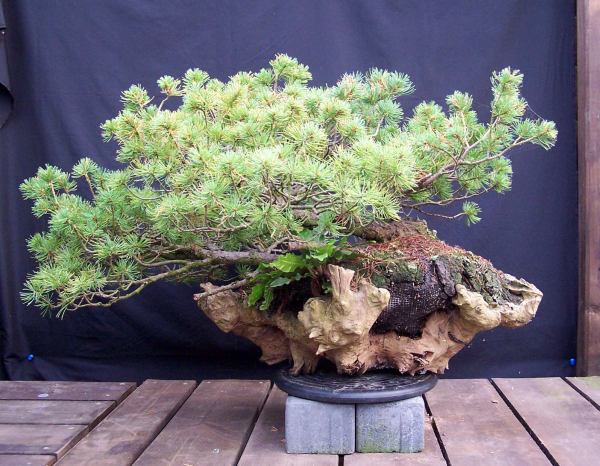
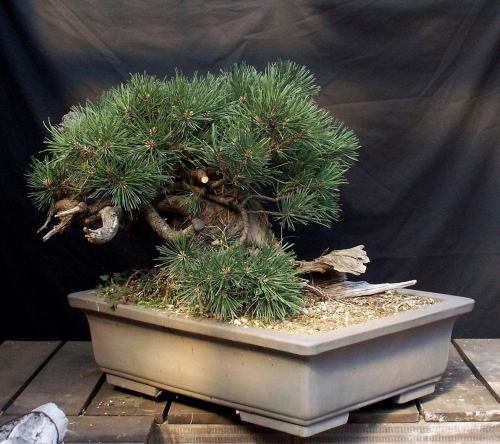
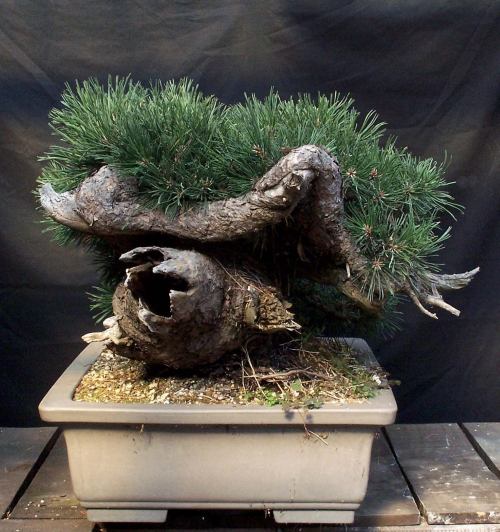
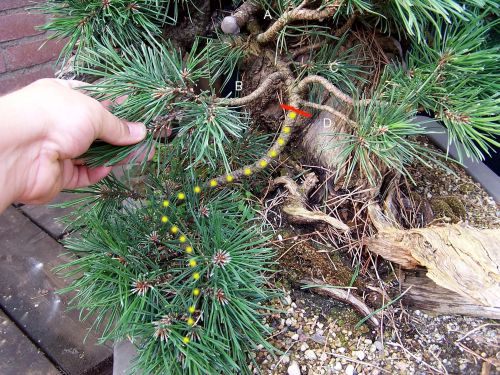
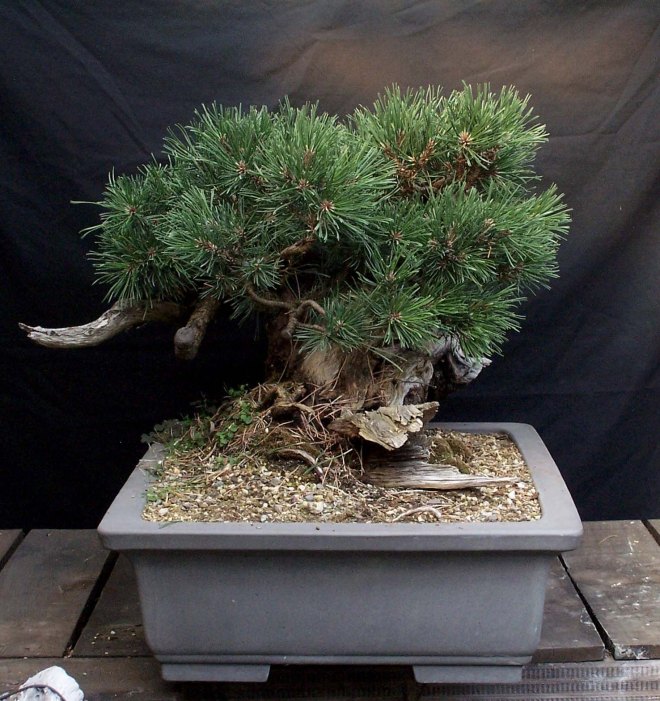
                                Have you found it? This is what I have in mind:

To reach this ideal profile or frame, I had to do some major branch cutting! Always trying to leave as little wounds as possible, where there was no room for some deadwood/Shari on the trunk.  

As you can see in the pictures below, the yellow cuts were not much of a problem to do, but the red cut was a bit harder to reach with cutters or normal saw!  


First, all the excess branches were cut off, so I could get a  good firm hold on the tree, while I was sawing away, without pricking myself a thousand times! Then, with the help of a very sharp small bladed woodcutters knife, that is used by foresters, I was able to remove the thick branch in one go.

 Then one by one and bit by bit all the other useless branches were cut back.

A  large branch cutter, like  I use here, is a priceless tool for this kind of work! It makes a clean cut in one go, without placing to much sideways force on the tree and roots, like a saw or power tool does. No matter how good you think you hold the tree in place!

Slowly, with every cut, the new shape of this tree is revealed! All wounds are worked over with concave cutters to promote better wound healing. So that in a few years,  the tree is left with large, but natural looking scares, that can be seen on every Hawthorn here on the coastline.

After all the wounds were cut back sufficiently, they were sealed with cut paste. The large wound on the left of the tree (middle picture) is cut back to about 2,5 cm/1 inch of the truck. In the future, this stump will be worked into a small Jin + Shari or maybe only a   Shari? But this work is left for the future! Because doing it now and then leaving such a large open scare, right on the trunk line, could cause die back in the trunk! Every large wound that is left exposed to the elements; will dry/die back,    interrupting the sap flow between roots and branches! Which could kill your branches and roots or even your whole tree! Because I left the bark on this little stump, it will stay alive for a long time, preventing the possibility of trunk die/dry back!  The tree will probably even throw out a bunch of strong shouts along the rim of the wound, the tree’s own bandage! A sign the tree’s sap stream is pumping along the wound. Only after the tree has shown these signs of full recovery, will I start to take that stump away, bit by bit.

Below: Now only the top needs to be shortened right above the second right                              small branch leaving some room for the die/dry back! 

februari-2008-352-hans-van-meer.jpg

For now, I’m really pleased with the outcome of this little Hawthorn, I love it’s movement and bark texture. I am really looking forward, to next season to see where all the buds will appear! If I’m lucky they will grow just about where I need them.  And if not….who cares? Together, we will think of something.

I hope you liked what I did so far? And I will keep you all posted on this little tree’s progress.

Regards,

Hans van Meer.

Info: karamottobonsai@hotmail.com

—————————————————————————————————–

MY DEMO AT THE LAST “GINKGO AWARD” 2007.

Hi, everybody,

I can clearly remember the day that Danny User asked me to demonstrate at his 2007 “Ginkgo award”! He called me (which he never those) at work and asked if I had something to do in September of next year? And if not, would I like to demonstrate at his next and last “Ginkgo awards”? He knocked me right off my feed and I accepted with a full-hearted YES!!! The “Ginkgo award” holds a special place in my heart and to demonstrate there is and was a dream come true for me, so I could not be any happier!

Two days before the event I drove to Danny and Ingrid Bonsai Centre “Ginkgo” in Belgium to bring in my 4 bonsai that were selected for the show, and to find a suitable tree for me to demonstrate on among the literary many hundreds of raw materials that you can find there. After I brought my Bonsai to where they were photographed for the commemorative “best Bonsai in Europe” book, I headed outside to look among the many hundreds of trees to find an inspiring tree. But even with this many choices, finding a tree among the many that Danny has in his enormous place is not as easy as it might seem! I searched for the right tree as if I was buying it for my own collection. The tree had to appeal to my taste in Bonsai and tickle my imagination at the same time. My demonstration trees always reflect where I’m at that moment in Bonsai and it must always end up looking the same as when I had styled it in my own garden as a future Bonsai for my private collection! A big part of my Bonsai collection today, still consists of my former demo trees. After a long search, I ended up with two possible candidates! Both Yamadori “Yews” are from Japan. One with a lot of fantastic deadwood to work on with heavy machines, but almost now foliage to work with. And one with a lot of problems to solve, but enough foliage to work with. They both had a good possibility to demonstrate and to become a good pre-Bonsai that reflected my approach, taste and style. Because working on the first tree mend, I had to be doing wood carving for most of the two-day demonstration, making a lot of noise with my power tools, and bothering the other demonstrators and the stand workers that were all in the same big greenhouse with me! So I chose the second tree, it was more challenging for me anyway, with a lot more nice Yamadori problems to solve or incorporate into the design that I envisioned when I first looked at this lovely tree. The tree gave me lots of good Bonsai vibes!

                                 Picture 1: shows the chosen front of the tree.

                    Picture 2: shows me when I just discovered my demo tree.

 Picture 3: shows the very hot demonstration airier. Some big names with on the far right, U can just see  William “Bill” Valavanis from the USA, next to him Udu Fisher from Germany, next to him Sandro Signeri from Italy and I’m the one on the left and I’m from Holland.

 Picture 4,5,6: The start of my demo, Here I am cleaning and plucking the branches to prepare them for wiring.

Picture 7: here you can see me removing the too-long and too-highly-placed top branches. Leaving some stumps that might be useful later, when I start working on the deadwood design!

Picture 8: Here I am looking where the all-important live lines of the tree are running. I do this with a small sharp chisel, peeling away the bark until I reach the live parts. In this case that was quite difficult to determent, because of the little difference in colour between the life and the dead part. So needless to say: I had to be very careful.

Picture 9: After I was really sure where it was safe to work, I could start working freely, without any fear for the health of the tree in the back of my mind. All I just had to do, was stay between the lines! I worked with both power tools and hand tools to first remove all the rotted wood and other unwanted parts. Then I just started to free flow, taking bits away, discovering a point of interest or beauty, a Little creating or revealing. But always working very carefully, following the grain of the wood. Gradually I worked towards the point where smaller bits were necessary on my power tool, to create, or reveal more detail in the deadwood. It is advisable to always wear Eye protection and always use a mask! The dust from working on a Yew with power tools is irritating to your eyes and can give you bad chest pain and cough for days! BELIEVE ME!!! I know what I’m talking about! (ugh ugh) :).

Picture 10, 11,12: My good old friend William van Vlaandre (inventor of the “SAMURAI” power tool bit), gave me one of his specially made power tools, loaded with his biggest “Samurai”, to use on the bigger parts of deadwood at the top of the tree. And it went like a warm knife through butter! Amazing you could make a small canoe out of a big tree in half an hour with this monster! Even the otherwise almost unworkable fresh and therefore wet wood, was no problem! It left a smooth surface! And with some care it was even possible to create more subtle details as well, it worked great! Only both my arms would disagree with these statements, they looked like I had been carrying 3 hedgehogs on fire! LOL! 😬😊

                            Picture 13: More detailed carving on the top “JIN”.

                                  Picture 14: View of the demonstrating area.

Picture 15: The three top branches that would make up the whole top part of the tree, we’re way too thick to be bent with just wire! So they first had to be protected with tight applied layers of in water-soaked Raffia. Then 4 strings of copper wire were placed lengthwise along the part of the branch that needed to be bent. Then another layer of wet Raffia was applied and then some more normal wiring with thick copper wire on top of that layer. Now I was sure that I could bend the branches with minimal risk of harming the tree. It would only need great force!

Picture 16, 17, 18: Now I could safely start, to gradually bend the very tough branches into their desired positions. Taking my time, piece by piece, until I could secure them with the help of some thin copper wire attached to a couple of Jins and one small screw.

Picture 19: After a wild long night playing snooker (pool) with my Bonsai friends and only 4 hours of sleep, I started with the detail wiring of the tree. Trying to keep in pace with the marching band in my head!🥴

Picture 20: Finally the real fun part of styling a tree hat arrived. When I am bringing all the branches into position, I am totally in the zone, I love it, it is magical to almost paint with foliage until I feel it looks good. Trying to create something I like and find beautiful in Bonsai, within the boundaries of what each tree has to offer to me, is always a wonderful experience. To do it on this stage with this valuable material Danny entrusted me with, made it even more elevating and meaningful to me!

Picture 21: Close-up of the basic first deadwood on the back part of the tree and the branches.

Picture 19, 20: Some last detail works on the deadwood using a very hard plastic brush, that left a grain-like texture on the still soft fresh part on the top.

Picture 21: YES! I finished and was drained, but happy with the result and the beer that was waiting on the other side of the camera!

Picture 22: The final result. I hope you liked this little demo story and the final image of this pre-bonsai? It was, as I said before, a great honour to do! Especially because this was the last “Ginkgo award”! It was a very happy and a bit melancholic experience!

gingko_040-hans-van-meer-klein.jpg

                               My “Ginkgo Award 2007” demonstration tree.

                                A “Taxus cuspidata   Yamadori from Japan.

Cheers,

Hans van Meer.

Info: karamottobonsai@hotmail.com

———————————————————————————————-