TODAY I FINALY DARED TO REPOT MY PRECIUS JUNIPERUS COMMUNIS.

Hi, everybody,

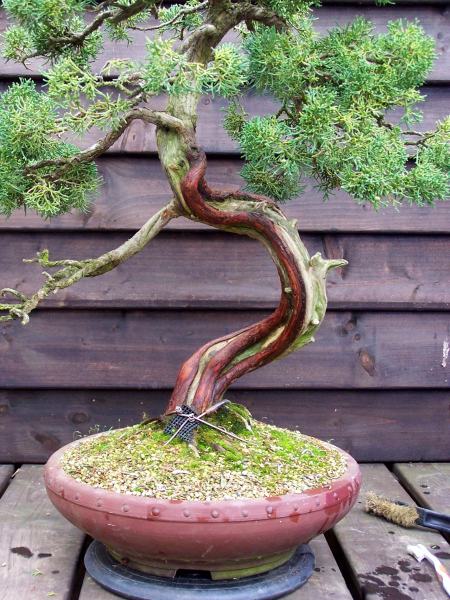
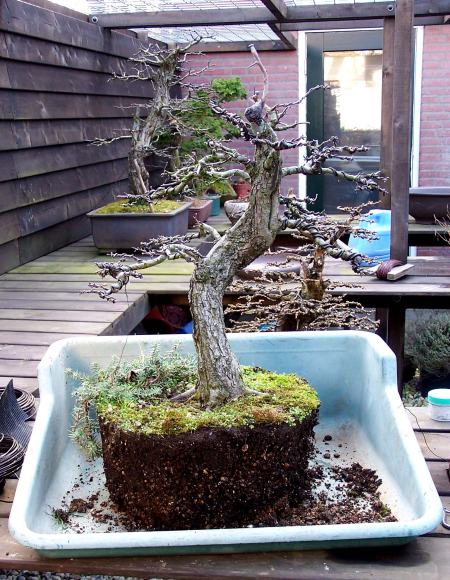
today I finally dared to repot one of my favourite trees. It is a Juniperus communis I collected in the Austrian Alps in. This tree has such great potential, but I decided to wait to work on it until I was fully convinced there would be enough new roots to support the tree safely through the stress of repotting it! This species is hard to keep alive after collecting and I was so glad that it had recovered so well after I brought it down from its mountain to my garden. In 1995, after I was convinced the tree was doing fine, I brought it along to the U.K to give it it’s first styling session during my demo’s at the “JOY OF BONSAI” show in “Bath”. After that, I allowed the tree again to recover from it all!

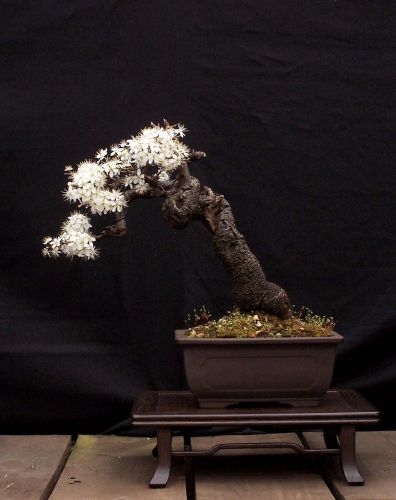
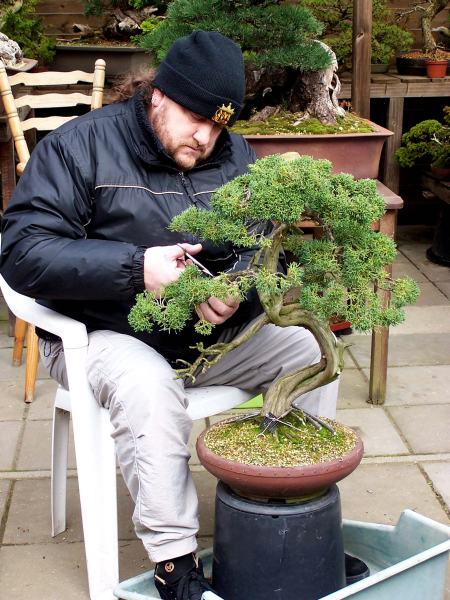
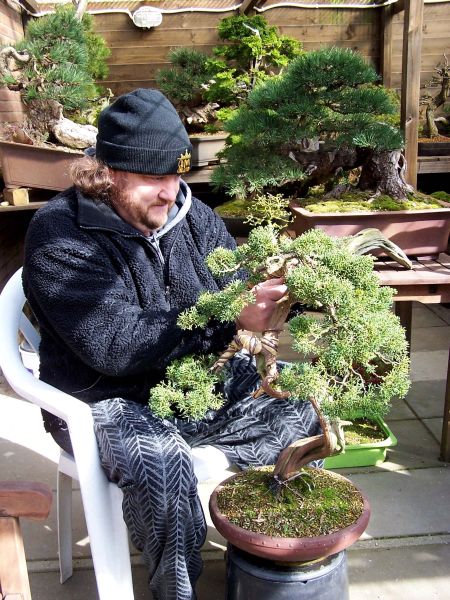
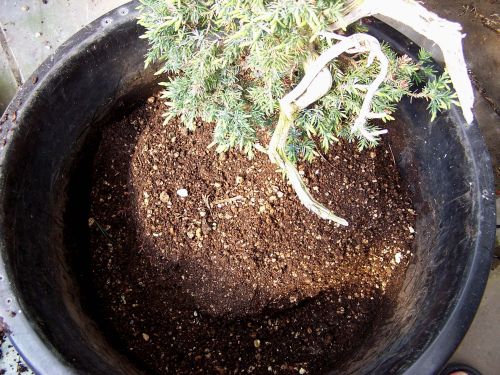
Picture 1: So today, finally it is time to have a look at the condition of the roots! Because I still can’t lift anything by my self, I had to work on the floor where the tree was standing.

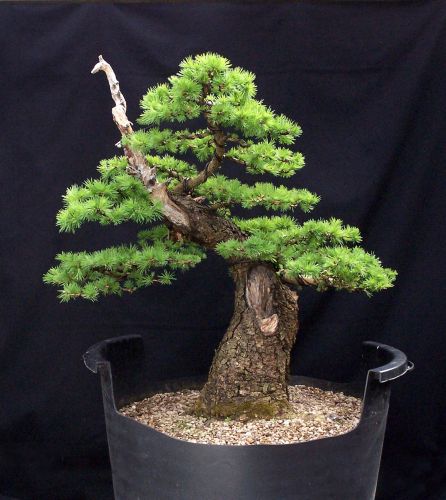
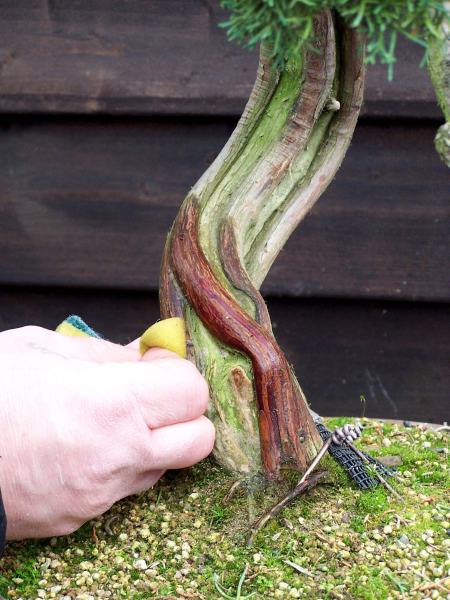
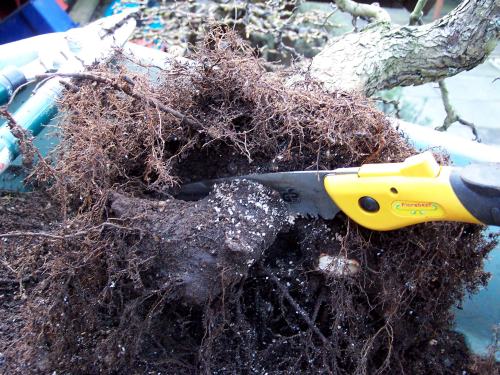
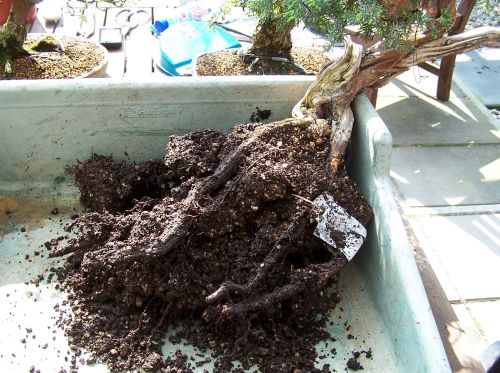
Picture2: First I carefully removed the soil around the outside of the plastic container, slowly working my way inwards and downward, until I uncovered some healthy roots. Just like how I prefer to collect a yamadori in nature. In this way, the root ball would stay more or less intact and I would be able to lift the much lighter tree from the ground into it, for now,  new container.

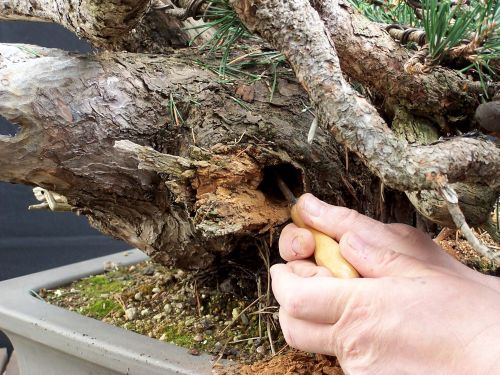
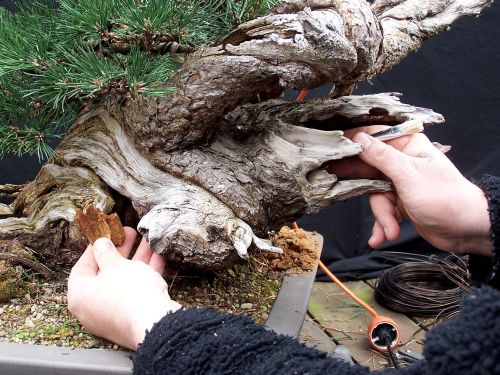
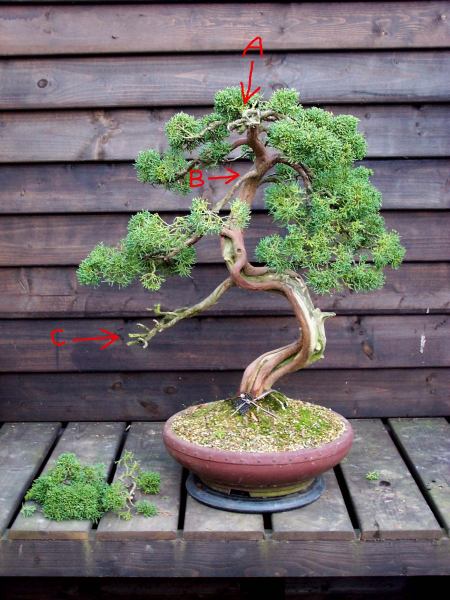
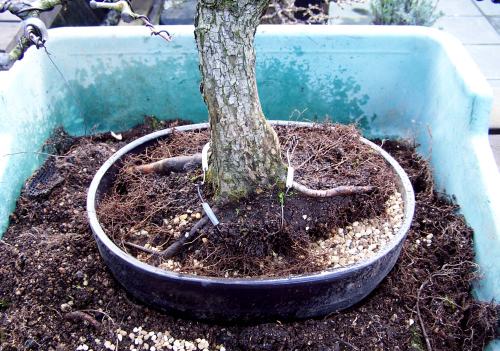
Picture3: The long roots that I left on when I collected it, were rotted away at the ends, so I could remove them now, without harming the health of the tree. There were new roots growing closer to the base of the tree now, so I would be able to plant the tree into a smaller pot!

15-4-2009-m-001-web

15-4-2009-m-012-web  15-4-2009-m-013-web

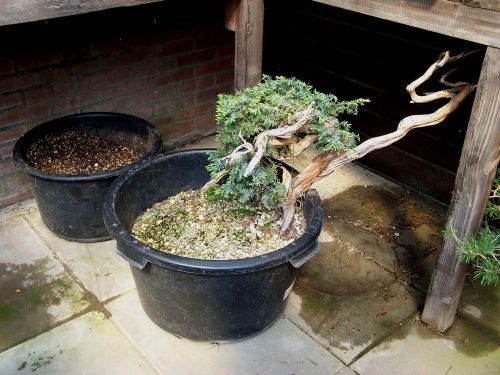
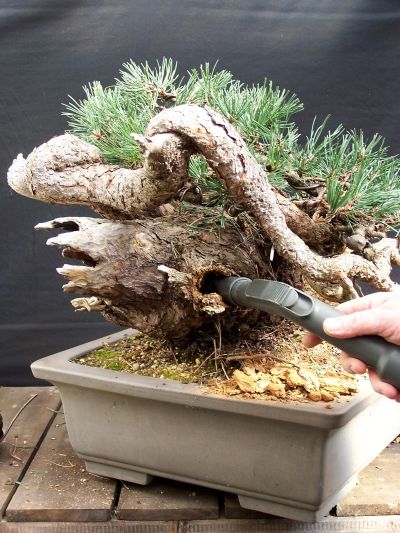
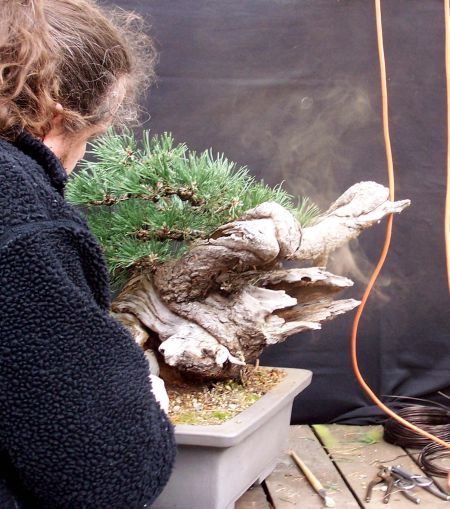
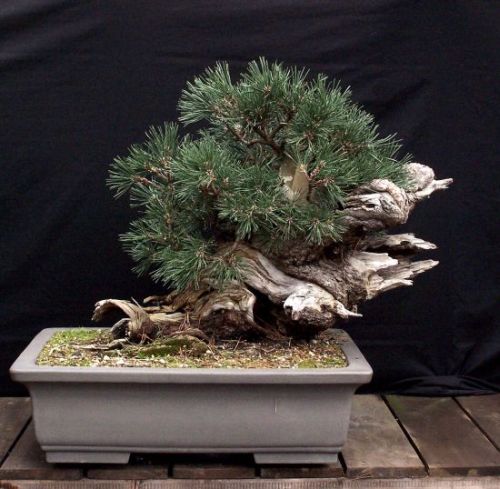
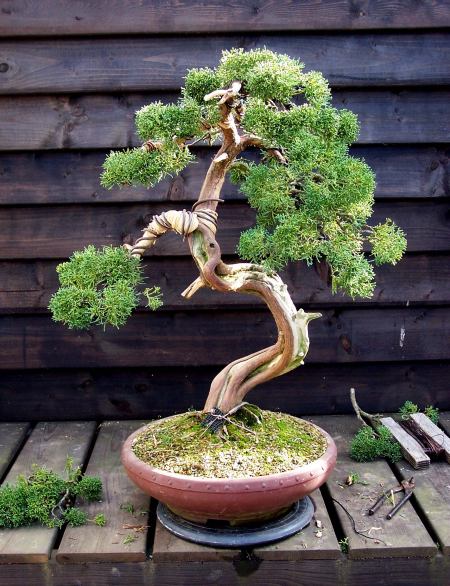
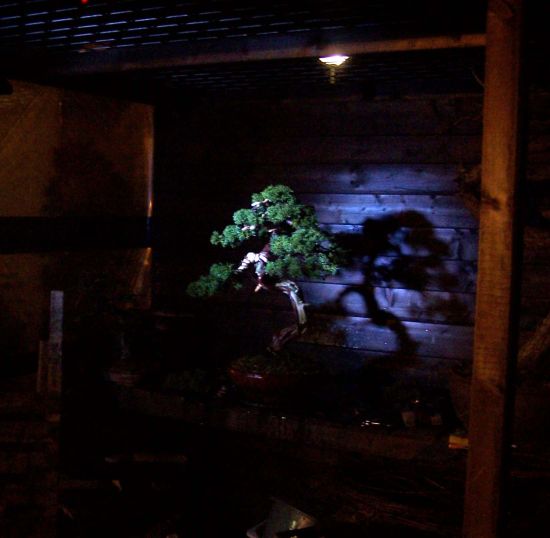
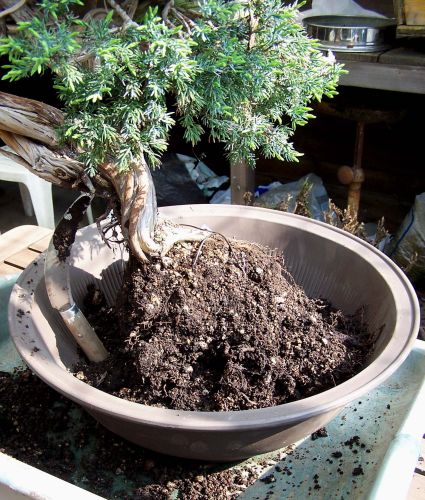
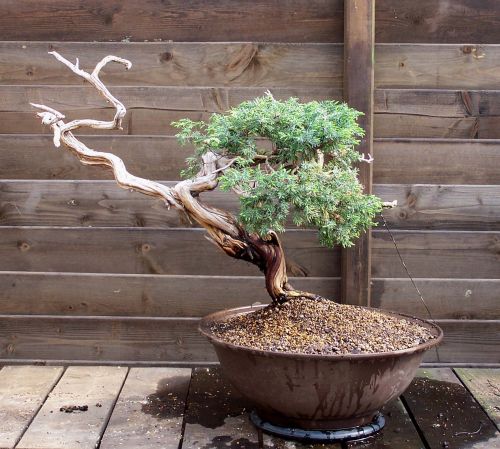
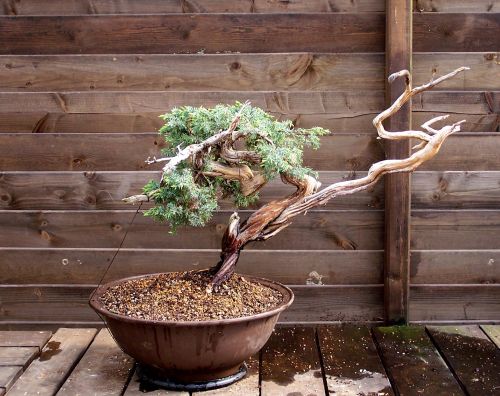
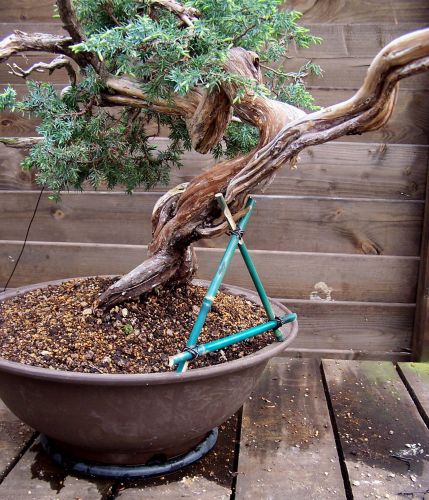
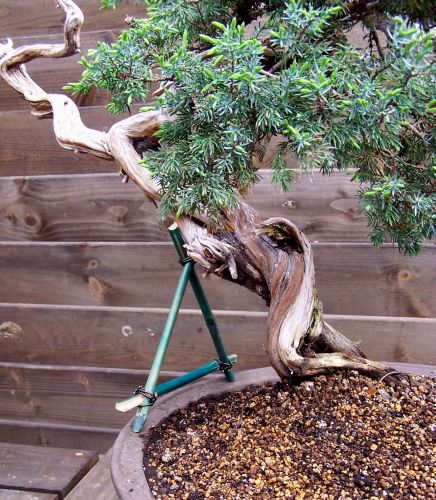
Picture 4 and 5: Here you can see the tree in his new home. It is a too large pot, but for now, it will just be fine, I need the tree to recover first!

15-4-2009-m-015-web    15-4-2009-m-019-web

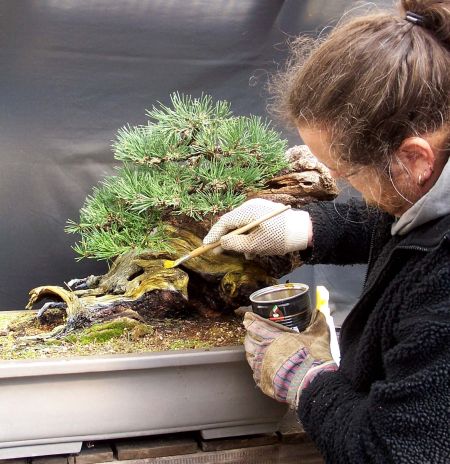
Picture 6: Because the tree was doing fine in its previous soil mixture, the new pot is filed up with the same soil it was growing in before!

15-4-2009-m-020-web

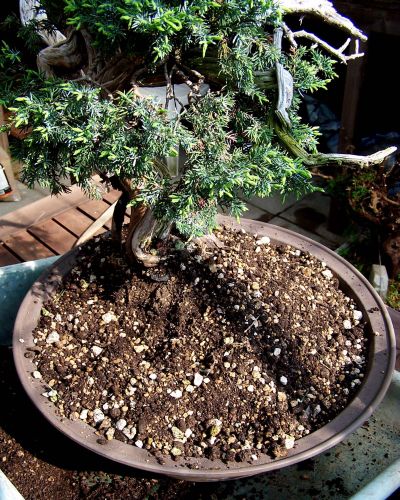
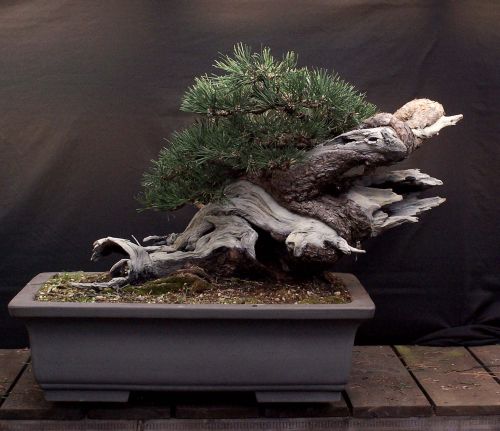
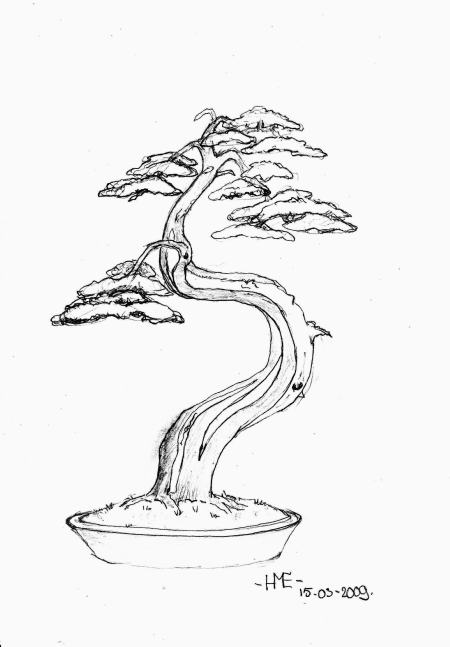
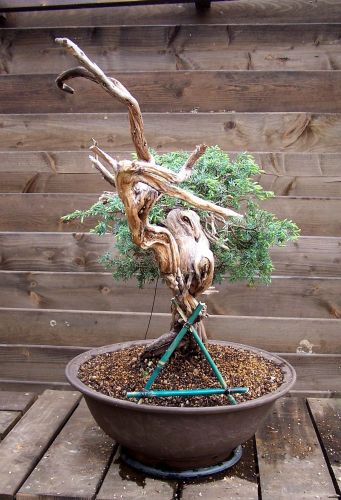
Picture 7 and 8: The tree in its new home. This is the first tree I have, that really has 2 good fronts! 🙂

15-4-2009-m-022-web

15-4-2009-m-027-web

15-4-2009-m-031-web   15-4-2009-m-035-web

15-4-2009-m-034-web

More to come!

Hans van Meer.

Info: karamottobonsai@hotmail.com

———————————————————————————————–

A PICTURE OF MY SMALL BLACKTHORN IN FULL BLOOM.

Hi, everybody,

here is a picture of a small Blackthorn from my collection. It is a Yamadori from the U.K that was given to me, a few years ago, by my dear friend Terry Foster. The upper half of this trunk is fully twisted around with a Shari running along it. And there is some Jin hidden amongst all those sweat smelling flowers! Next year I will find a more suitable pot for it!

Blackthorn "Prunis spinosa".
Blackthorn “Prunus spinosa”.

Hope you like it?

Cheers,

Hans van Meer.

Info: karamottobonsai@hotmail.com

——————————————————————————————–

A PICTURE OF “XL”.

Hi, everybody,

today was a lovely Sunny day, so I decided to make a  picture of the “XL”, so I could show you how it looks at this moment with its bright green coloured new foliage. It needs a lot more branch ramification, but the basic shape is there already.

I hope you like the progress of this tree?

Cheers,

Hans van Meer.

13-4-2009-xl-026-web

                                   Info: karamottobonsai@hotmail.com

——————————————————————————————–

WASTE NOT, WANT NOT! (PART II)

Hi, everybody,

Today I had a good Bonsai day, In the afternoon I had a Pine workshop at my old Bonsai club “Randstad”. Where I met up with some of my old and new Bonsai students to have a Sunday of great Bonsai fun and camaraderie. But my morning before all this was well spent as well! From an old wooden bar stool, my father had given to me some 30 years ago, I made a hard needed turning table, to hold my “EXTRA LARCH” in higher and therefore more workable position for me! WOW! … long sentence! 🙂 First I sawed off the back support and then, 2 sawed out wooden circles, 5 wheels and 1 long thick bolt and 4 nuts and cheap later..I ended up with a very useful and cheap work table. As you can see in the second picture: Now I am finally able to see the tree from the proper height, and boy, that makes all the difference! Because I could not lift this tree anymore, I had to work on it, while it was standing to low for comfort. My viewpoint was when I was styling it, the last time, from way too low! And now, finally seeing the tree from this proper height, I realise a lot need to be adjusted during the next styling. But, that is for next year! This year I will enjoy this tree as it is! And that is no punishment! 🙂

I was just finished before my student and old Bonsai friend, Michael De Ruiter, came to pick me up and bring me to the workshop. As planned, he kindly helped me to lift the “XL” onto its new home. Next season he will be repotted into a more suitable pot and than he can stand on the benches with his other friends. But now he is simply too heavy! 🙂 This old bar stool from my father sits just fine and I should know! Believe me! 🙂

                            Simple, but effective! I hope! :)
                                        Simple, but effective! I hope! 🙂

That fits nicely, now I can make some decent pictures in the next couple of days.

Regards,

Hans van Meer.

Info: karamottobonsai@hotmail.com

————————————————————————————————–

GROMING THE “SWAN” MY OLD MUGO PINE YAMADORI.

Hi, everybody,

here are some pictures of the deadwood work I did this afternoon. This work was mostly aimed at removing as much rotted wood from the inside of the tree. And then treating the deadwood with lime sulphur. Enjoy the pictures!

29-3-2009-085-web-hans-van-meer

29-3-2009-091-web-hans-van-meer

29-3-2009-103-web-hans-van-meer

                                 Like sucking the eye out off a moose! Hi-hi!

29-3-2009-113-web-hans-van-meer

          Poking from the right entrance and removing from the middle one!

29-3-2009-137-web-hans-van-meer

A very intimate view of the cave-like inside of the “SWAN”.  Preventing this fragile section from further decay will be my main worry in the future. As long as I can control that, the tree will outlive me by fare! 🙂

29-3-2009-156-web-hans-van-meer

When I was cleaning the inside from the hole in the middle front, the wood dust disappeared from the right side exhaust pipe, like a genie from his lamp!

29-3-2009-172-web-hans-van-meer

Although it is with pain in my heart, I do have to protect this deadwood every now and then In the future, to keep things under control. And after I had tasted, the lime sulphur I am applying here, multiple times on the deadwood of this pine, I discovered that this terrible pearly white deadwood will lose it’s unnatural glow very quickly. And I also have some Trix up my sleeve to hurry that proses a little bit more.

29-3-2009-240-web-hans-van-meer

                            Happy… happy happy! Happy….. happy happy! 🙂

Hans van Meer.

Info: karamottobonsai@hotmail.com

————————————————————————————–

—————————————————————————————————


IT TOOK ME A WILE, BUT HERE IS THE NEW “SWAN”.

Hi, everybody,

it might have taken me the better part of 2 days, but today I finished the styling of the foliage on “THE SWAN”.  The tree was placed just too high for me, to comfortably wire it and I am not able to lift a big tree like this anymore, with the state my back is in at this moment. I might only just start working on Shohin in the future. NOT! 🙂 I had to make some big decisions and a lot of branches had to be removed and replaced by the branches I had allowed to grow especially for this purpose. Just how this all was done, you can read on my website in a few days! Together with the story of the first styling of “THE SWAN”!

24-3-2009-001-web2

28-3-2008-063-web1

Well, here she is, the new “SWAN”! I am really pleased with the result so far, it is going a lot faster than I had hoped for. The whole tree has so much character and a nice flow to it, the vibrant green foliage leaning on and embracing the massive hollow trunk, with all it’s deadwood, clinging on to live on this weather battered fallen over high mountain pine. It is almost a living JING/JANG symbol I am really Hope you like it so far?

More deadwood work will follow tomorrow!

Cheers,

Hans van Meer.

Info: karamottobonsai@hotmail.com

————————————————————————————–

THOSE WERE THE DAYS! OLD PICTURES OF MY CELTIS SINENSIS NAMED “THE LION CRUSHER” (SIGH).

Hi, everybody,

I came across this picture from 1994. It is me repotting (alone) my huge Celtis chinensis. This tree "THE LION CRUSHER" was once a proud part of my growing collection those days. I loved this tree, because it was, a tree! You felt dwarfed, when you looked at it from close by. It gave me the feeling that I use to feel when I was a little child, playing under need a big tree in the forest. But I had to let it go to warmer places, it was struggling to much in my cold climate! Showing this difficult species at the "Ginkgo Award" was a highlight for me and the tree. I still miss the feel off this real tree!
I came across this picture from 1994. It is me repotting (alone) my hudge Celtis Chinensis. This tree “THE LION CRUSHER” was once a proud part of my growing collection those days. I loved this tree, because it was, a tree! You felt dwarfed when you looked at it from close by. It gave me the feeling that I use to feel when I was a little child, playing under need a big tree in the forest. But after 6 years, I had to let it go to warmer places (Frans), it was struggling too much in my cold climate! Being able to show this difficult species at the “Ginkgo Award” was a highlight for me and the tree. I still miss the feel of this real tree in my small garden!
Here is a other one. Can you tell why this tree is named "THE LION CRUSHER" ? Yes or no? Look harder!
Here is another one. Can you tell why this tree is named       “THE LION CRUSHER”? Yes or no? Look harder!

Regards,

Hans van Meer.

Info: karamottobonsai@hotmail.com

—————————————————————————-

WORKING ON MY JUNIPER!

Hi, everybody,

today I started working on one of my older trees. It is a Juniperus Chinensis import, that I bought in 1996, at “Crespy Bonsai” in Milan Italy. It is one off the few import trees I have ever bought. This tree has always been a problem child for me, one day everything was just great and the next day it just turned weak. Then I let it recover again into good health, did some mild styling or careful repotting,…and weak again. So now I am trying to style this tree again, back into a Bonsai. I hope that it doesn’t mind it to match this time.

16-3-2009-007-web

                          Above picture: The Juniper before my work began.

16-3-2009-004-web  16-3-2009-020-web

Above pictures: First all the old wire was removed. Then the live parts were cleaned with water, brushes and dish wash sponges with steel wool on one side. I stopped cleaning, as soon as I reached the red colour I was after, making real sure not to harm the sap flow of the tree! 

16-3-2009-025-web  juniperus-web1

Above pictures: You can appreciate the difference when you look at this picture of the tree after it is cleaned. Then just before dinner time, I made a quick drawing of the idea I have in mind for this Juniper. Now I only can hope for a sunny day tomorrow, so I can work on this tree again!

Next day, start cutting! A: The old top was to heavy and leaned to much forward for the design I have in mind. So it was removed, leaving some branch stumps to convert into Jin. B: this to long and thin branch is a eyesore for a long time, so it has to go! C: This long and straight Jin is totally out of place and only distracts, so it has to go!
Next day, start cutting! A: The old top was too heavy and leaned too much forward for the design I have in mind. So it was removed, leaving some branch stumps to convert into Jin. B: This too long and thin branch is an eyesore for a long time, so it has to go! C: This long and straight Jin is totally out of place and only distracts, so it has to go!

16-3-2009-049-web1  16-3-2009-053-web

Above pictures: This is the life! 🙂  The long Jin is shortened, the top is Jined, the two left branches are already carefully brought into place and there is a new top. Now some more basic wiring (only larger branches) and than I can bring everything into position!

Well, as you can see in this picture, I worked until late in the night and I must say the tree is getting along nicely! Tomorrow I only have some wiring and positioning on the two back branches to do and than I will tread the deadwood with lime sulfur to protect and whitening it again. And than the work work is don for this time. I will love this tree until it is nauseous, this growing season! And hope it will stay strong this time!I will post the pictures of the finished work tomorrow!
Well, as you can see in this picture, I worked until late in the night and I must say the tree is getting along nicely! Tomorrow I only have some wiring and positioning on the two back branches to do and then I will tread the deadwood with lime sulphur to protect and whitening it again. And then the work is done for this time. I will love this tree until it is nauseous, this growing season! And hopefully, it will stay strong this time!I will post the pictures of the finished work tomorrow!
18-3-2009: Today I finished the tree, for now that is. It was a wonderful sunny day and live was pretty good to me! I cleaned all the deadwood and than treated it with lime sulfur. The last wiring was don and than all the branches were brought into place. There was hardly any small wiring on this tree, only the larger branches were wired. I wanted to protect the growth I have on the tree as much as possible. I am pretty pleased with the result so far, only the strait and boring top section of the trunk is still a eyesore to me! But this will be solved mostly in the future, as soon as the tree tells me it is still doing fine, I will start to make a Shari on that part. This will connect, story and theme wise, the top of the tree to the bottom part. But this is for the later. When the foliage has grown some more, the top left branch will be brought more in front of that section as well! The first left branch is weak and I might decide to remove it if it those not get more vigorous this season. I calculated that possibility into this design. This tree needs a lot more work and growth, but it is on it's way to becoming a Bonsai again! I hope you like it this fare?
18-3-2009: Today I finished the tree, for now, that is. It was a wonderful sunny day and life was pretty good to me! I cleaned all the deadwood and then treated it with lime sulphur. The last wiring was don and then all the branches were brought into place. There was hardly any small wiring on this tree, only the larger branches were wired. I wanted to protect the growth I have on the tree as much as possible. I am pretty pleased with the result so far, only the straight and the boring top section of the trunk is still an eyesore to me! But this will be solved mostly in the future, as soon as the tree tells me it is still doing fine, I will start to make a Shari on that part. This will connect, story and theme wise, the top of the tree to the bottom part. But this is for the later. When the foliage has grown some more, the top left branch will be brought more in front of that section as well! The first left branch is weak and I might decide to remove it if it those not gets more vigorous this season. I calculated that possibility into this design. This tree needs a lot more work and growth, but it is on it’s way to becoming a Bonsai again! I hope you like it this fare?

 Cheers,

Hans van Meer.

Info: karamottobonsai@hotmail.com

————————————————————————————–

WASTE NOT, WANT NOT!

Hi, everybody,

please have a guess: what is the link between the trees in the below pictures? 🙂

16-3-2009-034-web

Did you have a guess? The former top off this Dutch "Hawthorn" Yamadori was, after it was cut off 2 years ago, planted in a pot (top left picture). It showed some tiny growth, that later that season mostly died back. But this year the sign of new live are there again! The roots that were cut off 3 year ago, of that same "hawthorn", were planted in a pot (left picture) and as you see it is doing fine as well. Will make a nice forest (Clump style) some day! As you can see "Wast not, want not" is a good motto. Hans van Meer.
Did you have a guess? The former top off this Dutch “Hawthorn” Yamadori was, after it was cut off 2 years ago, planted in a pot (top left picture). It showed some tiny growth, that later that season mostly died back. But this year the sign of new life is there again! The roots that were cut off 3 years ago, of that same “Hawthorn”, were planted in a pot (left picture) and as you see it is doing fine as well. Will make a nice forest (Clump style) someday! As you can see “Wast not, want not” is a good motto. Hans van Meer.

SOME MORE “HAWTHORN” WORK!

Hi, everybody,

This is a other Dutch "Hawthorn" Yamadori I collected near the coast line, close to were I live. I collected it because it had a nice root base and a nice gentle curve in the lower part of the trunk. So I had to cut down the tree considerably to get to the, more or less, correct height in comparison to the thickness and style of the tree. There was not one single branch left on the tree, when I was finished. Even my wife tooled me, I over did it this time! NOT! HIHI! Next season I had plenty long shoots to select my future branches and top from. I wired the branches in there new position and made a new top, in such a way that there would be more taper, in a way the new top would compliment the large wound that was left after the trunk chop! This wound was connected with the natural Shari that runs down the right top side of the tree. This new top grew so hard that it became to strong, long and thick, so last year I cut off the new top, just above a strong side shoot. I than raised this shoot with wire and created a new top with it. I hollowed out the wound I was left with extra deep, only leaving a ring of bark with cambium. This wall of bark is cut on the NORTH and the SOUTH with a V cut! Now you can fold the 2 bark flab's together. With a scalpel I will cut away just enough, so they will fit as best as possible! Than the complete wound was covered with sealing paste and than a piece of plastic was used to hold the two part firmly into place. I have tried this technique many times before and it those not always work as good on all species. But what can I lose? I would have been left with a large scare any way! But it works? I would be left with a natural looking smaller wound! But that is for the future! First some wiring and than repotting this tree.
This is a other Dutch “Hawthorn” Yamadori I collected near the North Sea coast line, close to were I live. I collected it because it had a nice root base and a nice gentle curve in the lower part of the trunk. I had to cut down the tree considerably to get to the, more or less, correct height in comparison to the thickness and style of the tree. When I was finished, there was not one single branch left on the tree, . Even my wife told me, I over did it this time! NOT! HIHI! Next season I had plenty long shoots to select my future branches and top from. I wired the branches in there new position and made a new top, in such a way that there would be more taper, in a way the new top would compliment the large wound that was left after the trunk chop! This top wound was connected with the natural Shari that runs down the right top side of the tree. This new top grew so hard that it became to strong, long and thick! So last year I cut off the new top, just above a strong side shoot. This top was planted in a pot and lived, so their is a other nice Shohin saved from the dustbin! 🙂 I than raised the top shoot with wire and created a new top with it. I hollowed out the wound I was left with extra deep, only leaving a ring of bark with cambium. This wall of bark is cut on the NORTH and the SOUTH or EAST AND WEST with a V cut! Now you can fold the 2 bark flab’s together. With a scalpel I will cut away just enough, so they will fit as best as possible together! Than the complete wound was covered with sealing paste and than a piece of plastic was used to hold the two part firmly into place. I have tried this technique, successfully, many times before, but it those not always work as good on all species. But what can I lose? I would have been left with a large scare any way! But if it works? I will be left with a natural looking smaller wound! But that is for the future! First some wiring and than repotting this tree.

11-3-2009-064-web  11-3-2009-066-web

Above pictures: As you can see in the left picture, the tree has filed his former pot with long roots, so it was saved to repot it now and do some drastic root pruning. In the right picture, you can make out the part off the tap root that I left on for safety when I collected it. These backup roots feed the tree, so it can recover from collecting and grow new feeder roots.

11-3-2009-075-web  11-3-2009-081-web

Above pictures: As you can see in the left picture, the tree has made plenty of new roots above this backup root. So it is safe to remove it with a saw! In the right picture, you can see that the tree fits nicely in its new temporary plastic pot. It is firmly secured and now it will be filled with a mixture of Akadama, Kiryu and Bims. These coastal Dutch’s Hawthorns, originally grow in almost pure sand, so I like there mixture to drain extra well!

11-3-2009-087-web

Above picture: The tree in its temporary plastic pot. I am very pleased with the roots and I think it is possible to plant the tree in a more fitting pot, it’s next repotting! The tree needs a lot more branch growth and structure and overall work. But I do think,  looking at the basic as it is now, the tree looks promising to create a nice bonsai from! Time will tell! 🙂

Later,

Hans van Meer.

Info: karamottobonsai@hotmail.com

———————————————————————————–