
Hi, everybody,
on 16 Dec. last year, after a week with freezing cold weather followed by a couple of day’s with heavy rain, we had some dry weather so I was finally able to work on the deadwood sections of XL! First, the excess off dirt and algae was removed with water and an old soft toothbrush. A hard copper or metal brush would be quicker for this job, but cannot be used on the soft deadwood off this larch, because it would remove the natural bleached very thin silvery white top layer of its deadwood! I only carefully removed the dirt from places where I did not need shadows, but I left it in places like natural cracks and hollows so that they would still stick out in all that silvery white deadwood! When this was don I left the deadwood for a day so that the cleaned deadwood could get dry again. Then with the help of a small brush, I started to apply a thin layer of water diluted Lime Sulfur to most of the deadwood, but I tried to avoid the places were I wanted darker tones and shadows! The next day I saw that the bulk of the deadwood was now bleach just enough, so now I could focus on applying some more heavily bleached highlights. This was don with some stronger Lime Sulfur that I softly stamped on with a short haired brush. There was hardly any Lime Sulfur on that brush so the bleaching effect would be open and scattered so that the darker layers under need could still shine through in some places! A day later the same was done, but now even fewer places were treated with stronger Lime Sulfur. So now the deadwood has an overall greyish white colour with some brighter highlight in tactical places and all the places that lie deeper in the surface are still darker coloured in various tones, making it all look natural! XL is now placed in it’s winter shelter were he will be closely observed until the upcoming show. I have to make sure that branches stay in their desired position, that the moss stays fresh and I have to mist the thin copper wire that I used with water every now and than so that it will rust and get it’s desired dark brown color, instead of the shinning copper color it still has now! When this thin copper wire is bend to apply it around the branches, the dark (rusted) top layer will break off and disappear into the air, leaving the surface of the wire all shinning and looking new, and I don’t want that! This airborne copper dust can irritate eyes and dry out exposed skin, so be careful! My hands, face and lips are always dry after using copper wire and that is very annoying!
Friday 4-1-2013.
I just became another year older, 52 now and 25 Kilo’s lighter, a new year and a fresh start to become a happier person and to pursue my old dreams again! 😉
It was wonderful weather so I decided to take a long walk along the sea dyke that protects our coastline close to my home. Walking on this highly elevated dyke gives you a wonderful view of the sea and the many different birds that seek protection and shelter on it. It is also a great place to find many varieties off mosses that grow on the black boulders that were used to build the inclining dyke. These mosses grow directly on those rocks, without any soil, so they are very thin, ideally for the use as ground covering on my Bonsai! Collecting the moss was not as easy as it sounds, because of the steep inclination and the slippery surface of those rocks, but I managed to get enough to replace the weathered mosses and to add some mosses with yellow and orange
coloured long seed pots for more detail!
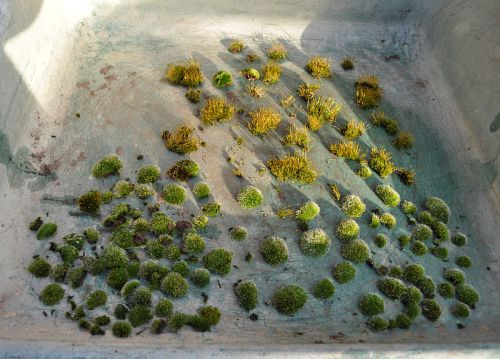
Below: The different mosses ready to put on, the top ones with the seed pots are the ones that I will use to bring more detail to the surface and depth to the whole image.
Below: The soil surface before I started. All off this moss was planted 2 years ago so that by now it is really attached and grown over and in between the open soil structure and looks really natural and not as if it is placed just before the show.

Below: After the new mosses were added. The green arrow shows what I meant by adding depth to the image and variety in the structure and colour of the soil surface.

I did not use much of that silvery ball like pieces of moss, they are different in colour and too symmetrical and round shaped and therefore looked out off place and unnatural. I think that like this the soil surface looks old and natural so I am happy with it!
Below: This is how the deadwood looks now after cleaning and carefully bleaching it in several layers of different strength Lime sulphur.

Just two more weeks until the Noelanders Trophy in Belgium, I can’t wait to show XL there and to meet all my friend from around Europe again! ![]()
Cheers,
Hans van Meer.
Info: karamottobonsai@hotmail.com
