
Hi, everybody,
today I would like to share with you the Air Layering or Marcot that I performed yesterday on one of the mine Prunes mahaleb Yamadoris.
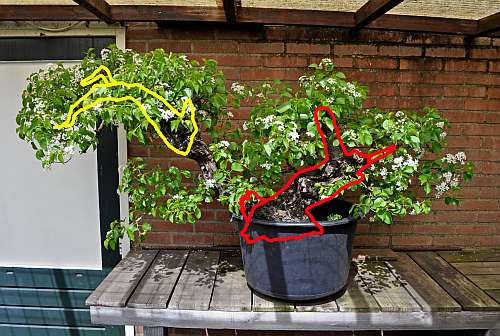
Remember this picture? This is the Prunus mahaleb that is about to be air layered. The left (yellow) section needs to be separated from the right (red) section! This beautiful left section, full of age-old death wood, goes to my dear friend Tony Tickle (UK) and the right trunk/tree section stays with me in Holland…if all goes well that is?!
 Before I start a little explanation about the different layers that make up a trunk and branch.
Just look at the quick drawing I made to explain. The bark on the outside of the tree protects the living cambium layer that lies under need it. This cambium layer produces the growth rings adding each season new layers of phloem and xylem to the tree. The cambium layer is a very thin living layer that produces phloem towards the outside where it eventually becomes bark and xylem towards the inside where it becomes sapwood. This all-important cambium layer is responsible for the growth of stems and, important for the technique that I am going to use, the roots! The phloem transports all the food and hormones that are produced by the leaves downwards to the roots. The xylem is basically vascular tissue that carries the water and other dissolved nutrients all the way up to the leaves.
So now we know this, how does those air layering work?! Where new roots have wanted a strip of bark is removed with the help of a sharp knife or in my case a small iron saw! After the strip of bark with the phloem is removed with the help of a sharp chisel (this was very easy on this Prunus) the thin layer of cambium is scrapped off with a sharp and clean knife! This is very important to do because if the cambium layer is left intact the tree or branch will not be fooled because the flow is not disrupted and most likely will not produce new roots if only the bark and phloem are removed! A sticky paste is made by adding the rooting hormone to water and that is then applied generously around the edge of the wound (on the side closest to the top of the branch or trunk). Then a thick layer of moist (but not soaking wet) sphagnum moss is applied all around the wound. This all is packed in with a piece of transparent plastic that works as a water barrier and allows the sunlight to come through. Holes can easily be made at the top of this plastic if watering the sphagnum moss is later necessary! When enough roots have grown from the wound, this depends on the species and the vigour of the parent tree, the trunk or stem is removed carefully with a saw from the mother tree and is then planted in a training pot. So now we know how to let us see what I did with this old Prunus yamadori?!

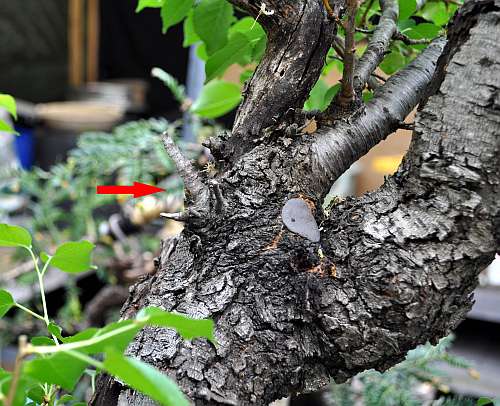
The red arrow shows the point where the air layering needs to be made. This is a thick and old side branch that grows from the lower left side of this massive trunk. This long branch or almost trunk is full of old deadwood and although it those not fit into the design that I have planned for this tree, it would be a shame and almost criminal not to try to save it to become a future Bonsai of its own!!

This is more or less where the air layering will be made! This is the widest part of this trunk and therefore will be the best future root base of the new tree when it is separated! This site consists mostly of deadwood and the 2,5 Inch live fain grows mostly on the other side!

A look at the future air layering from the other side of the trunk. The red arrow points at two branches that need to be removed because they are in the way and because they don’t have a future growing near the future new root base!

With a concave cutter, they are cut flush with the trunk line and sealed with cut paste. I don’t want any change of infections that close to the new roots!
The wound is properly treated and sealed with cut paste! The red arrow points at a Jin that is also in the way of the future marcot and therefore also needs to be removed! Here you can clearly see that this section of the trunk is the widest and there for the logical choice!
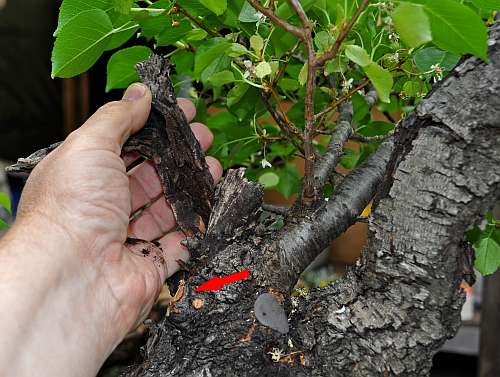
Red arrow points at the Jin that is just removed. The old Jin just above it proved to be almost completely rotten and broke off easily when I checked it with my hand! A little stump that still was hard is left for Tony to decide if he wants to use in the future when this trunk is separated and starts its new life in his garden in the UK…if all goes well that is?!

Here that rotted old Jin is removed up to where the hardwood started! The branch growing to the right side of it is left as an engine for the new roots that hopefully will grow below it! It is again up to Tony what to do with this branch in the future?!

A closer look from the other side. That jin stump could be interesting in the future and that branch that is left can be left and used in a design or be transformed into a Jin as well in the future?!

With the use of a wire, the angle of the air layering is checked from both sides until I was satisfied! Red arrow: Then with the help of a thick black marker two lines were drawn, one next to the wire and the other one about 2 Inches further down the trunk.

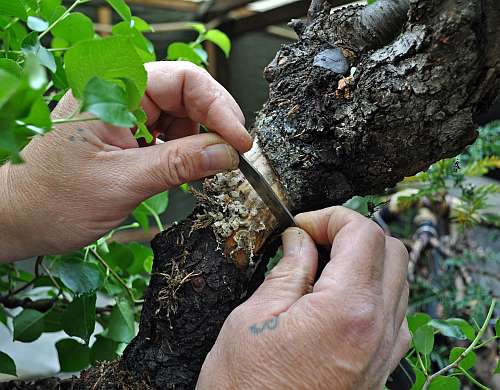
With the help of a small iron saw, I carefully sawed through the bark! using this saw was an experiment because in the past I had struggled to make a clean cut when I used a sharp knife and I was right…it worked like a charm! Straight lines and a clean cut without the chance of cutting off a finger or damaging the bark! Red arrow points at the bottom cut!

With a just sharpened chisel, the bark was piece by piece carefully removed. At the top of the fresh air layering, you can see where the life section stops and the (brown) deadwood part starts!
With a sharp and clean knife, the cambium layer is carefully scraped away everywhere along the top incision! Making sure that nothing is left so that there will be no cambium flow possible between the top and bottom incision! This now will trigger the tree to make new roots along that top incision….if all goes well that is?! 😉
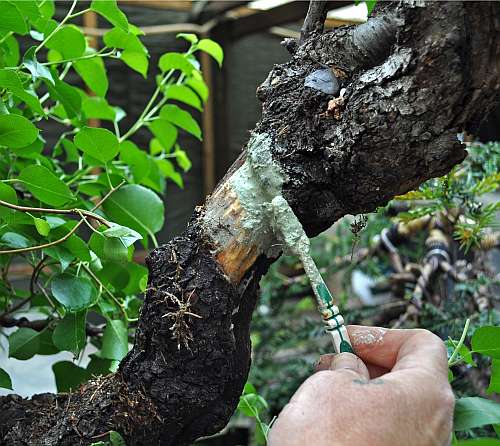
Then a paste of rooting hormone and water was applied to the top cut and below it. This was left to dry so that it would stick to the surface even when the wet sphagnum moss is applied! This rooting hormone powder (from Bayer) will stimulate and help the production of new roots!
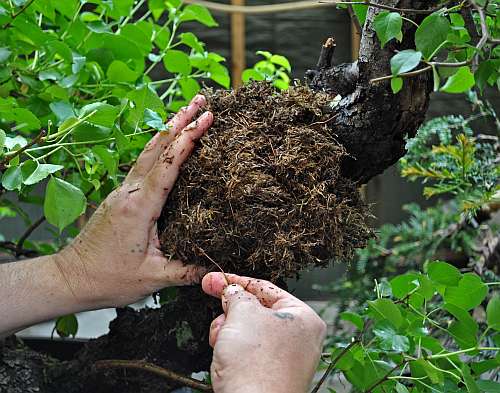
First, a layer of water and rooting hormone-soaked sphagnum moss is applied and held in place by a strain of 1 mm aluminium wire. Then the second layer of in-water-soaked sphagnum is applied on top of the first layer and is also held in place with wire.
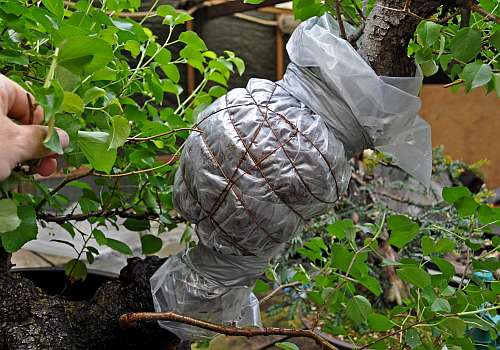
Then the sphagnum is completely covered by a double layer of strong transparent plastic that is tightly held in place with aluminium 1mm wire. Both ends of the plastic are tightly taped shut to make sure that nothing will move. In the future when the sphagnum gets too dry, small holes can and will be made at the top of the plastic ball to be able to insert water to wet the sphagnum!

The whole air layering is seen from the front side of this old Prunus. From now on it is fingers crossed and anxious waiting and watching until the first roots appear through the plastic! I forgot to tell you that all the foliage above the air layering is cut back to 2 leaves to minimise the need for water! I will try to keep this heavy monster and its air layering out off too much direct summer sun heat and hope for the best!! 🙂
I will keep you all informed if there is any progress and I hope you enjoyed this little story this far?!
Cheers,
Hans van Meer.
Info: karamottobonsai@hotmail.com

2 thoughts on “Air Layering (marcotting) A Prunus Mahaleb Yamadori.”